QROST
Welcome to the FAQ Section
With QROST its very easy to set up and connect your business (restaurants or store). We have created this special Faq (Frequently Asked Questions) section for you so it will be very easy to connect you with QROST


QROST
Check Out QROST Functionalities
QROST has everything you may need and more! Scroll down to view the topic and select all the information you need to connect your business.
Get Started With Our Knowledge Base

Just Select Your Topic And Connect Your Business With Qrost!
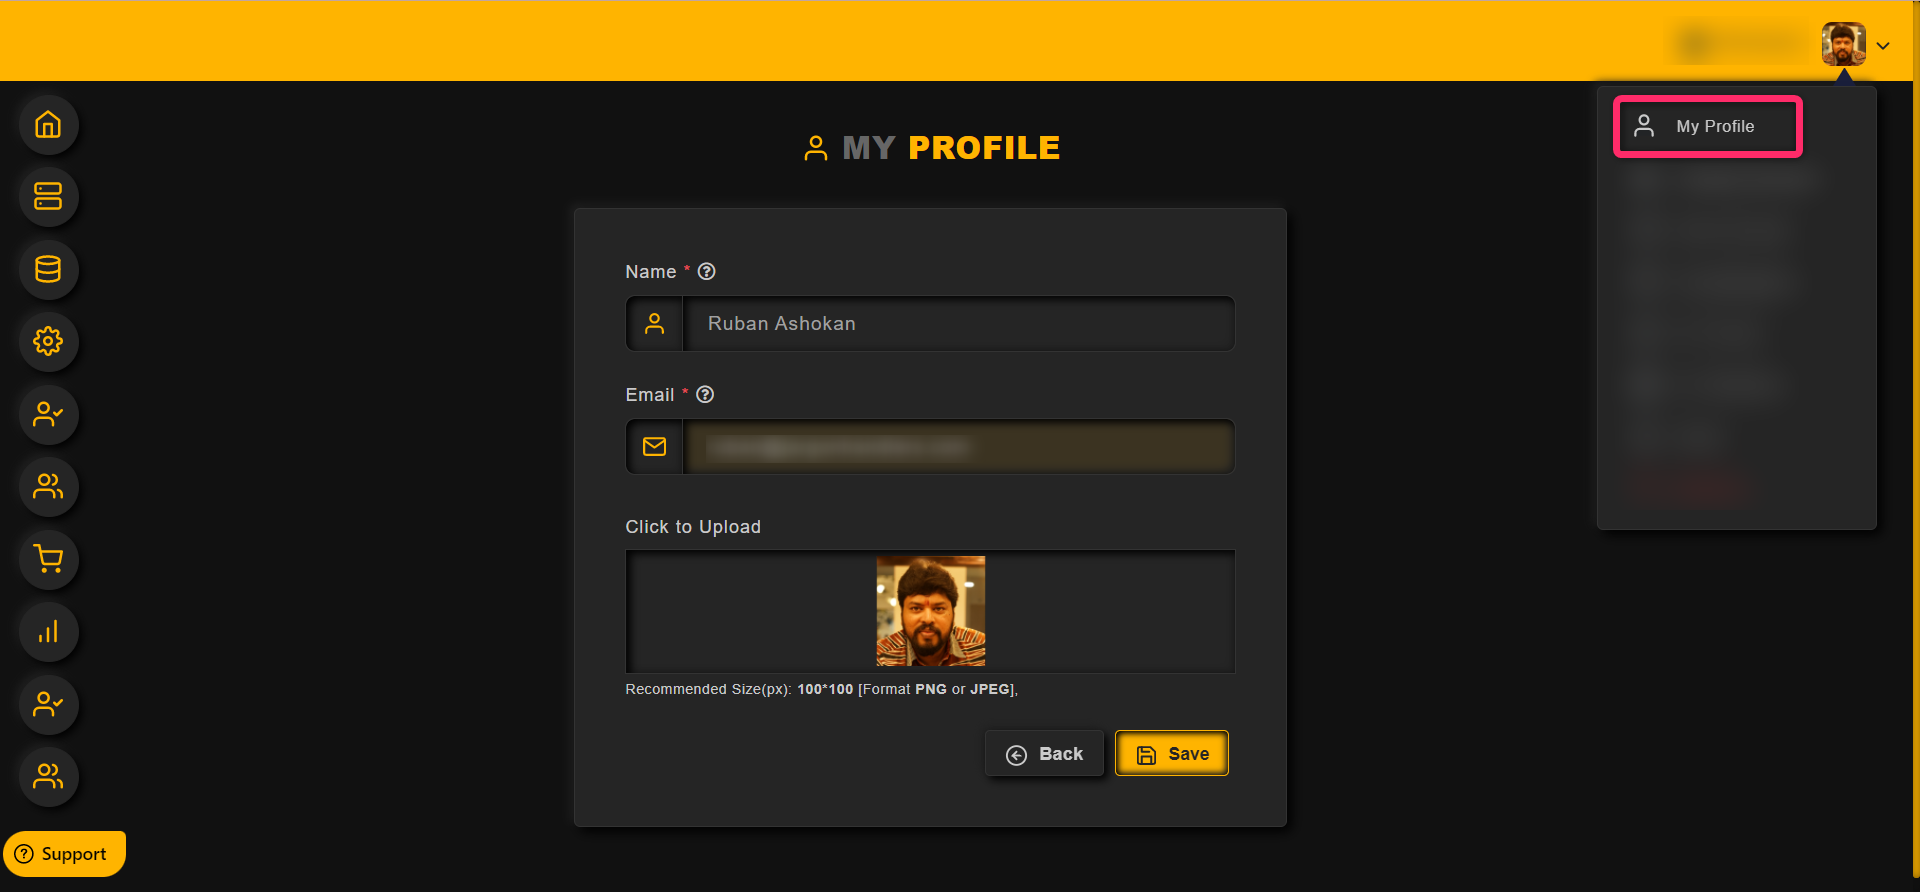
Category: My Profile
You can change setting in your profile
Inside My Profile section one can add or change you Name and profile image.
STEP 1 : Click on the top right profile icon.
STEP 2 : Click My Profile.
In this section, one can change/modify the login password.
STEP 1 : Click on the top right profile icon
STEP 2 : Click Change password.
Fill all the three mandatory sections
– Current Password
– New Password
– Confirm New Password
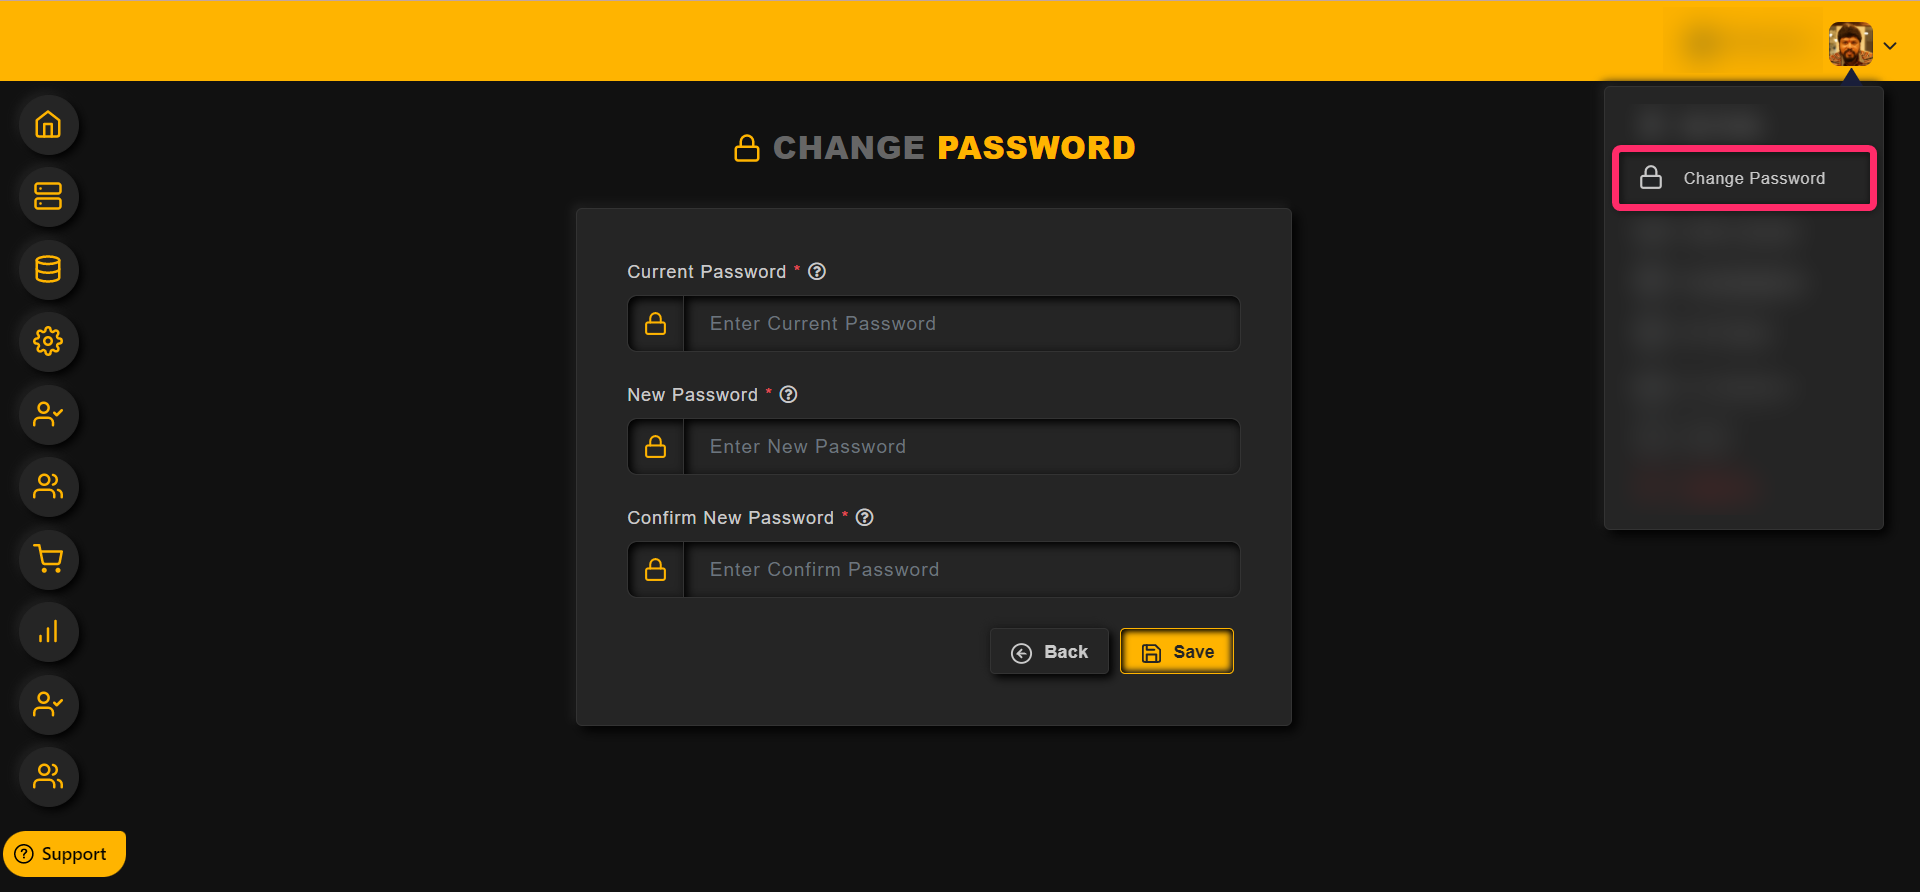
Please click the save button for the changes to be effective.
Category: My Products
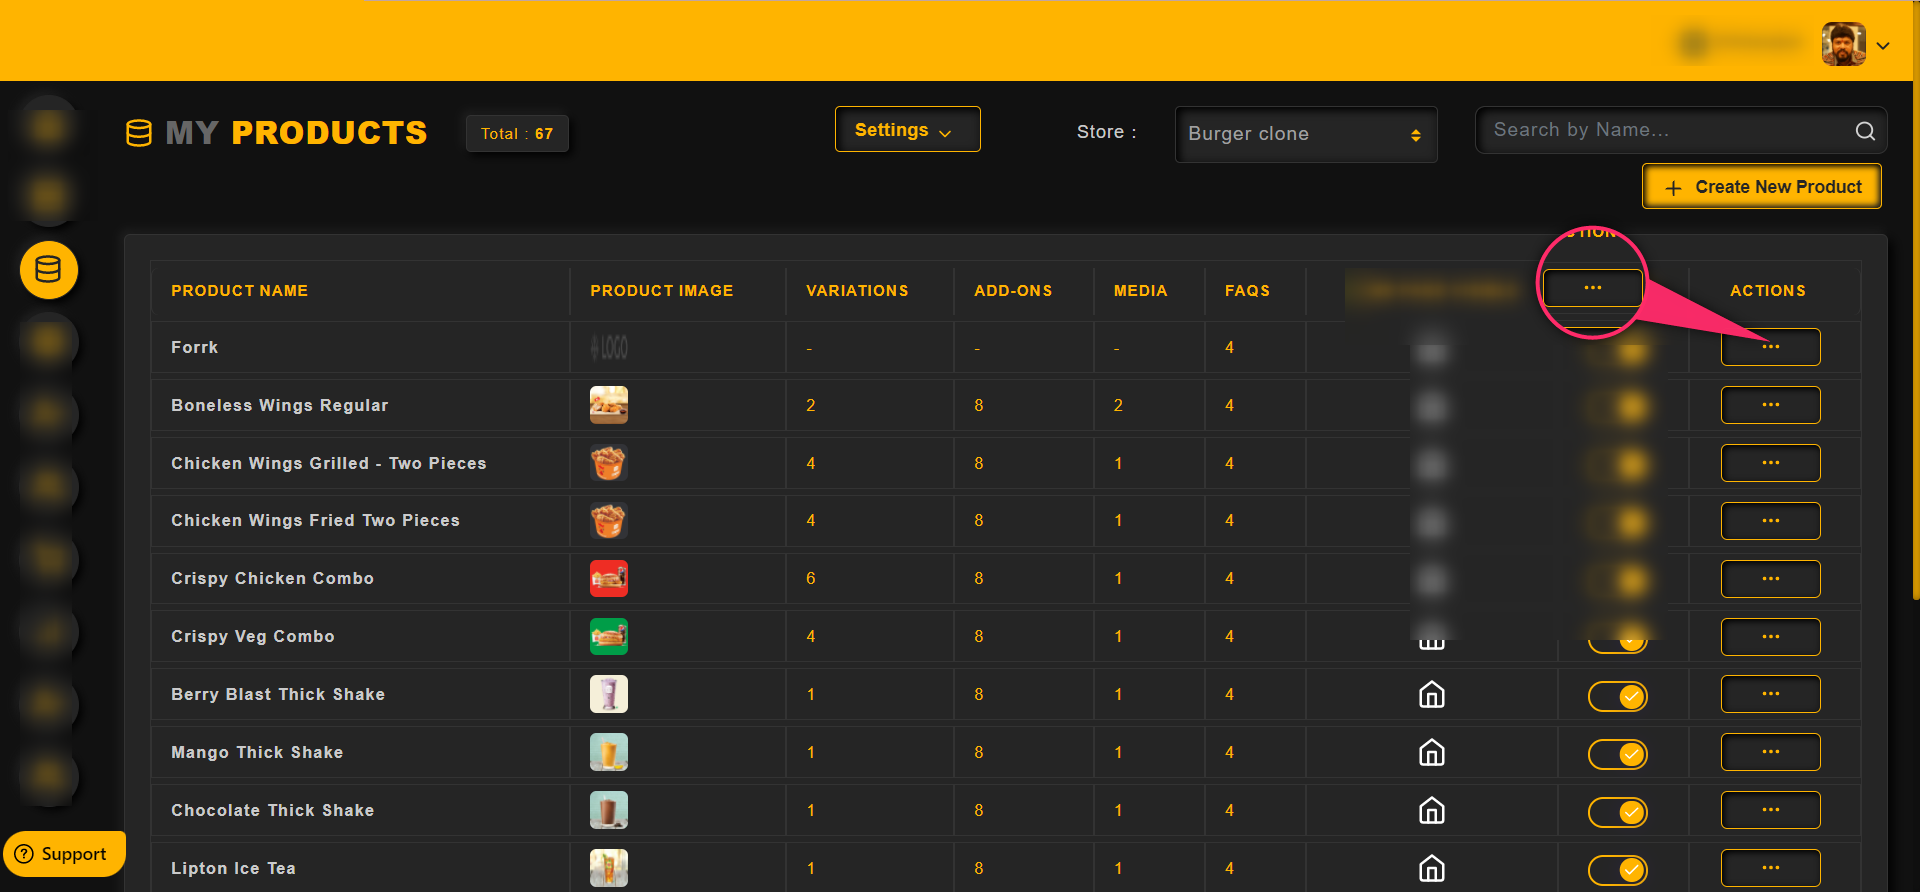
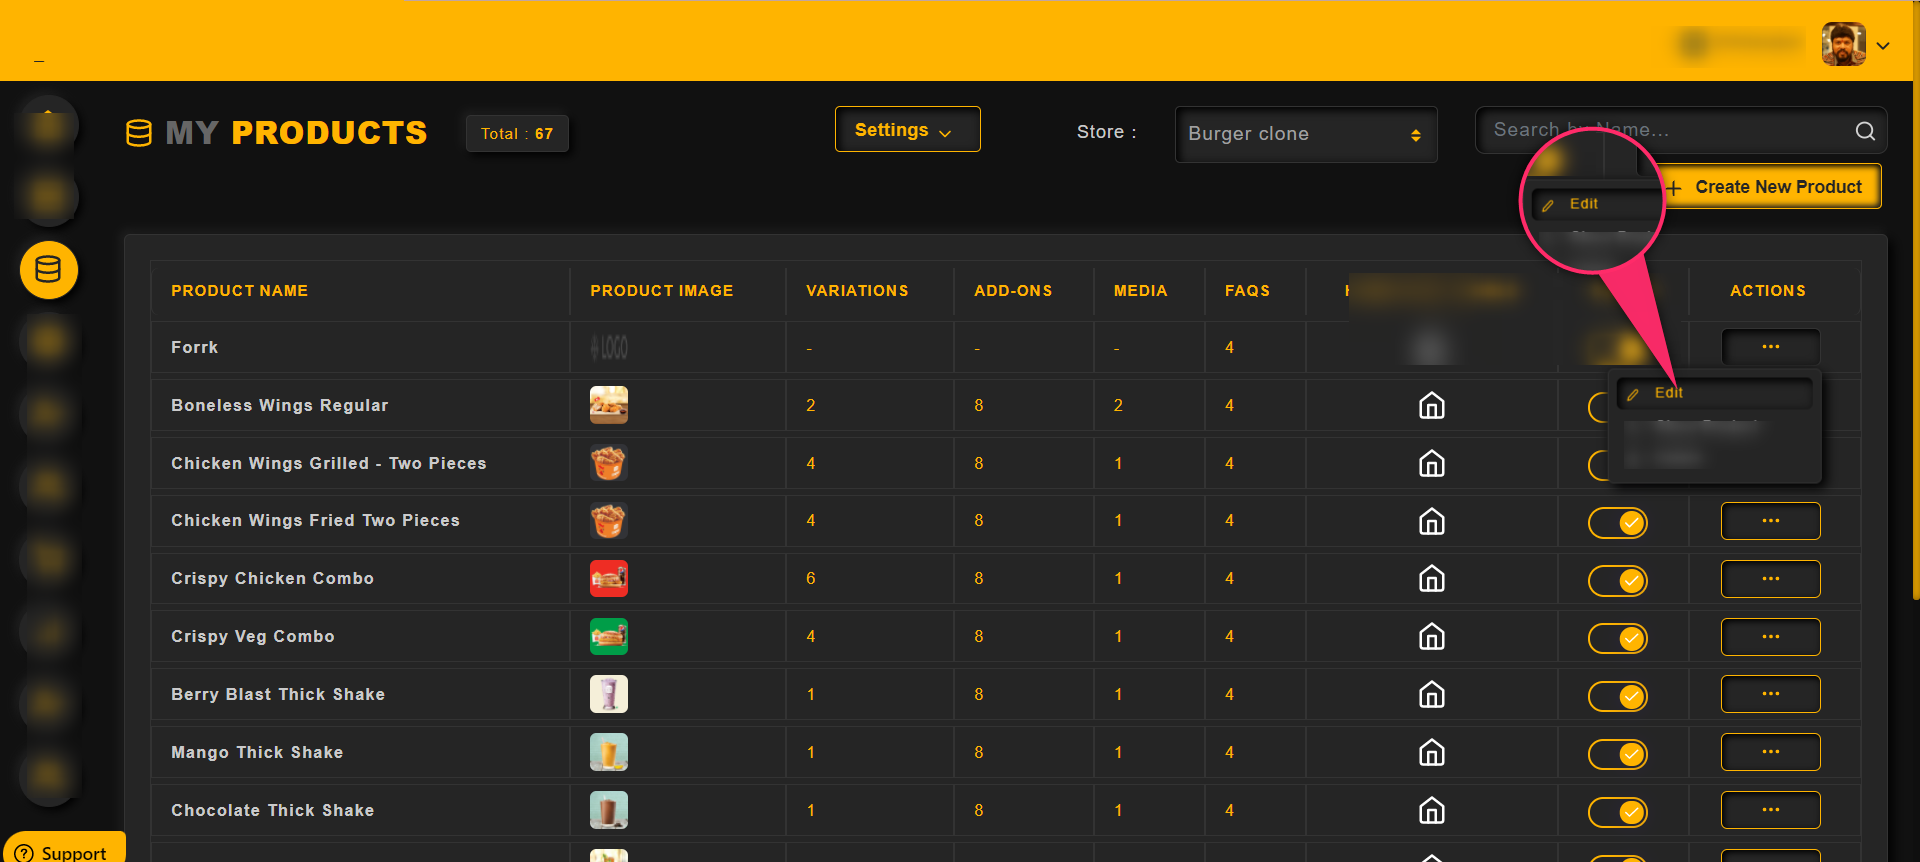
How to edit your products
One can perform edit, clone and delete product operations using this action menu
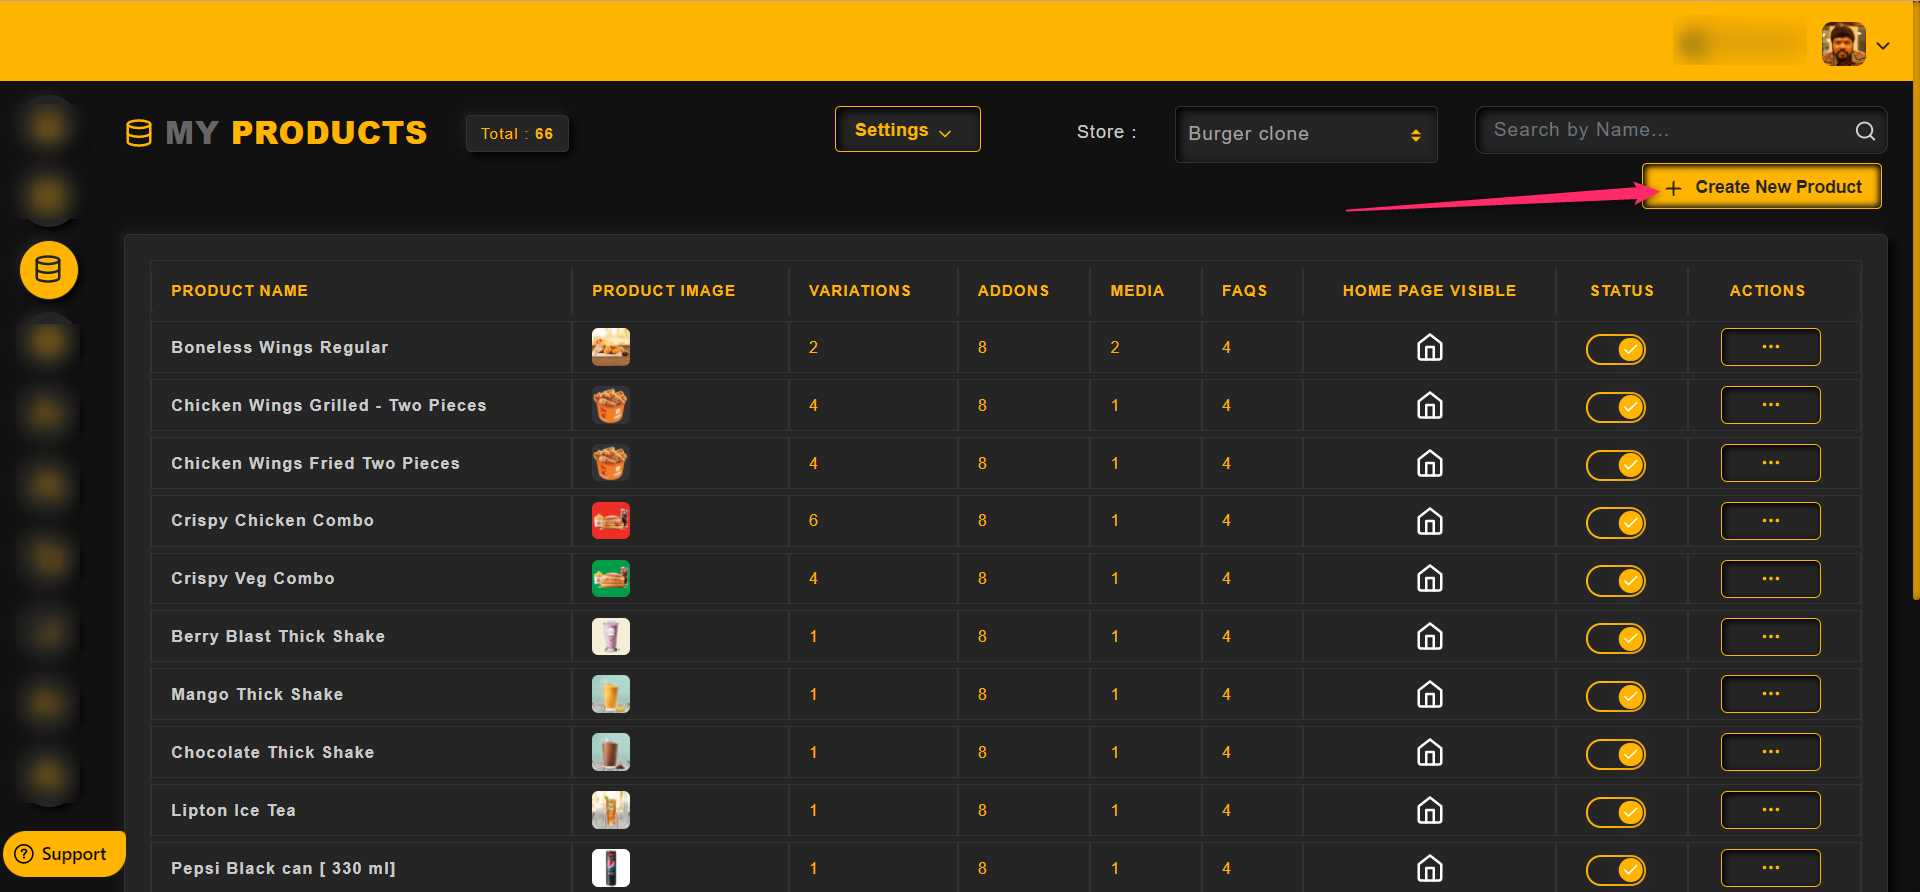
To create a new product,
Then click on the Create New Product button as shown in the image below,
How to Edit a Product
Click on the edit option for each product
How to Add Product Details
Product Details section: In this section, the product name and basic details about the product can be added
Product details section to be filled to proceed further
Product Name: Enter the name of the product in this text field
Short Description: Write a short description about this product so that the user can get to know your product
Upload Product Image: Click on upload button to add image to the product
Offer Text: Add Offer Text for the Product here
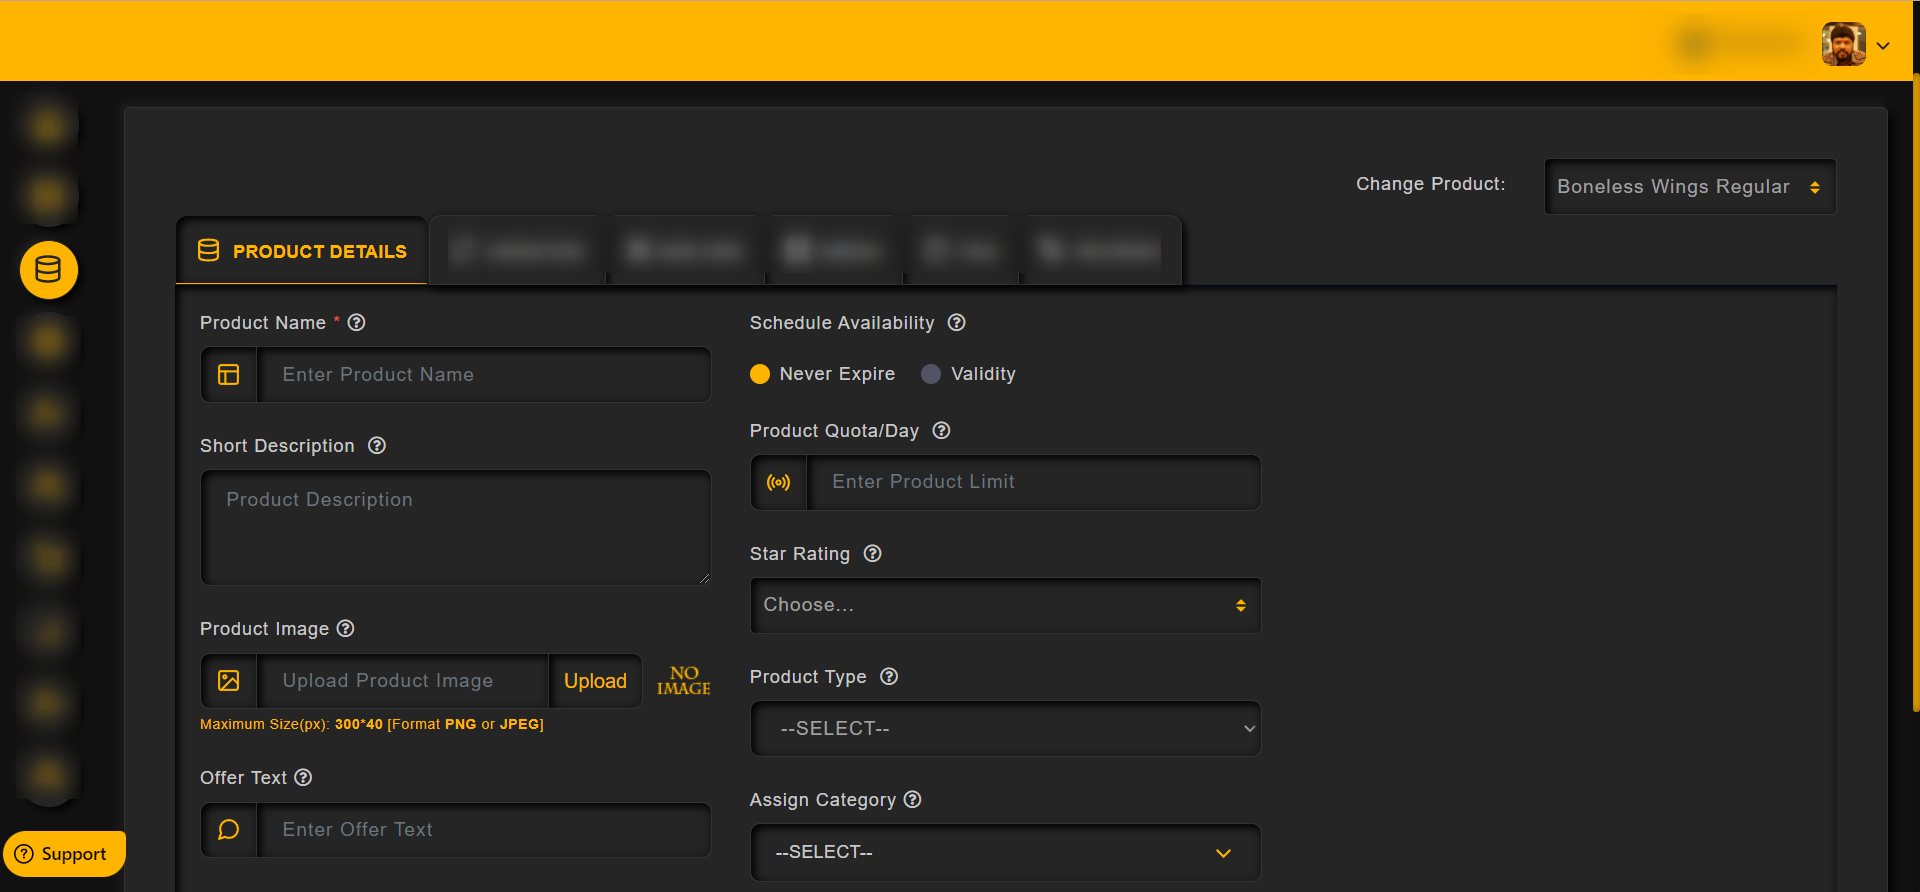
Product Availability: Choose the date till which the product is available
Product Quota: Input the total number of people can buy the product
Star Rating: Choose the Star rating from the drop down menu
Product Type: Choose the product type from the given options
Assign Category: Assign a category in this section
Recommended Products: Choose other product which is to be promoted inside the current product
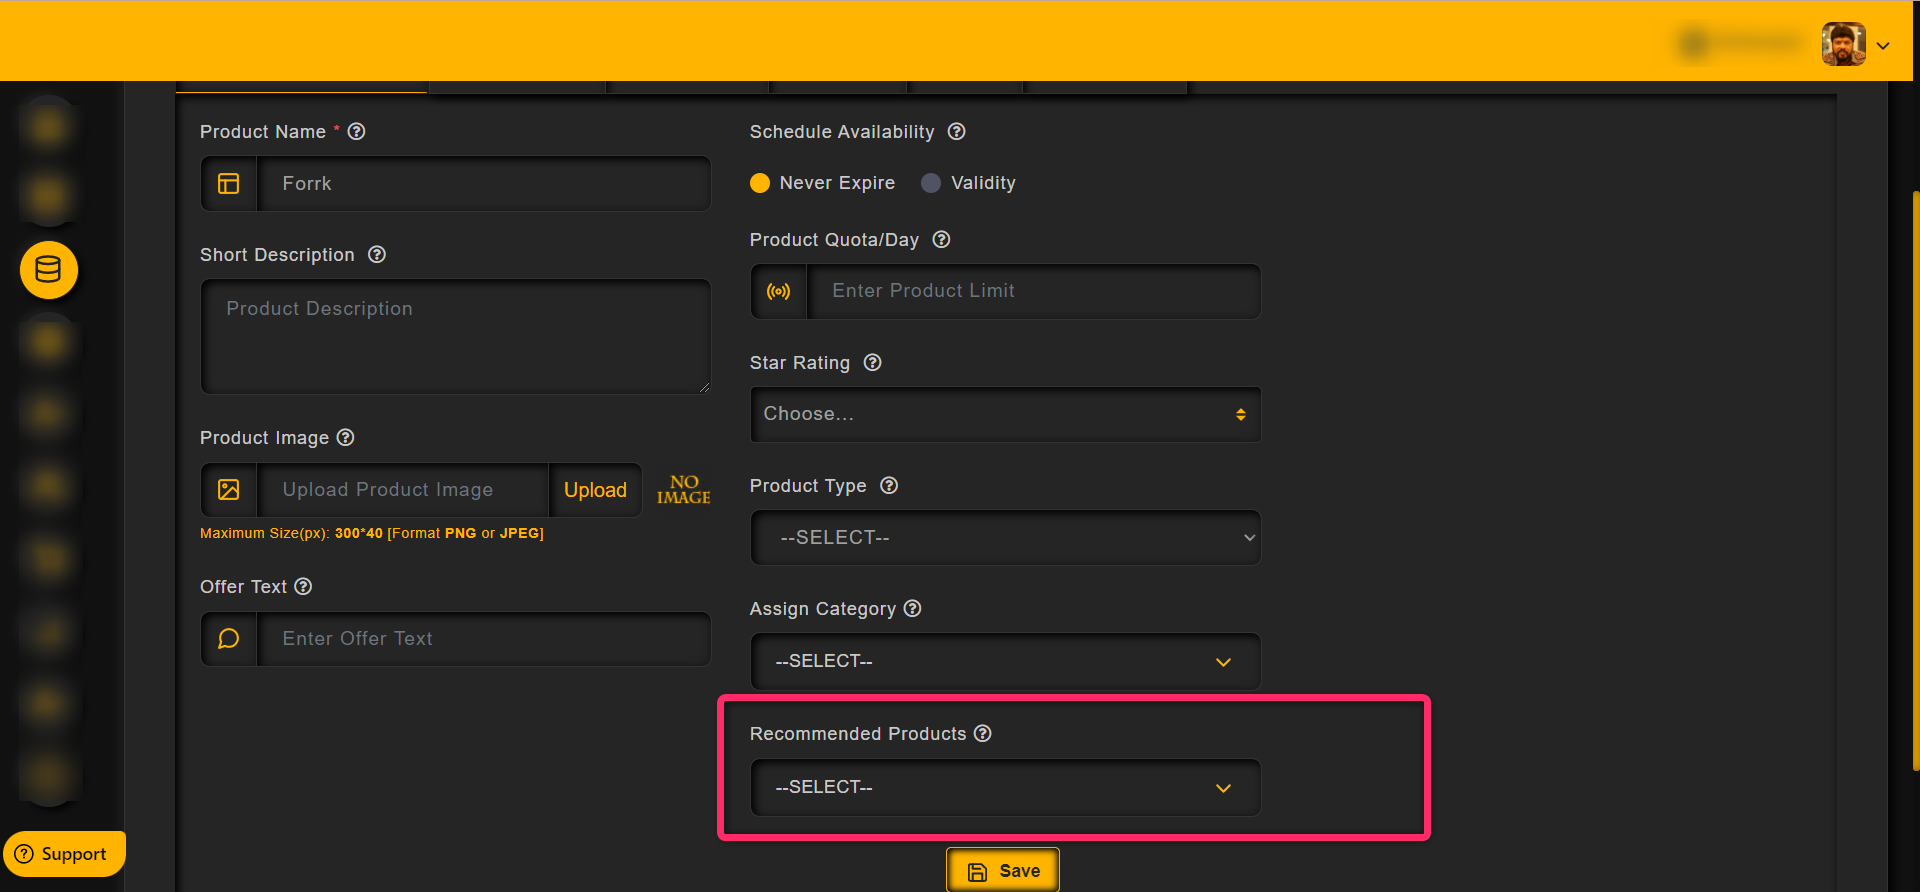
Click on “Save Product” button and proceed further
Note: Please choose the start date and end date if you tend to choose the validity option under Schedule Availability
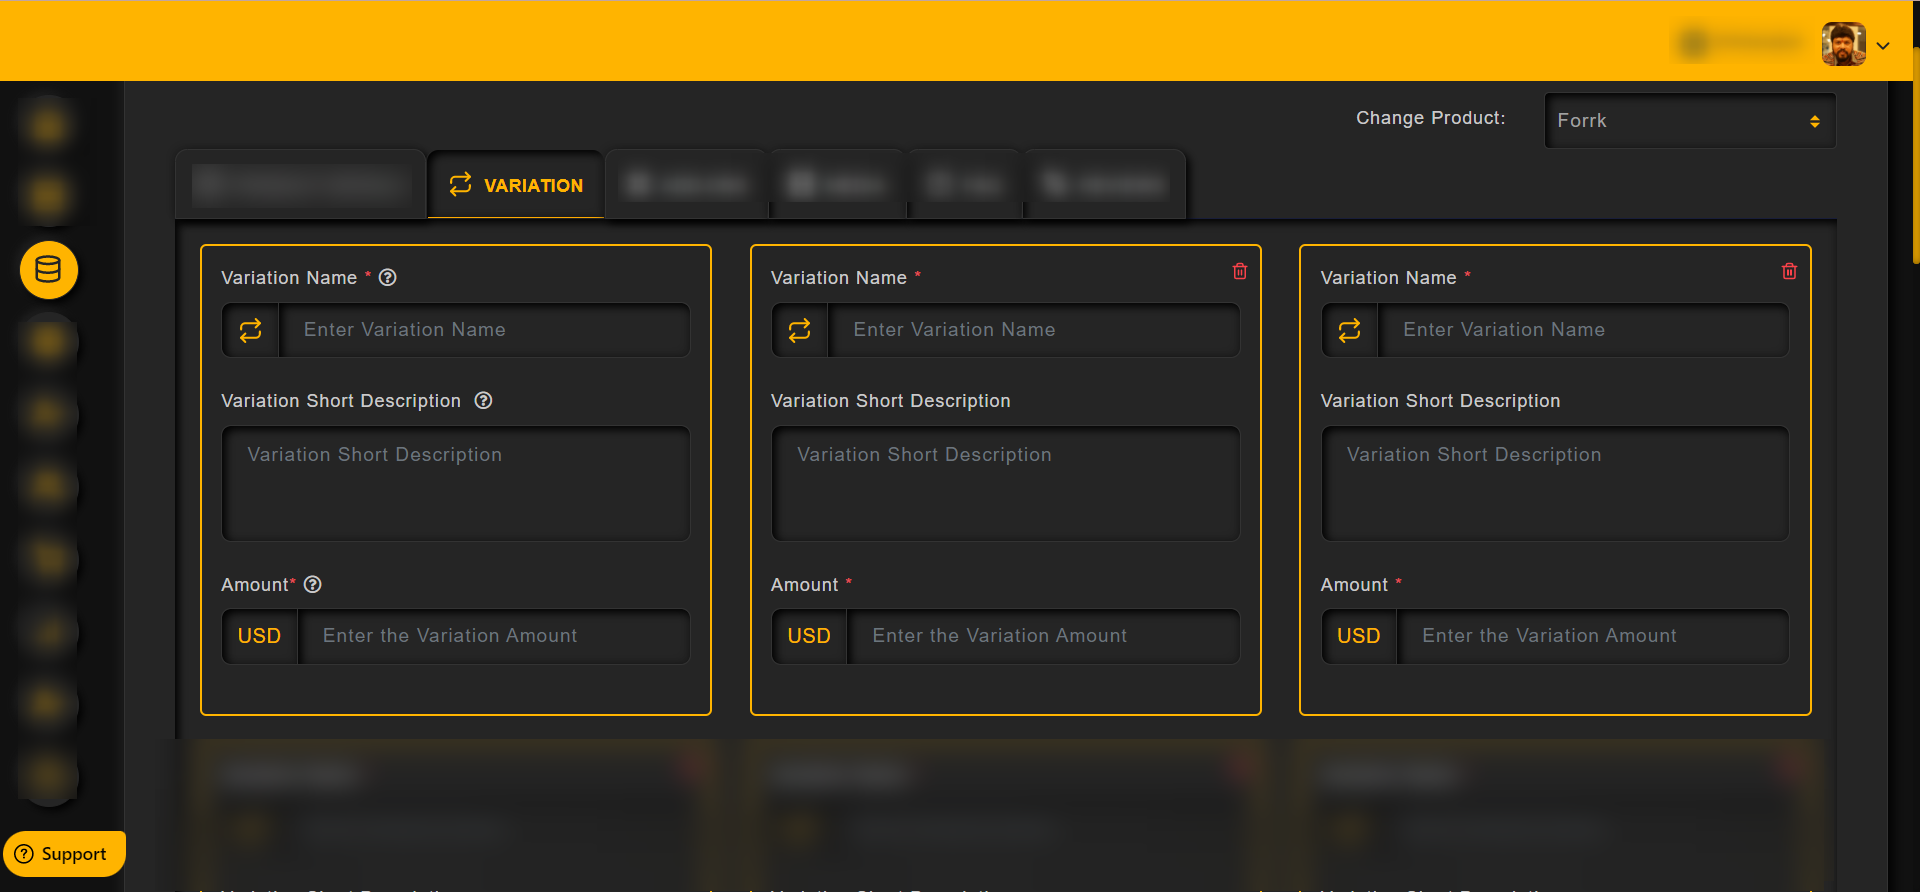
How to Add Variation
Variation: In this section, Add variations,its description and the price amount that you would like to include in your Product.
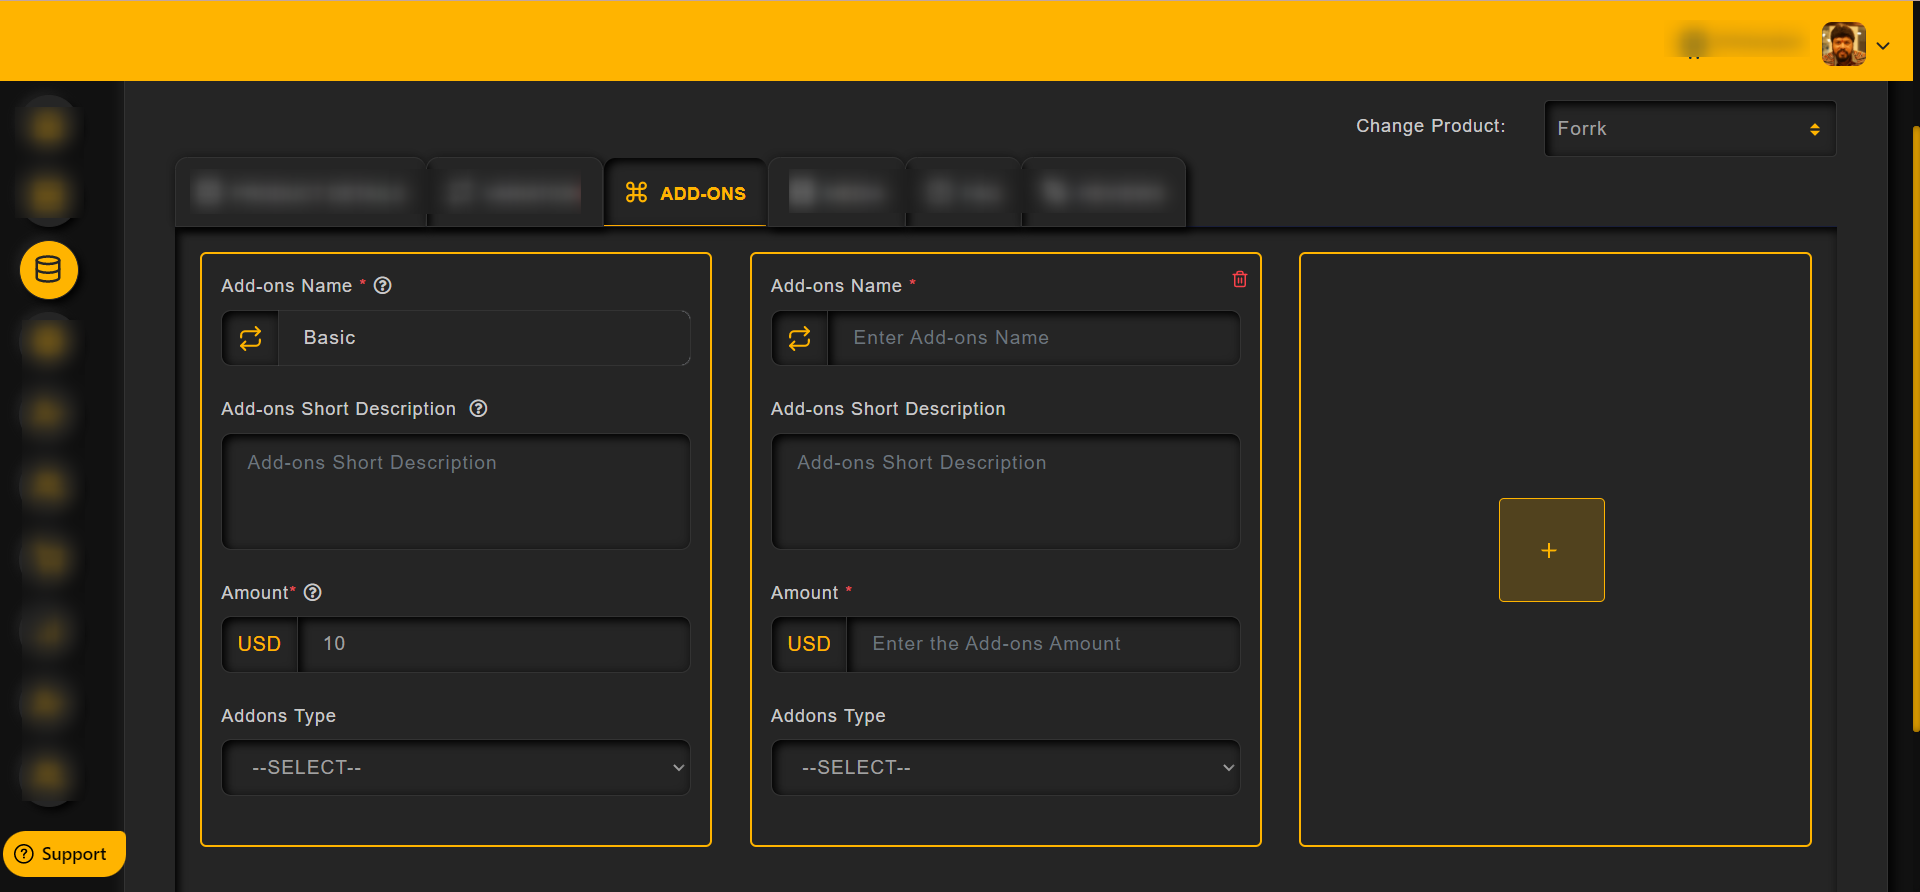
How to Edit Add-ons
– Add-ons Name: Enter the name of the Add-on in this text field
– Add-ons Short Description: Enter a description about the Add-on
– Amount: Enter the amount for the Add-ons
– Add-ons Type: Choose the type of the Add-ons included with the product
– Click on Save button after adding all the details
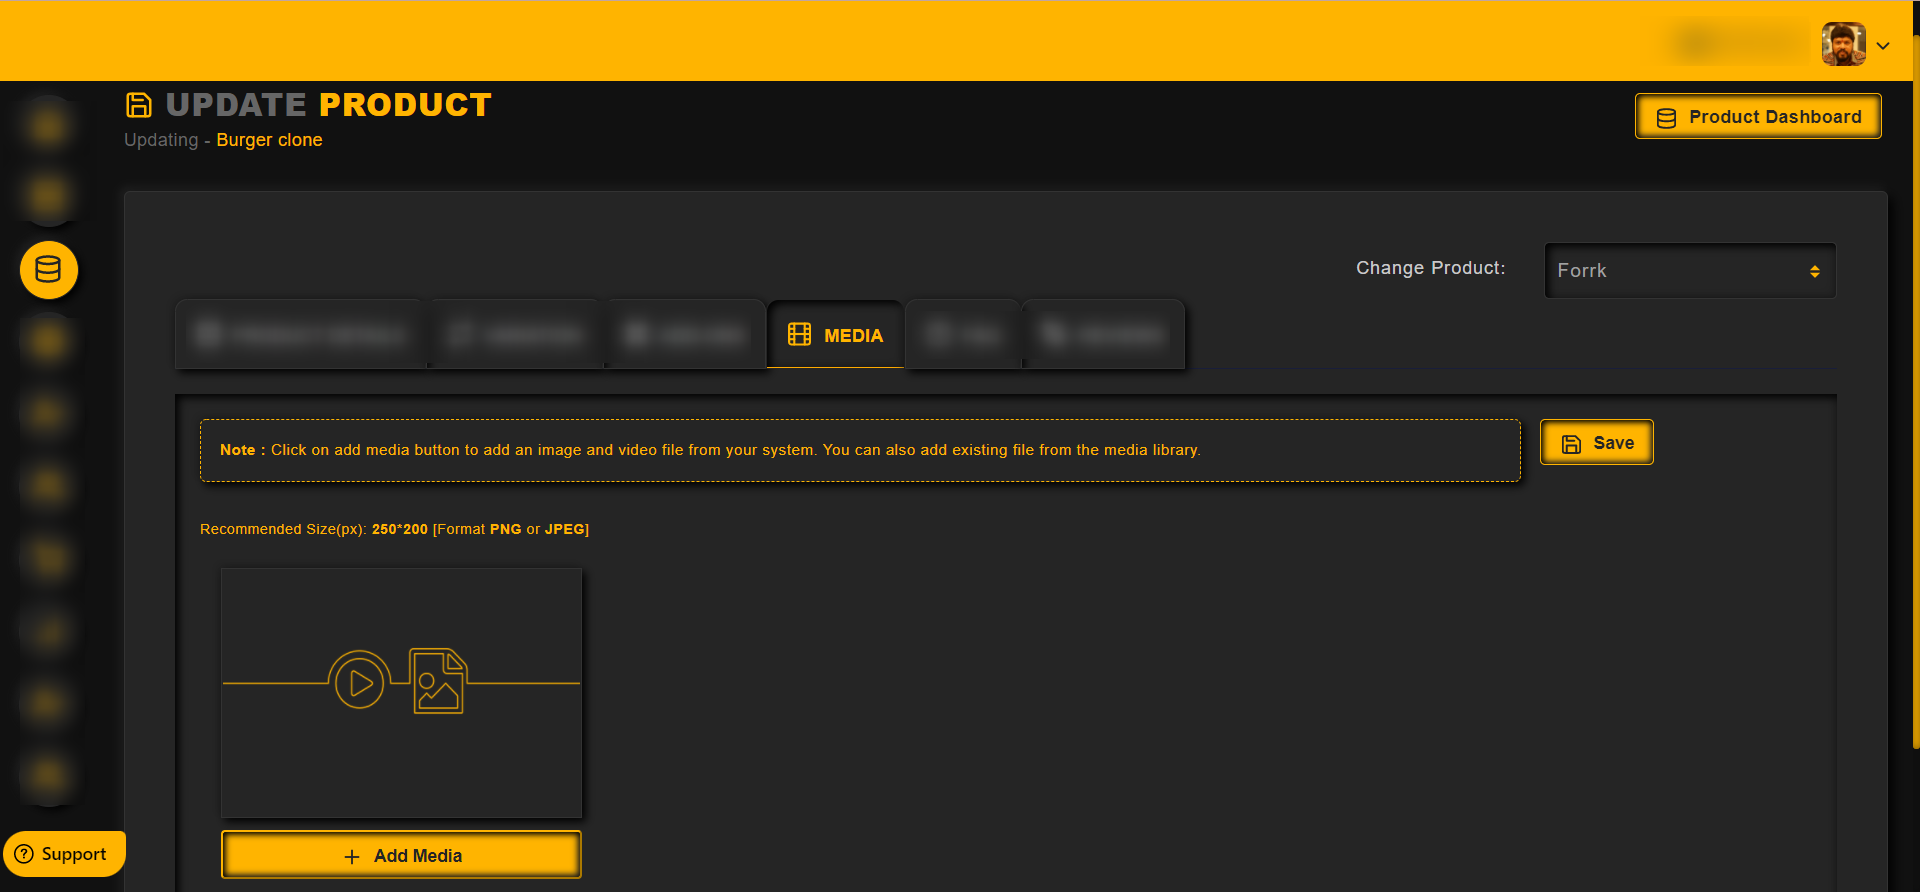
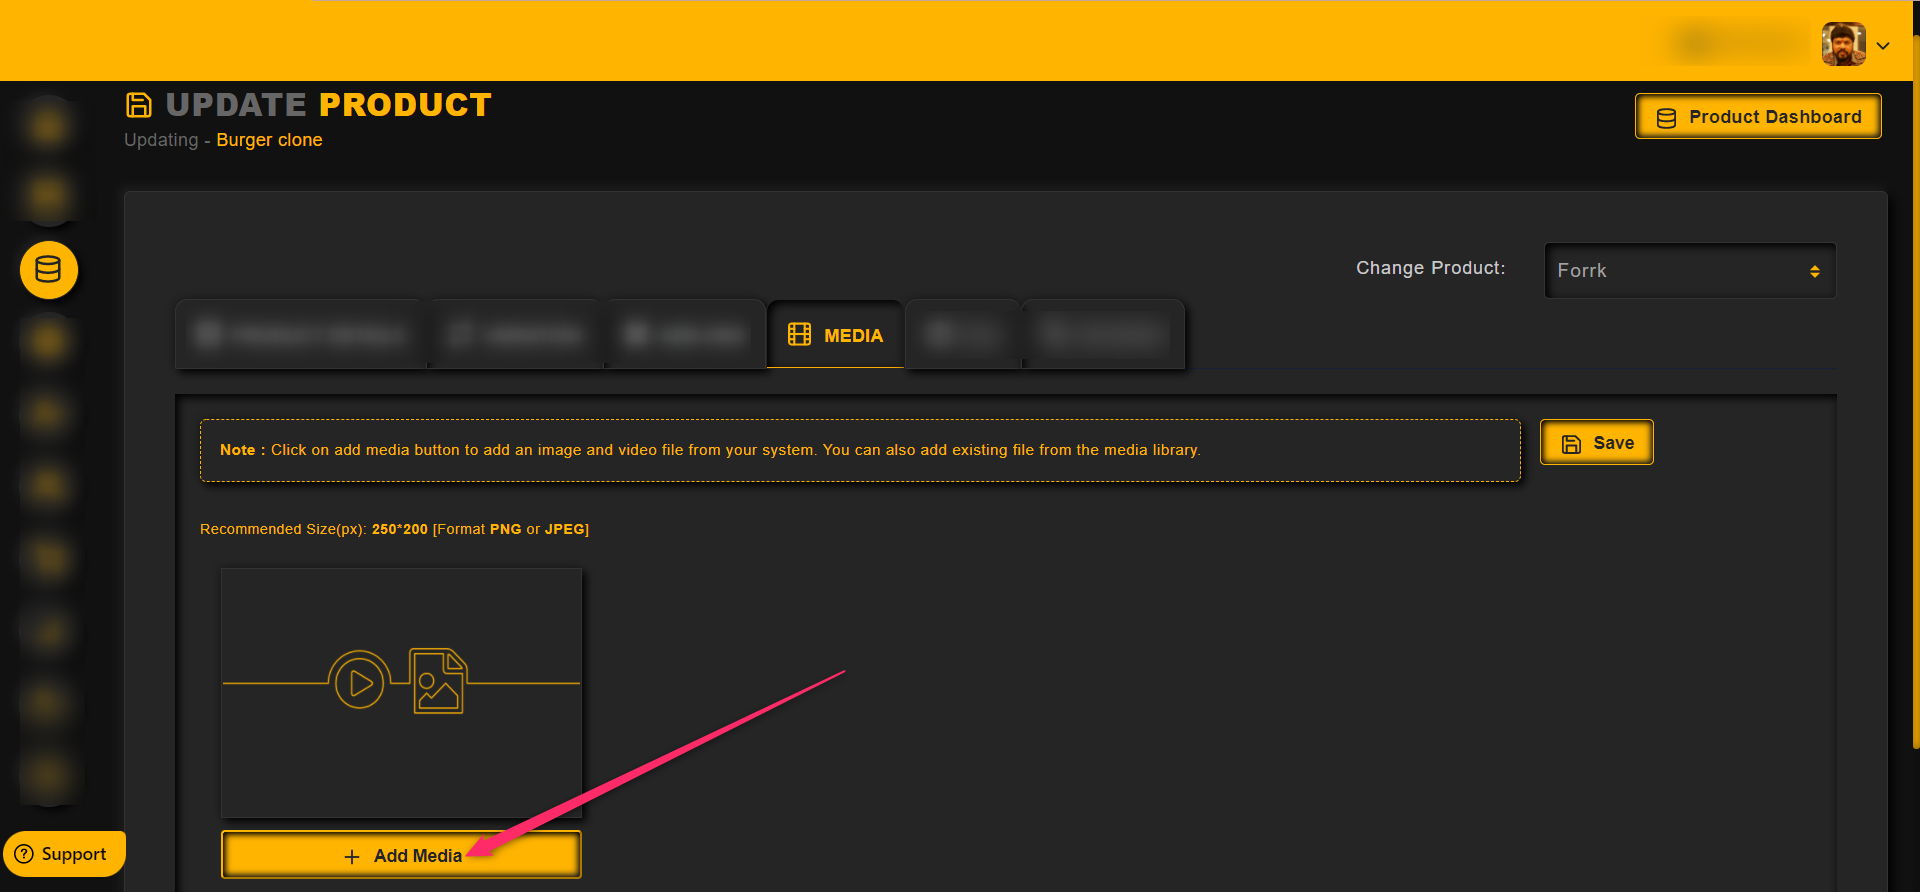
How to Add Media
Media: In this section, one can add their media files (Image, Video) to their products
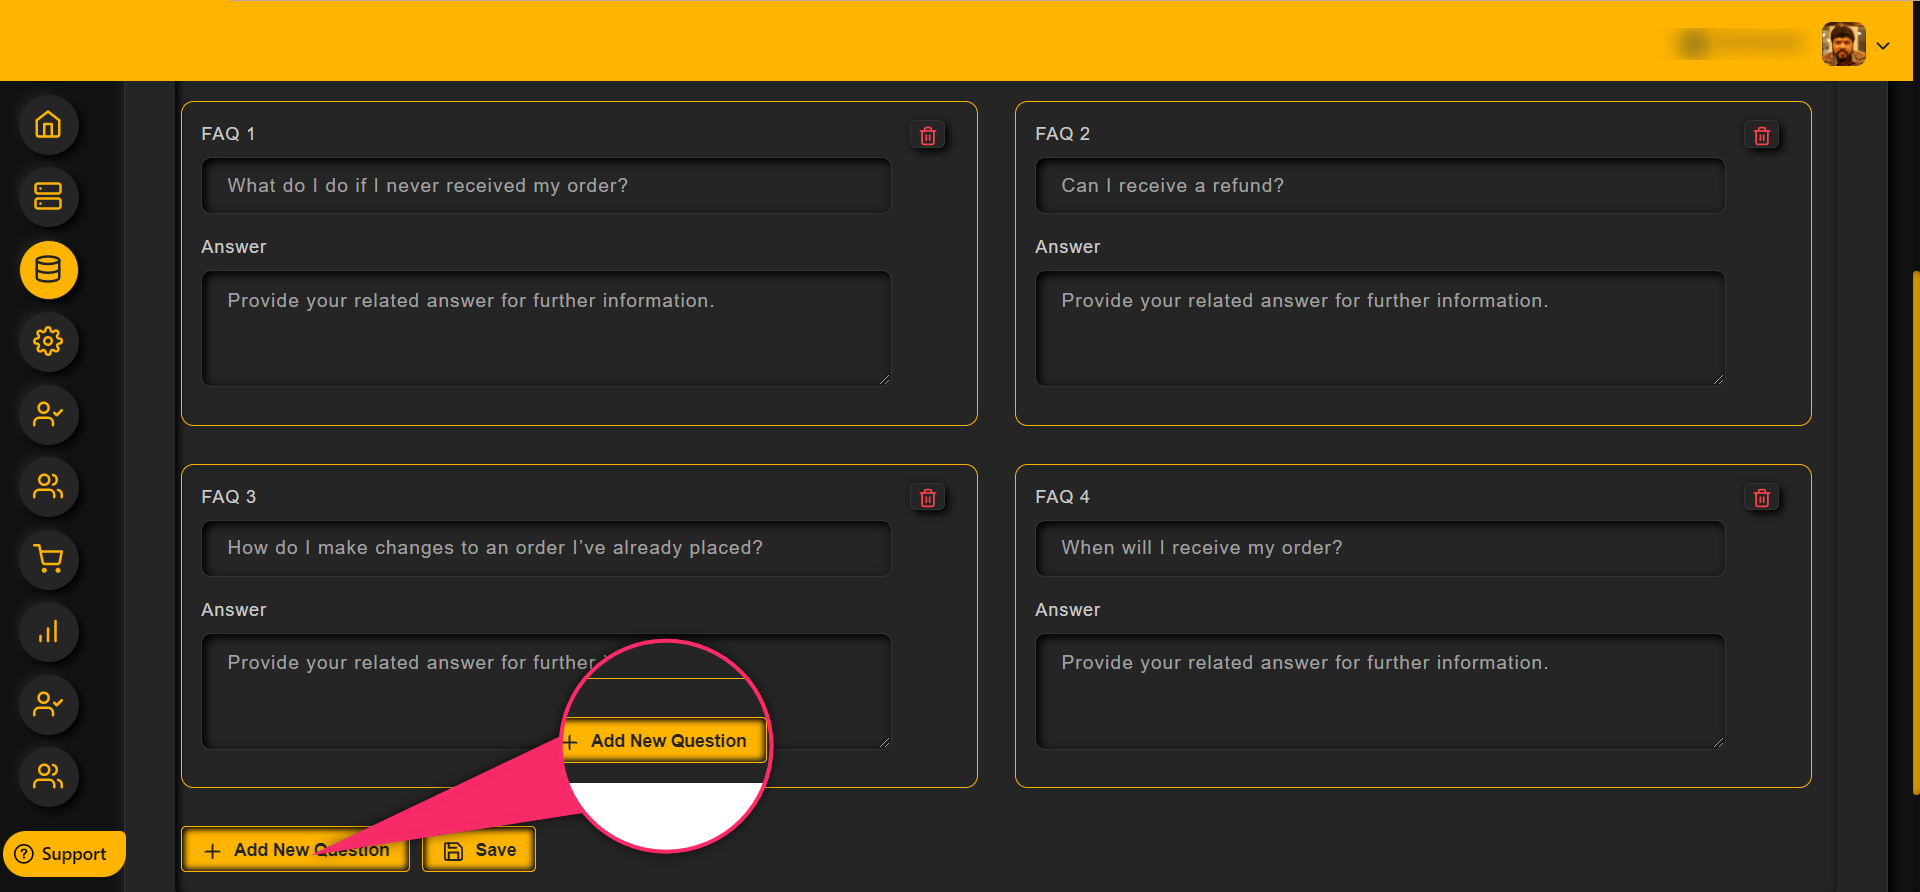
How to Add FAQ

To import FAQs from other store,
Click on the Import Faq button as shown in the image below,
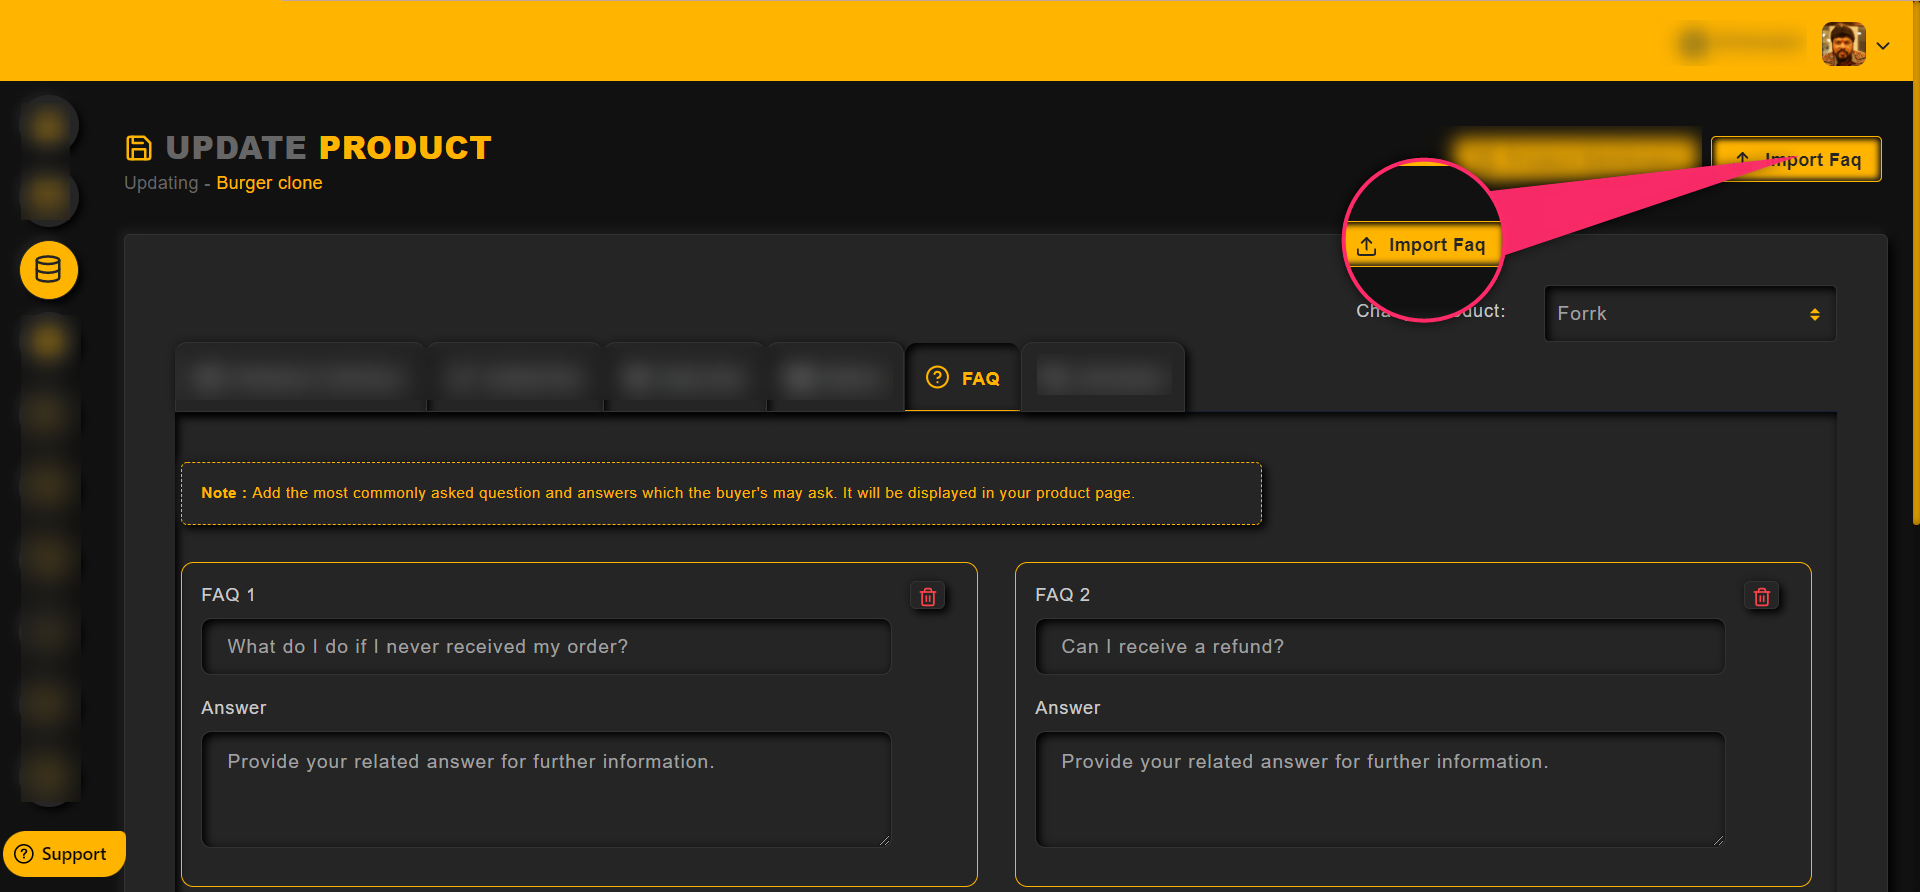
Now choose a product and then click on Import button
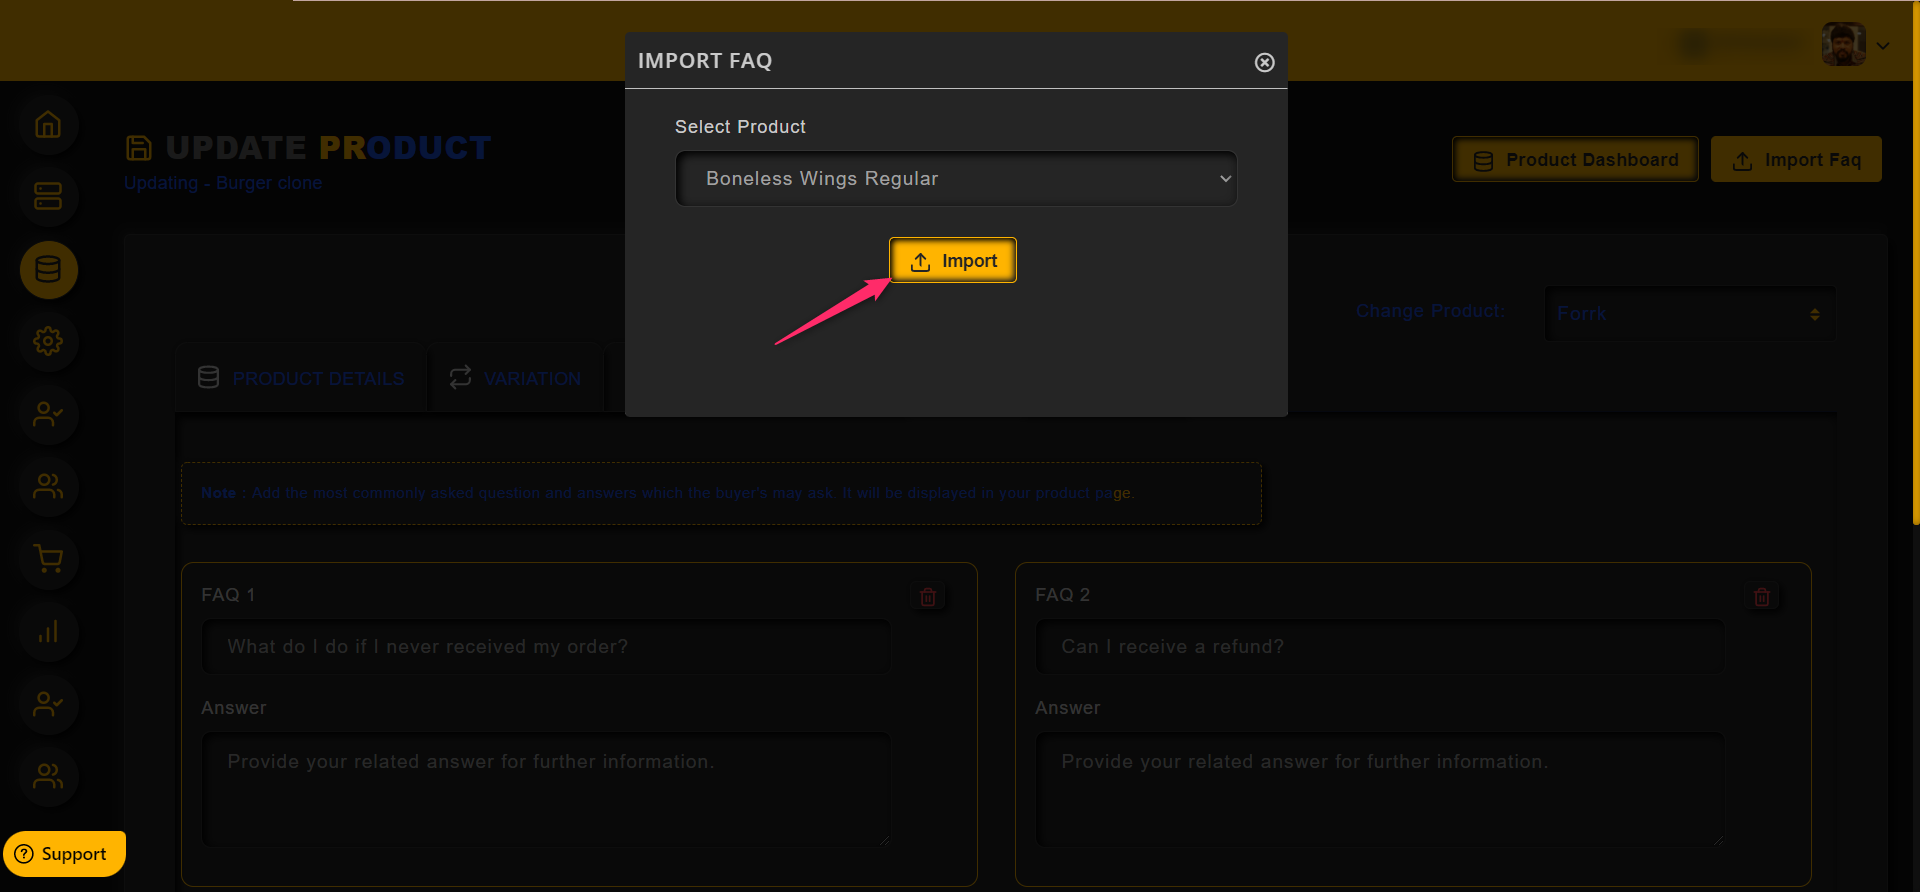
– Click on Save button once completed
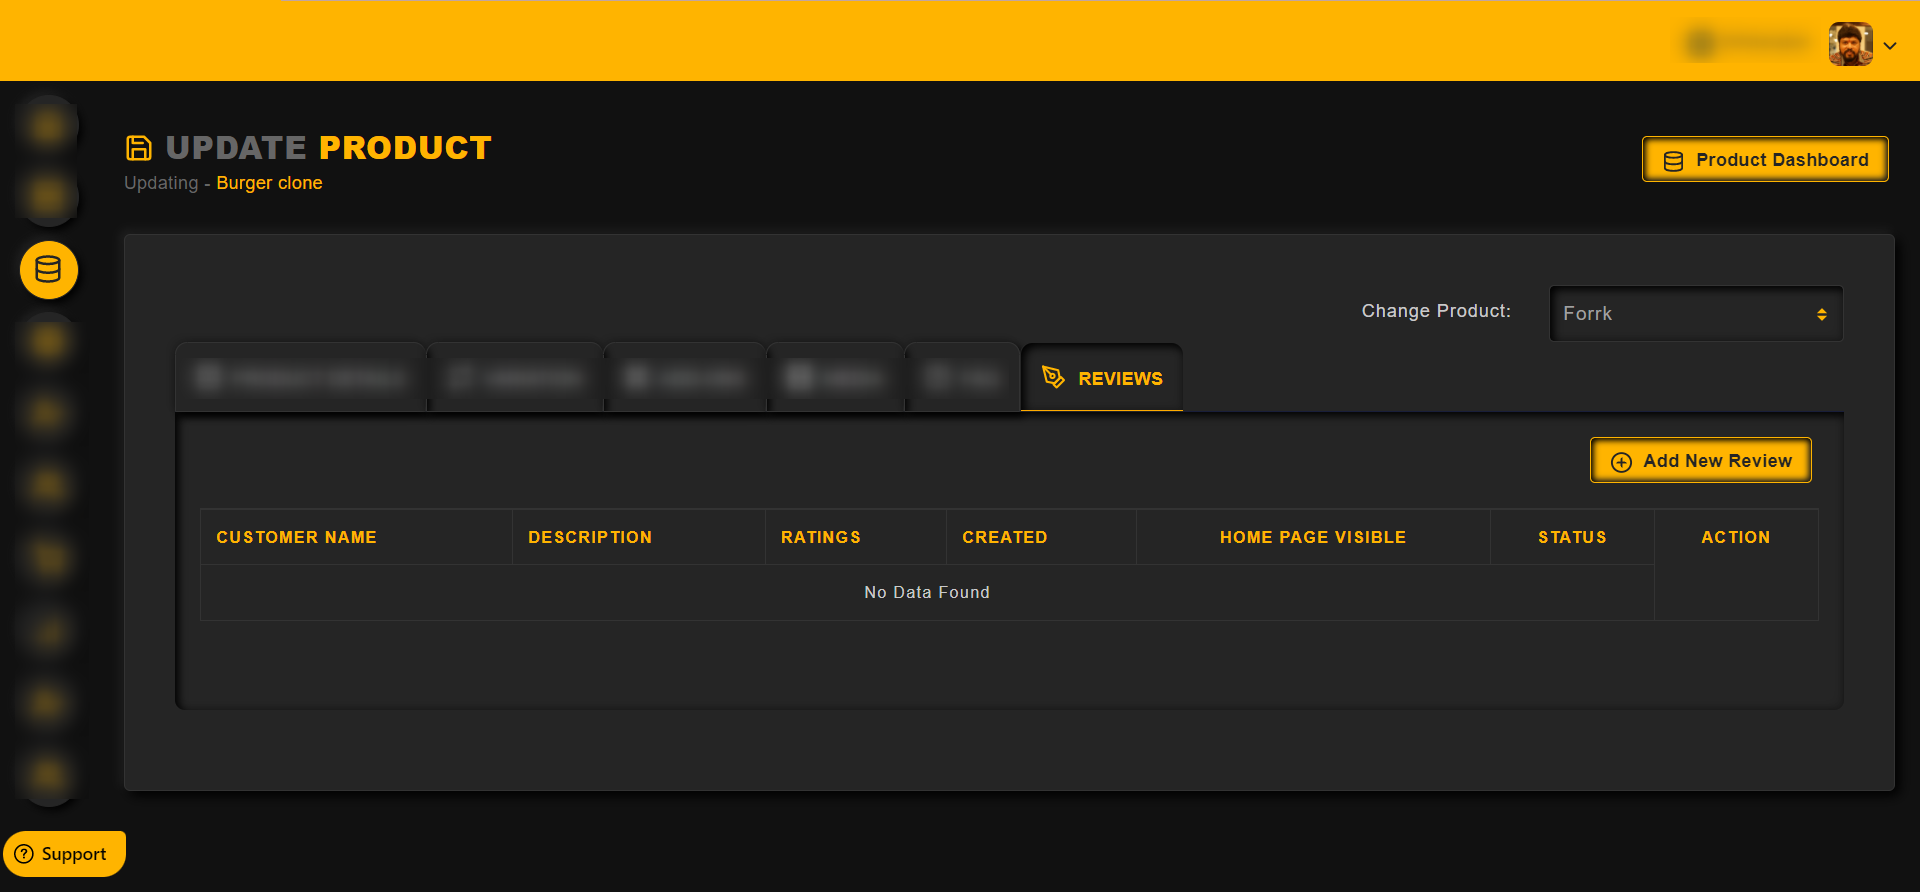
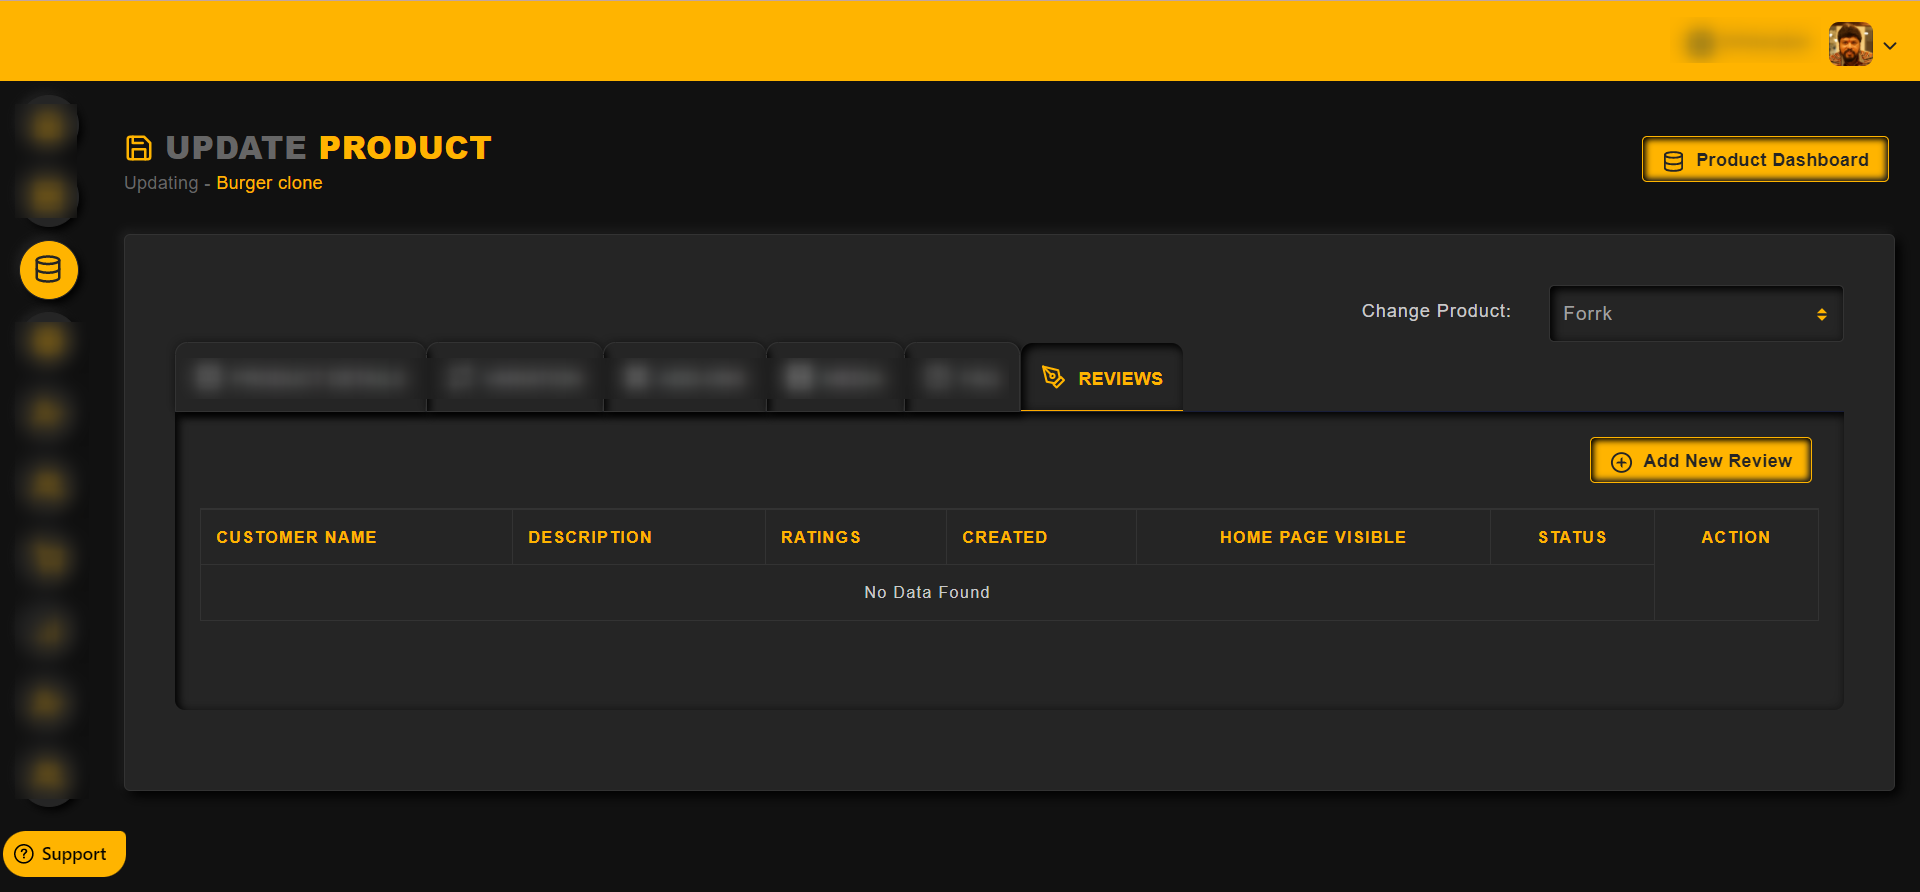
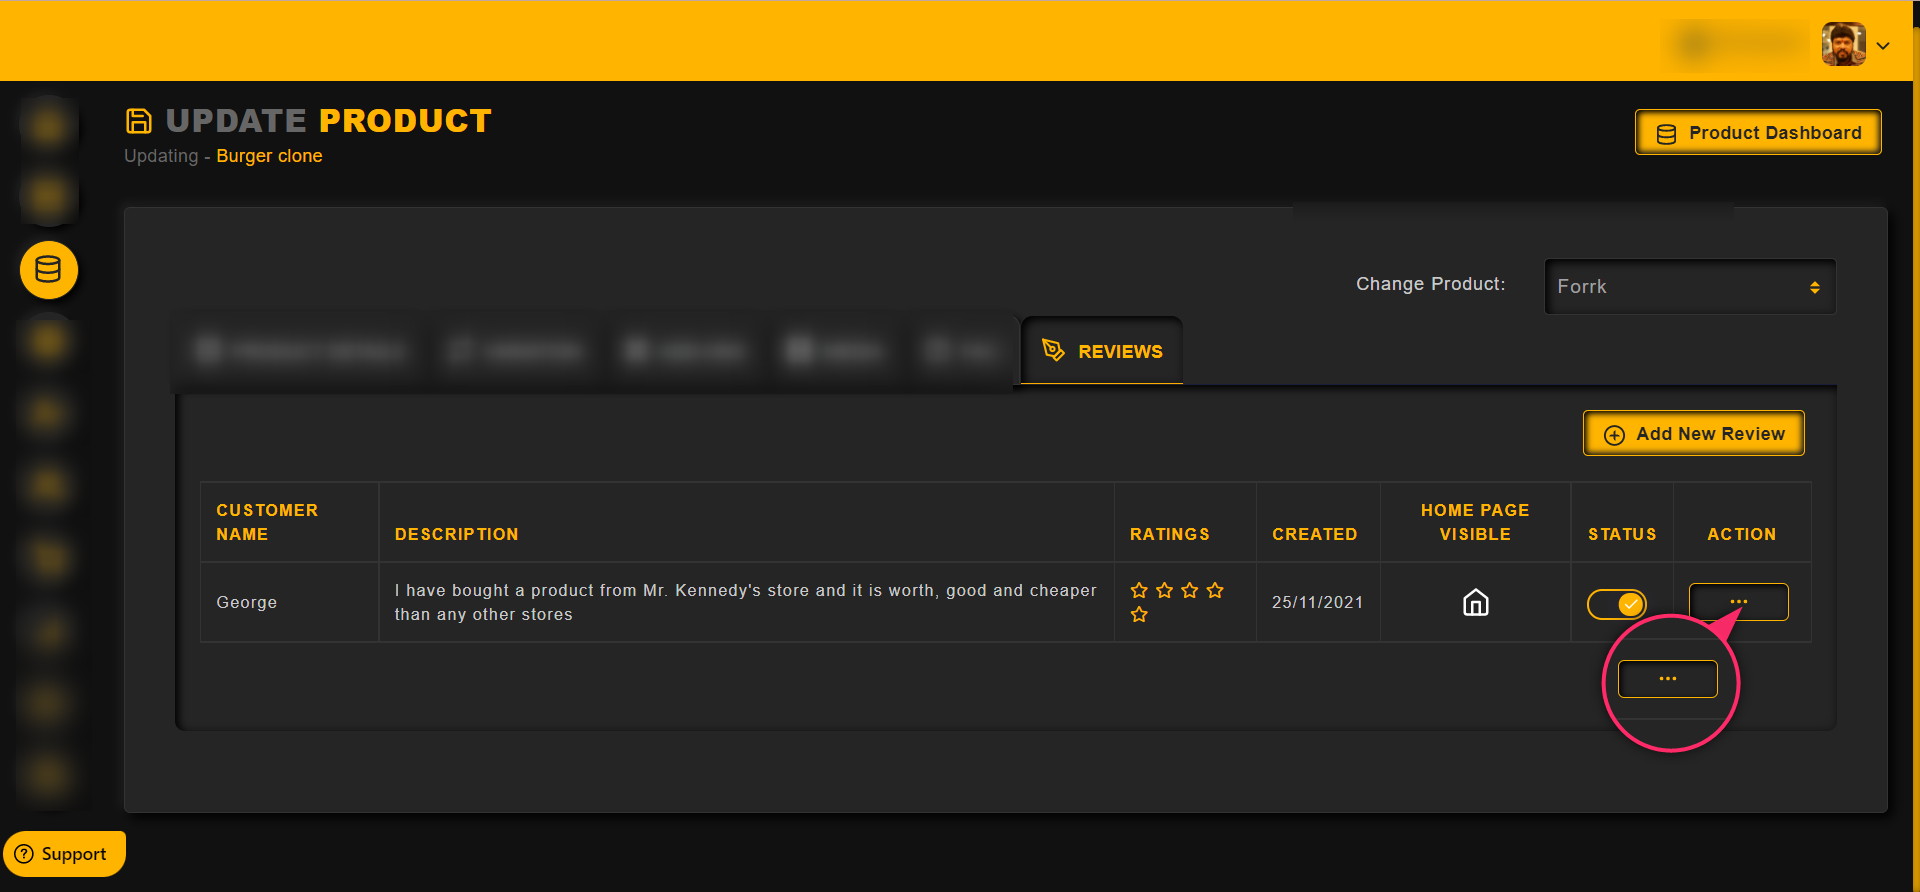
How to Add Reviews
Click on the Reviews as shown in the image below, to add a review for a product
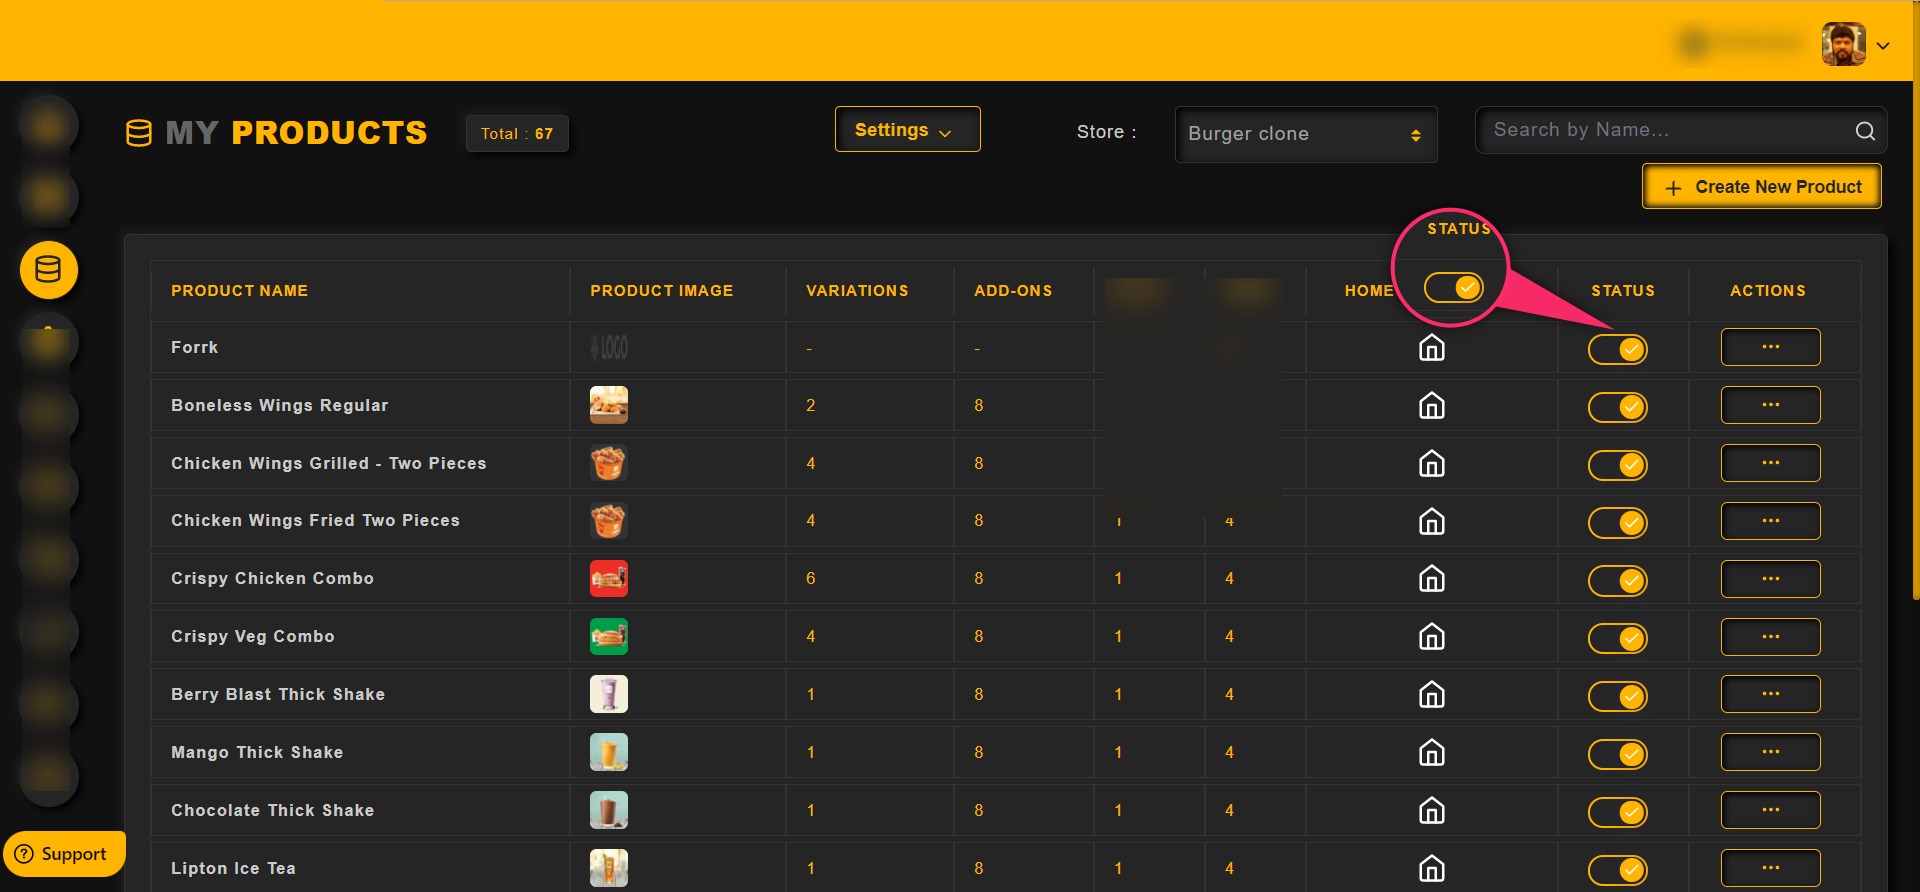
One can enable/disable a product using the toggle as shown in the image below
Click on My Products to view all the products added to the overall stores

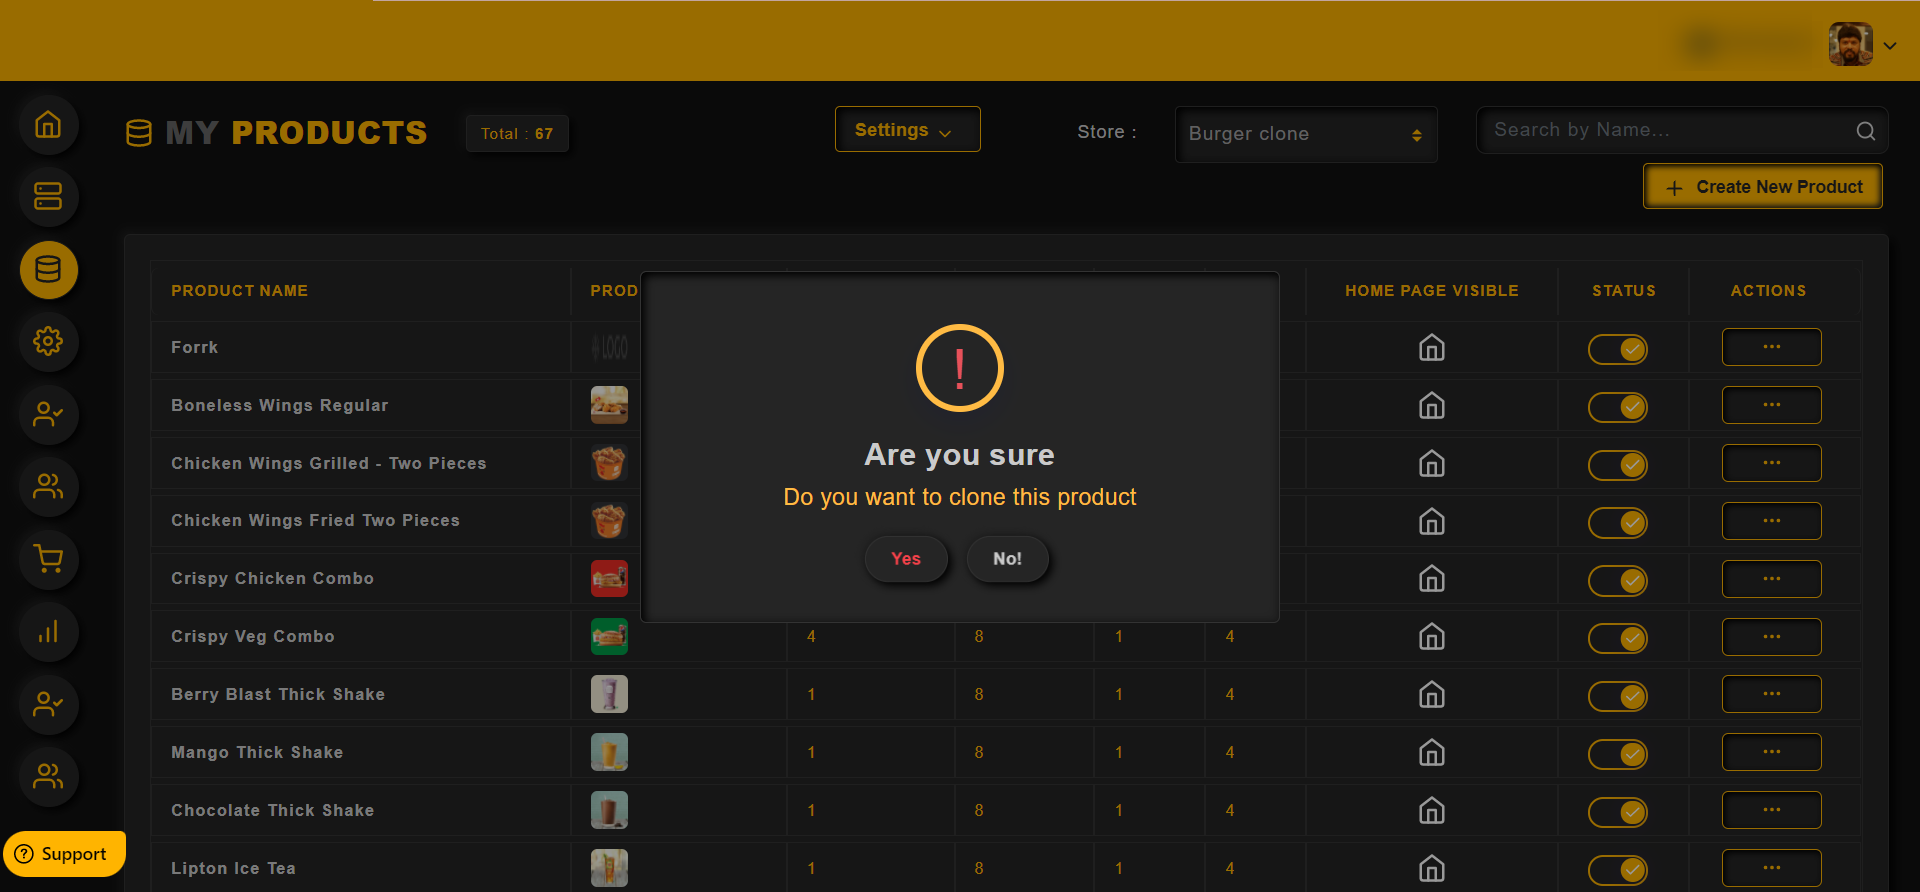
To make a copy of a product,
Click on the Action menu and then click on the clone option as shown in the image below,

Once the admin confirmed, the product will be cloned
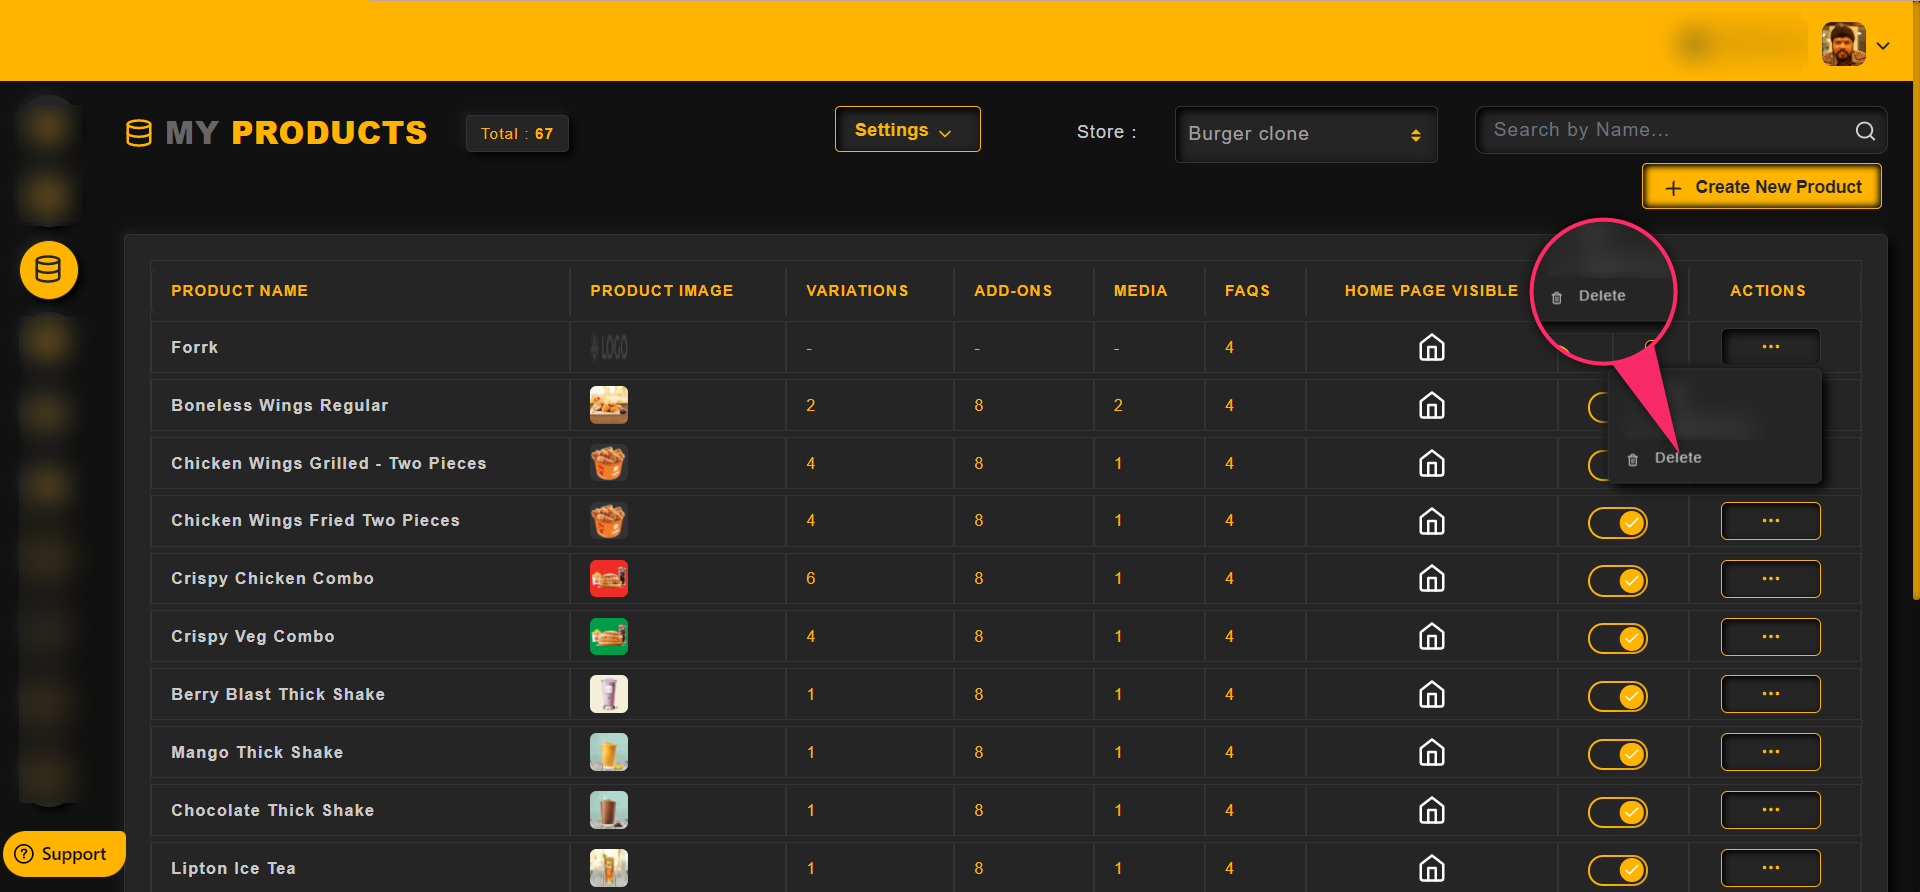
Click on Action menu and then the Delete option to remove the product from the list
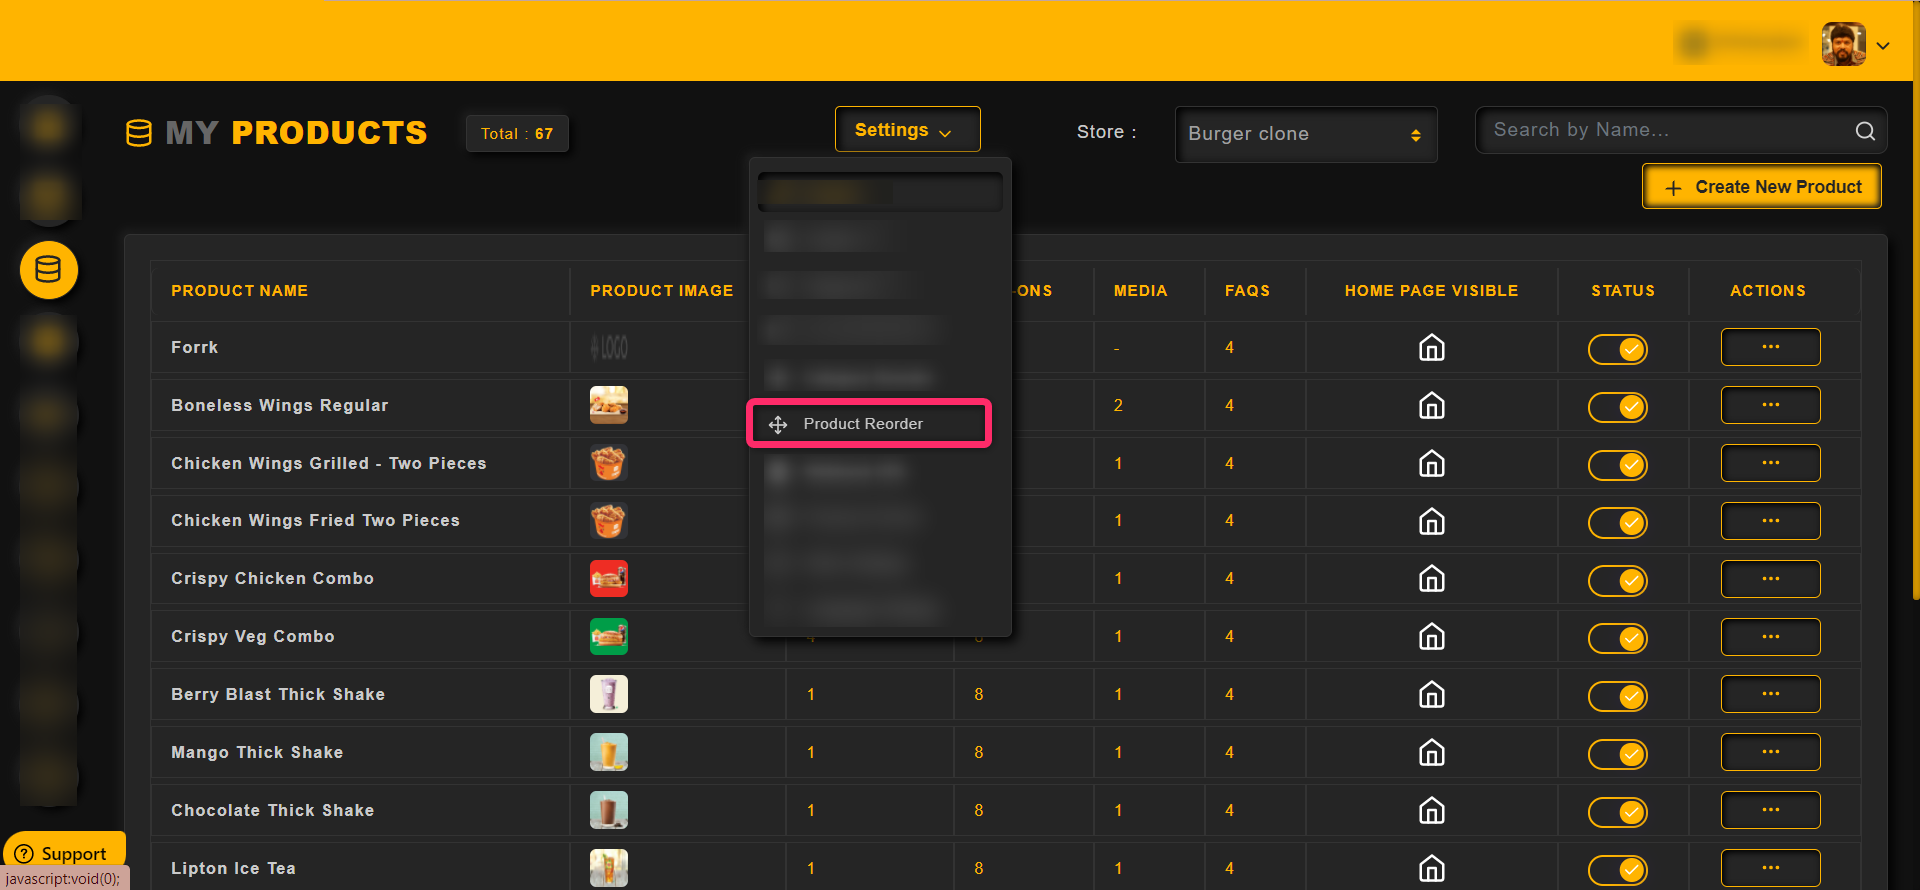
To reorder the products,
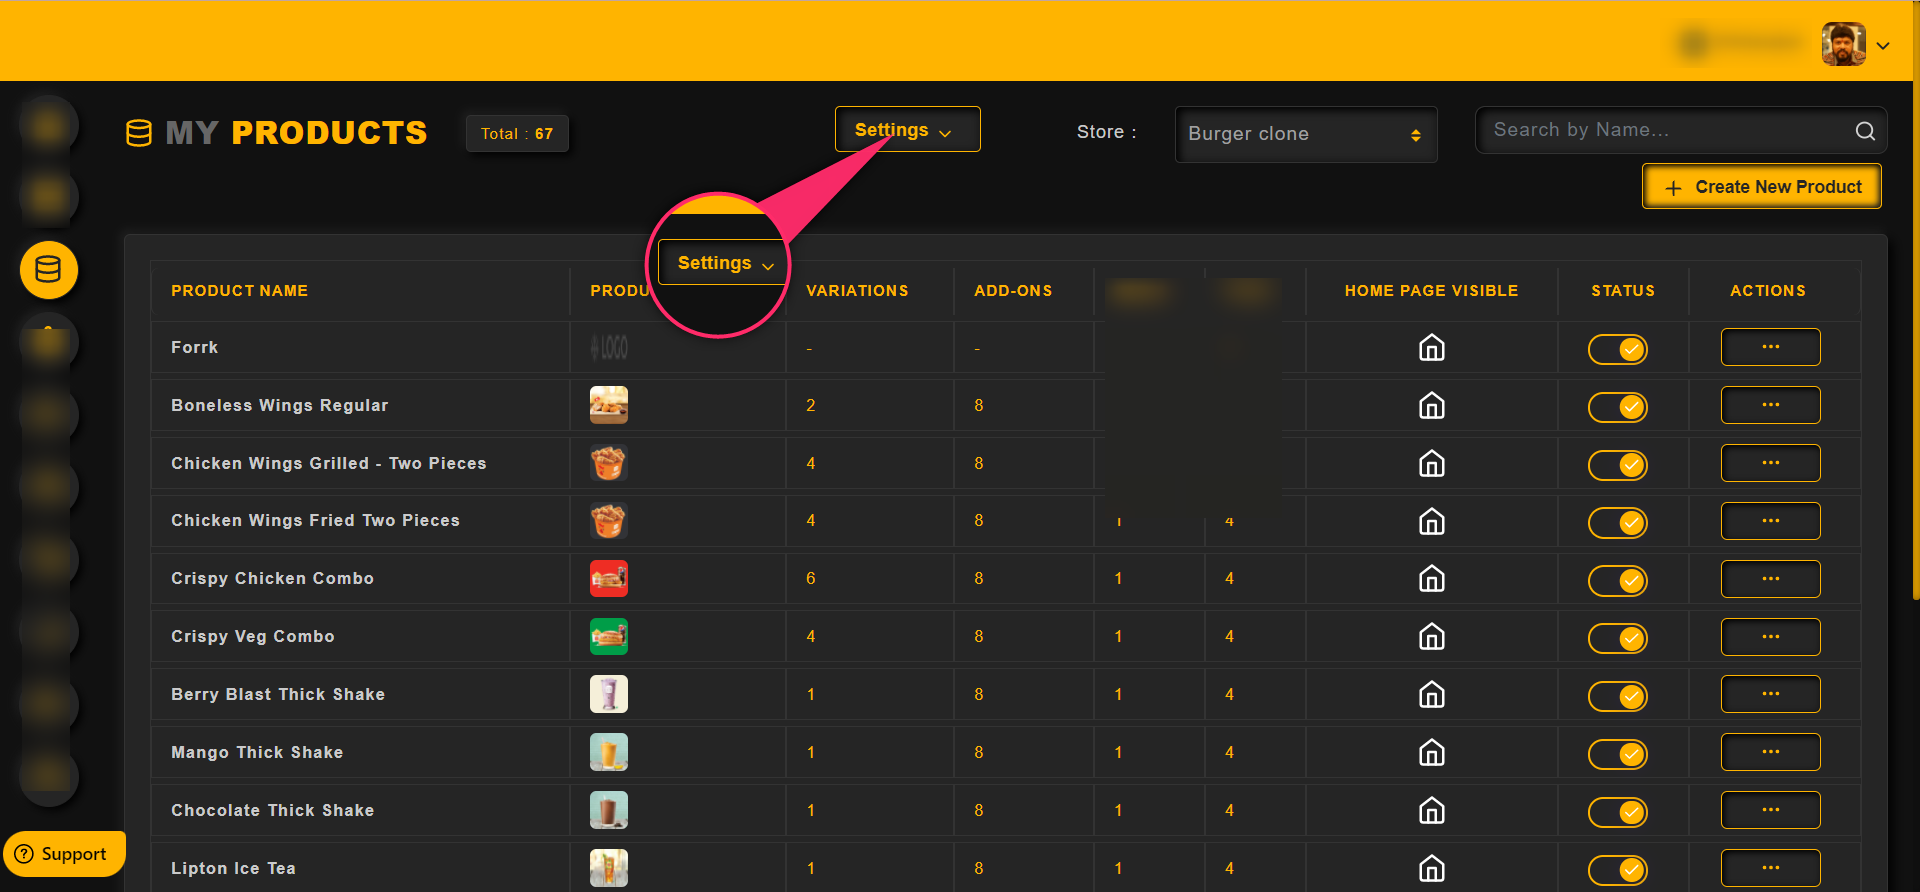
1. Click on the Settings
2. And then click on the Product Reorder from the drop down, as shown in the image below,
By clicking and dragging the arrow, one can move and reorder the Products

Click on the Save button once the Reorder process is completed
One can make a product visible using the visibility option as shown in the image below
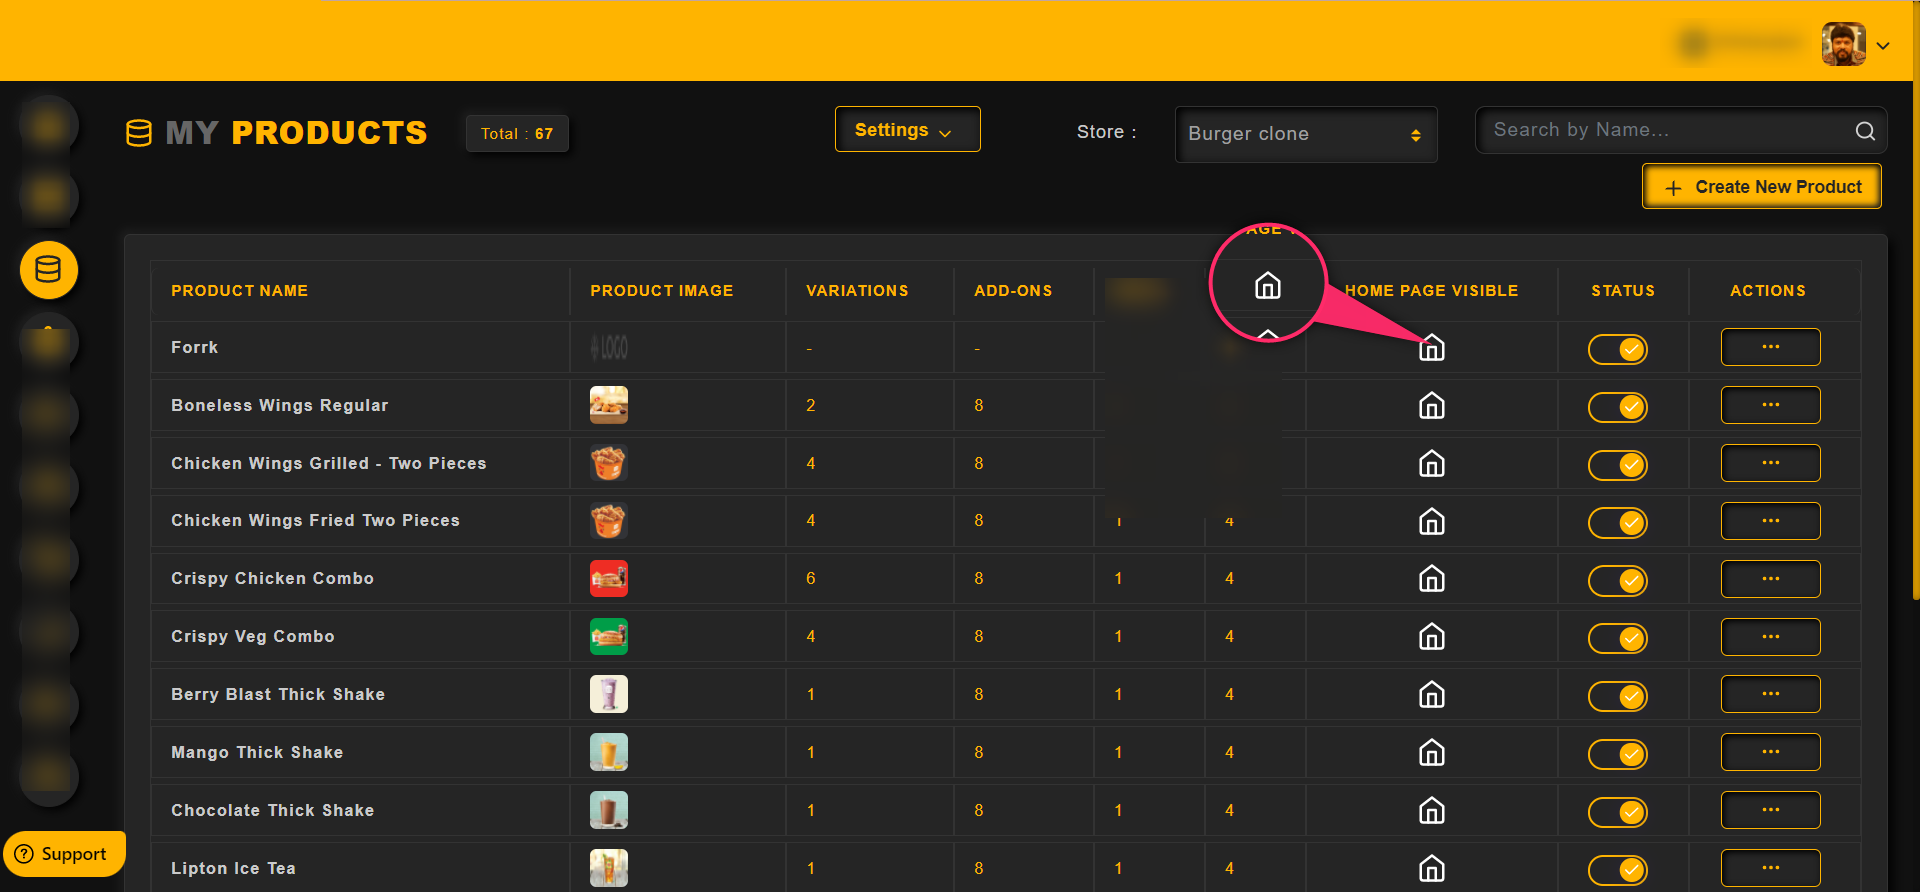
If this option is enabled, then the product will be displayed in the store page
If this option is disabled, then the product will not be displayed in the store page
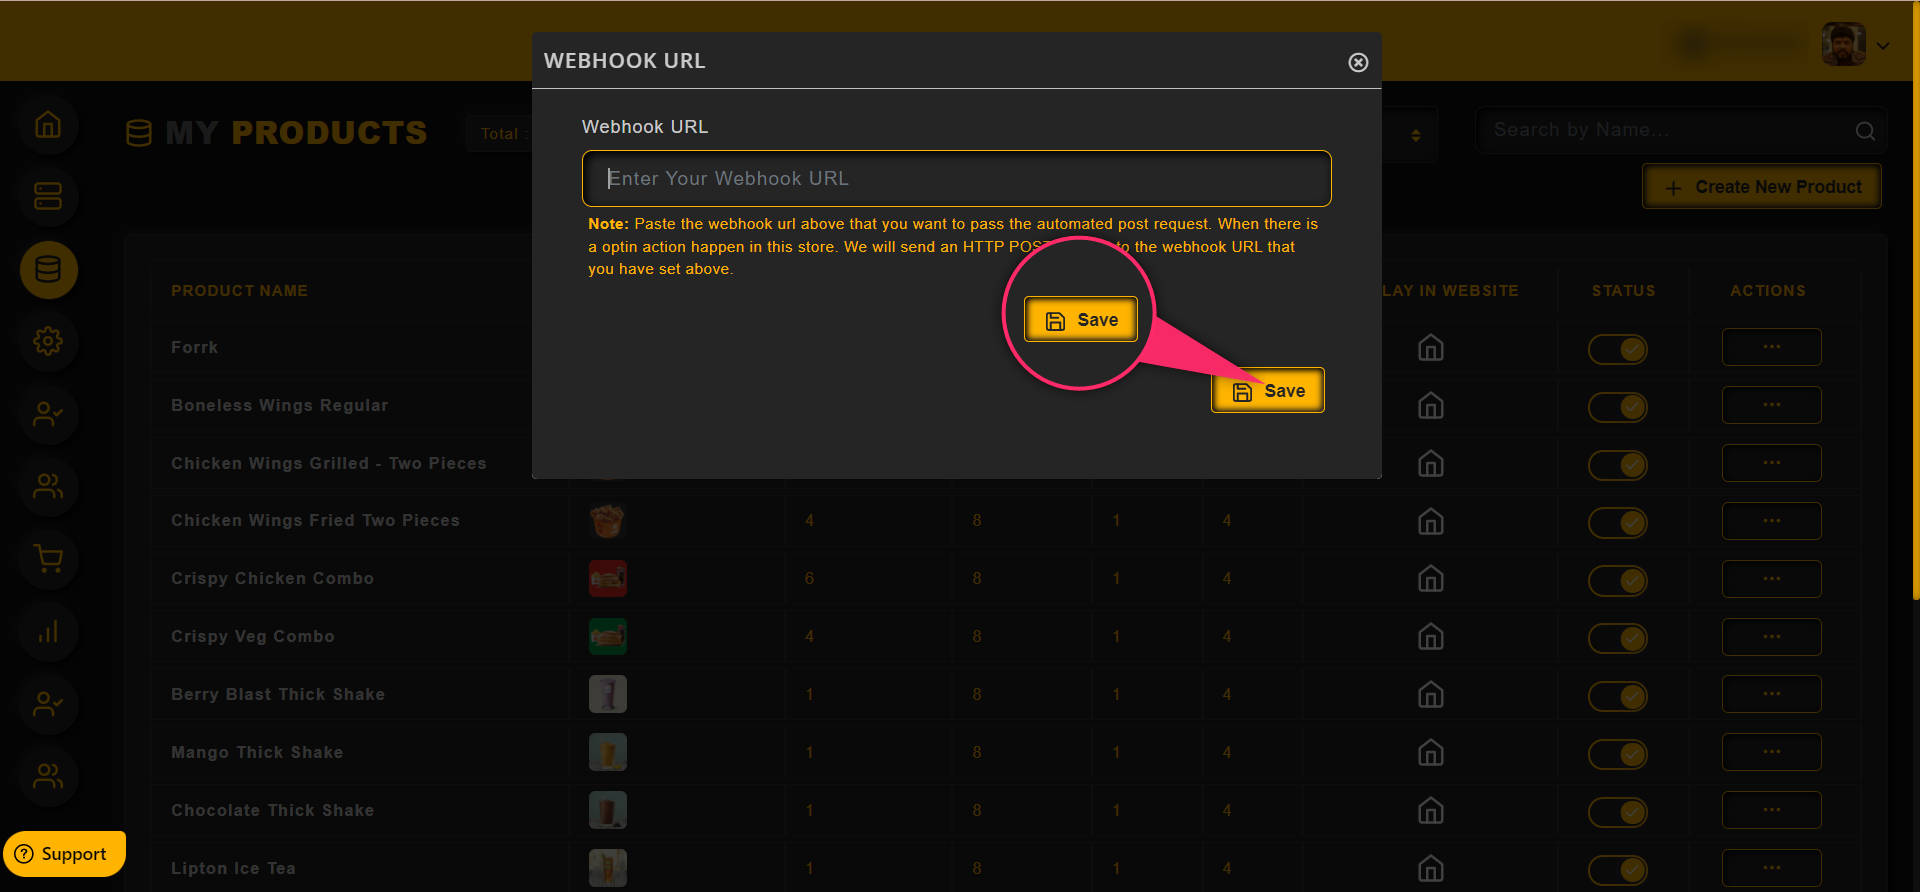
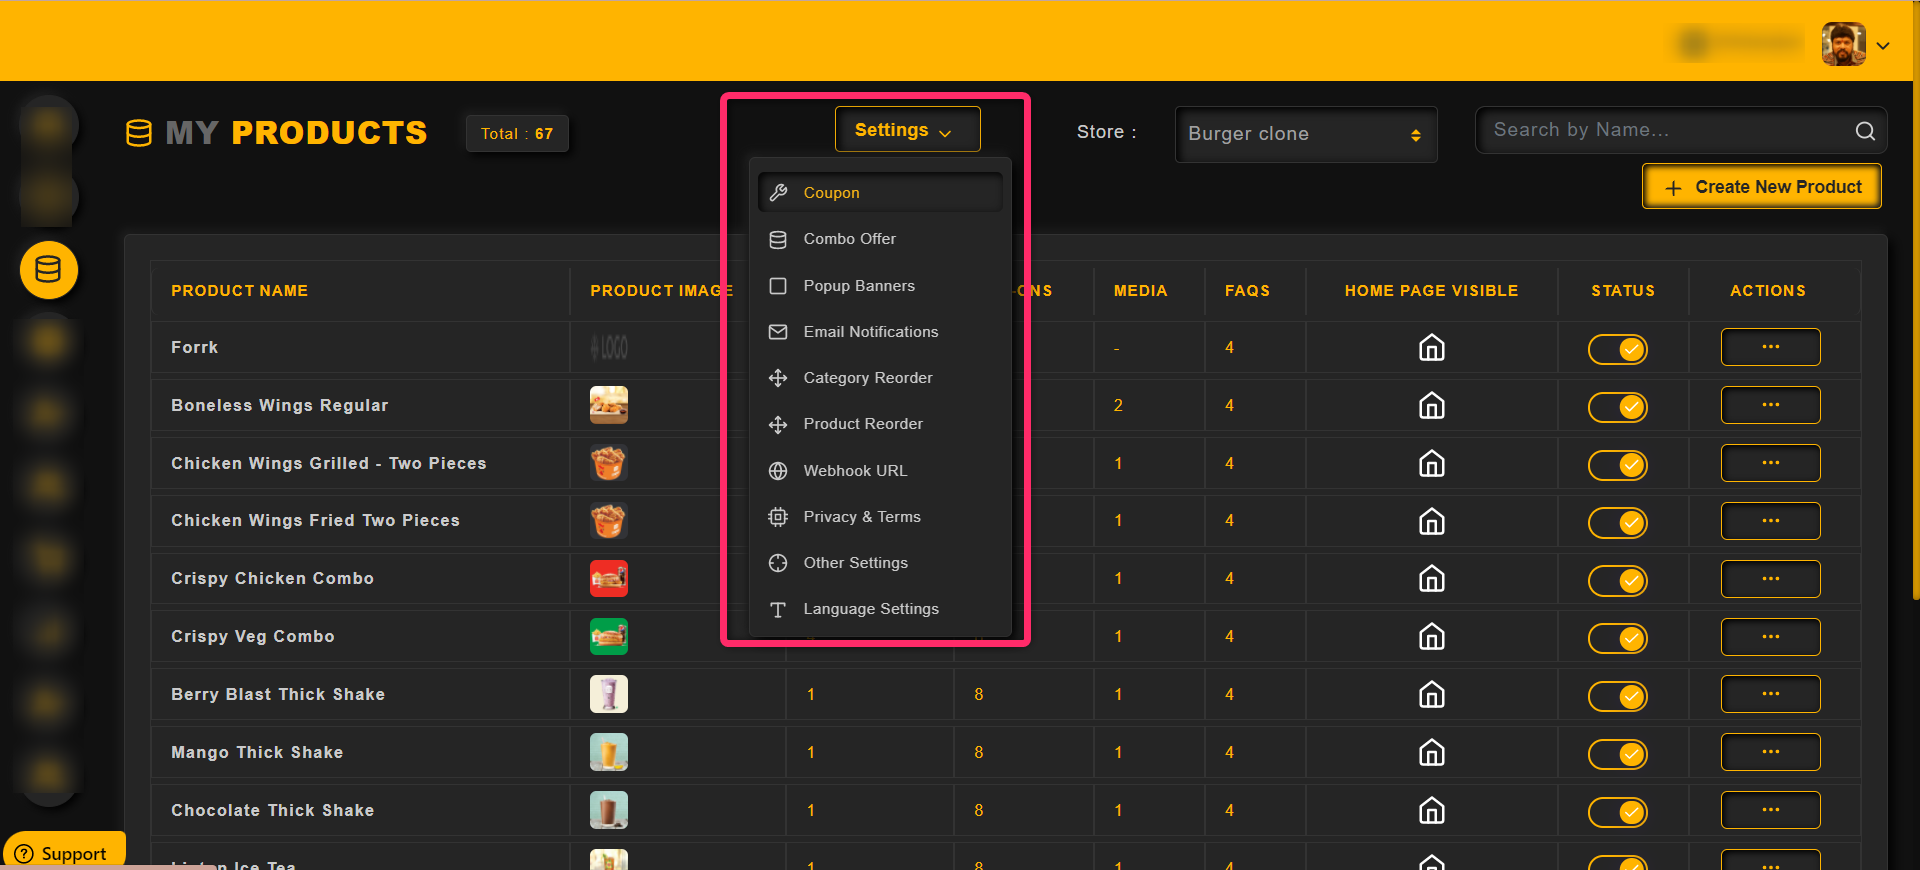
To add a Webhook URL to a product,
Click on the Settings option and then the Webhook URL option as shown in the image below

Paste the webhook url in the text field that you want to pass the automated post request.
When there is an optin action happen in this store. We will send an HTTP POST request to the webhook URL that you have set above.
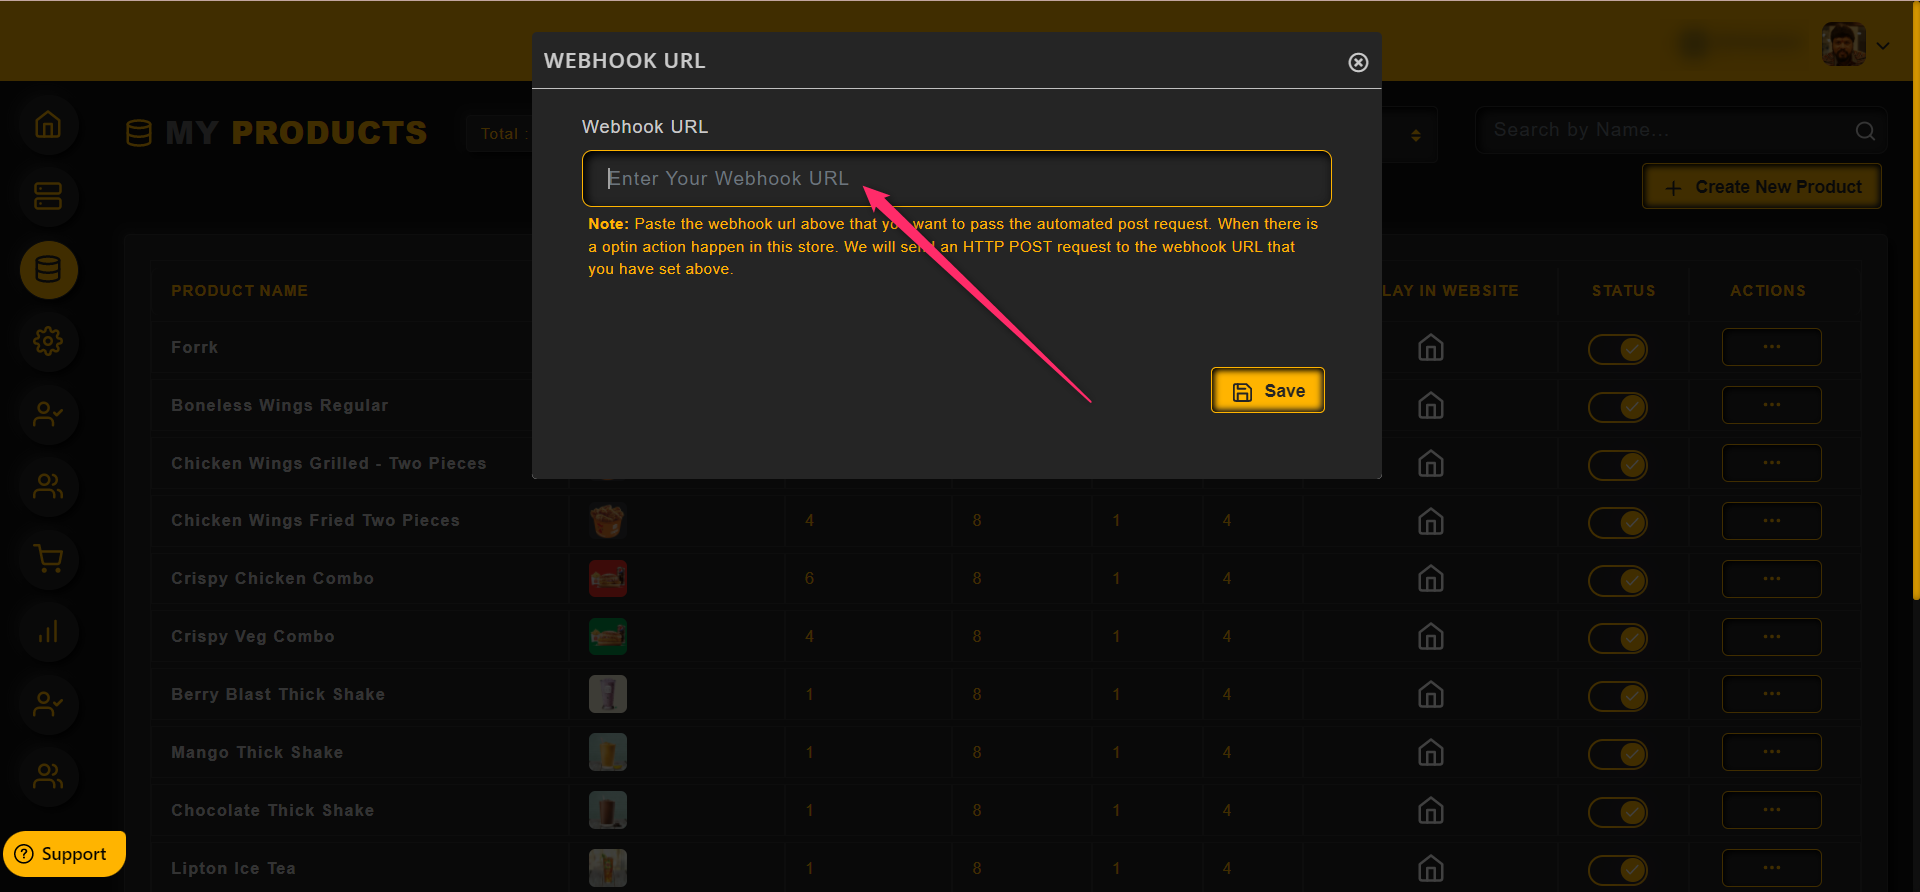
Click on the Save button once the Webhook URL is added
To perform or configure additional settings for the products,
Click on the Settings option as shown in the image below,
In this section, one can add their media files (Image, Video) to their products

How to Add Media
To add a Media file to the product,
Click on “Add Media” button as shown in the image below,
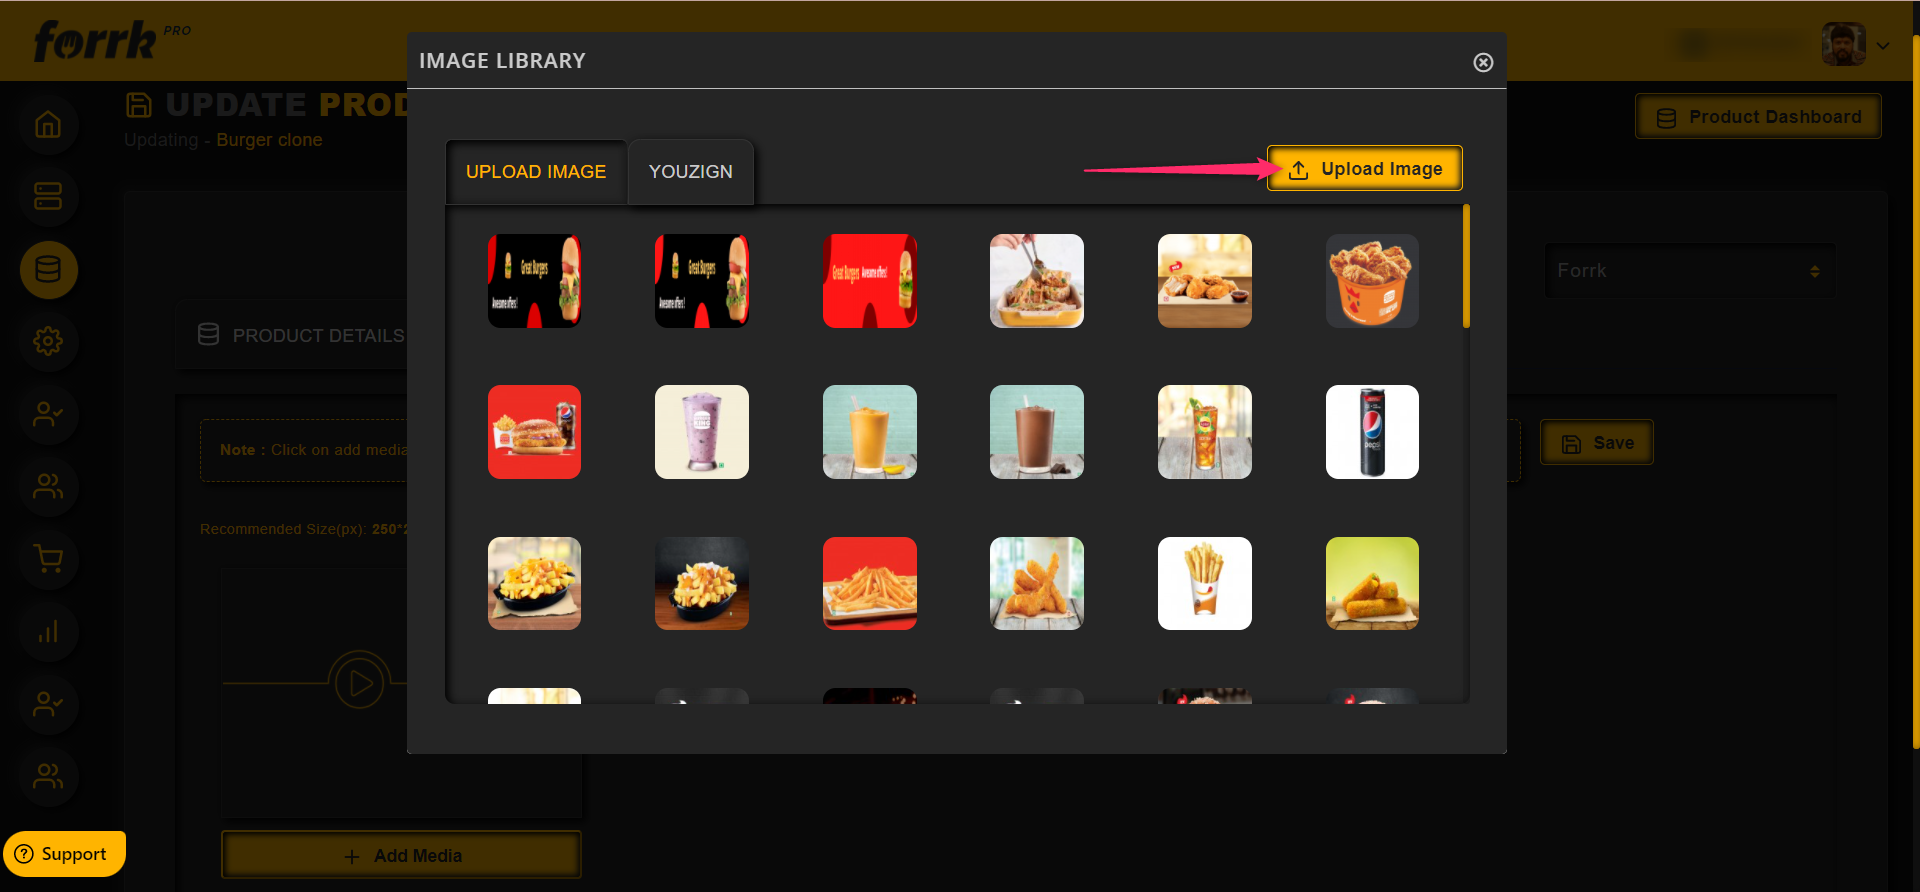
How to Add Image
Click on image option from the drop down to add an image to a product

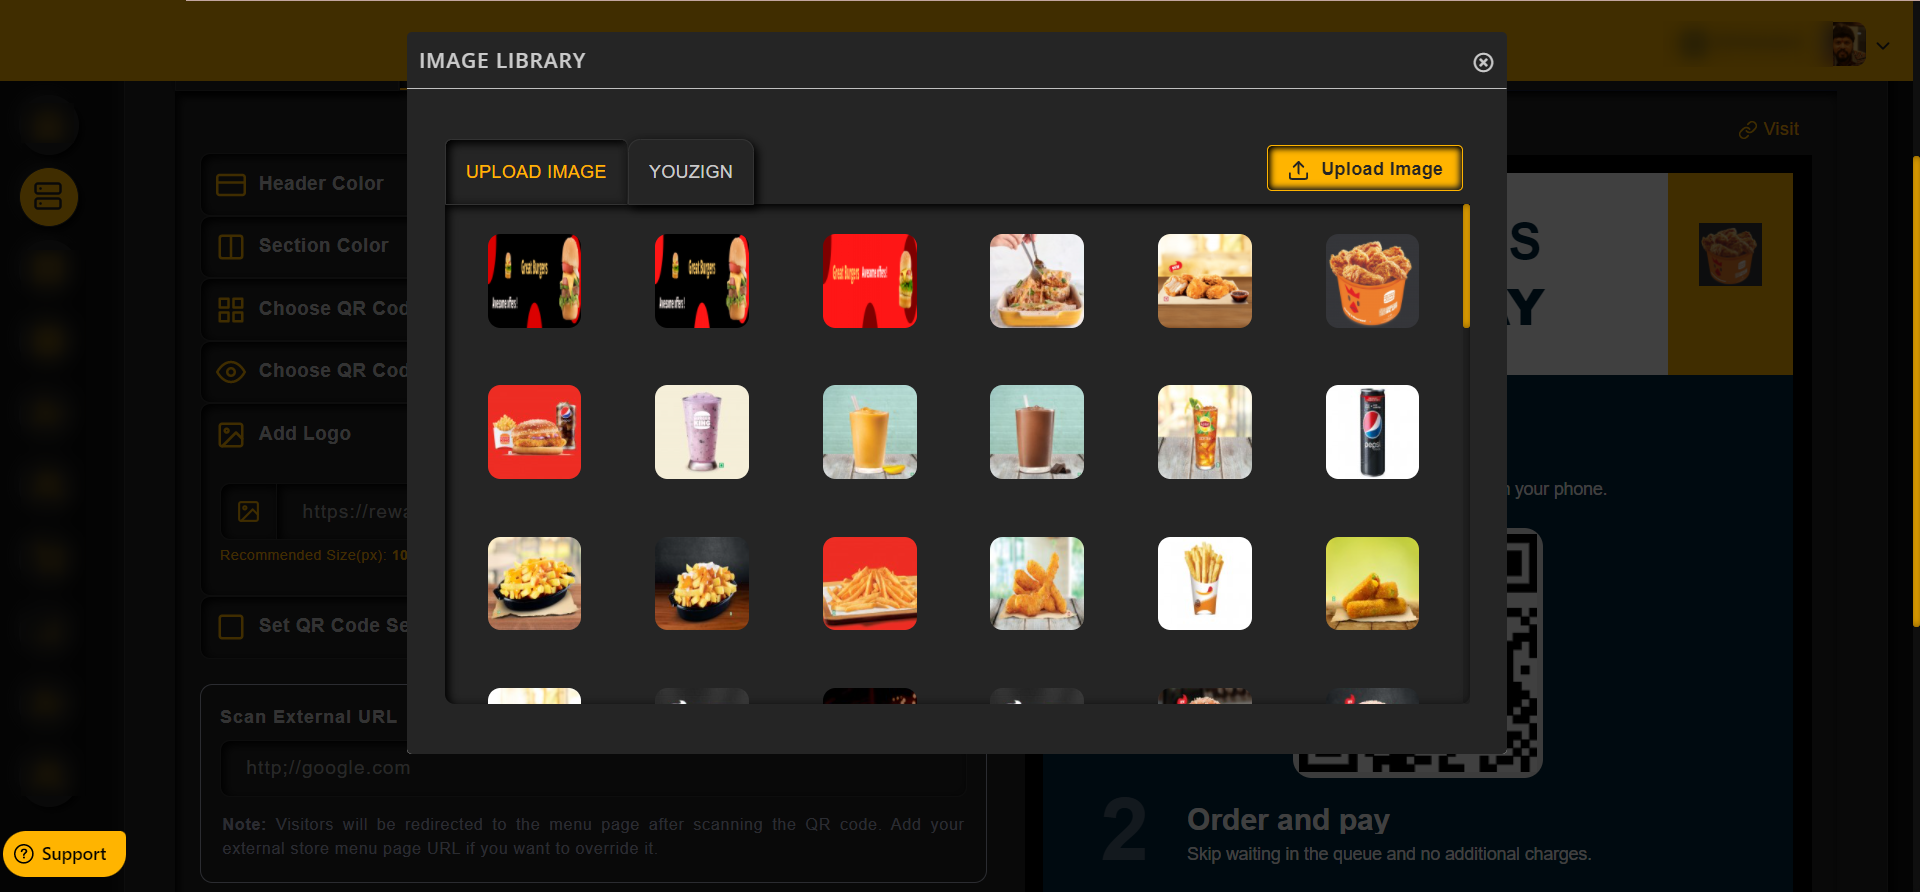
One can add image by uploading from the local device or from the Youzign
Note: To use the Youzign images, Youzign should be integrated with the platform using the API keys

To upload an image from the device, click on the Upload button as shown in the image below
Once the image has been uploaded, click on the Insert button as shown in the image below, to add the image file to a product
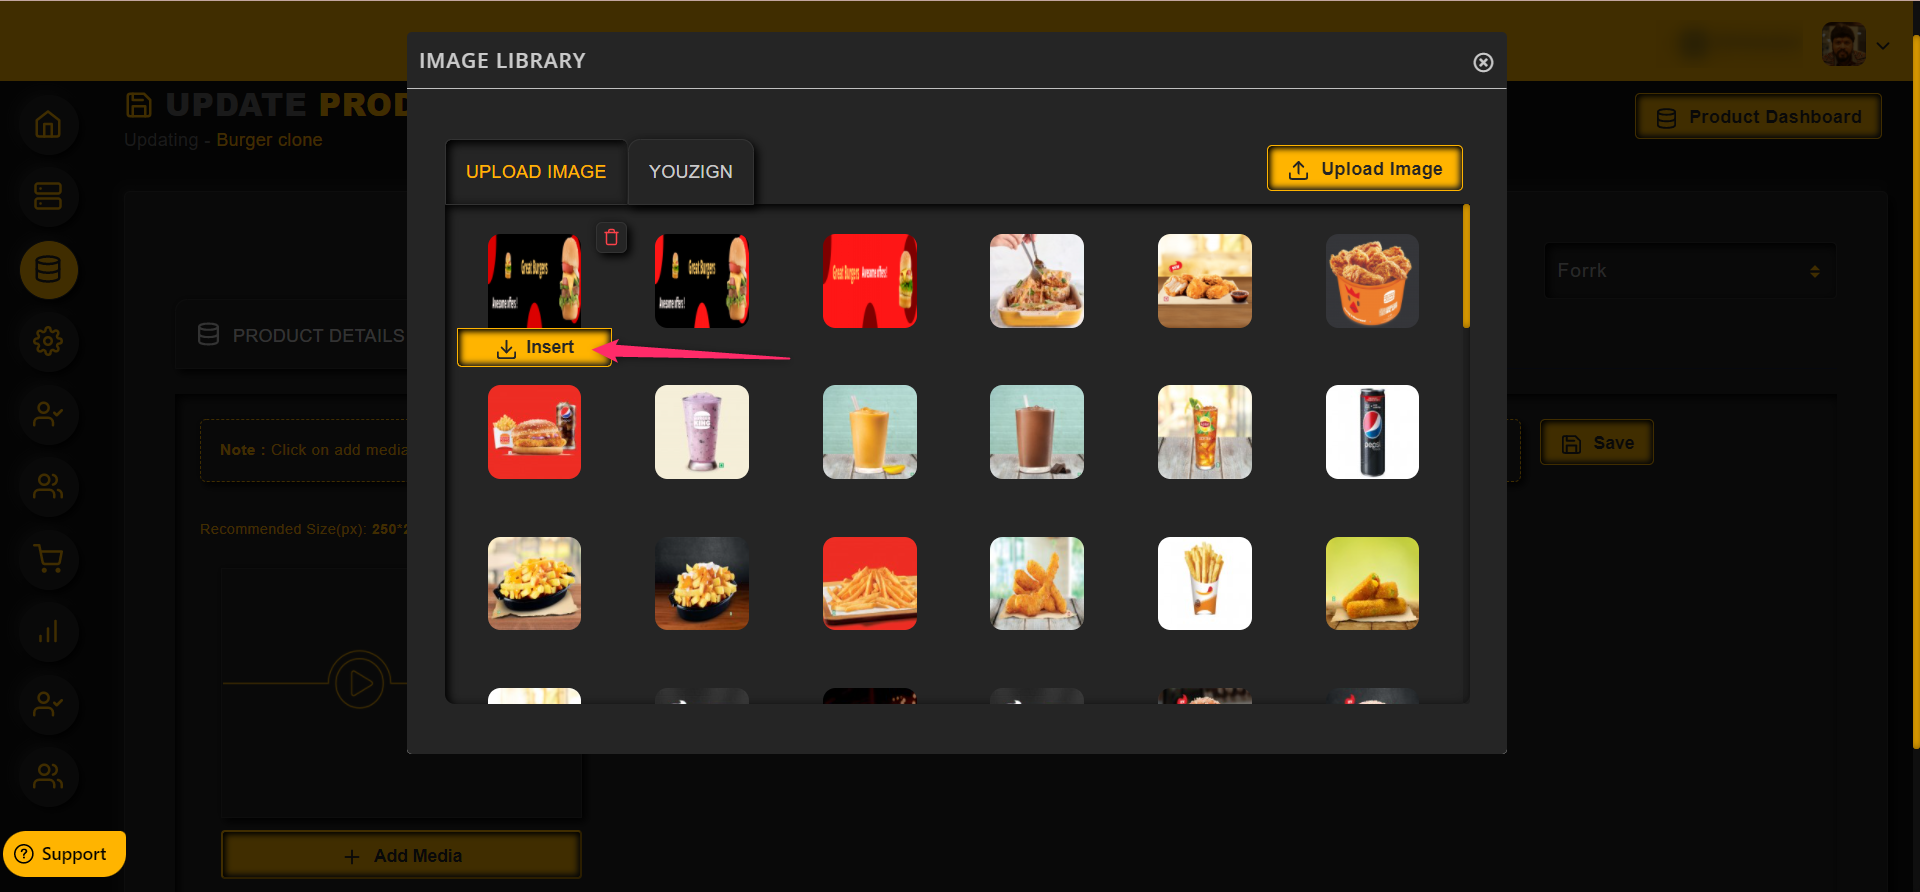
To delete an image from the gallery, click on the delete icon as shown in the image below

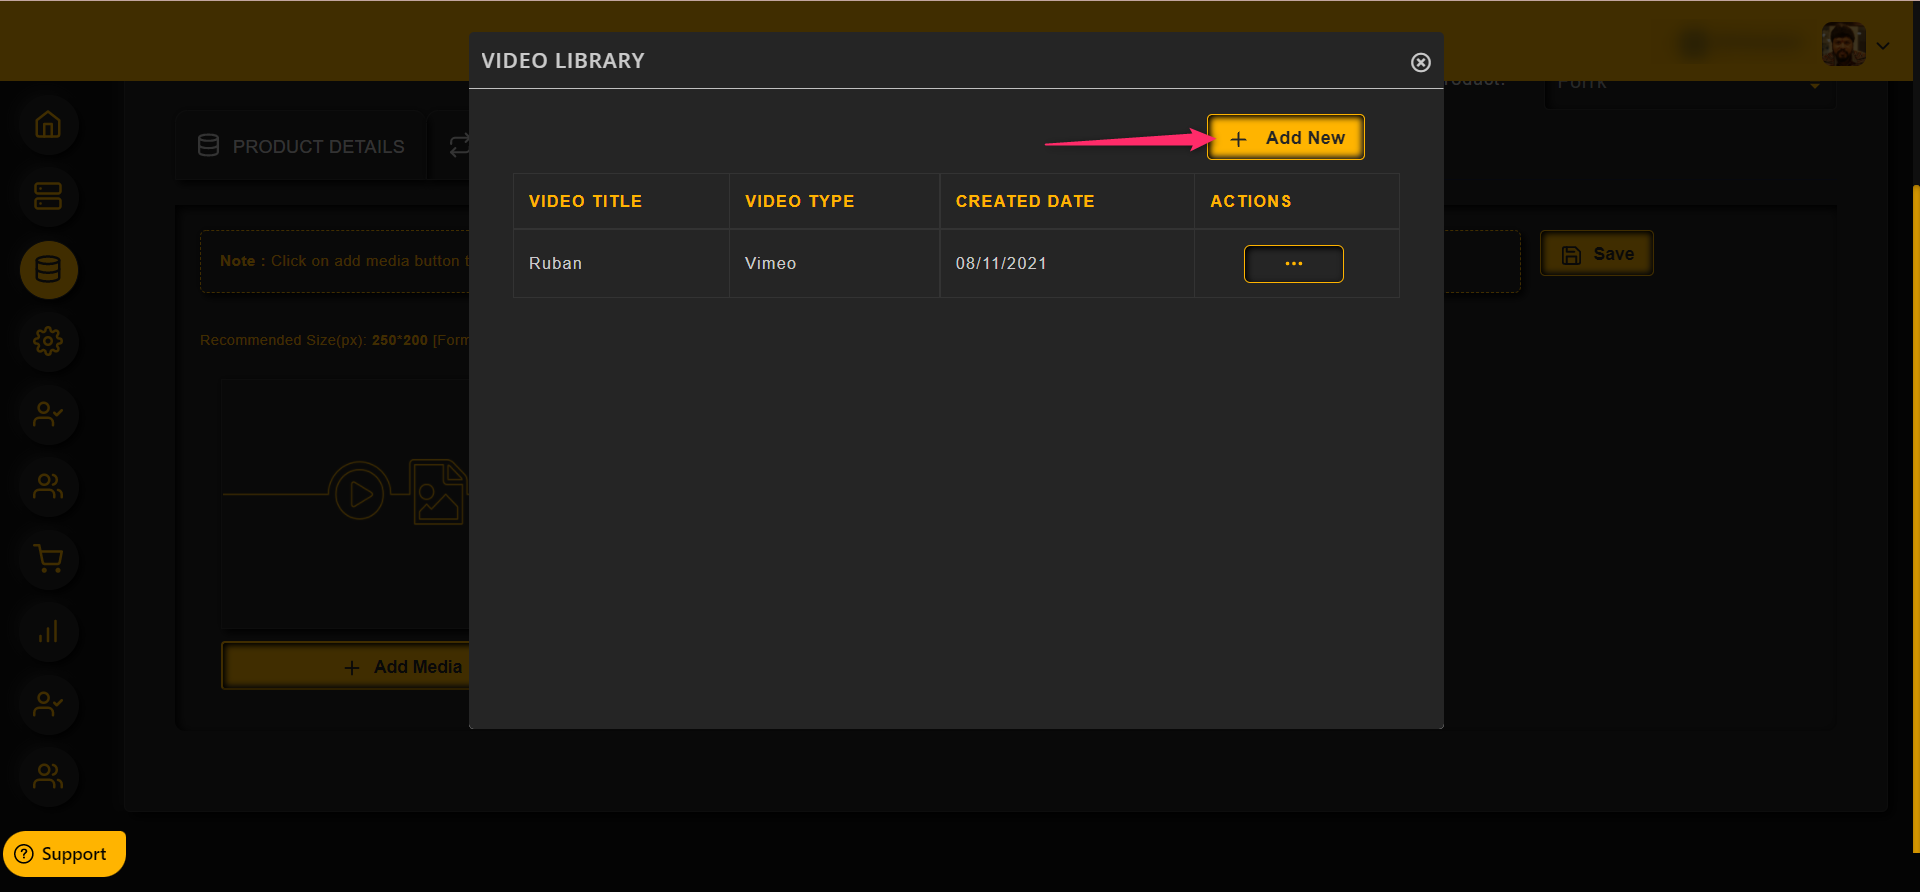
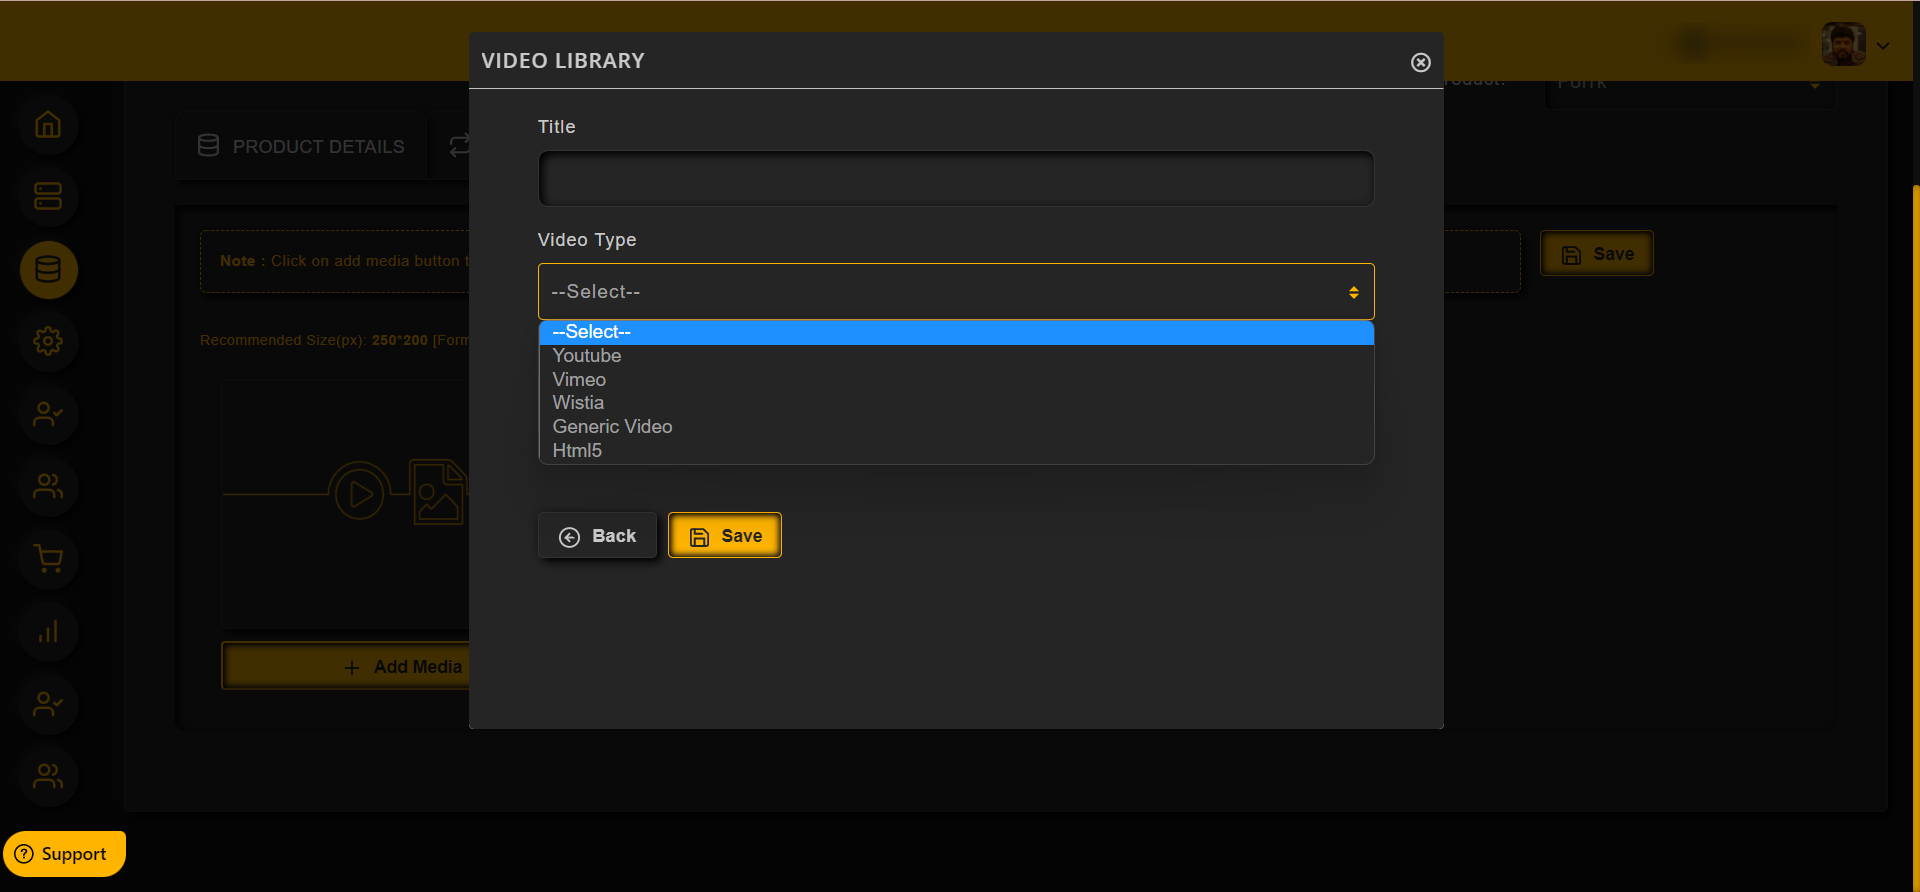
How to Add Video
Click on video option from the drop down to add a video to a product

One can add video by using the Video URL or the Embed code (based on the platforms used)
To add a video, click on the Add New Video button as shown in the image below
– Enter the Video Title
– Choose the Video Type from the options given in the drop down
– Upload the image for the video file
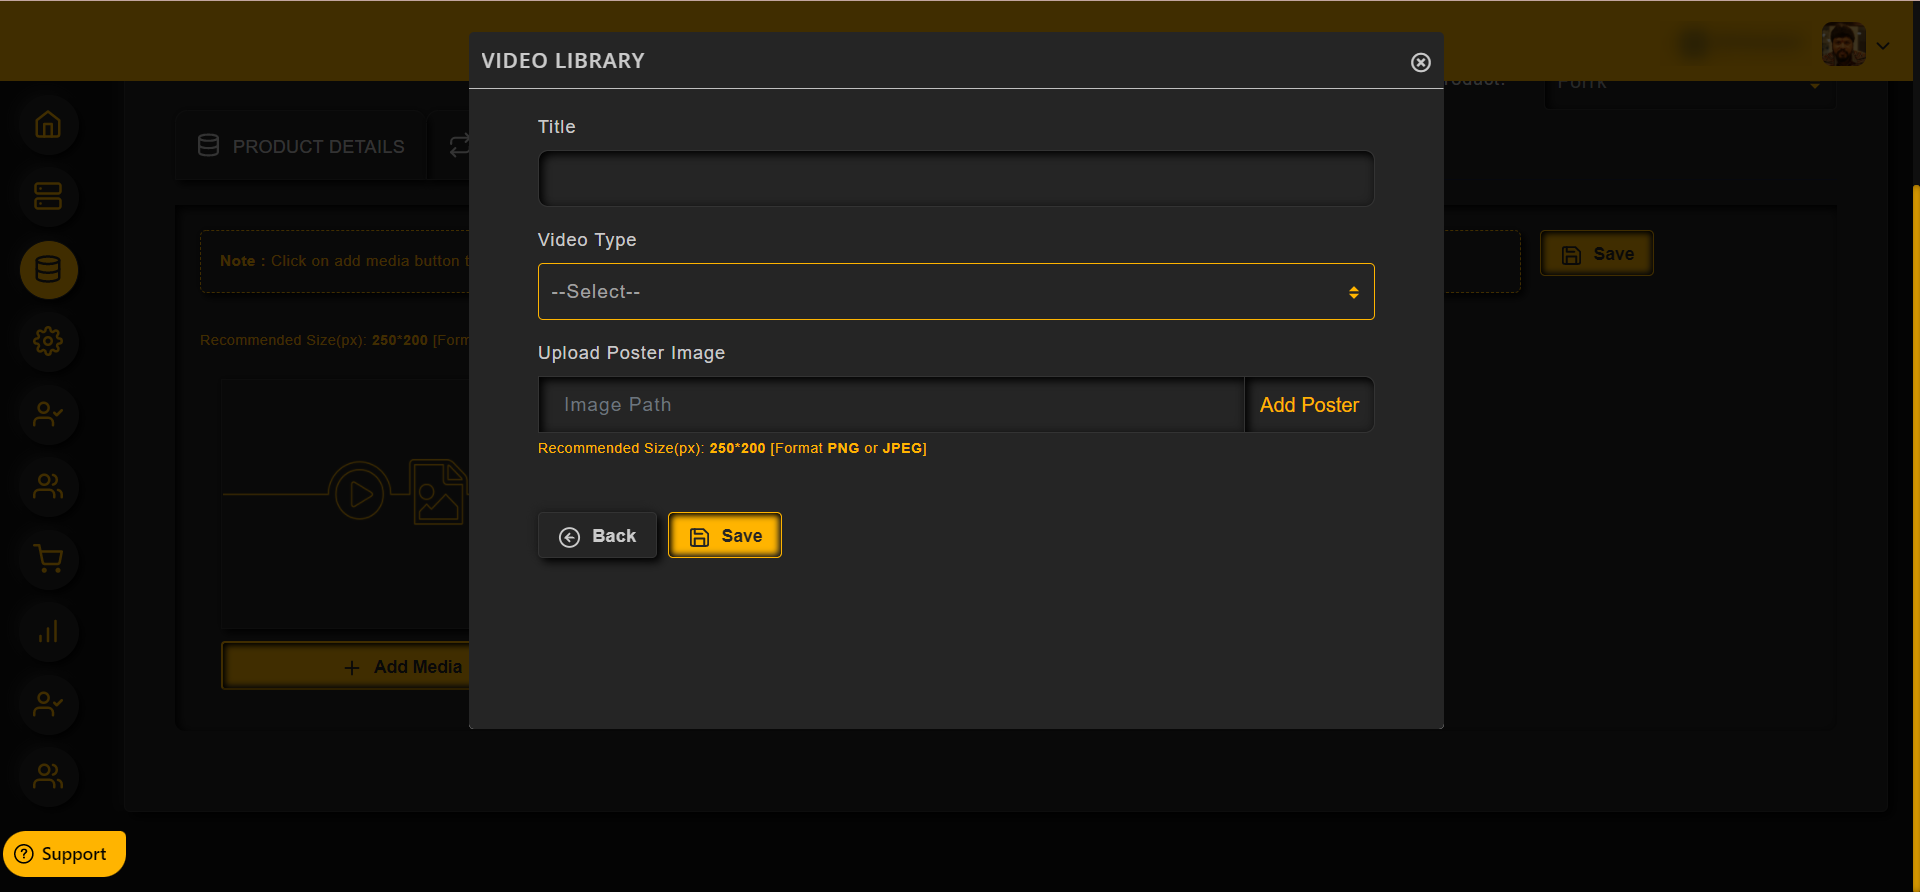
One can choose the Video type as shown in the image below,
To add a Youtube video, choose Youtube from the drop down
Then paste the Youtube video URL or Embed code in the text field provided
Choose the options based on that, if Embed is to be added then choose embed code option or URL option

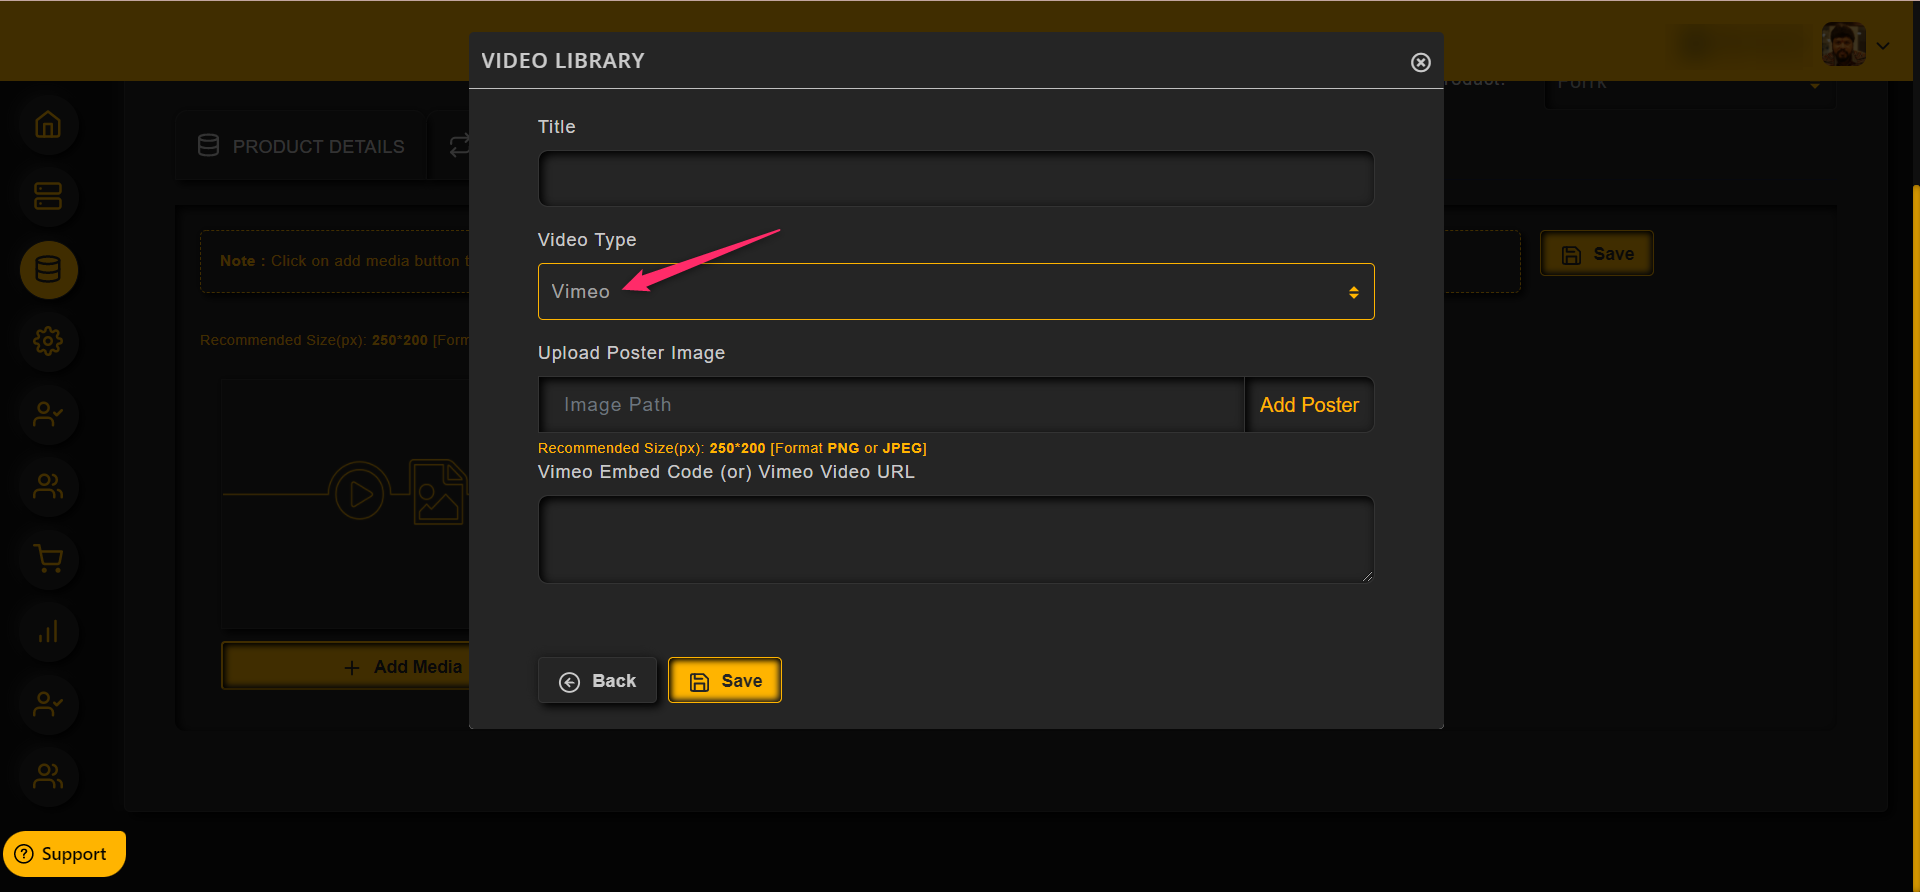
To add a Vimeo video, choose Vimeo from the drop down
Then paste the Vimeo video URL or Embed code in the text field provided
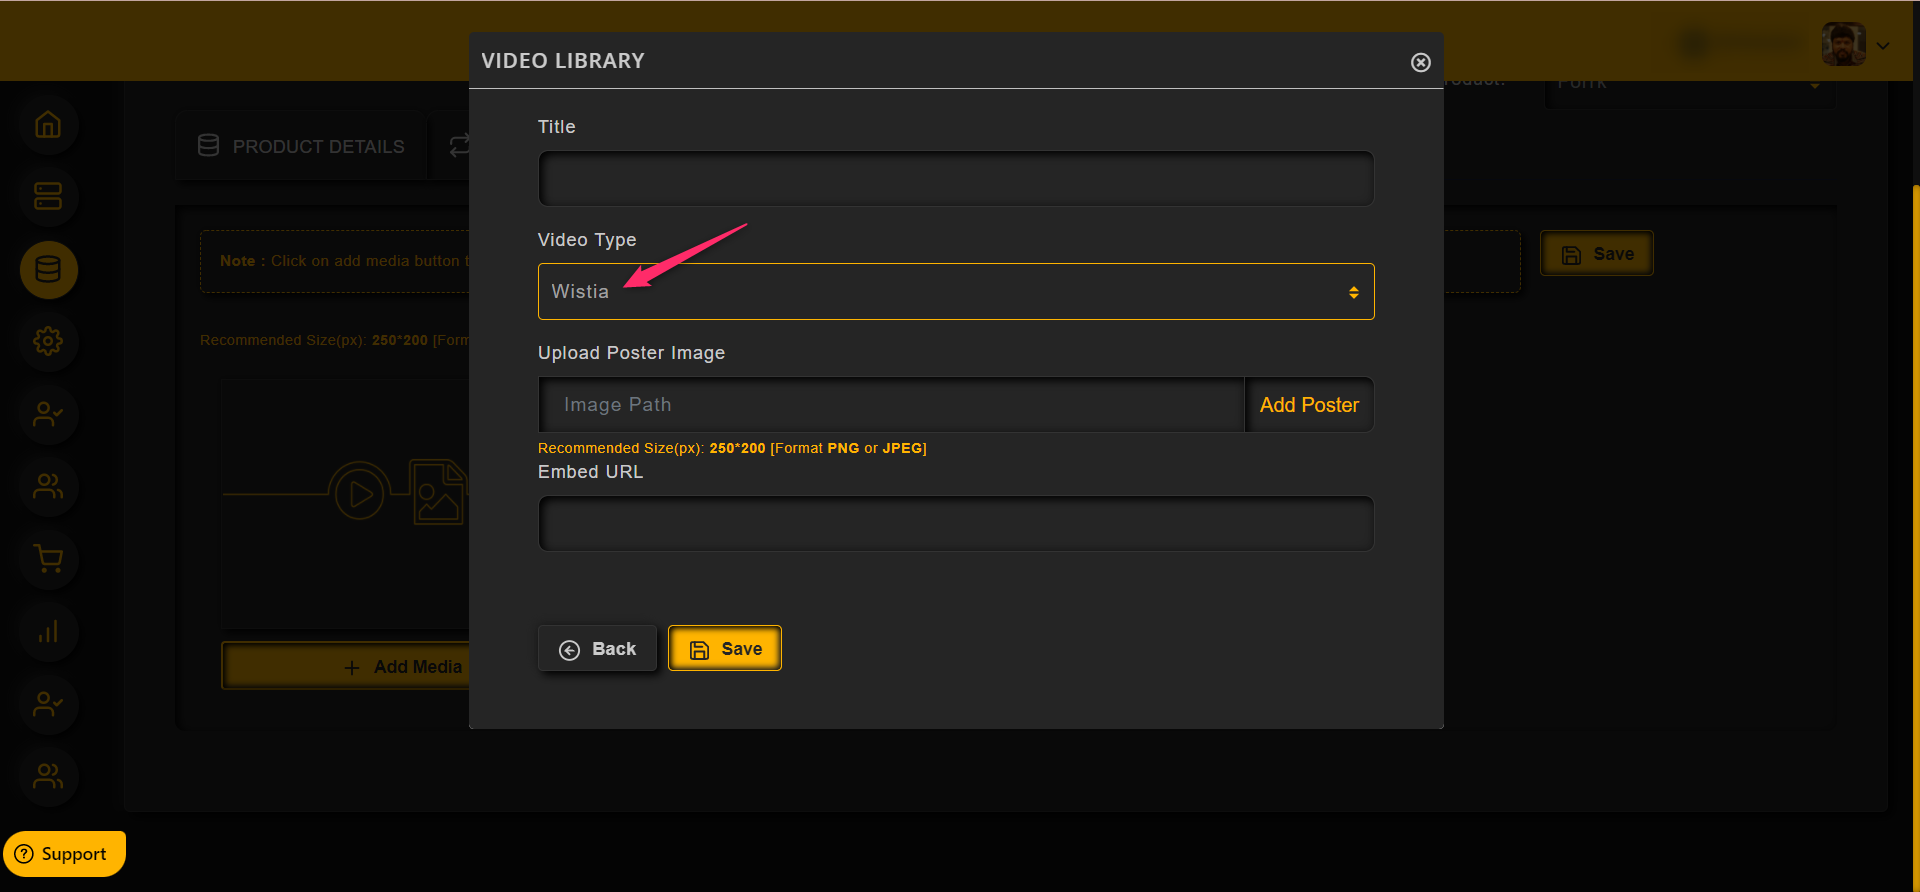
To add a Wistia video, choose Wistia from the drop down
Then paste the Embed URL in the text field provided
After entering all the details, click on the Save button
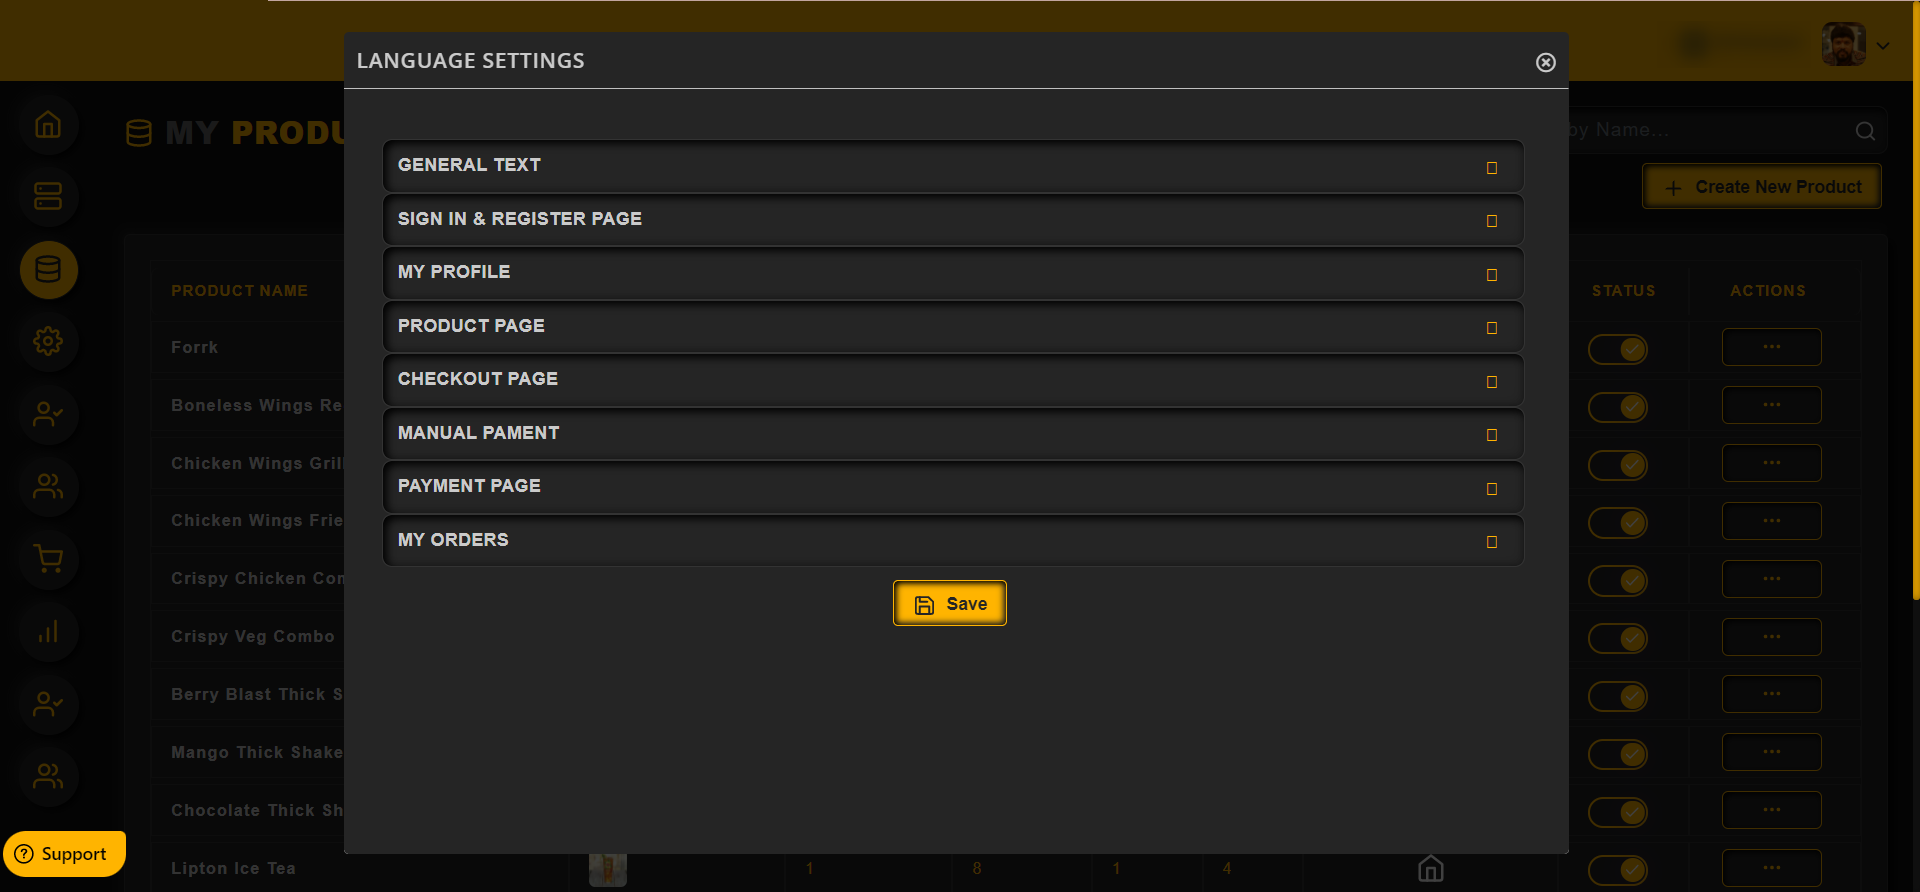
Language settings allow the admin to change the system generated words to any language.
STEP 1 : Click on the Settings
STEP 2 : Then click on the “Language Settings”
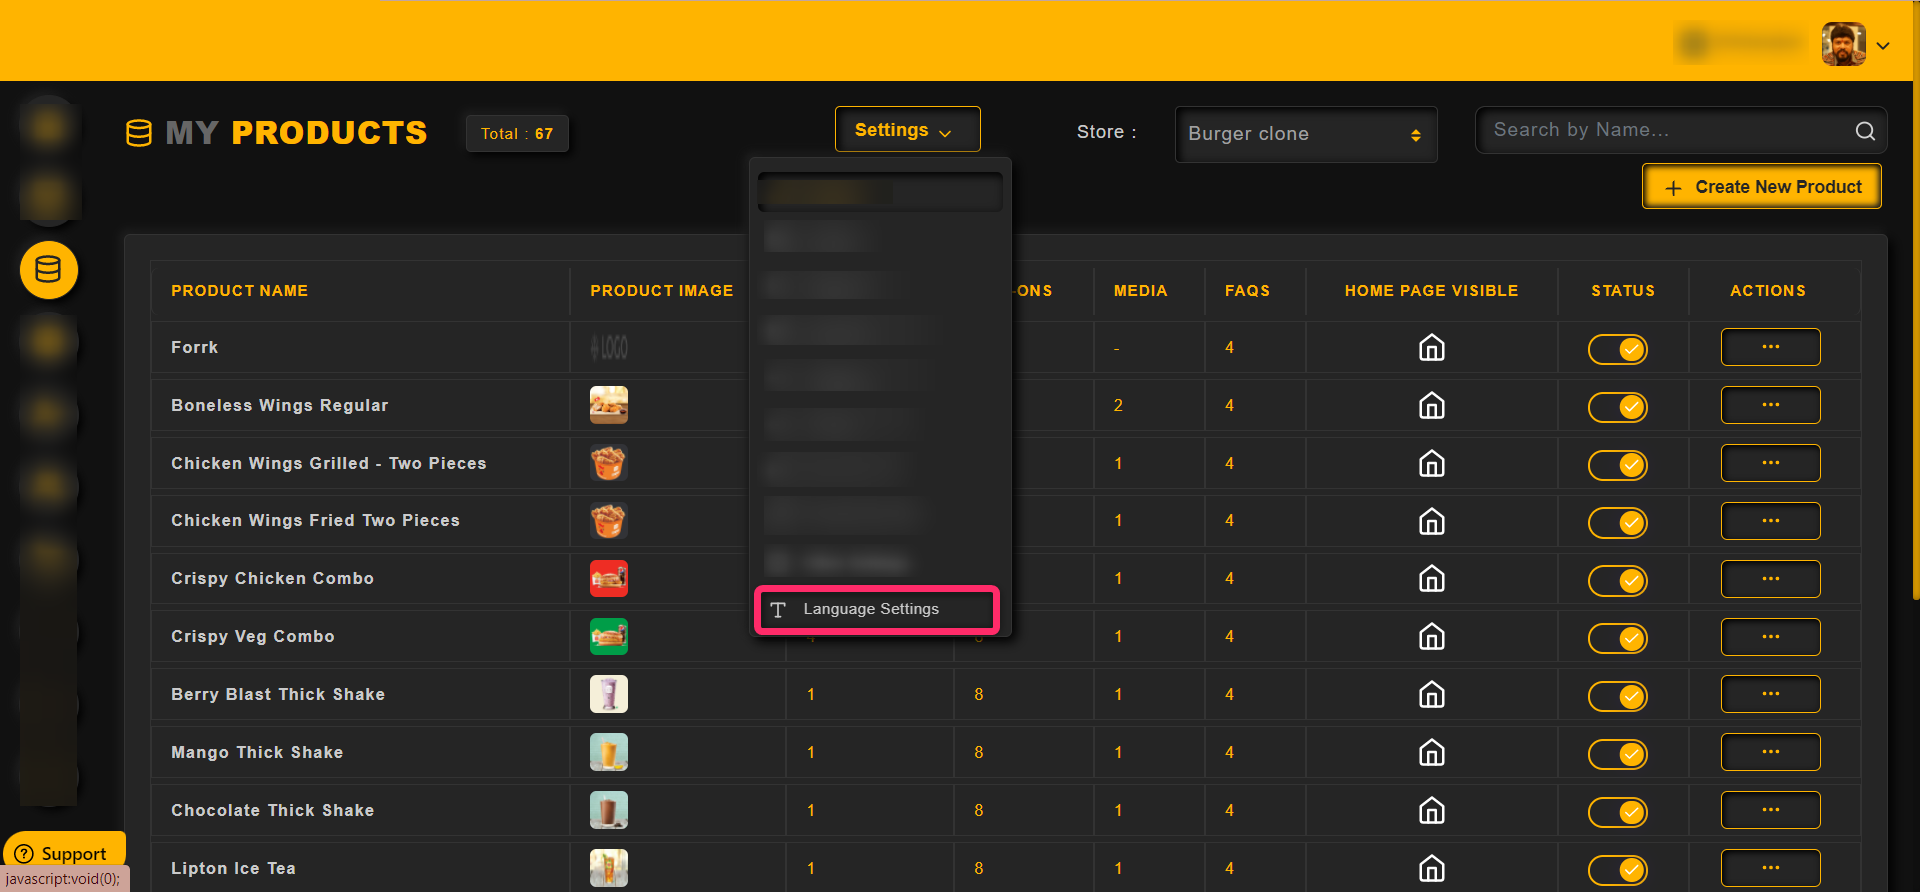
STEP 3 : Change the language of the words as per your preference.
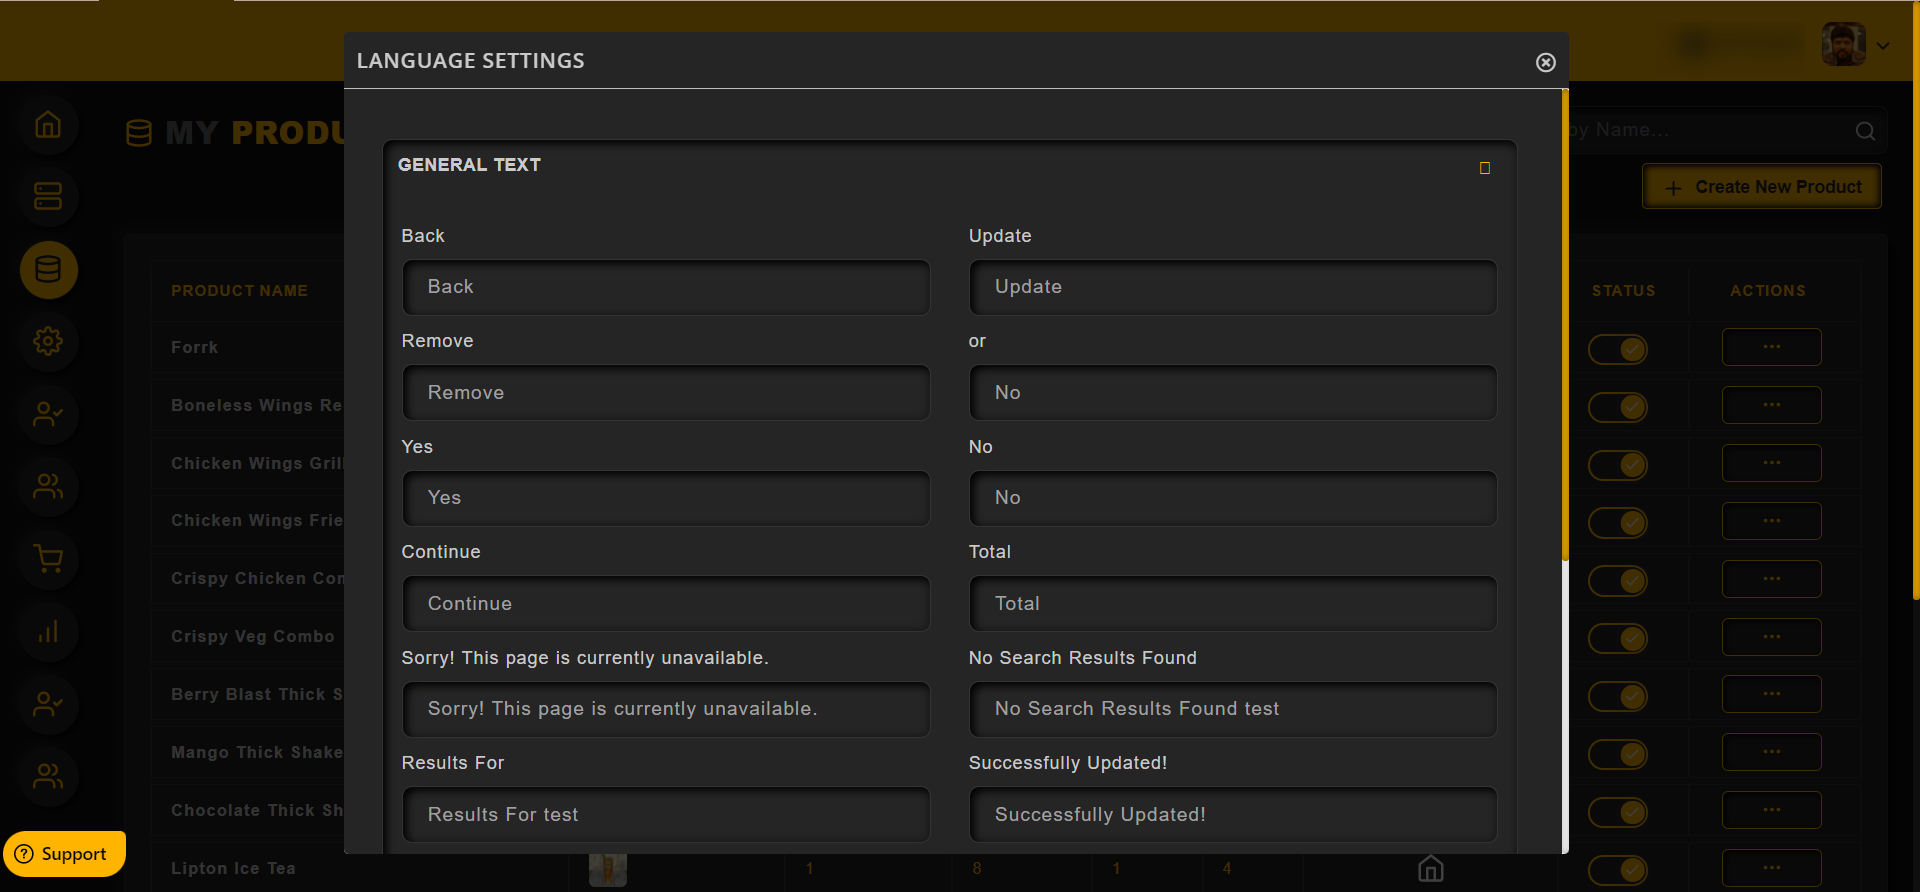
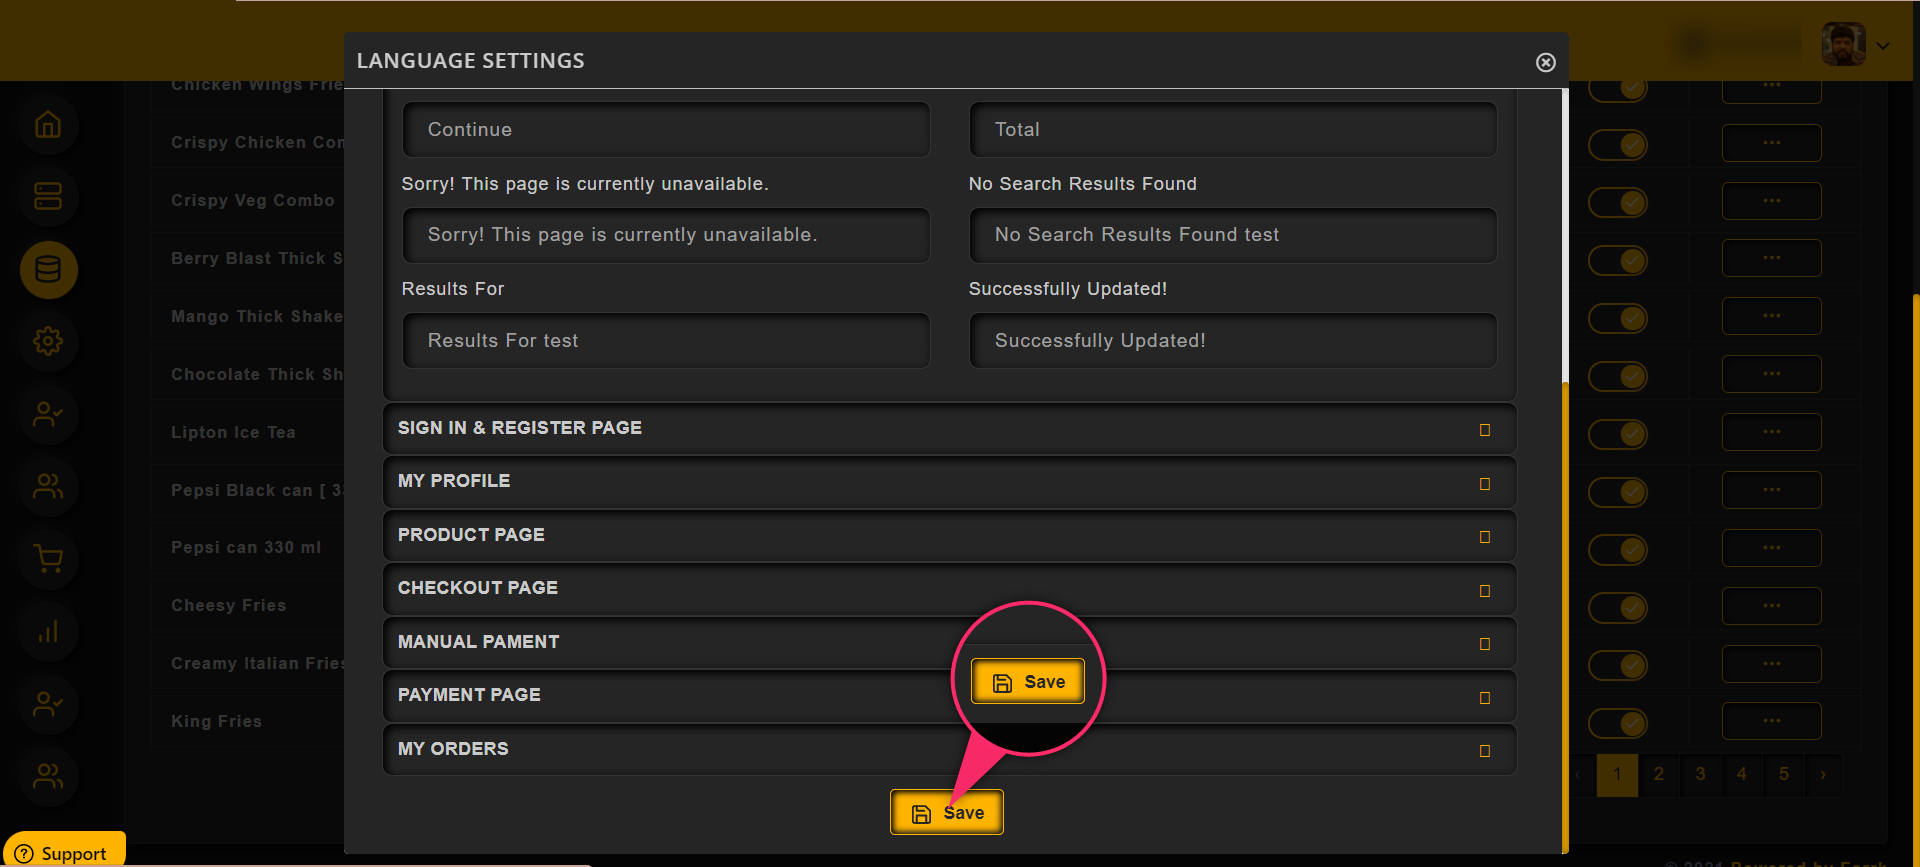
Click on the Save button once the sections are translated
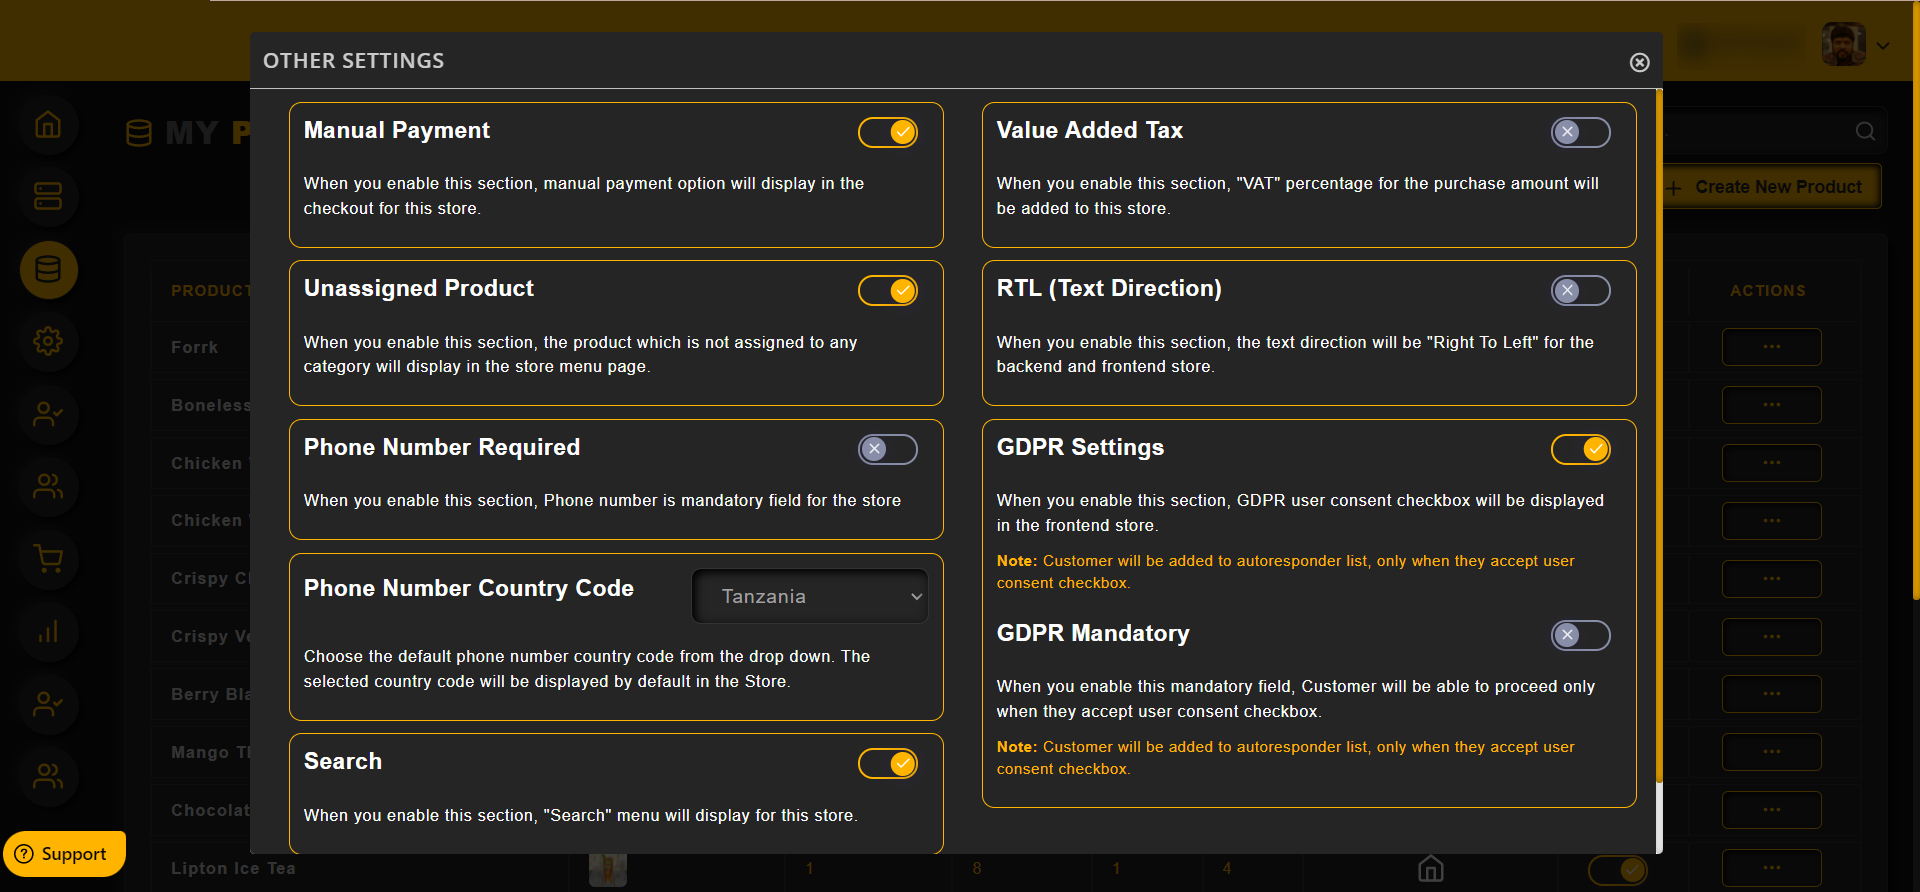
Admin can configure the other settings, as follows
Click on the Settings and then the Other Settings from the drop down

Admin can perfom the settings as shown in the image below inside the other settings
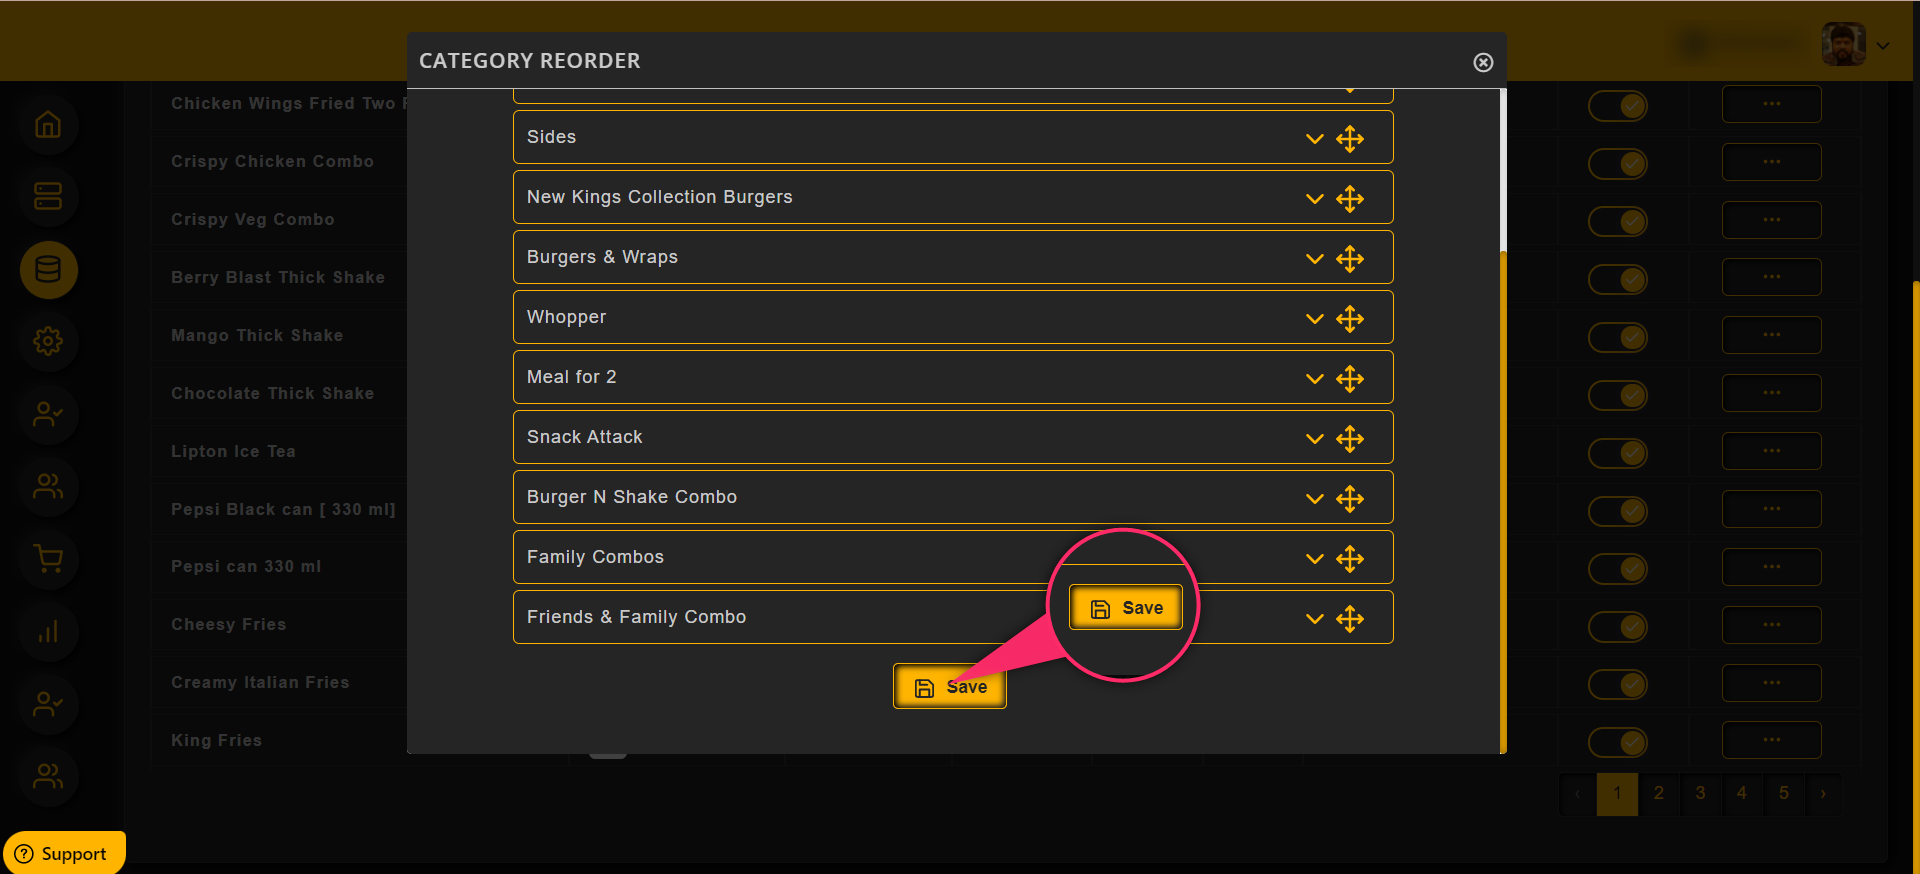
To reorder the categories,
1. Click on the Settings
2. And then click on the Category Reorder from the drop down, as shown in the image below,

By clicking and dragging the arrow, one can move and reorder the Categories

Click on the Save button once the Reorder process is completed
Click on the Reviews as shown in the image below, to add a review for a product
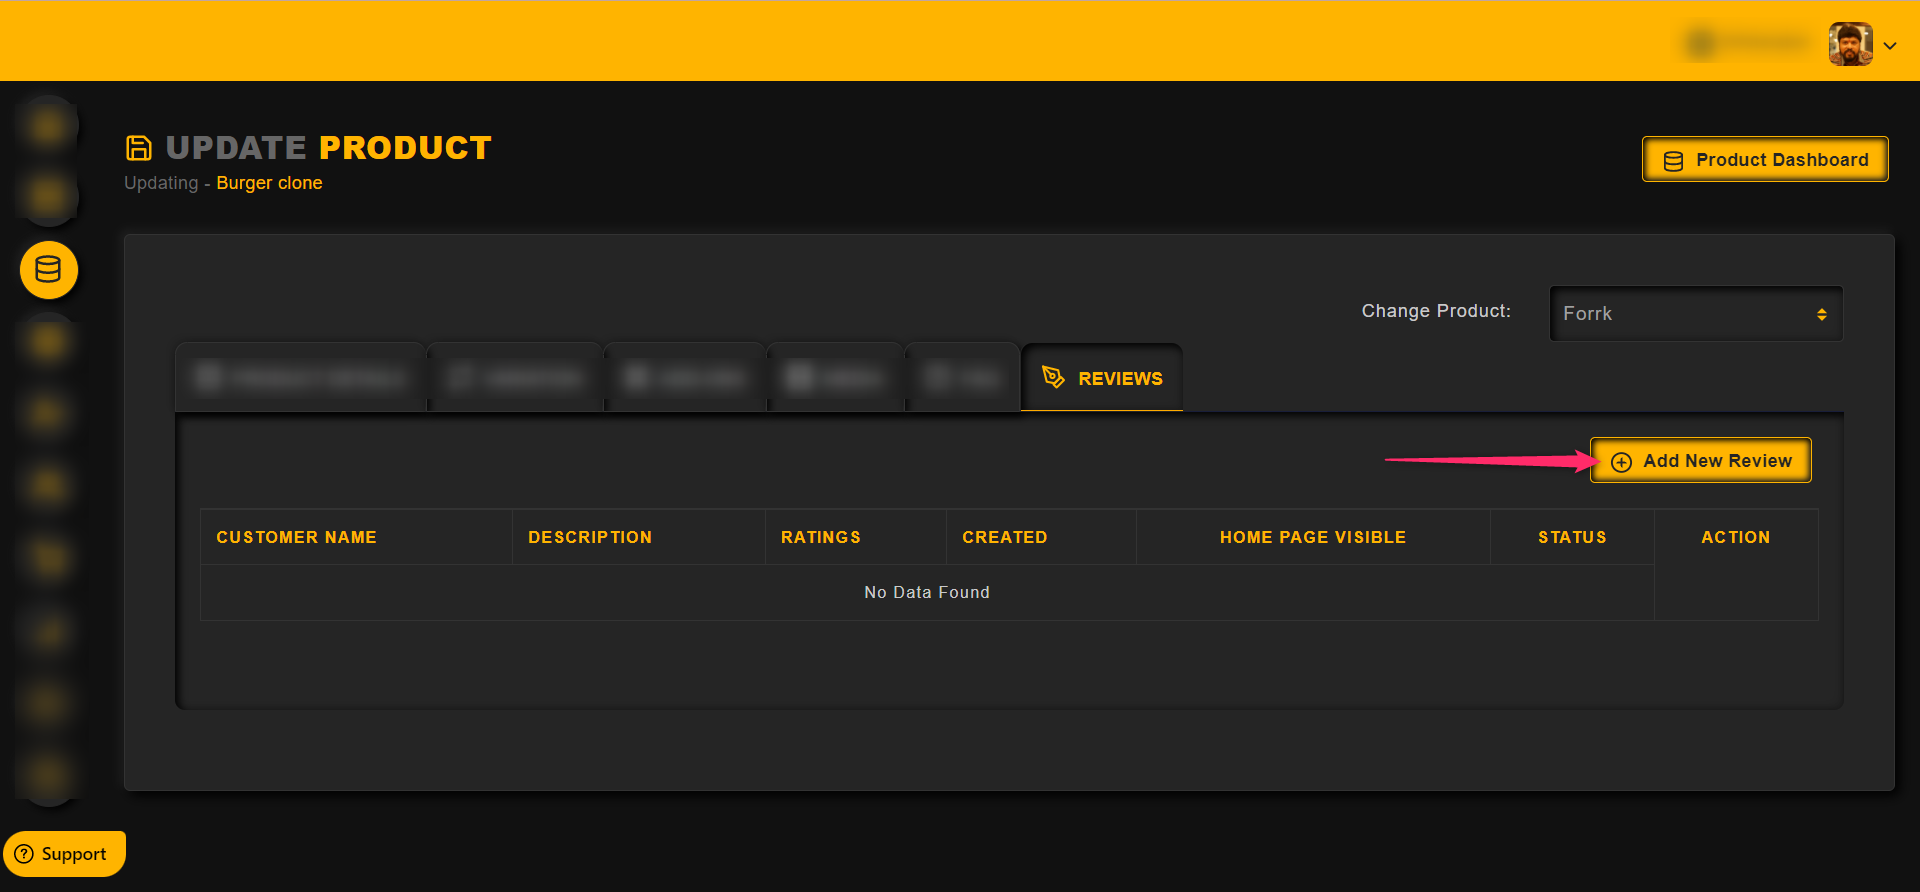
How to Add New Review
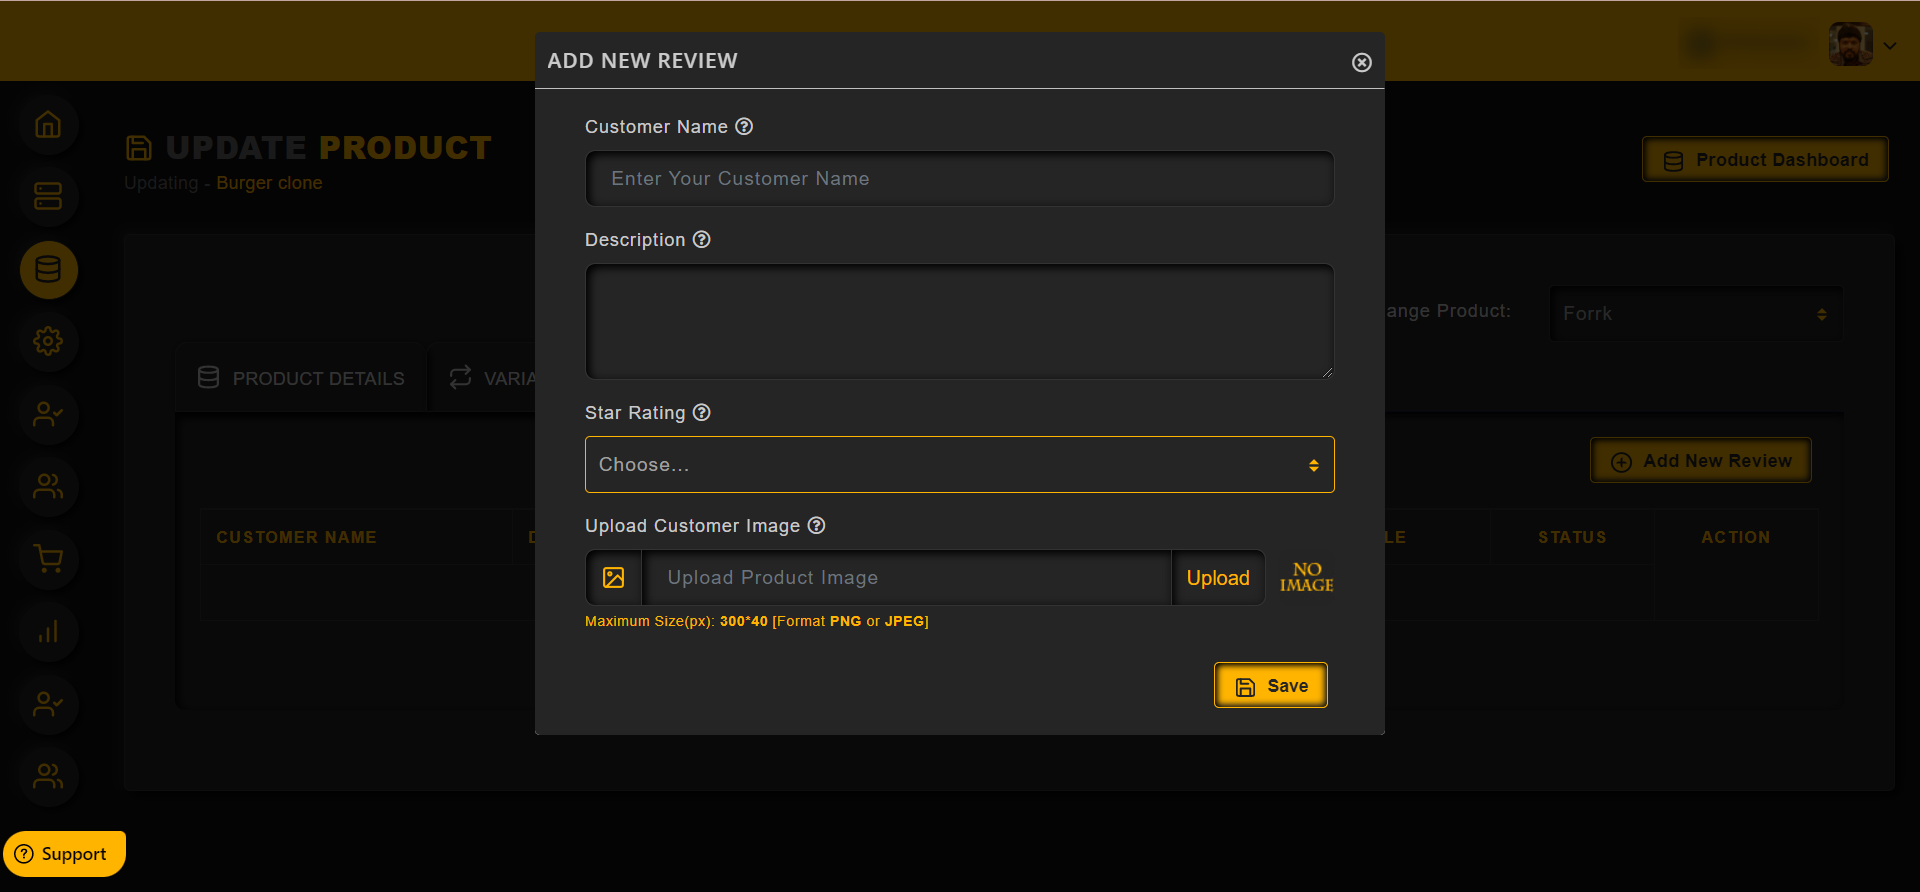
To add a new review, click on the Add New Review button as sown in the image below,
– Enter the customer name
– Enter teh description in the second text field
– Choose a star rating from the drop down
– Upload customer image using the upload option
– Click on the Save button once you are done with the process
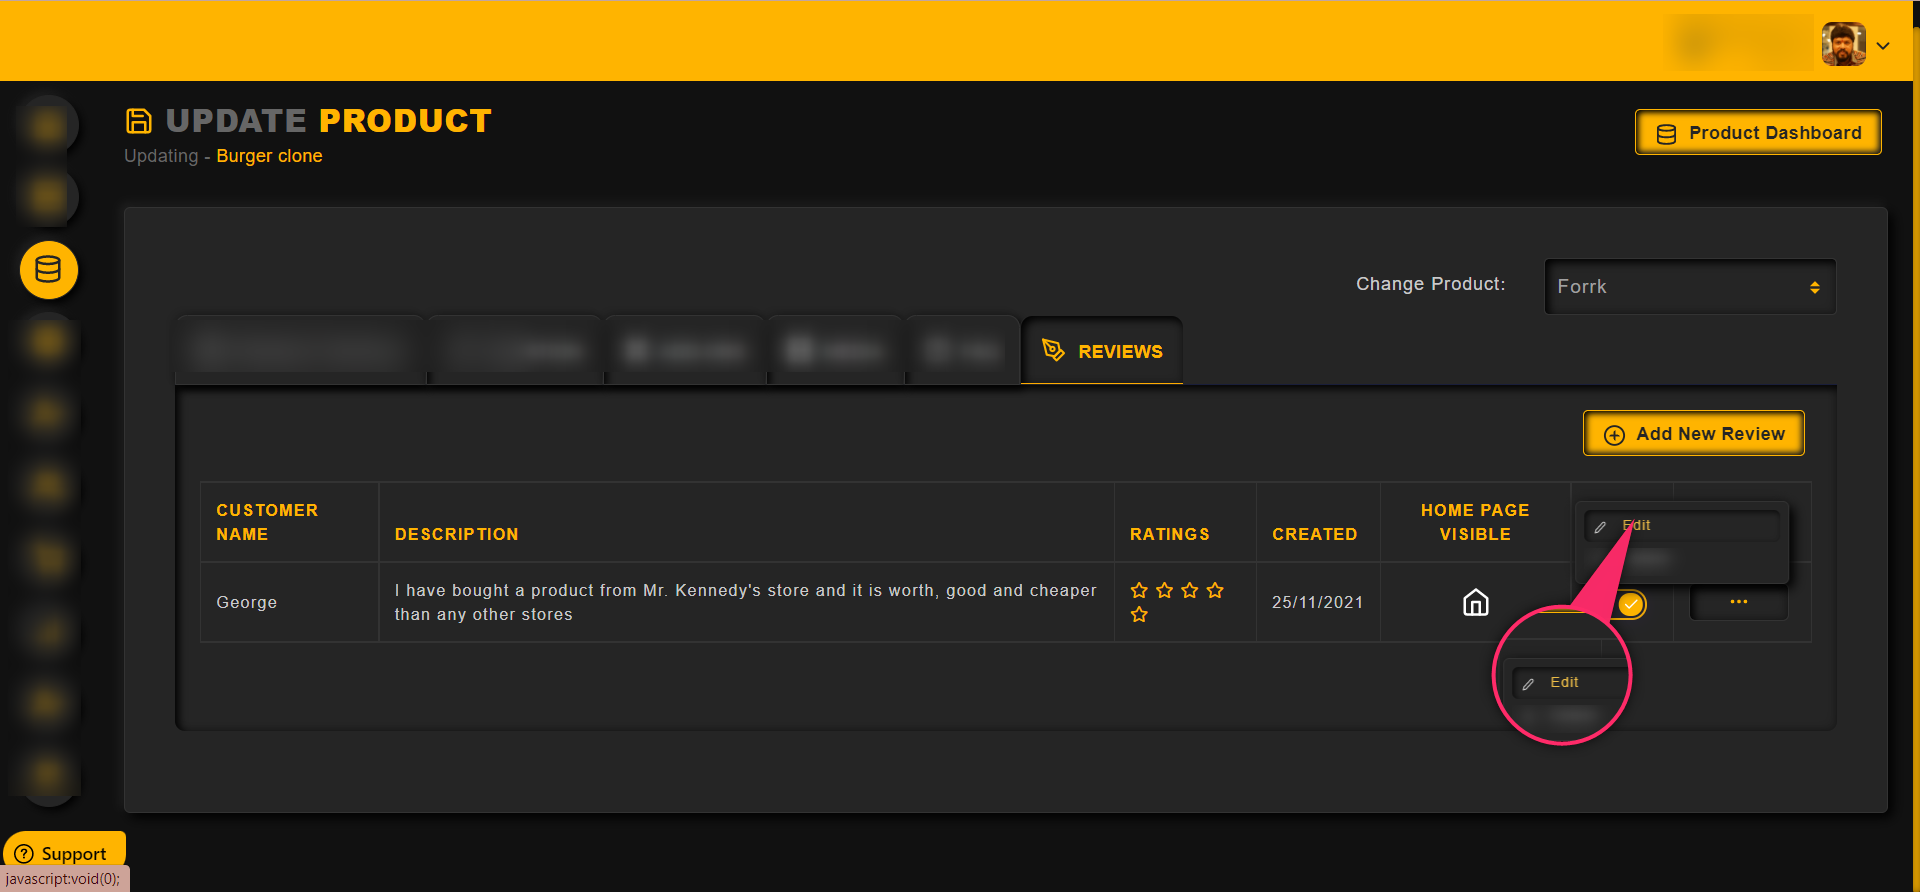
How to Edit Review
To edit a review,
Click on the Action menu as shown in the image below,
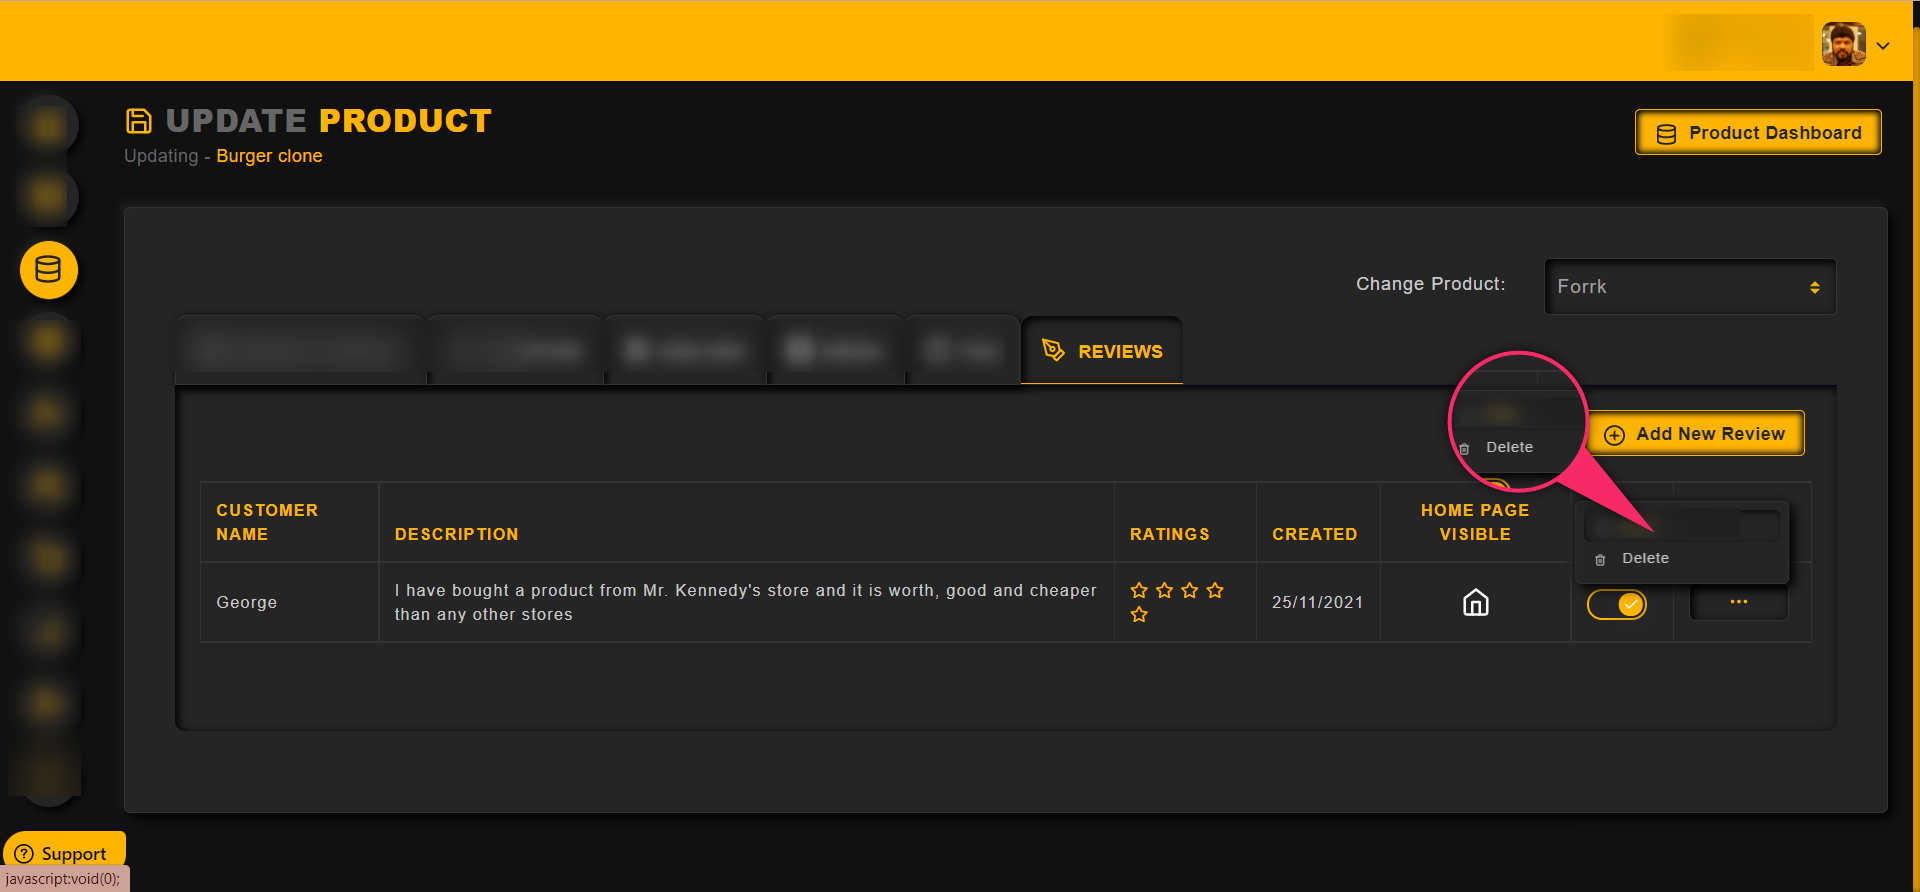
How to Delete a Review
To delete a review,
Click on the Action menu as shown in the image below,

Then click on the Delete option to delete the review from the list
How to Enable/Disable Status
One can enable/disable a review using the toggle as shown in the image below

How to make a Review Visible
One can make a review visible using the visibility option as shown in the image below
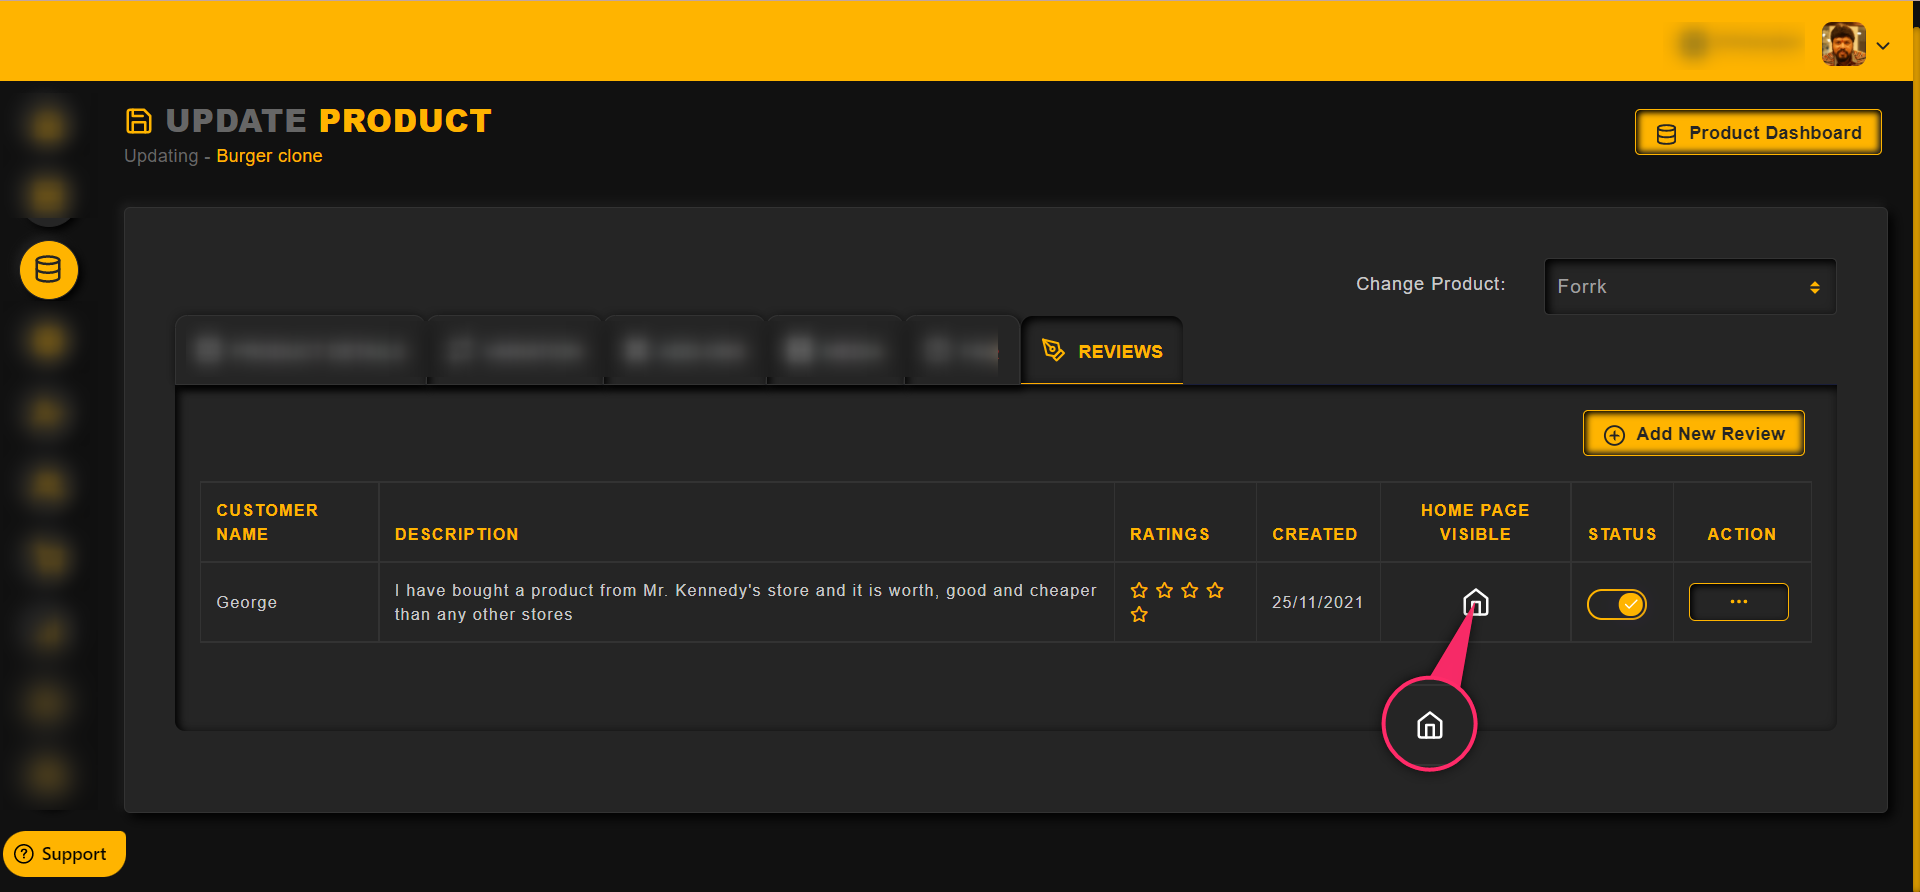
If this option is enabled, then the review will be displayed in the store page
If this option is disabled, then the review will not be displayed in the store page
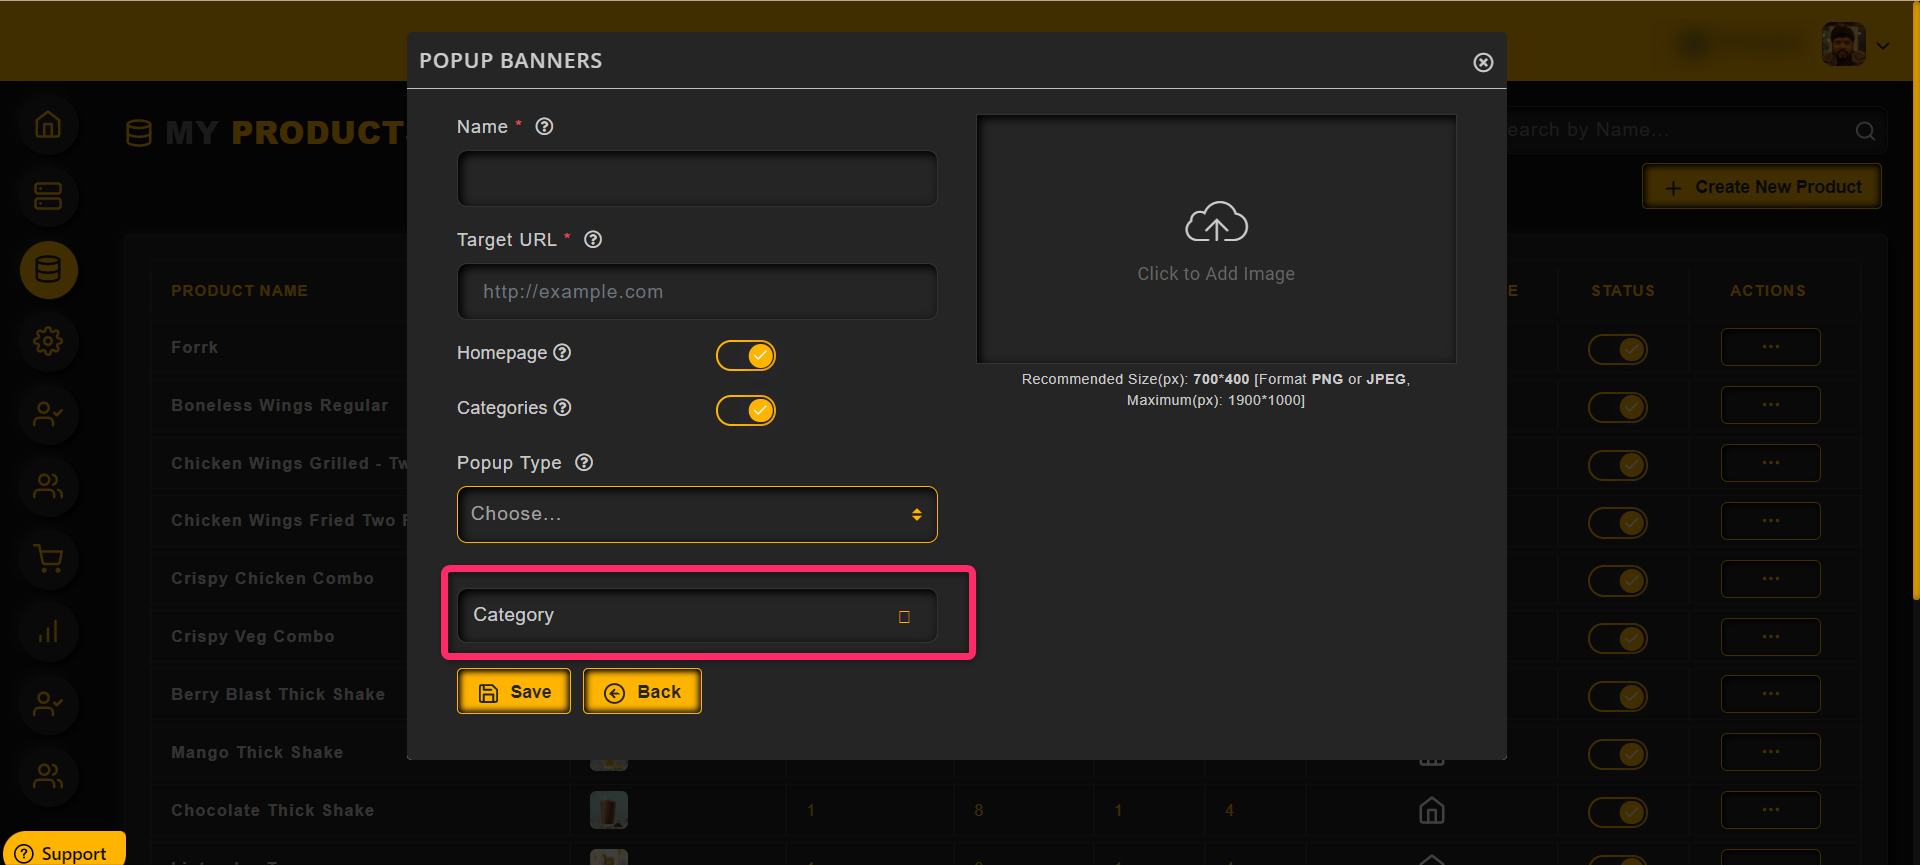
To add a new pop up banner to the home page and the category page,
Clikc on the Settings and then the Popup Banners
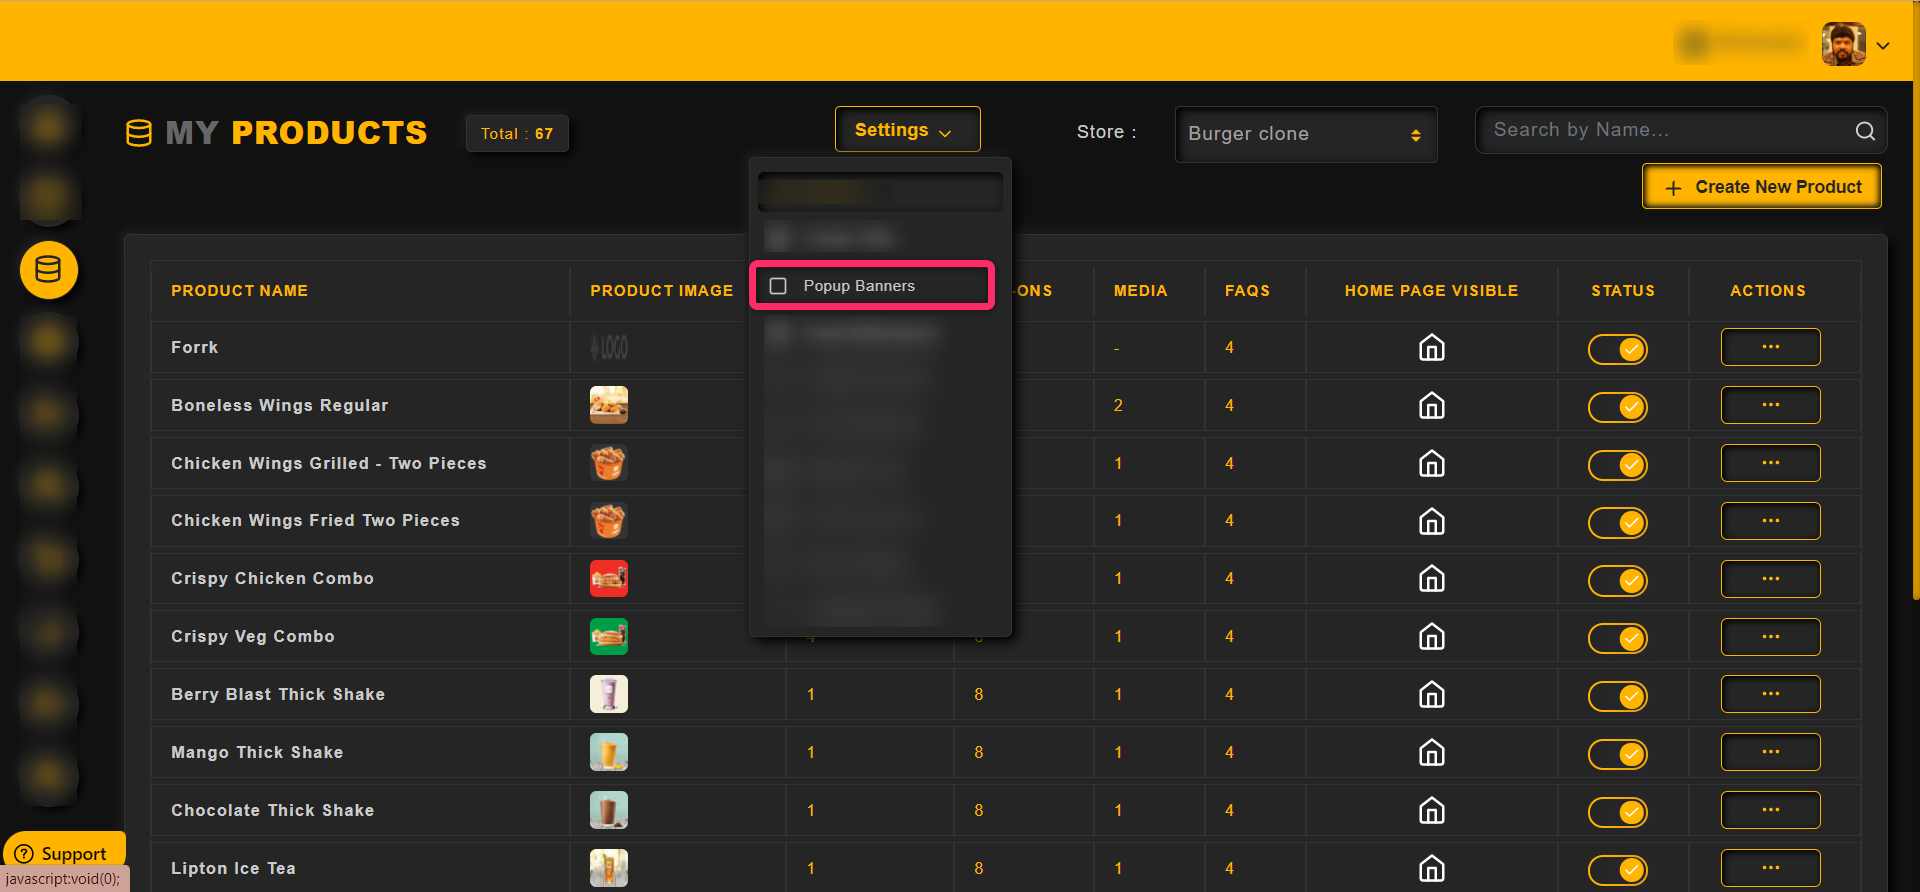
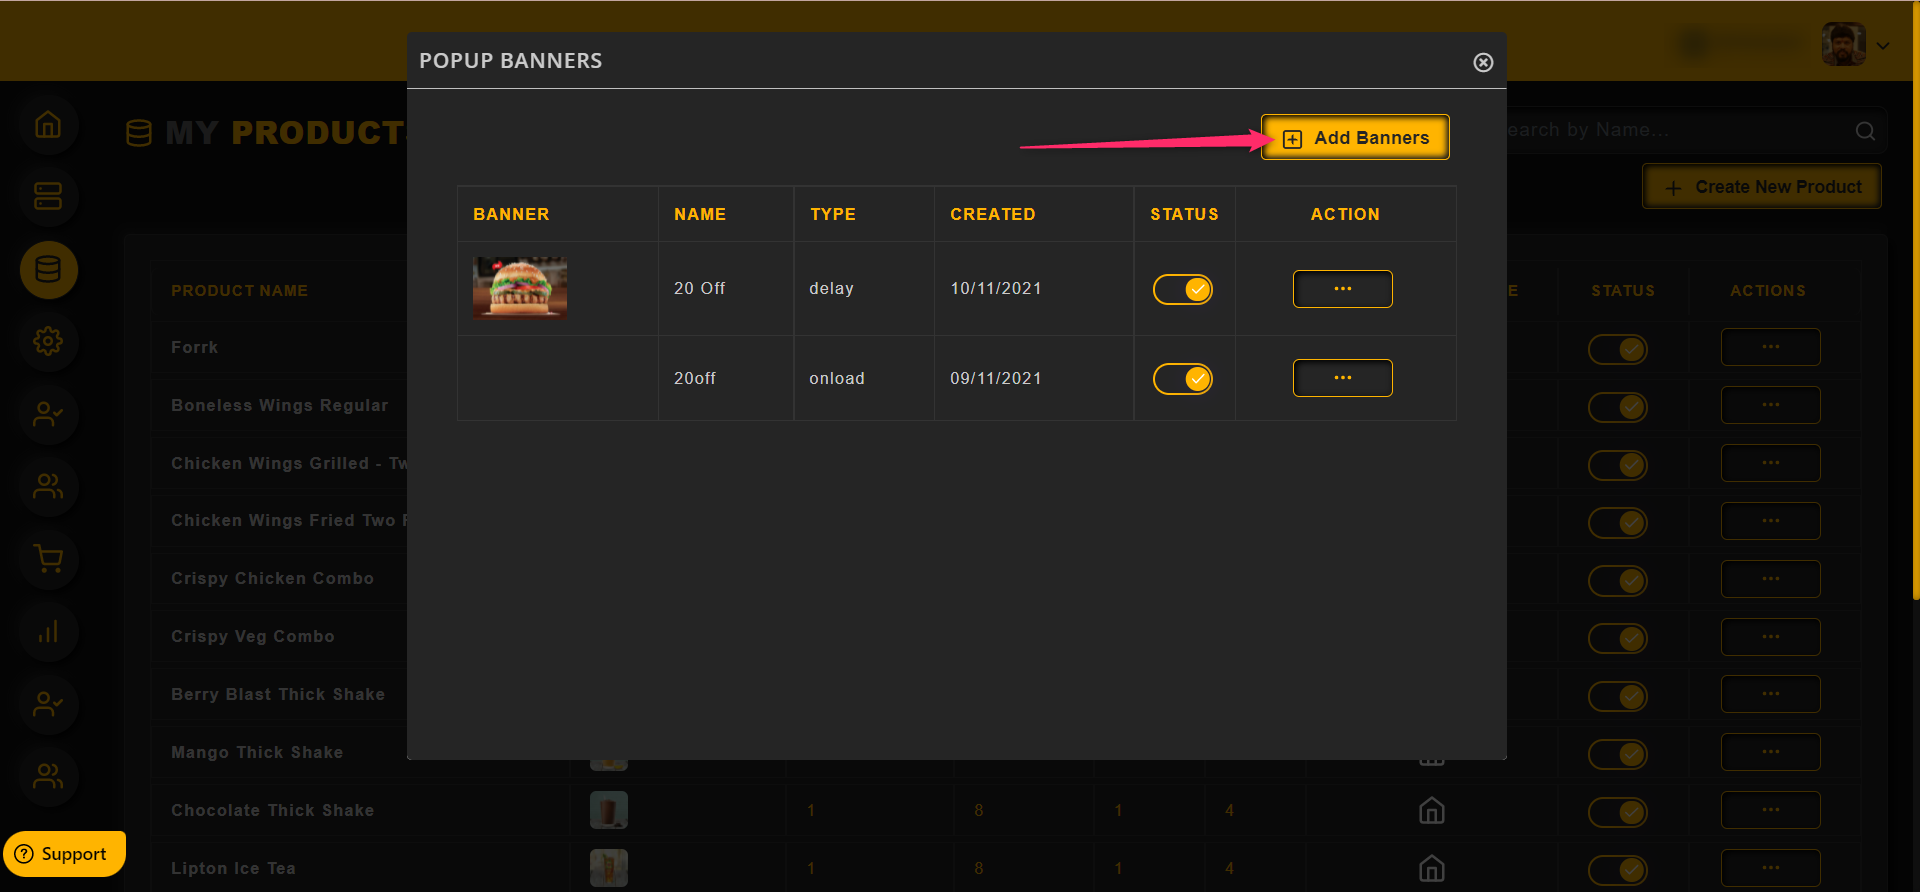
To add a new popup banner, click on the Add Banners button as shown in the image below
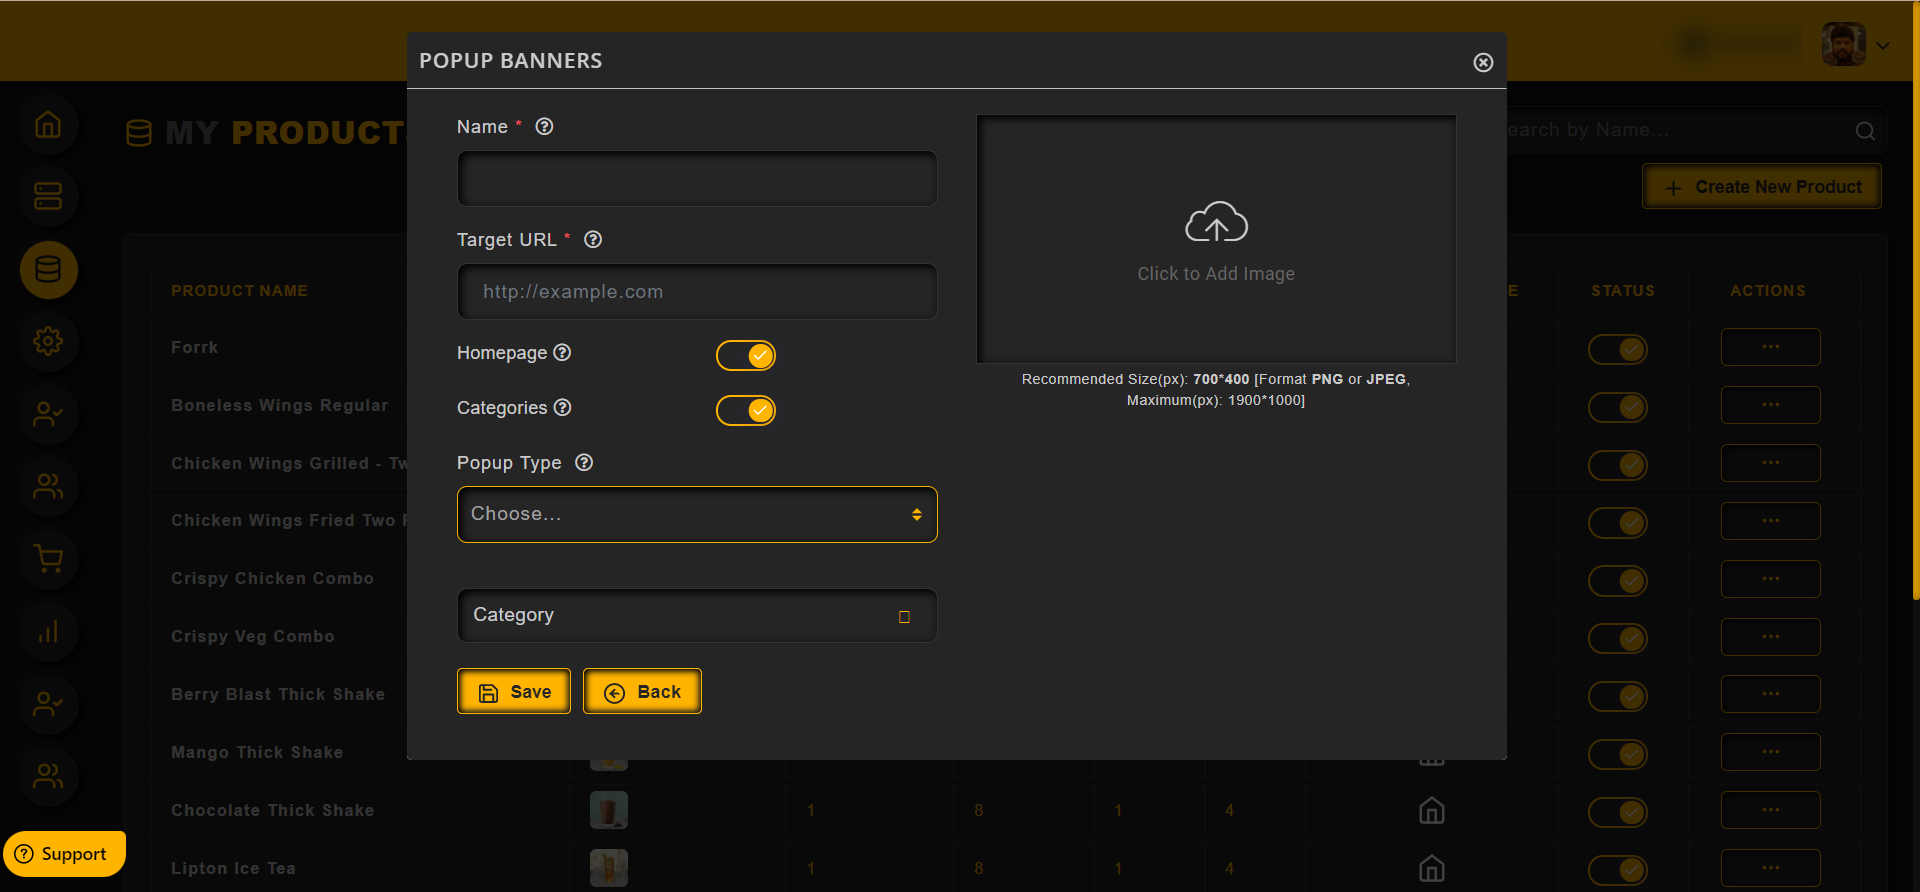
Enter the details in the text fields provided
– Enter the name of the banner
– Enter the target URL to which the user to be redirected when they click on the banner
– Enable or disable the banners from the home page and category page using the toggles
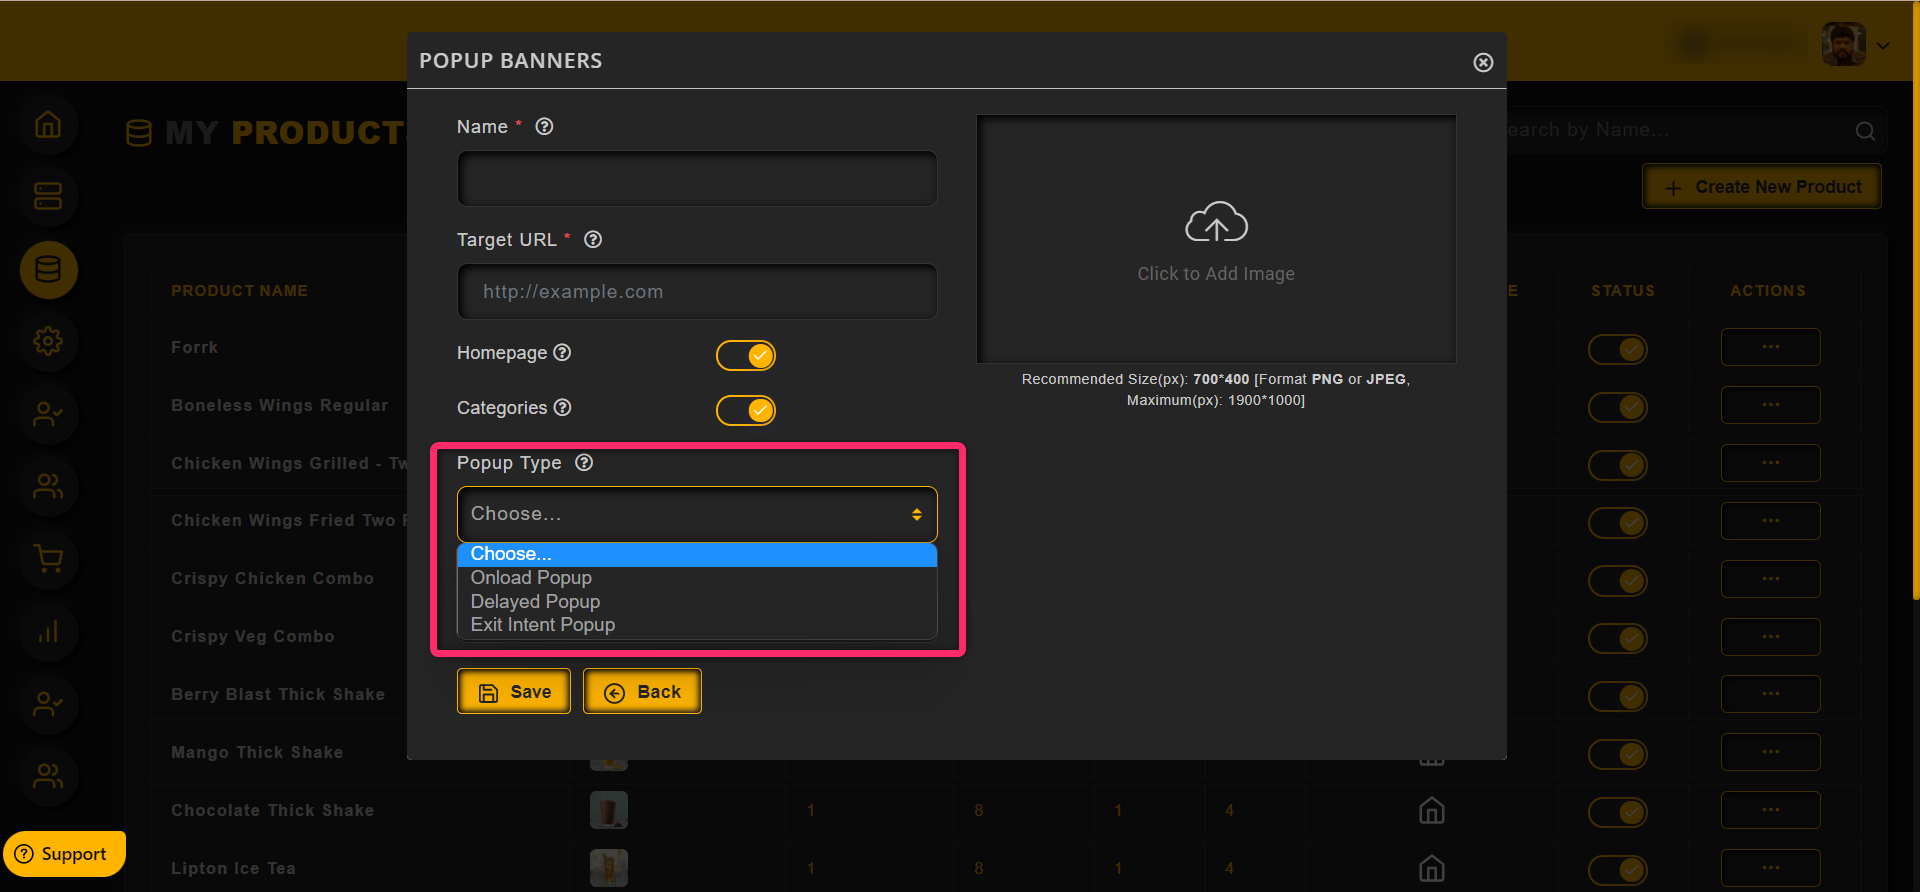
– Choose the popup type from the drop down
Onload popup – This will be displayed once the user land in the webpage
Delayed popup – One can display the popup with a little delay after the user landed in the webpage
Exit intent – This will be displayed once the user is heading to close the webpage
– Choose the categories from the list in which the popup to be displayed
One can enable/disable a banner using the toggle as shown in the image below
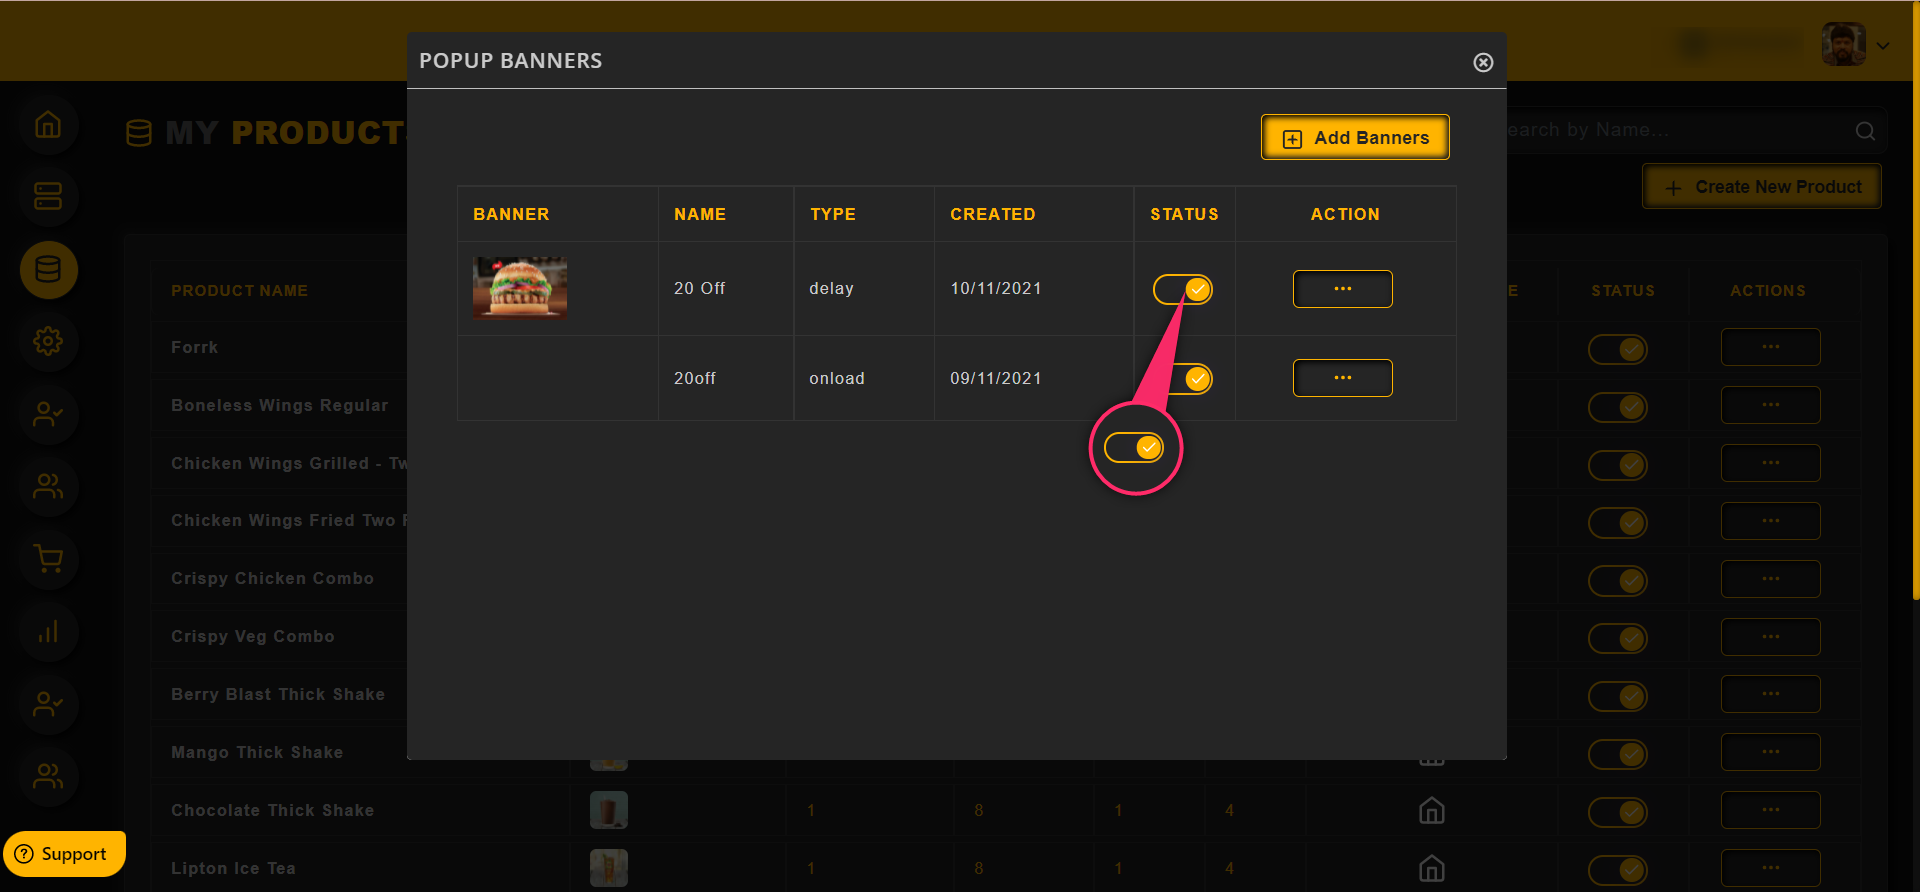
Using the action menu, one can edit and delete the created banners
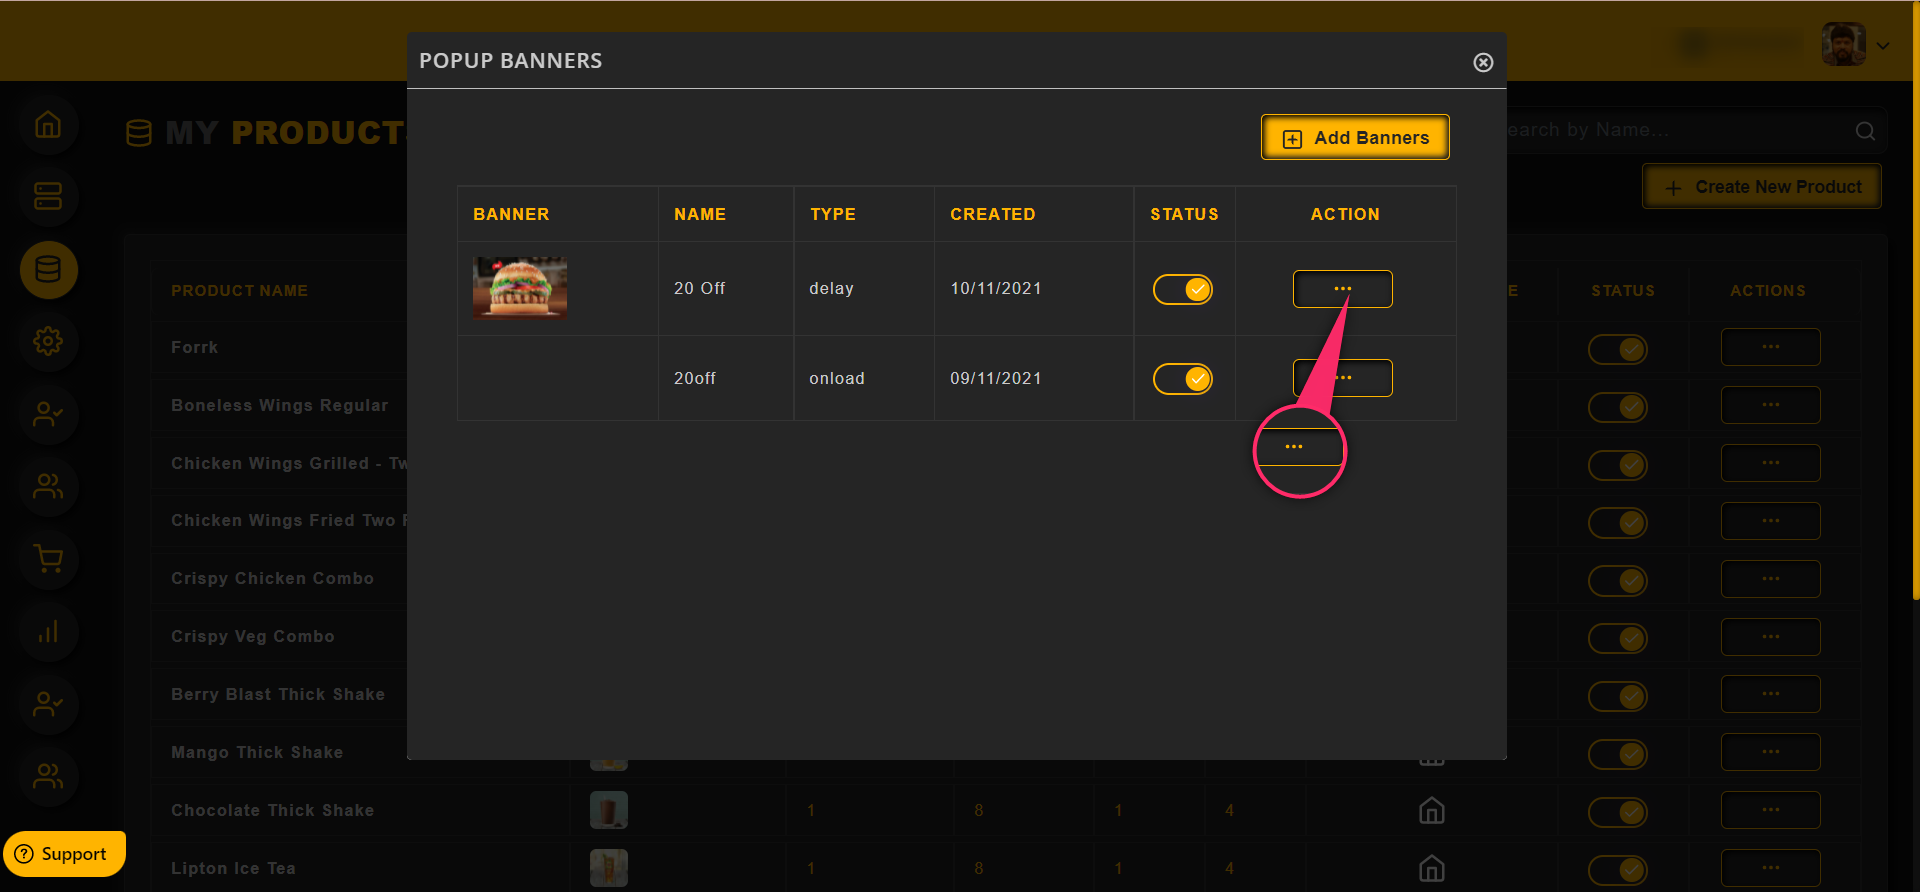
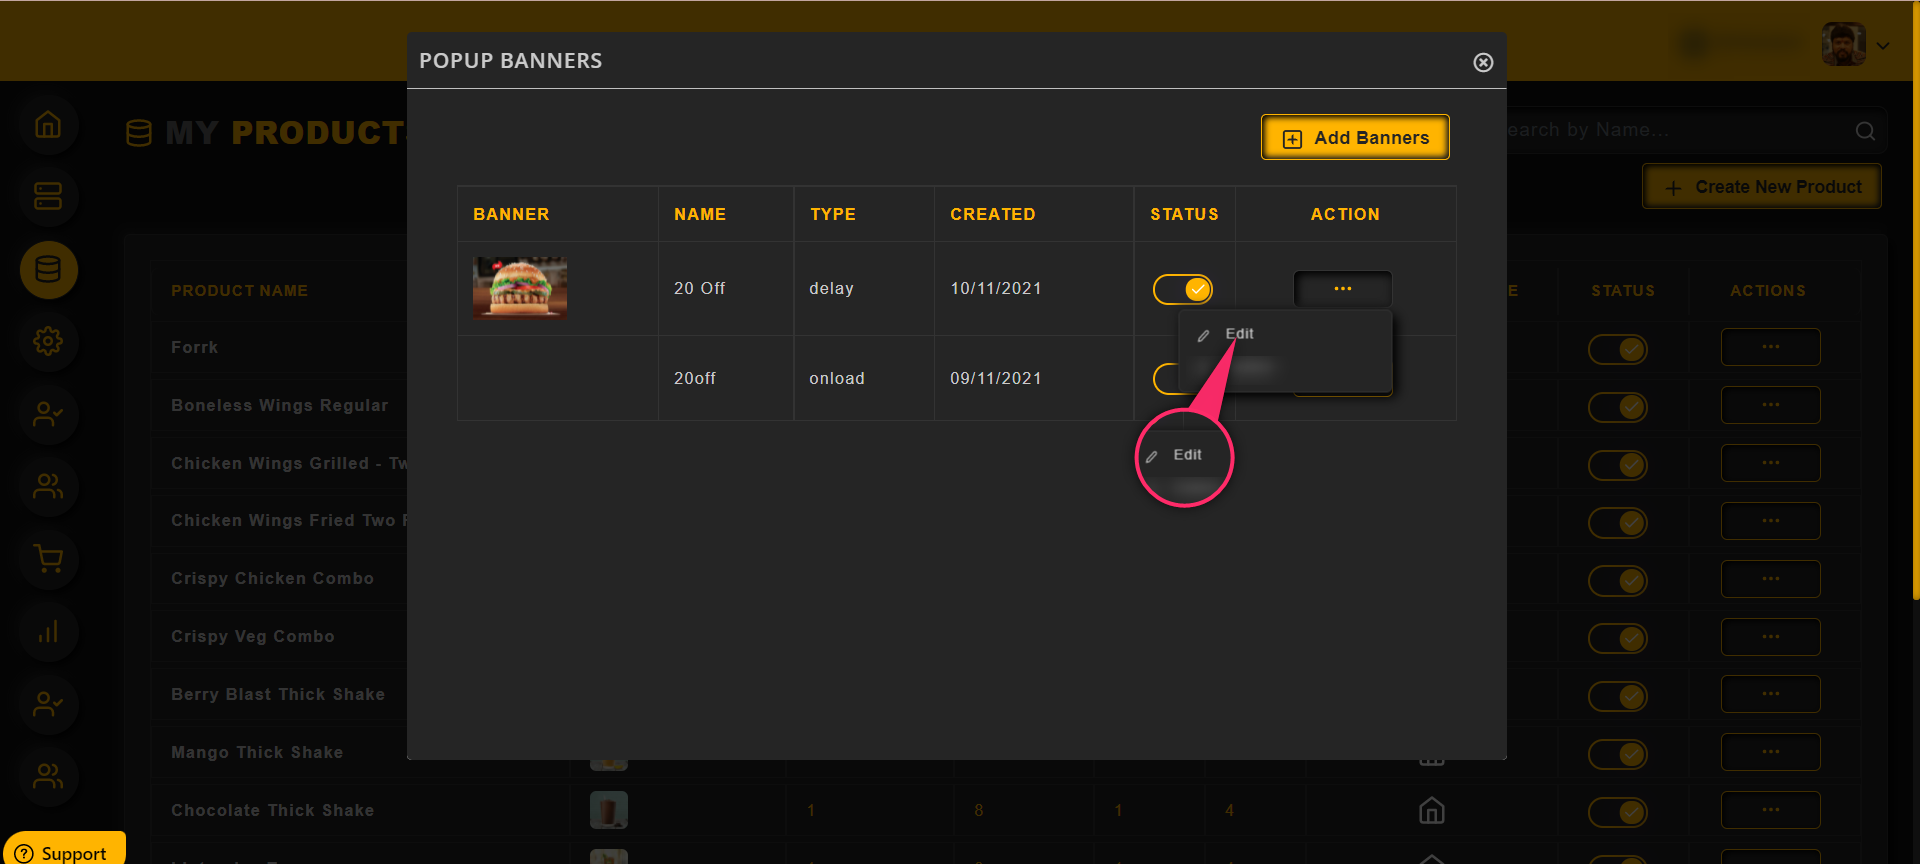
To edit a banner, click on the action menu and then the edit option as shown in the image below
To delete a banner, click on the action menu and then the delete option as shown in the image below

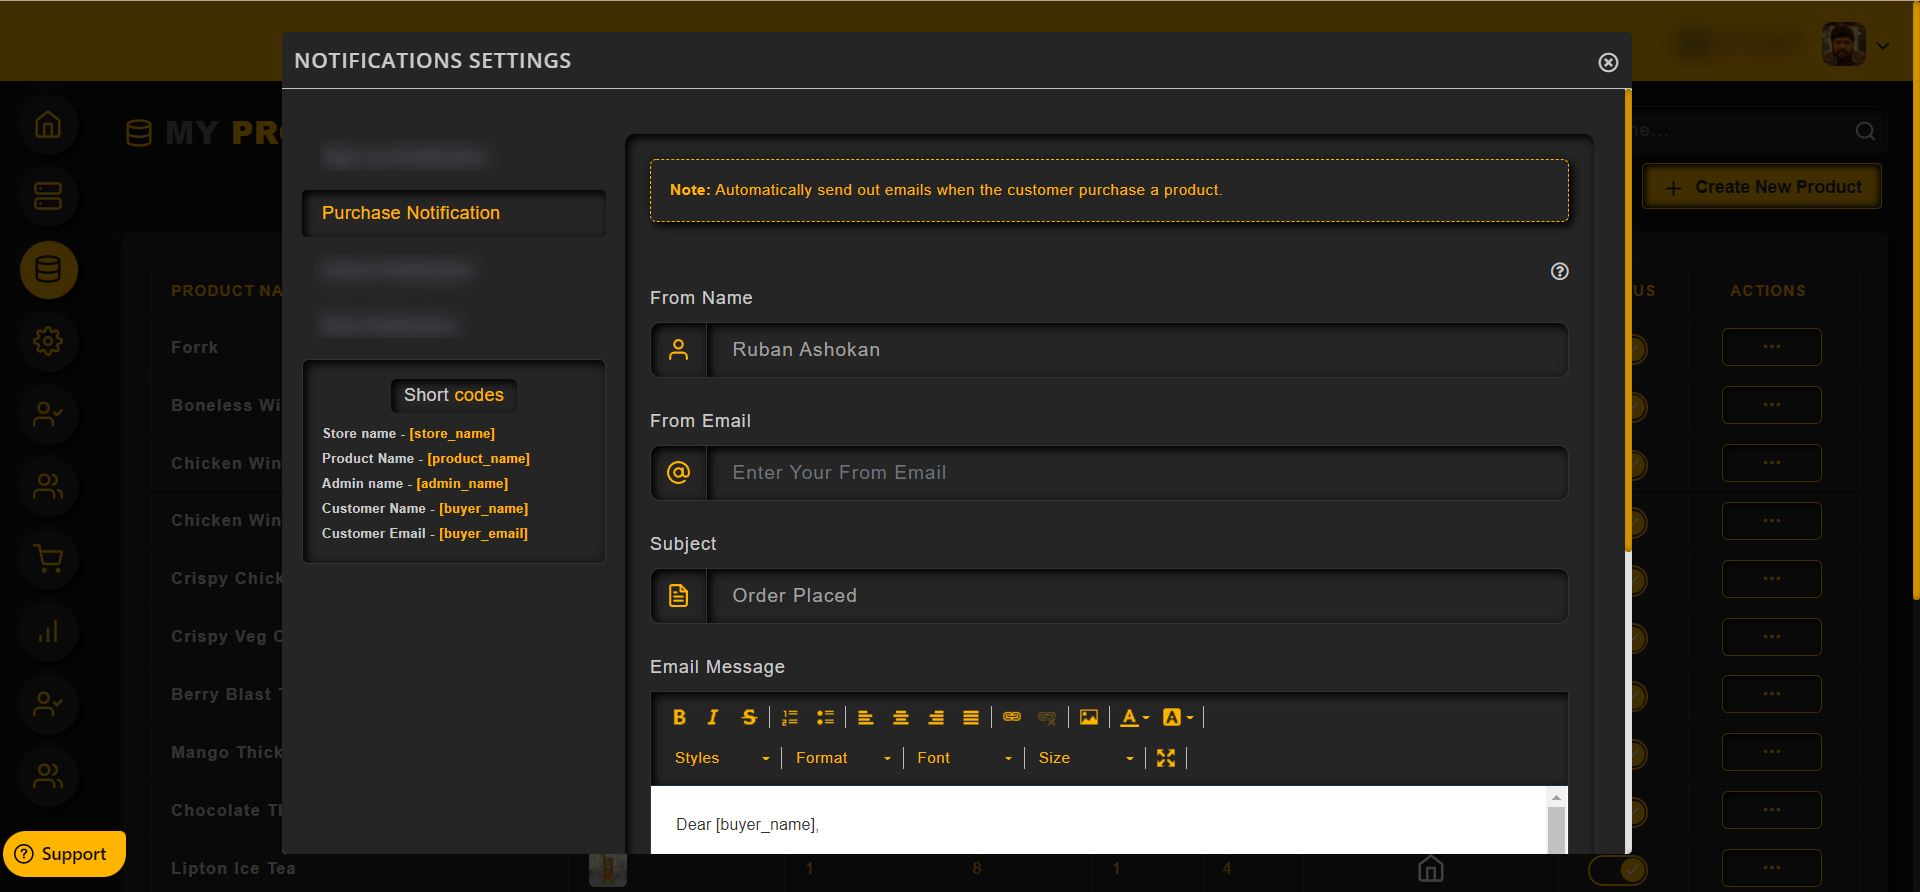
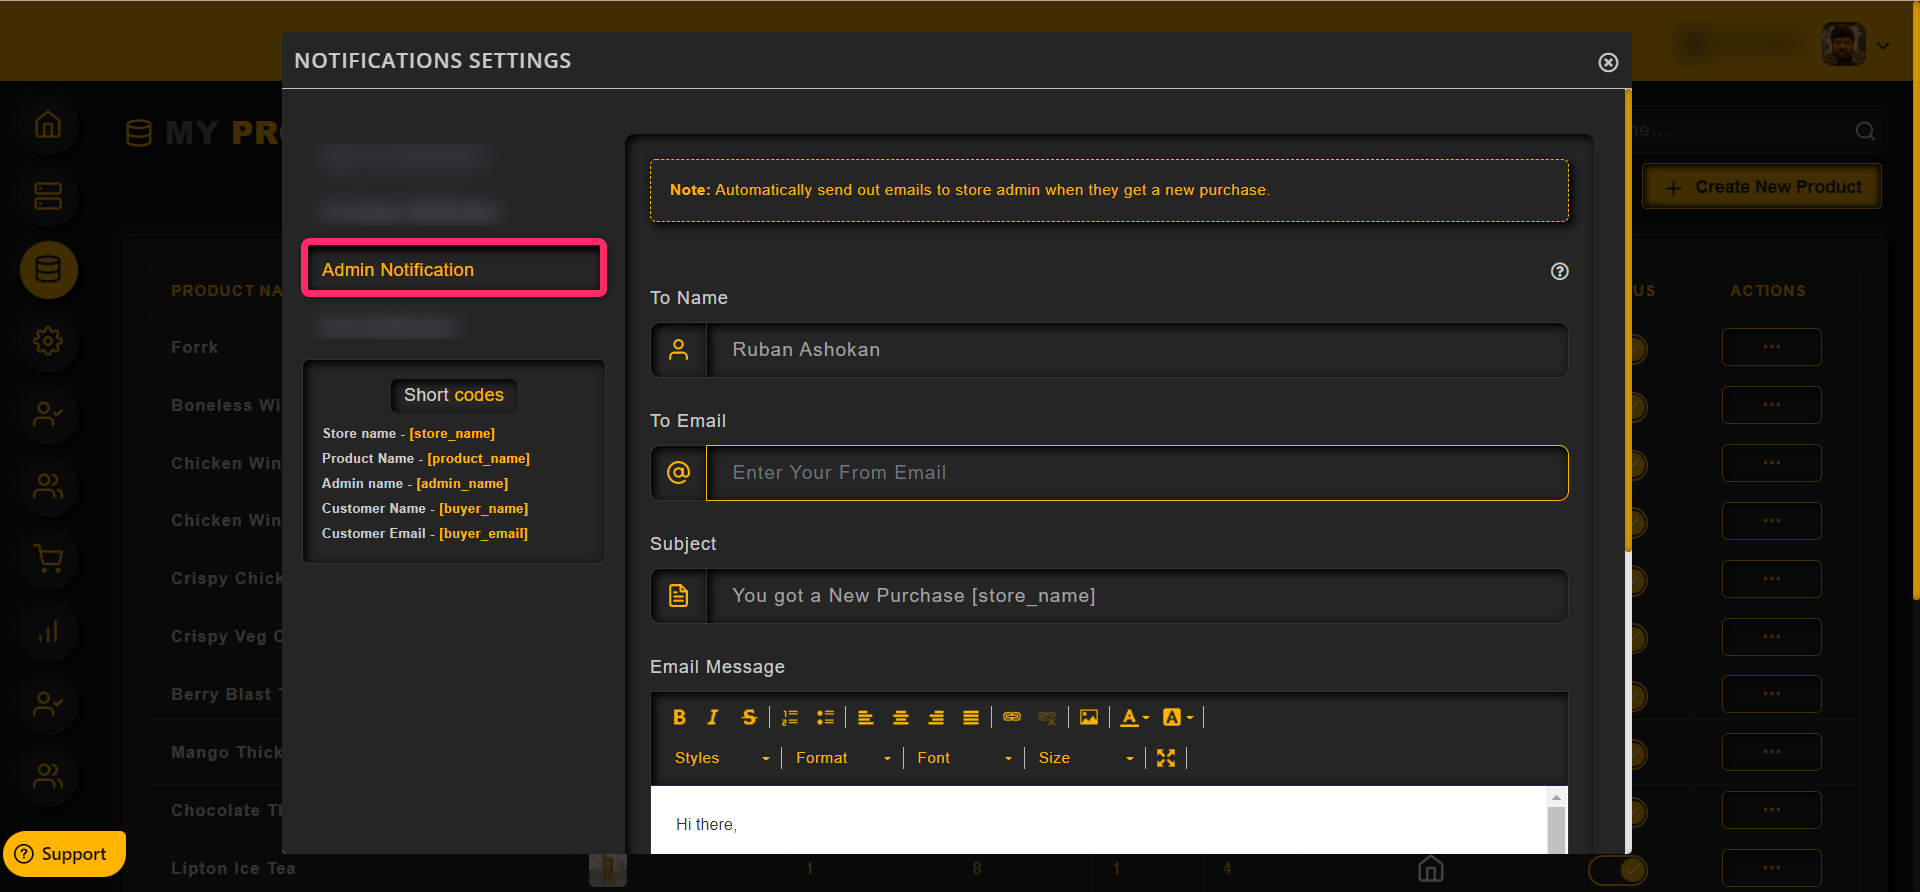
To configure the Email Notification, follow the steps below
STEP 1 : Click on the settings option
STEP 2 : Then click Email notifications.
Note: The SMTP needs to be configured to use the email notification feature.

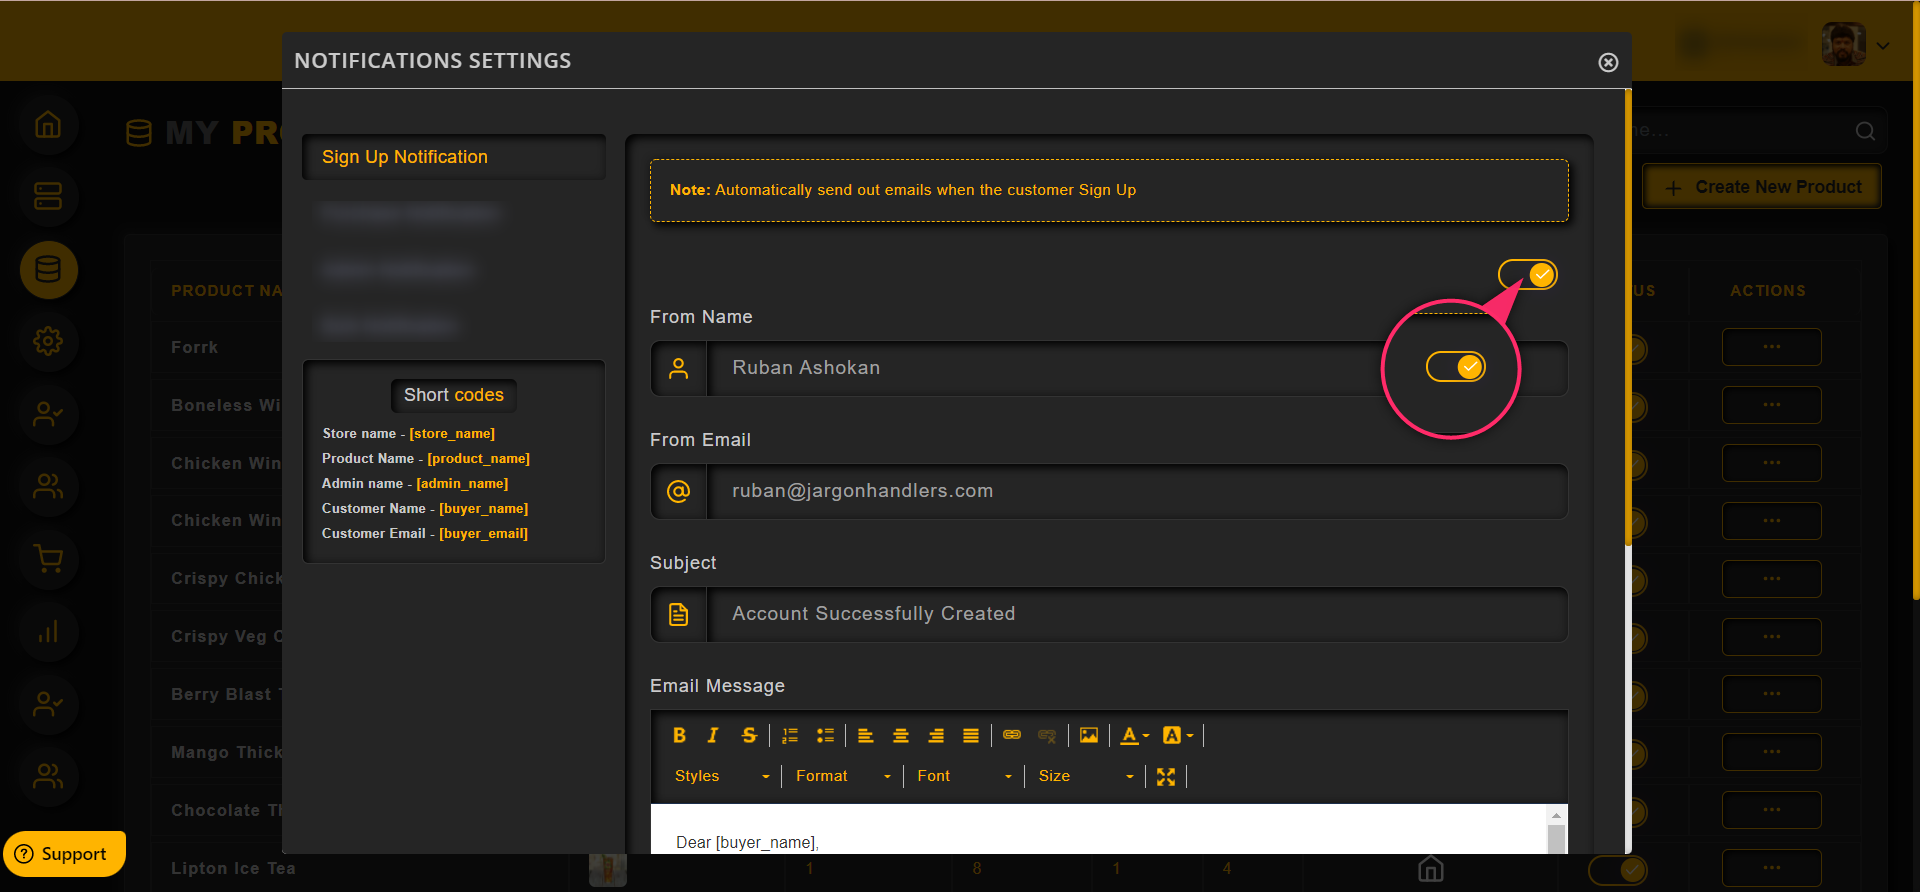
To configure the Sign up notification Email, then click on the Signup notification option as shown in the image below

To configure the purchase notification Email, then click on the Purchase notification option as shown in the image below
To configure the admin notification Email, then click on the Admin notification option as shown in the image below
To configure the bulk notification Email, then click on the Bulk notification option as shown in the image below

Once the mail content is saved, admin can see the toggle to enable/disable the notification
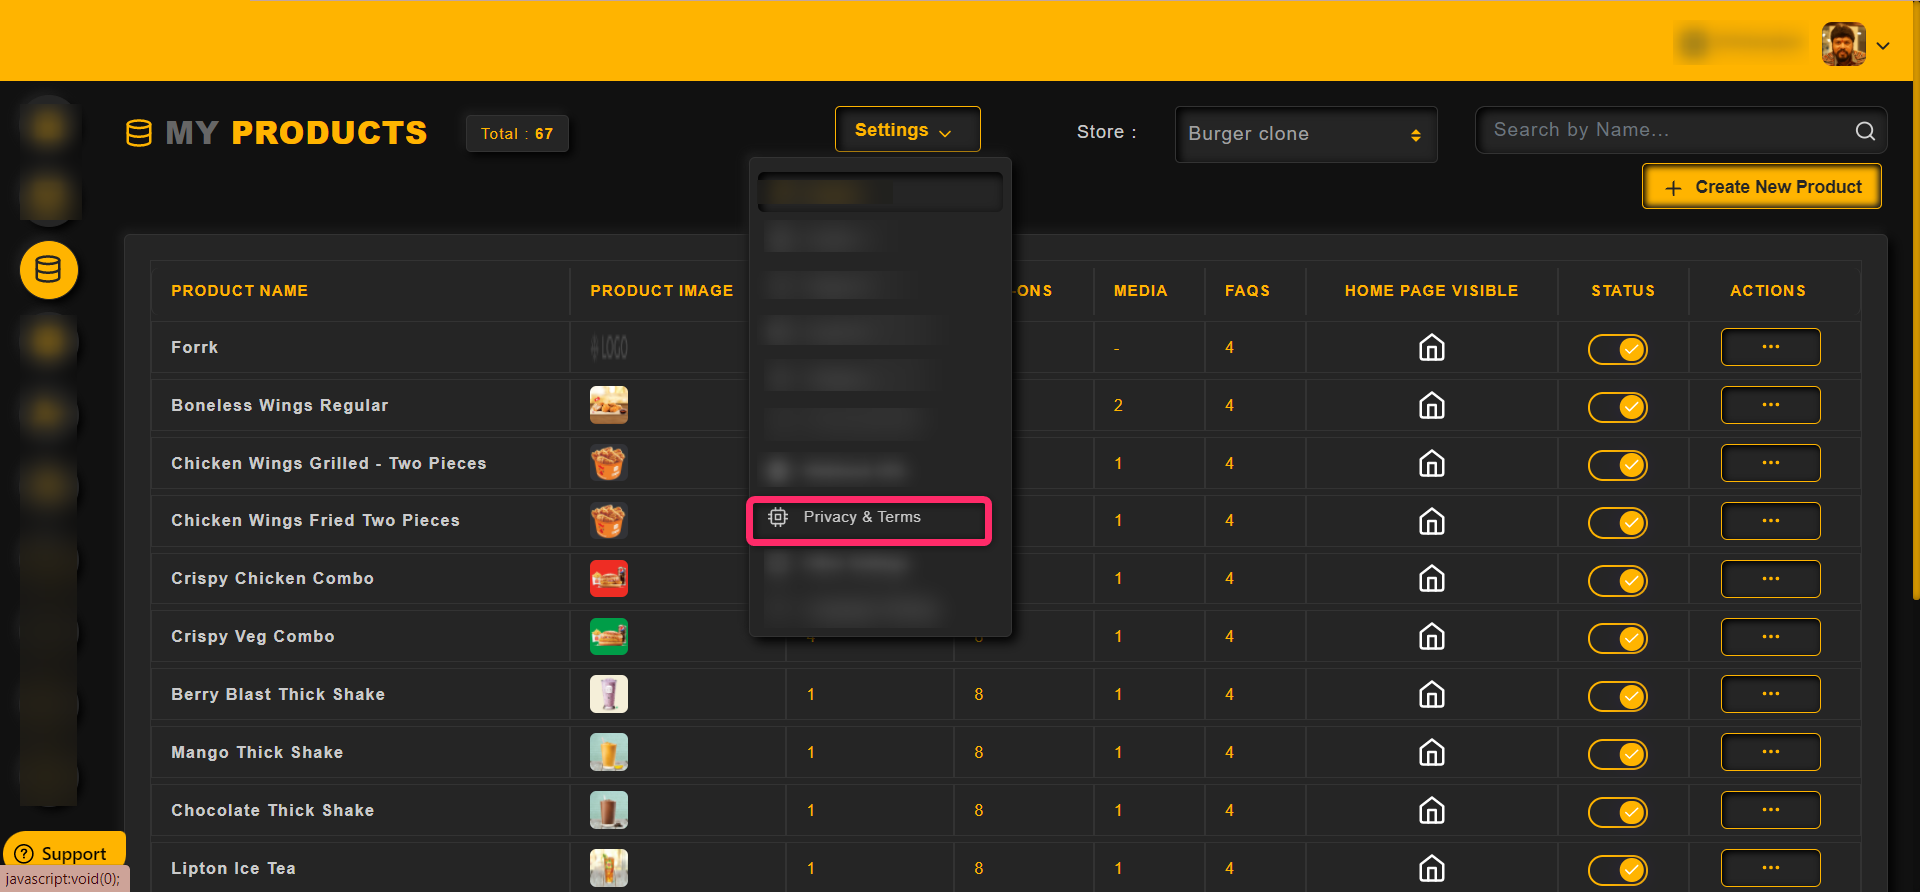
To add Terms and condition, Privacy policies to the product
1. Click on the Settings
2. Then click on the Privacy & Terms from the drop down, as shown in the image below,
To add a privacy policy, click on the Privacy Policy option
Enter the title and the content
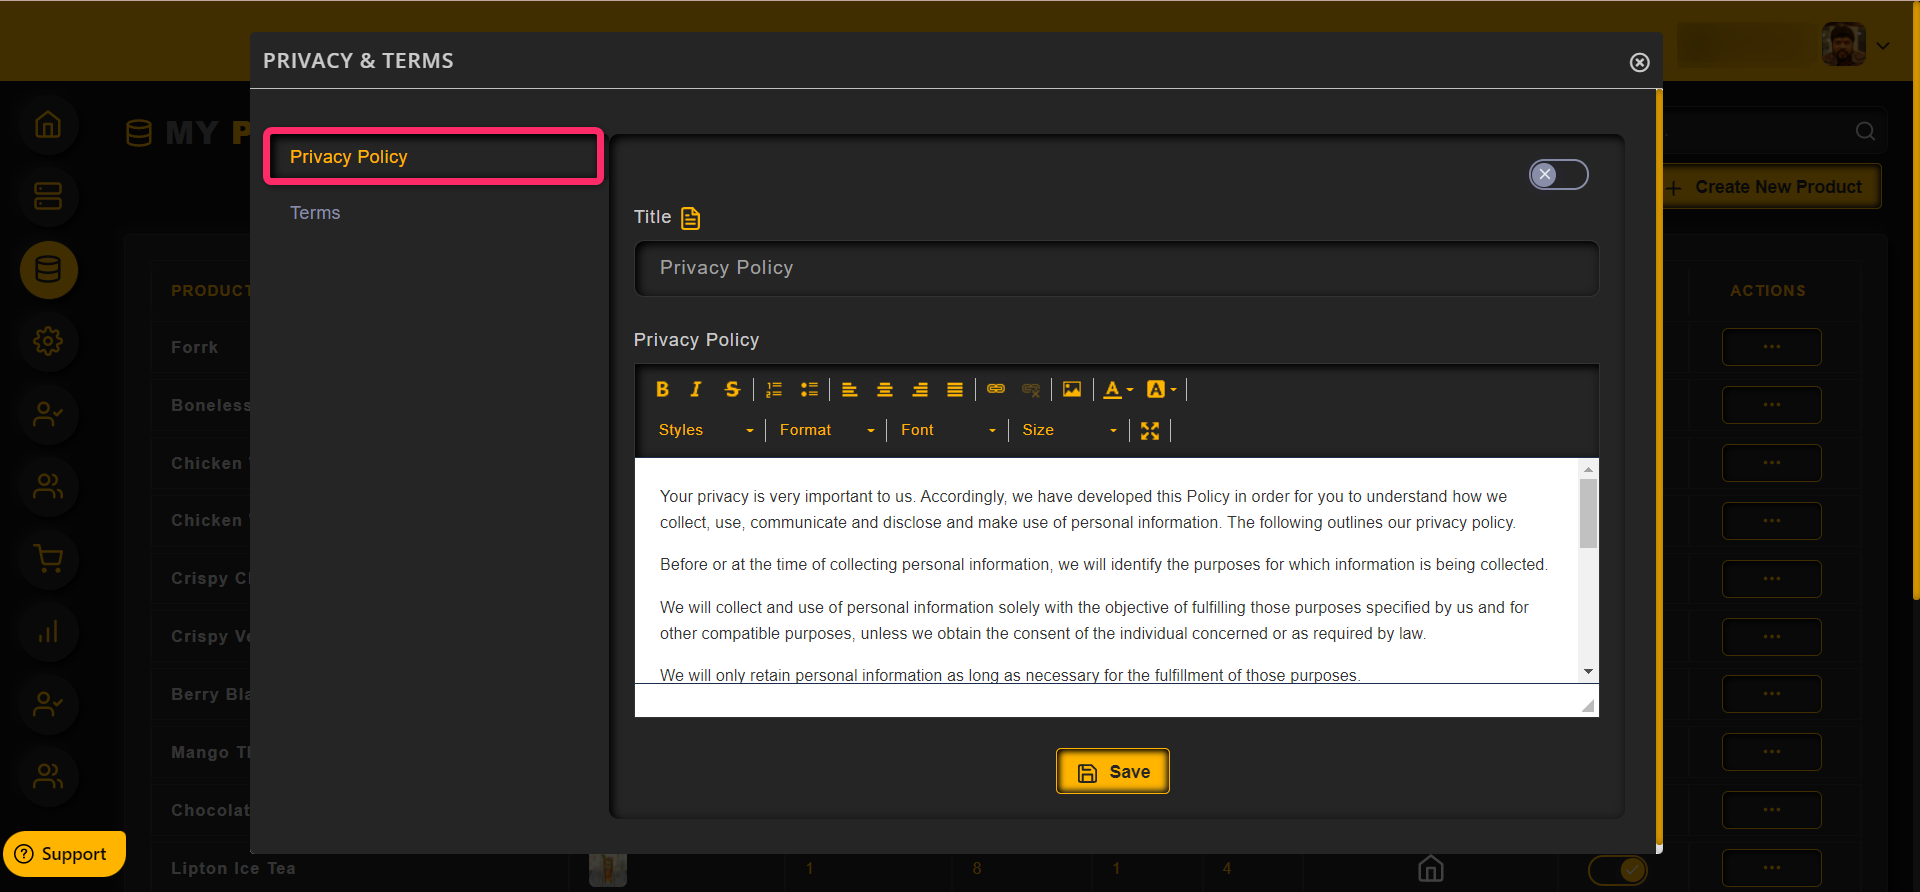
Click on the Save button once the content has been added

Admin can enable or disable the privacy policy using the toggle as shown in the image below

To add a terms, click on the Terms option
Enter the title and the content
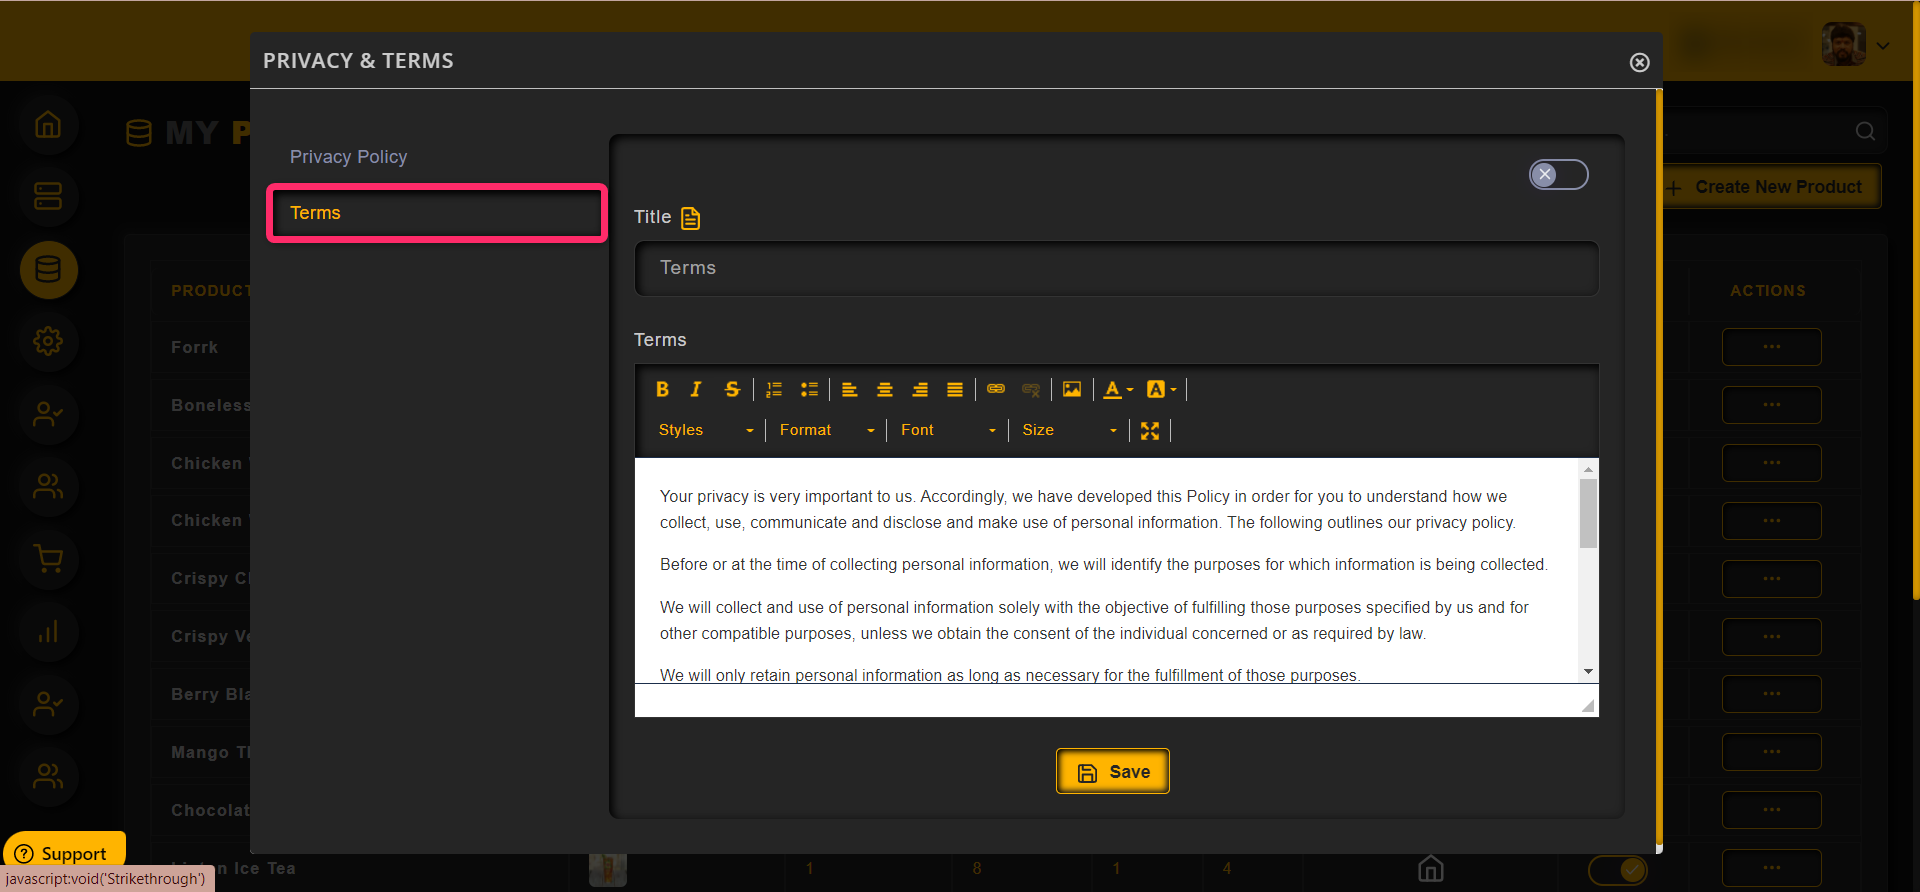
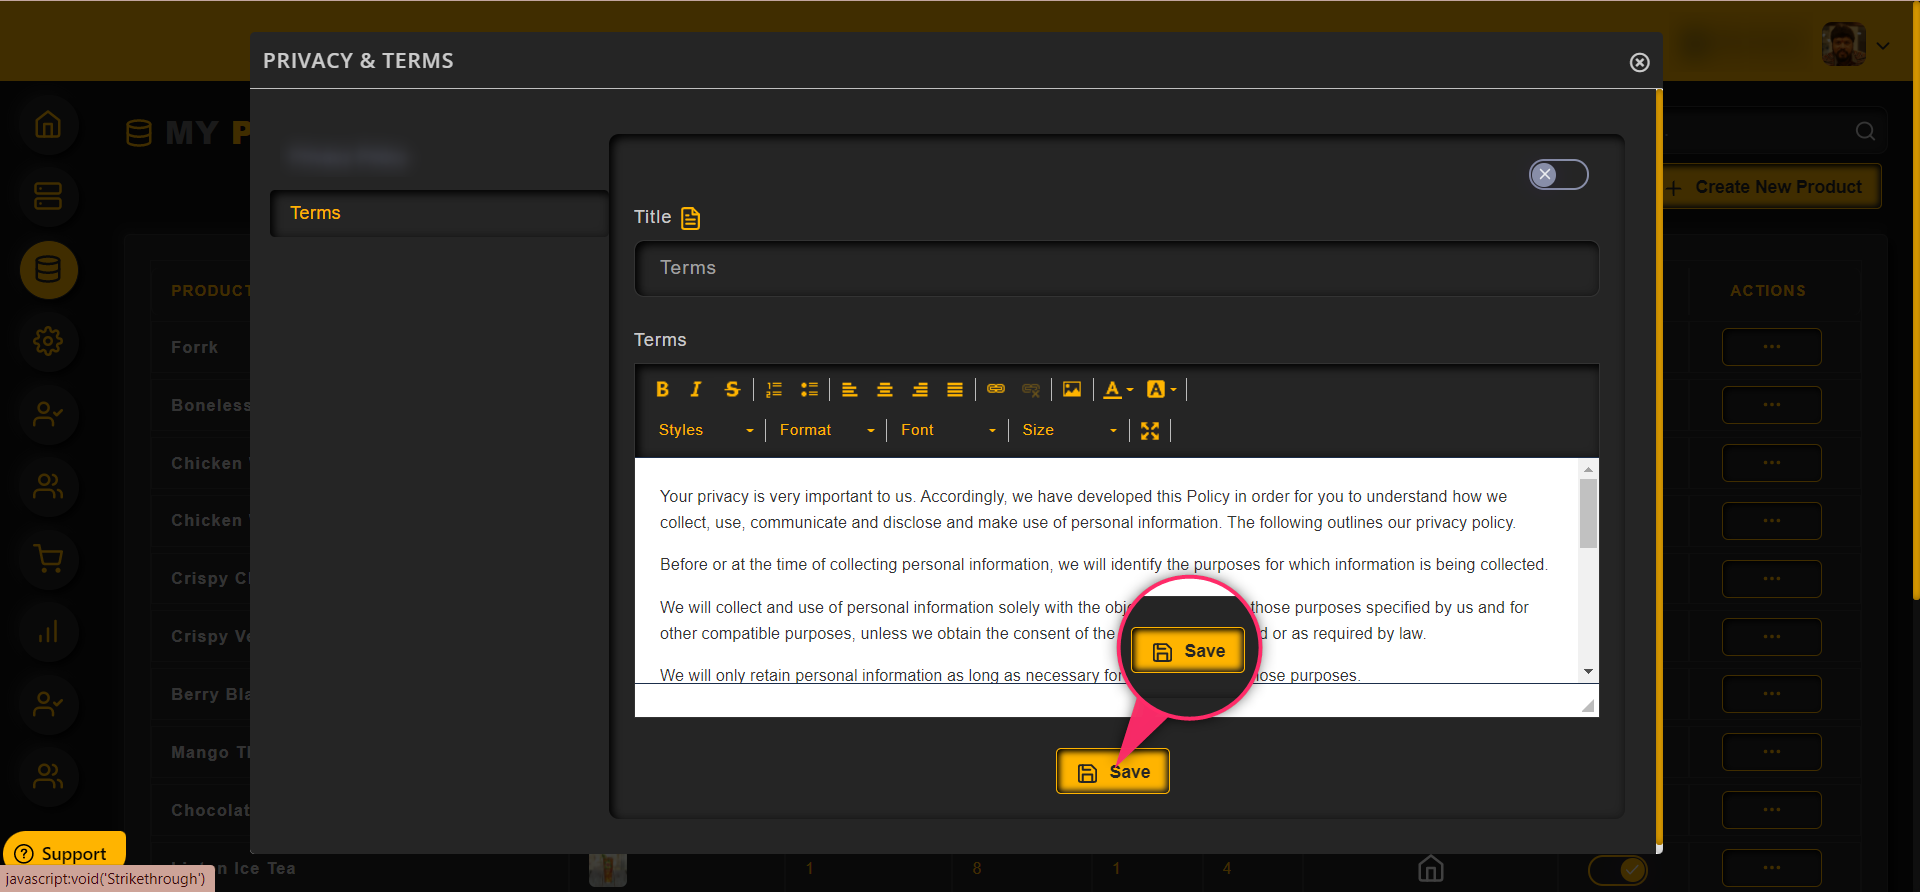
Click on the Save button once the content has been added
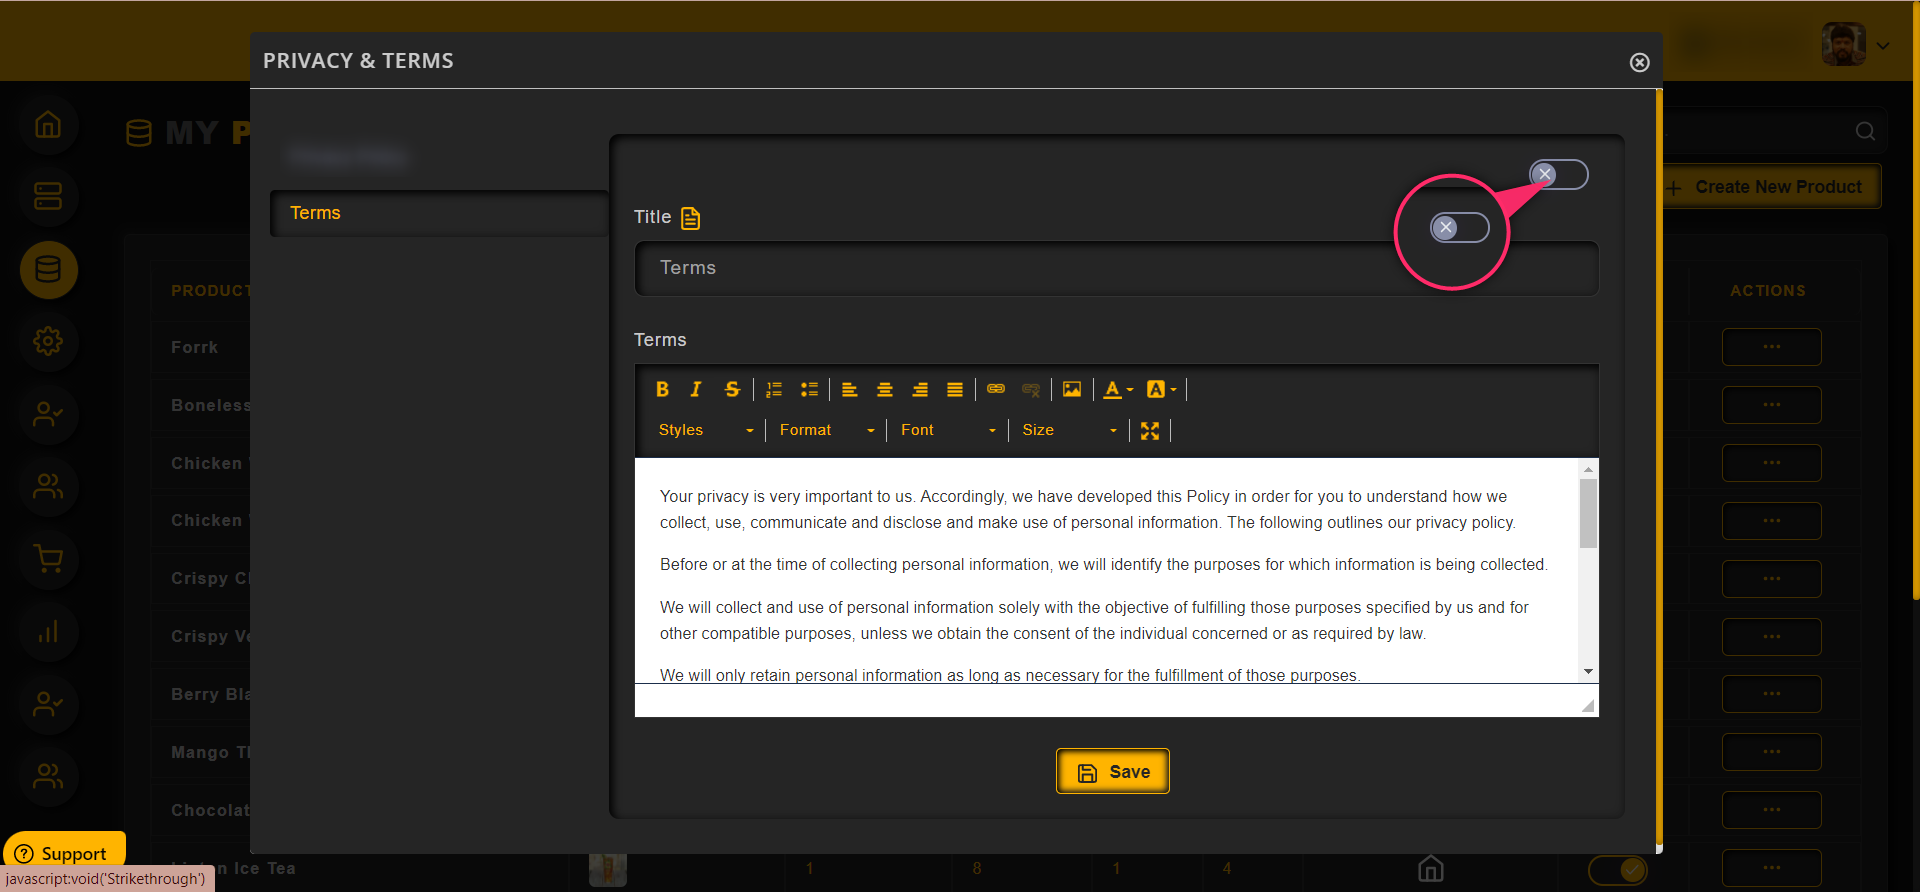
Admin can enable or disable the terms using the toggle as shown in the image below
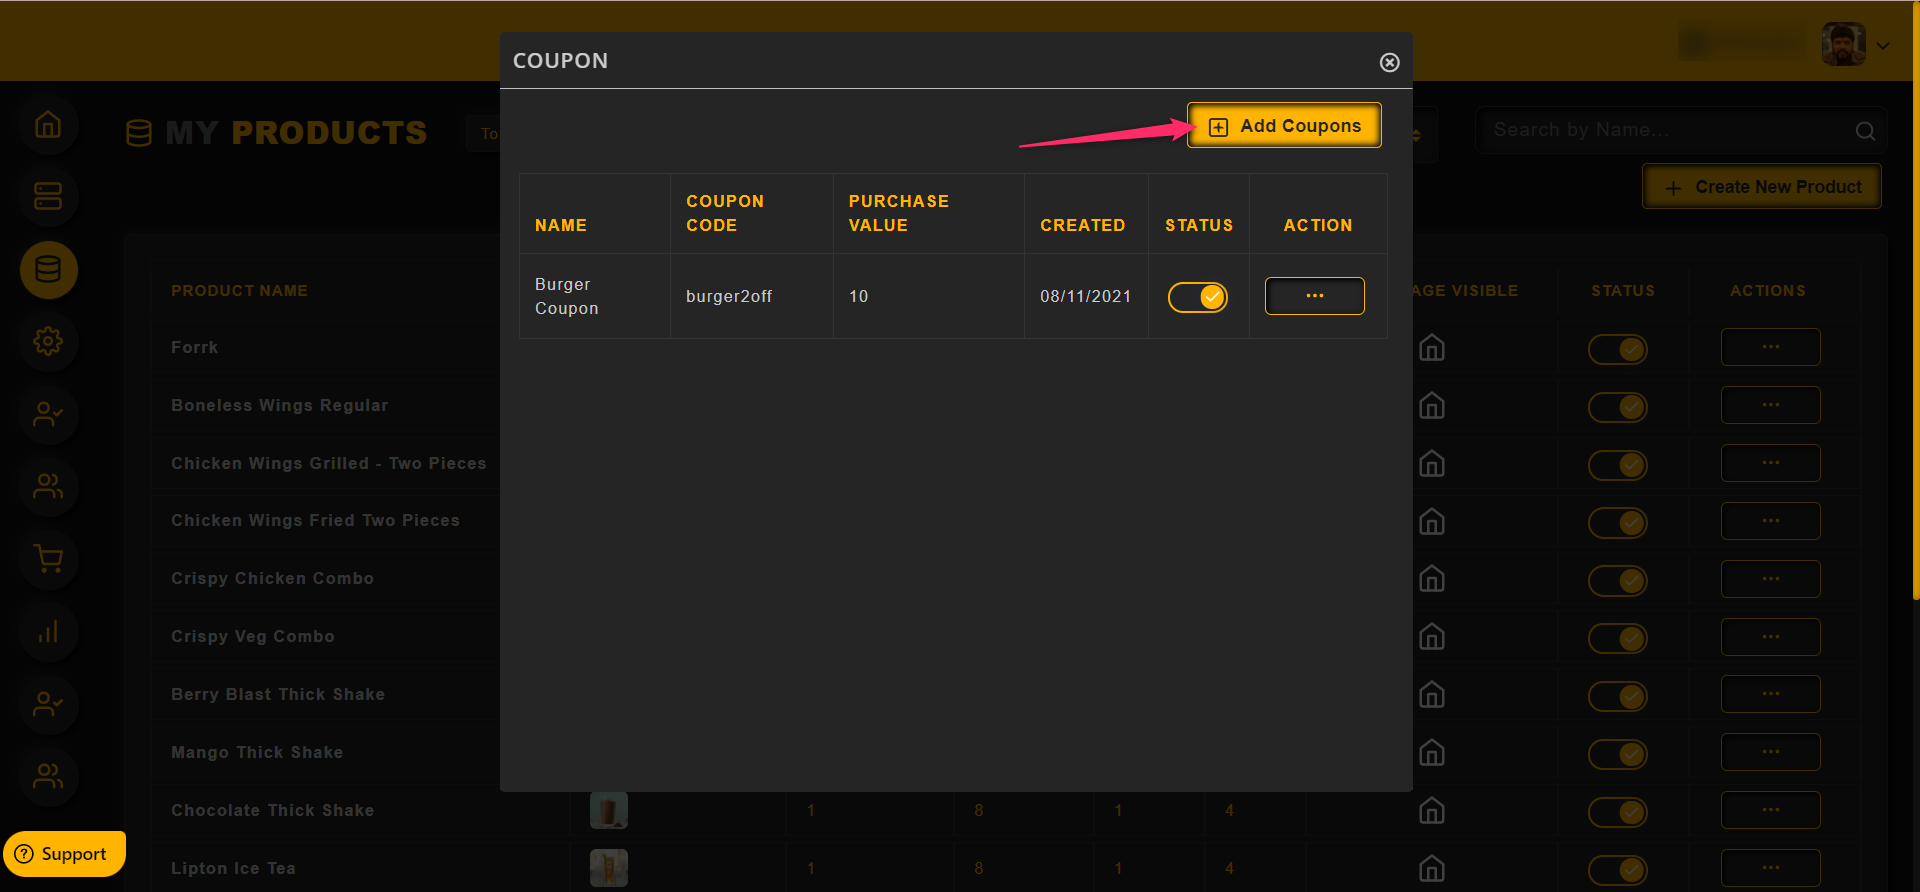
To add a coupon to a product,
Click on the Settings and then Coupon option as shown in the image below

To add a new coupon, click on the Add coupons button
Coupon Name: Enter the name for the coupon
Coupon code: Enter the coupon code of your choice and the user will use this while purchasing from the respective store
Purchase Value: Enter the purchase value of a product
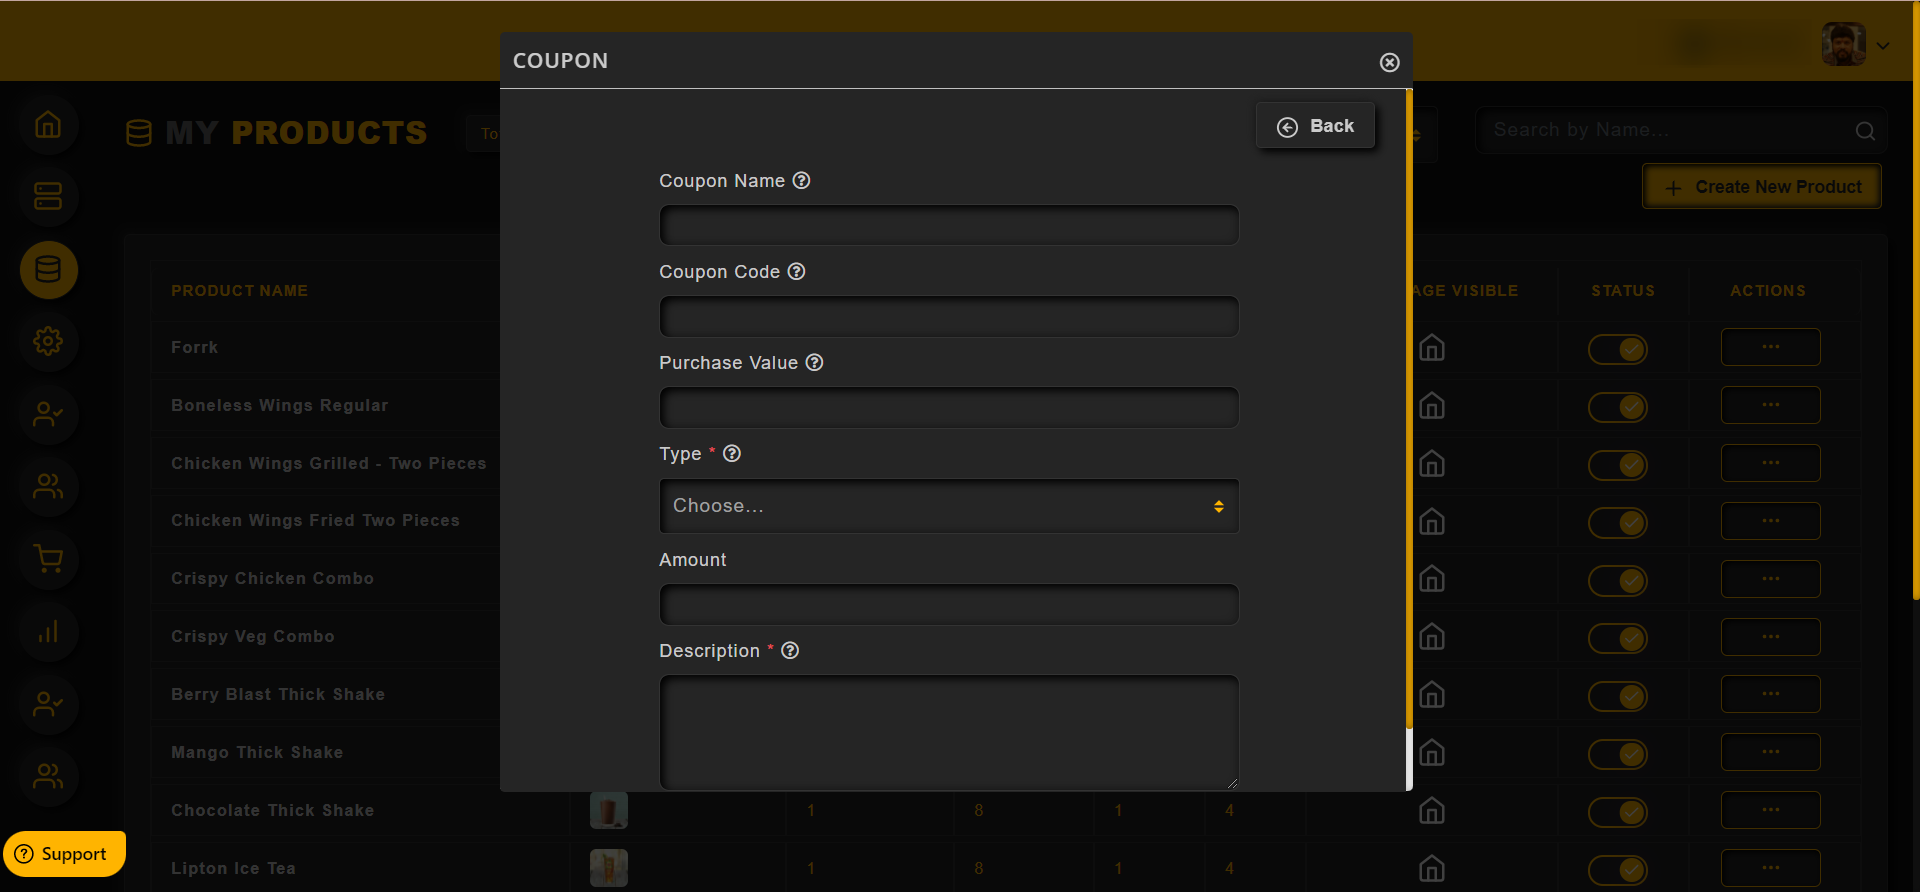
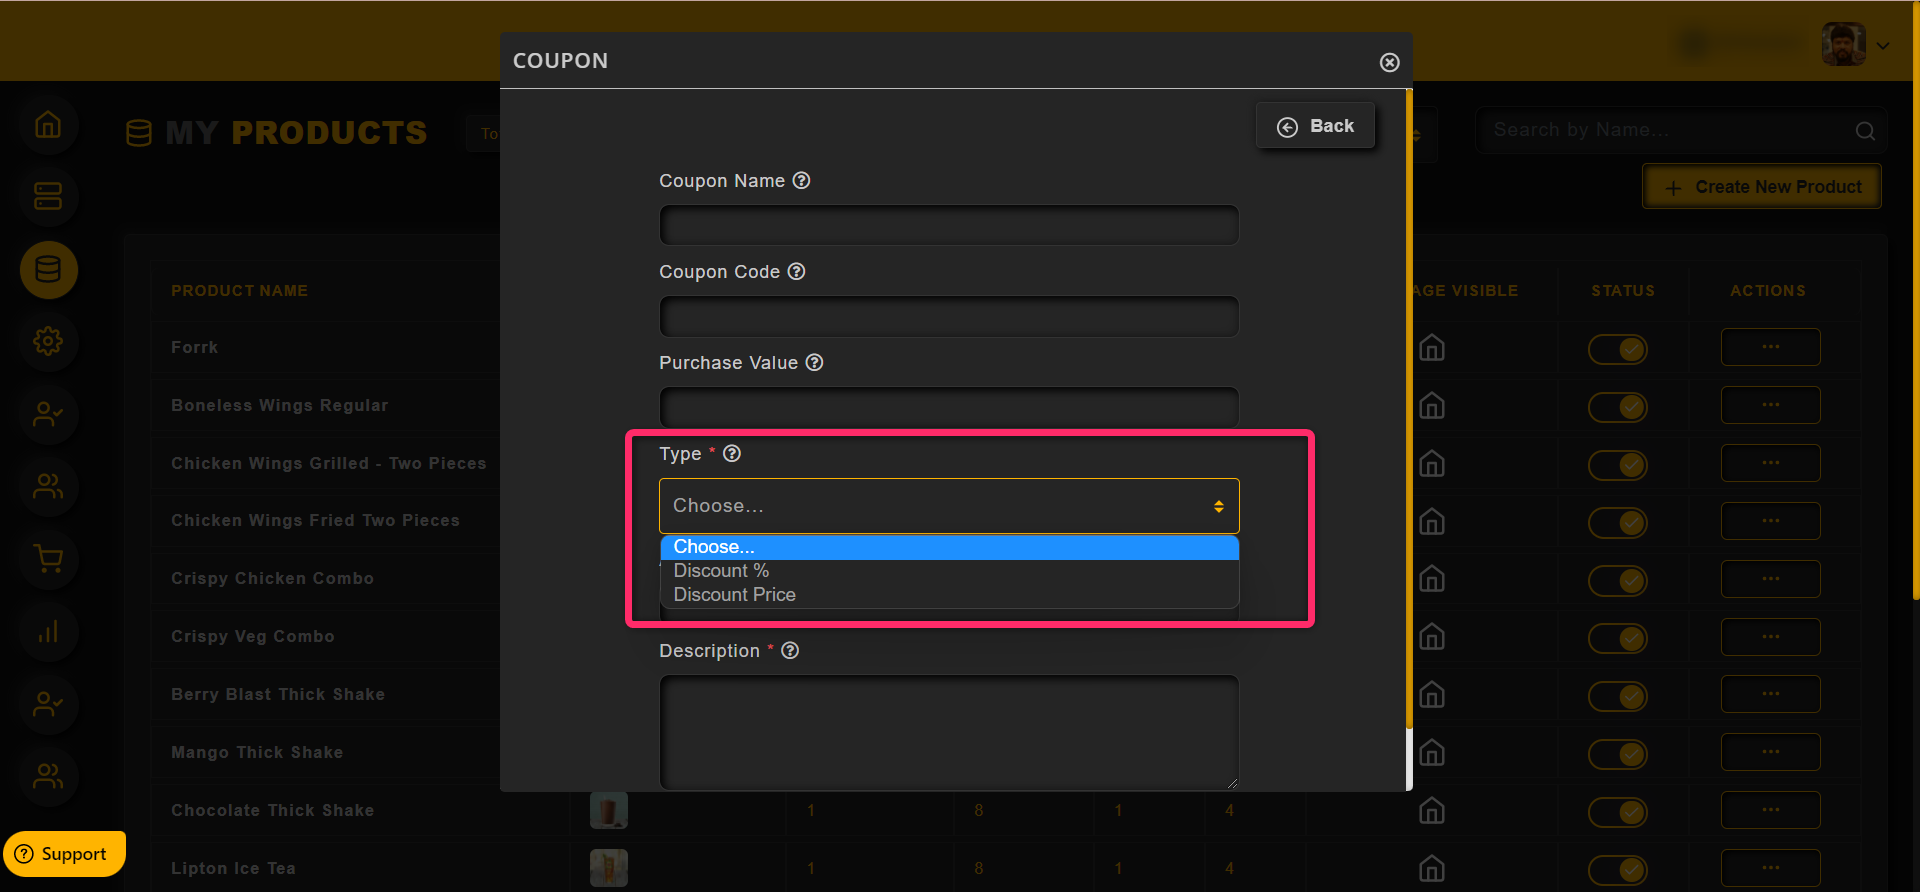
Type: Choose the type of the coupon using the drop down either Discount % or Discount Price
If one chose Discount %, then enter the % in the text field, or if one chose Discount price, then enter the discount price in the text field
Description: Enter a short description about the coupon
Click on Save button after adding the content
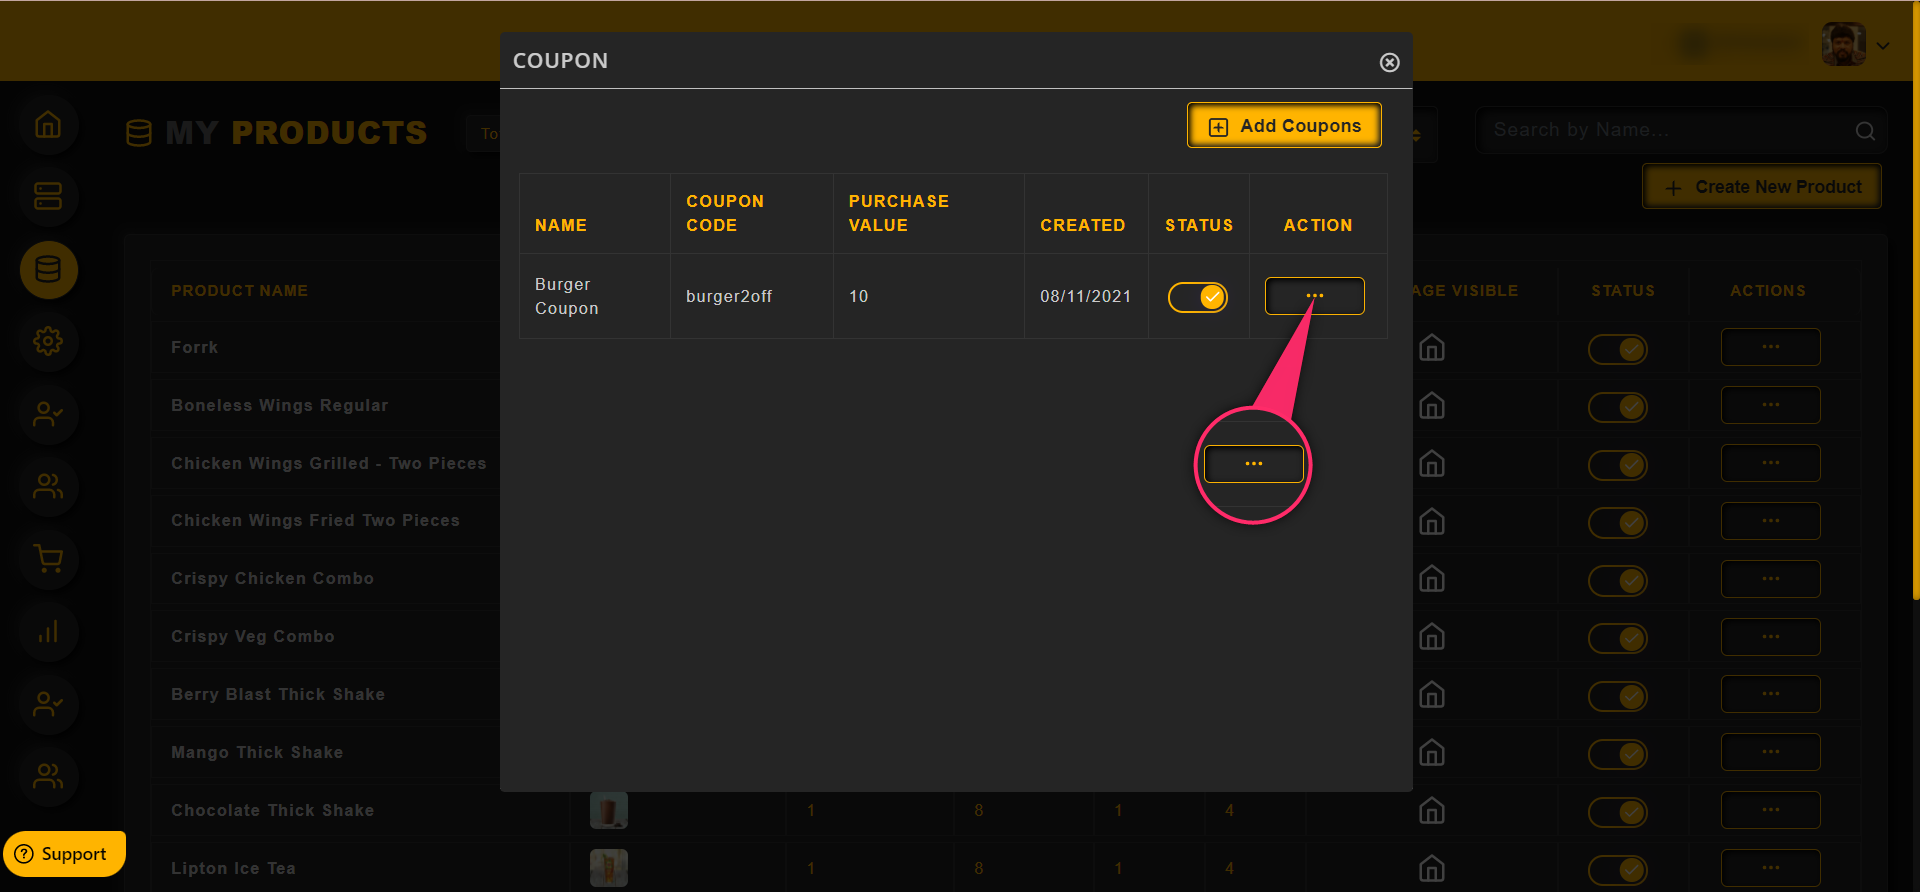
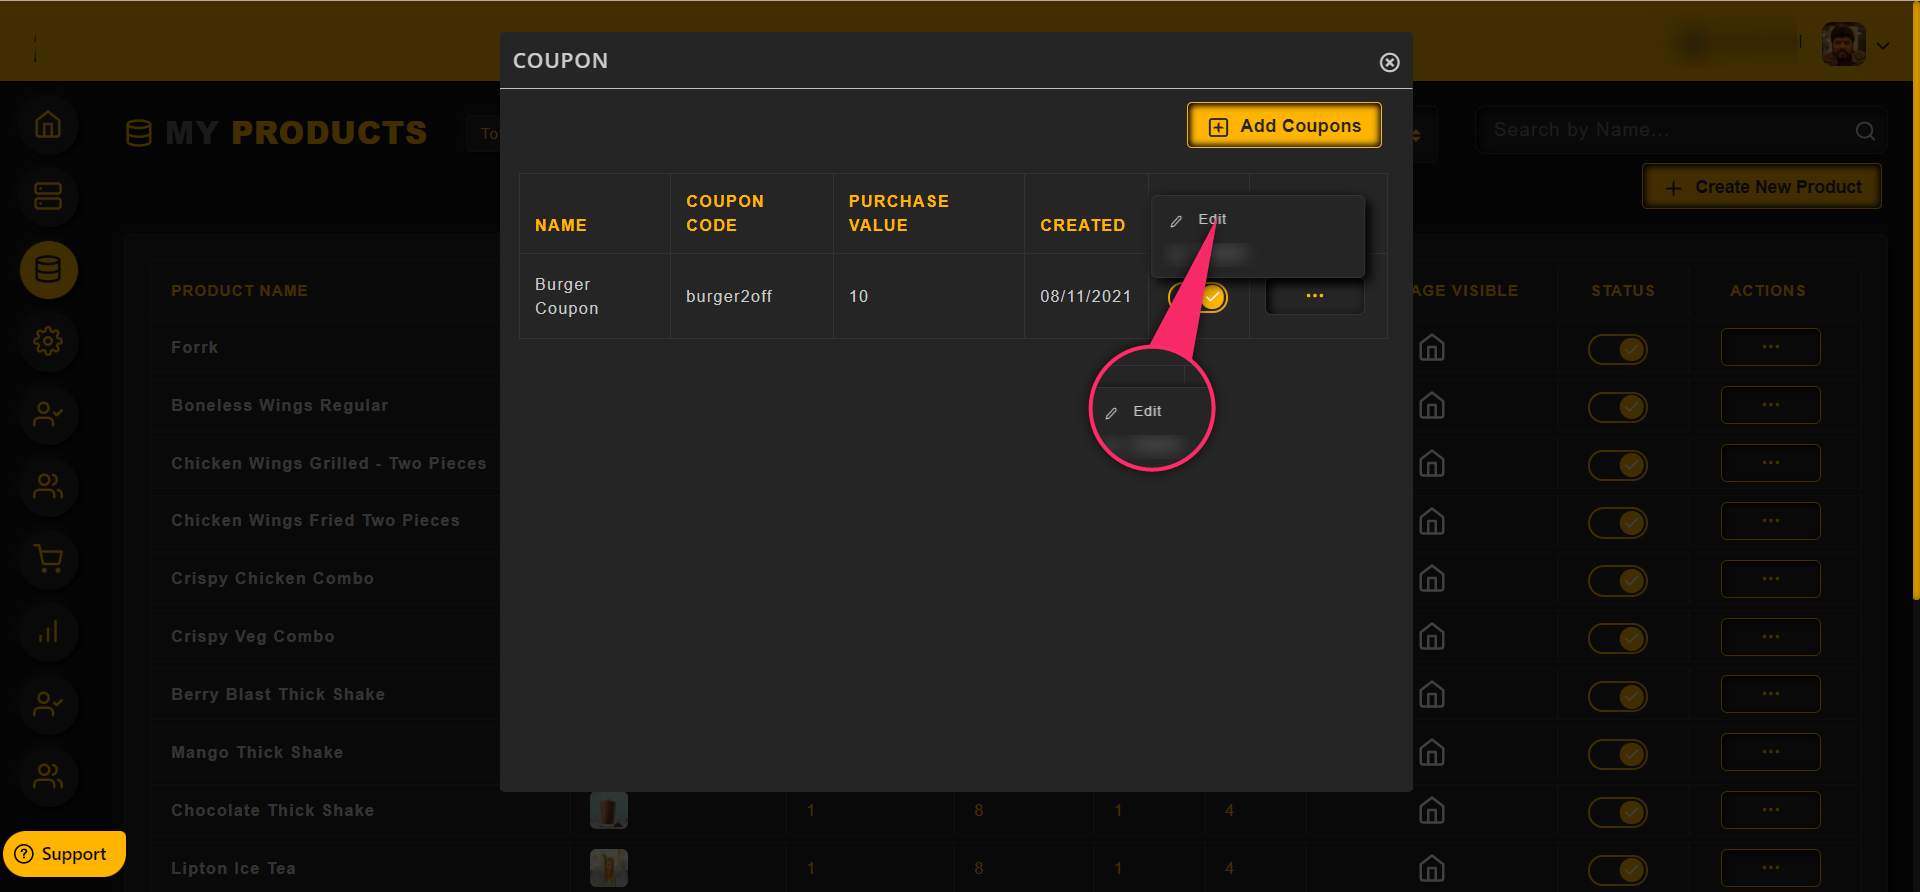
To edit a coupon,
Click on the Action menu and then the edit option as shown in the image below,
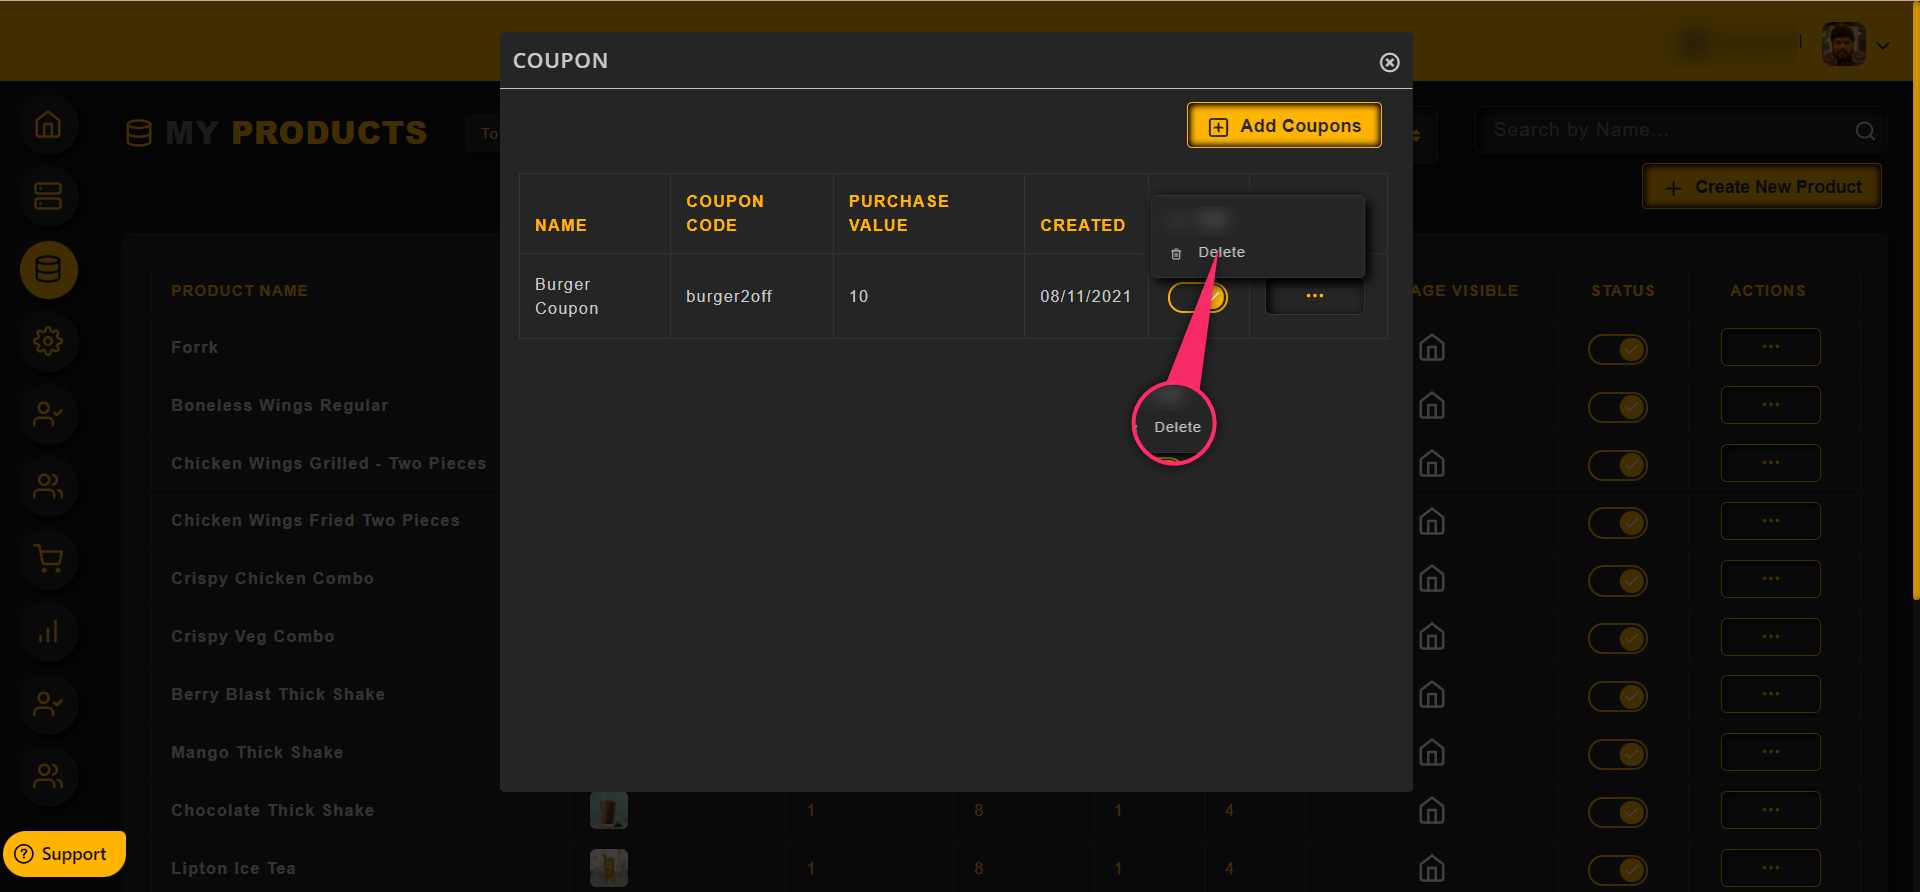
To delete a coupon,
Click on the Action menu and then the delete option as shown in the image below,
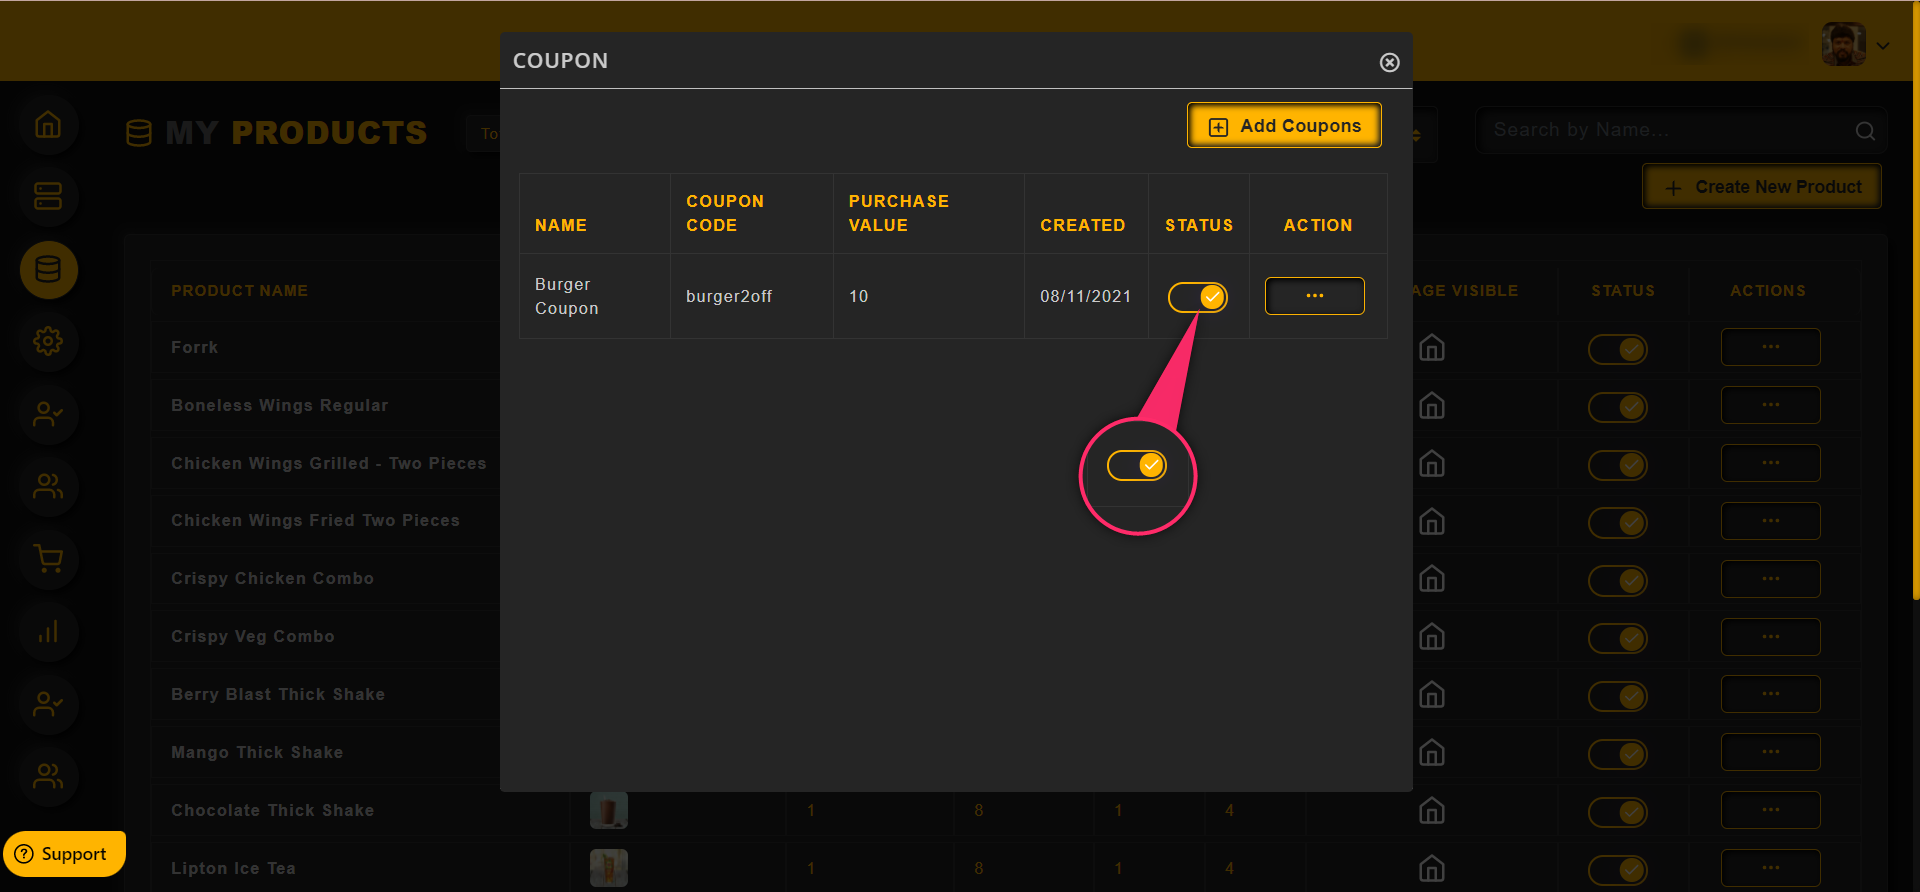
One can enable/disable a coupon using the toggle as shown in the image below
In this section, an admin can combine 2 products as a single item and sell it with a single price package
To configure the combo offer,
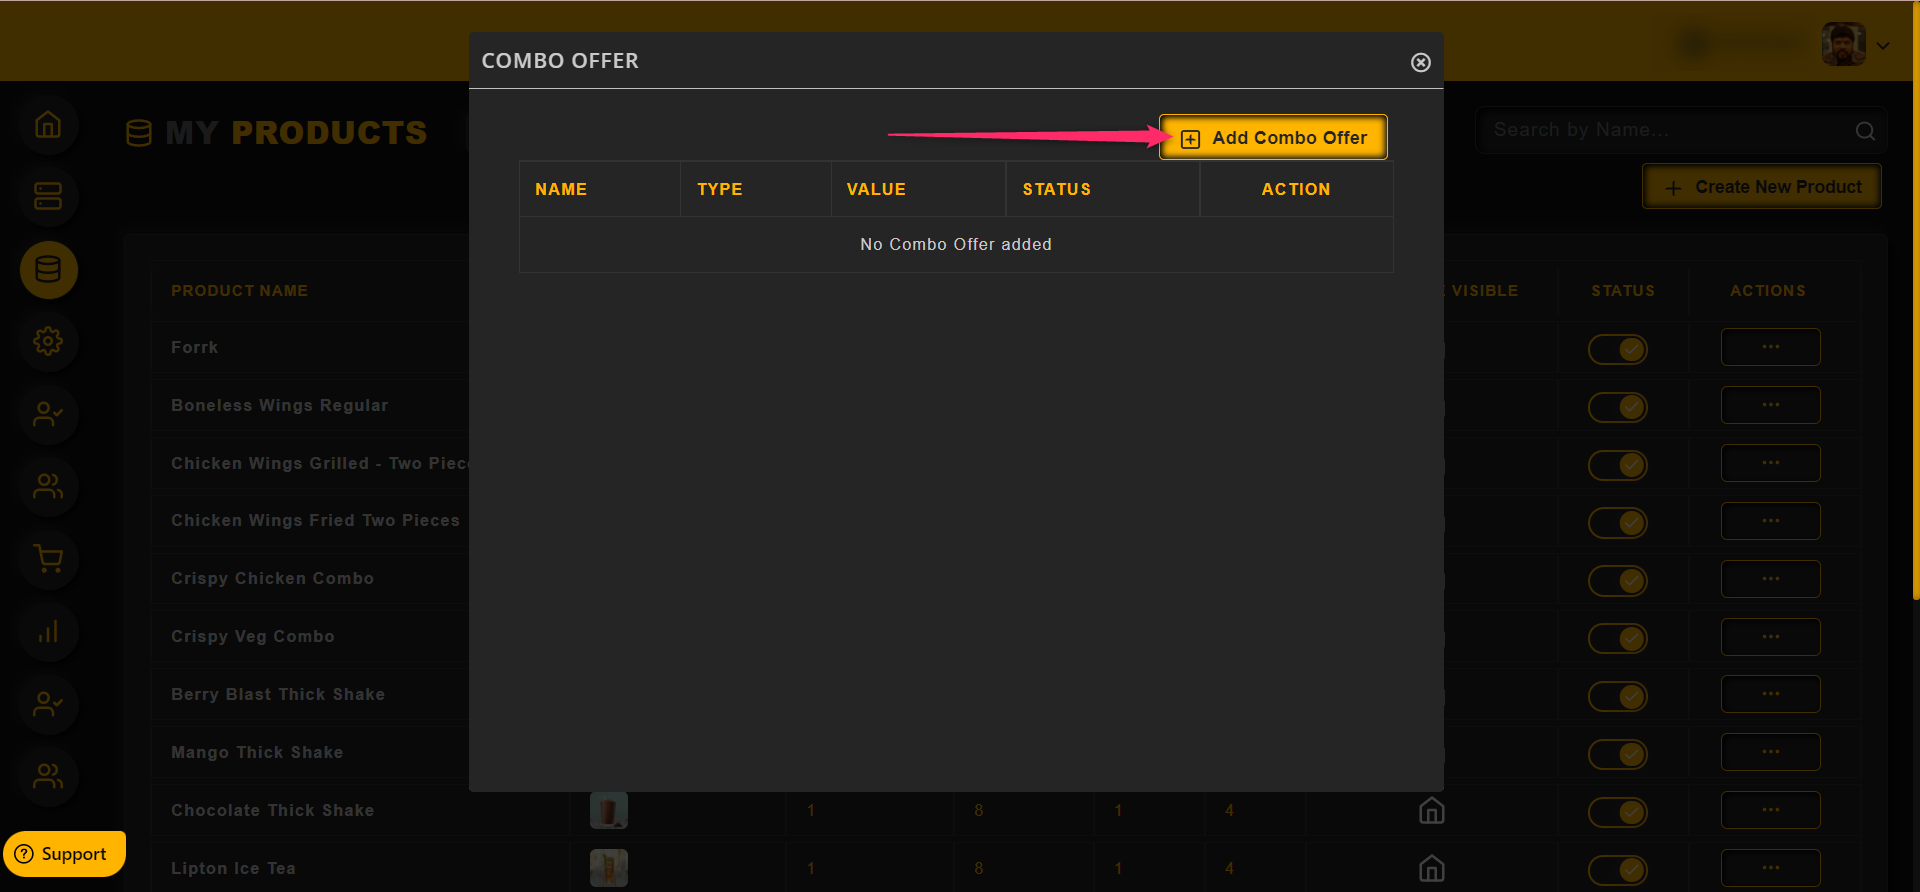
Click on the Settings and then Combo offer option as shown in the image below

To add a new combo offer, click on the Add Combo Offer button
Offer Name: Enter the name for the offer
Select the products and Variations using the drop down
Total price amount will be displayed once the varaitions are selected
Type: Choose the type of the discount using the drop down whether it is Discount % or Discount Price
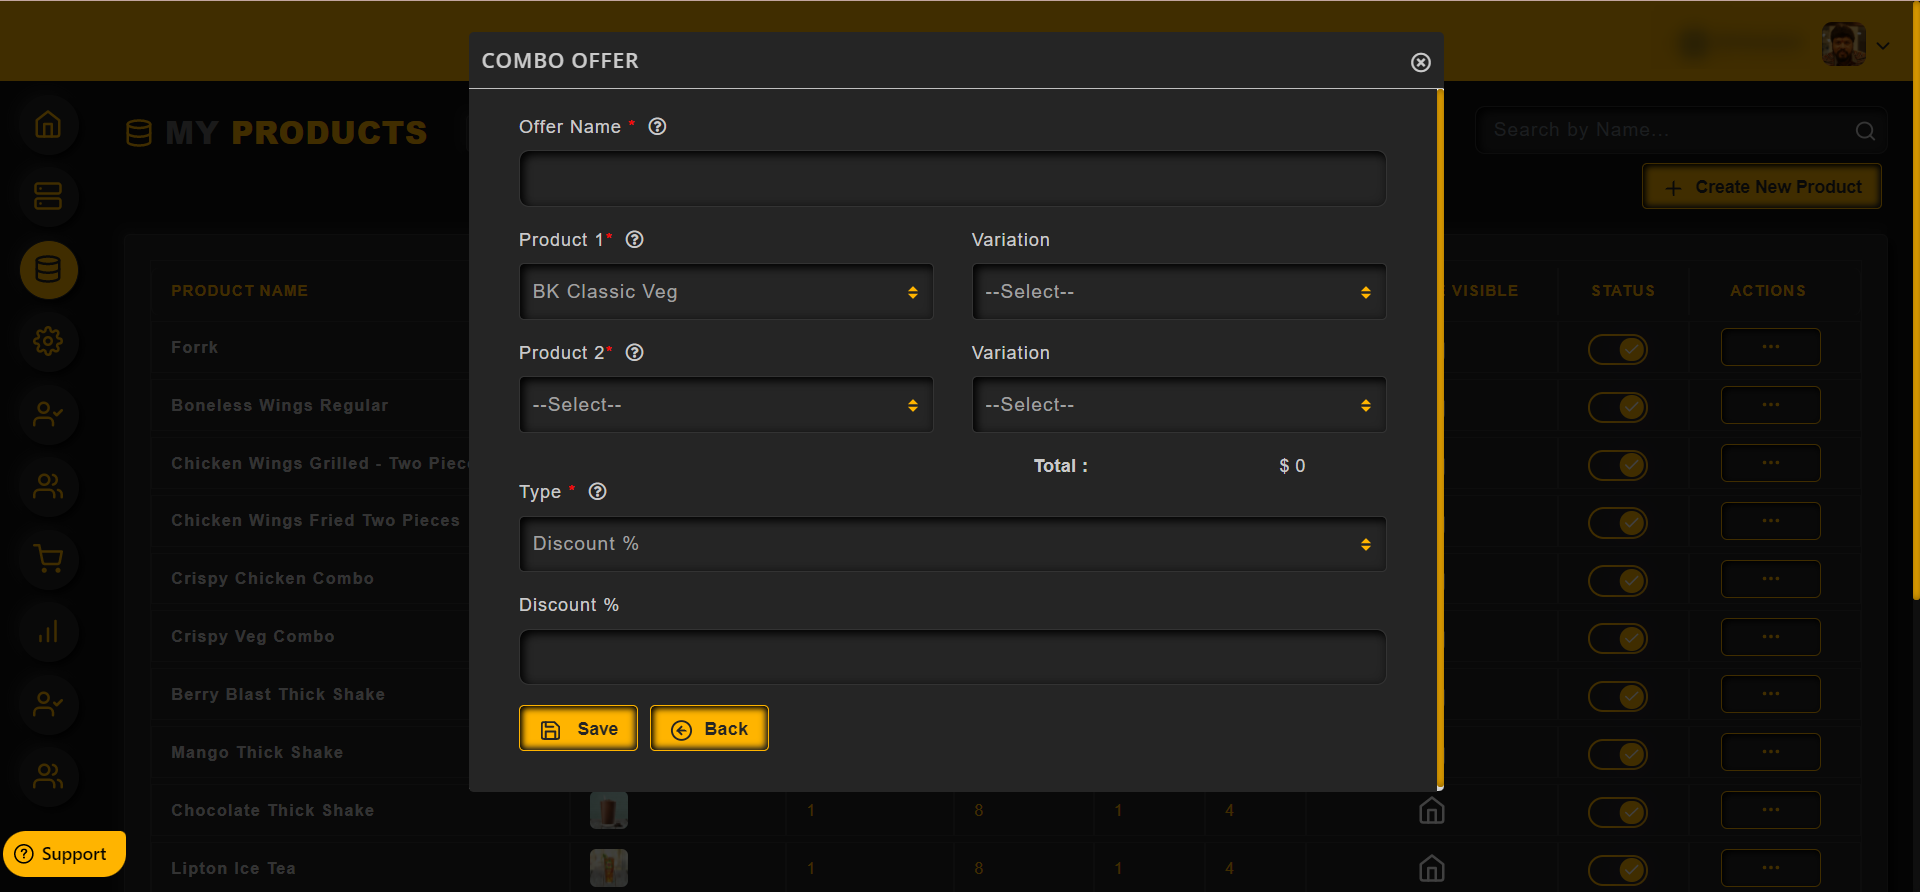
If Discount % is selected, then enter the % in the Discount % text field provided
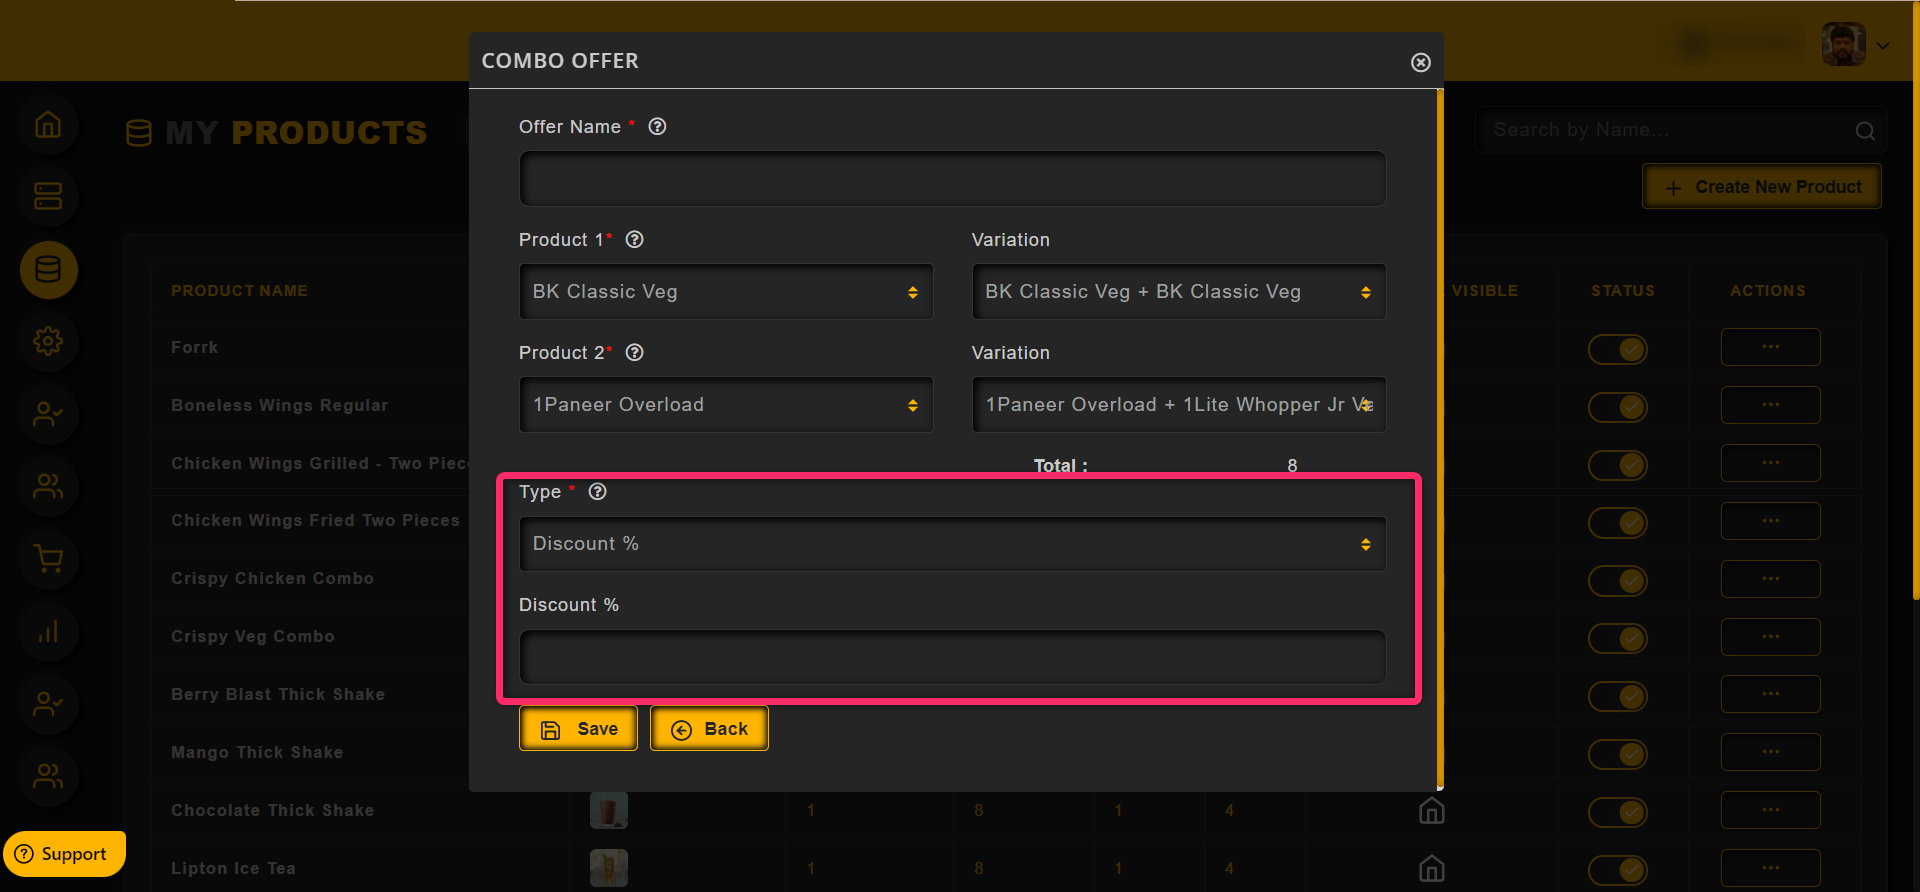
If Discount Price is selected, then enter the amount in the Amount text field provided
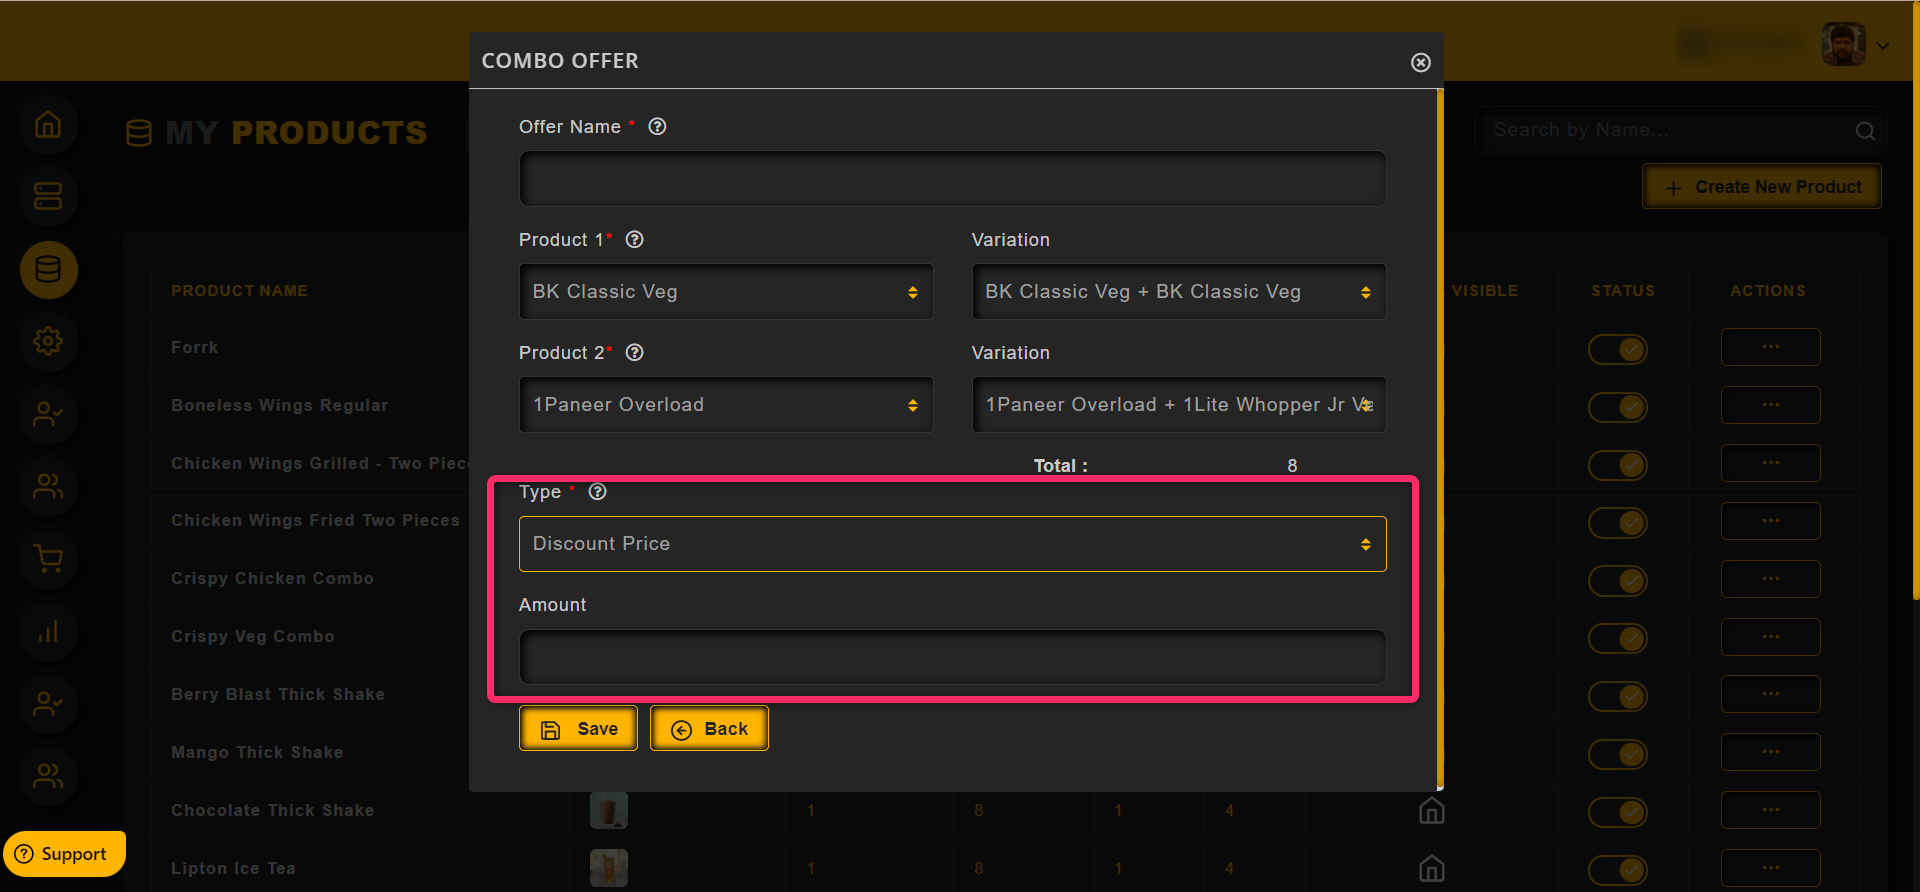
Click on the Save button once the configuration is done
One can enable/disable an offer using the toggle as shown in the image below
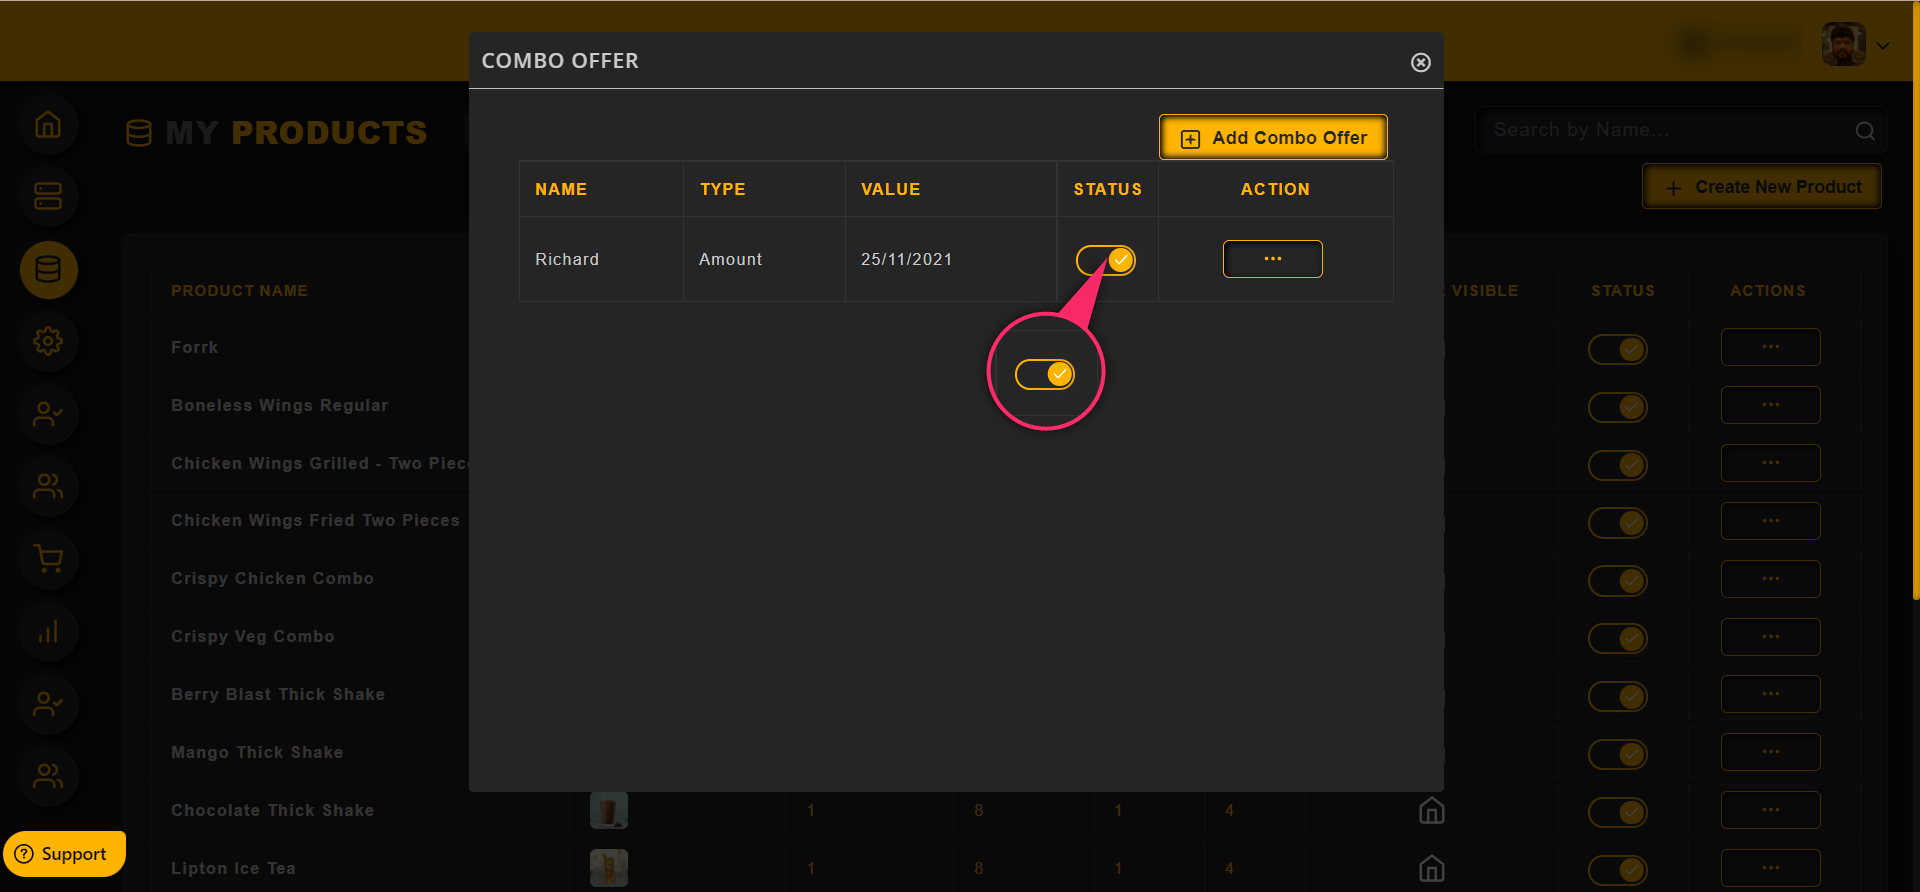
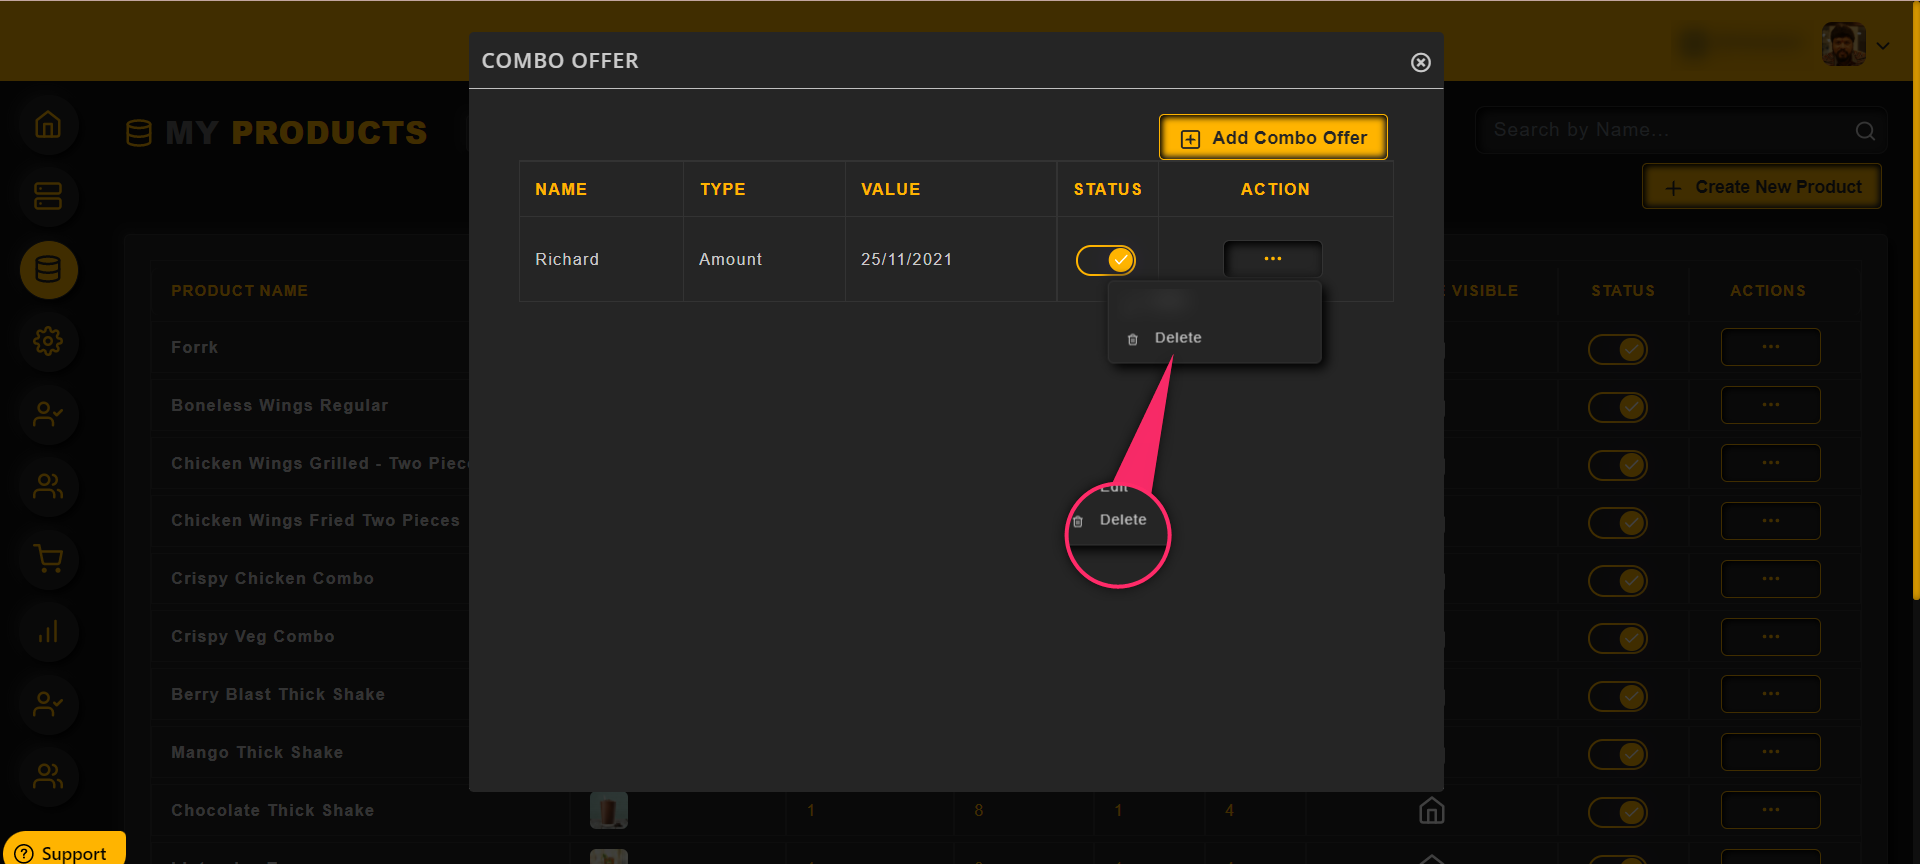
One can edit and delete the offer by using the Action menu as shown in the image below

To edit the offer, click on the Action menu and then the Edit option
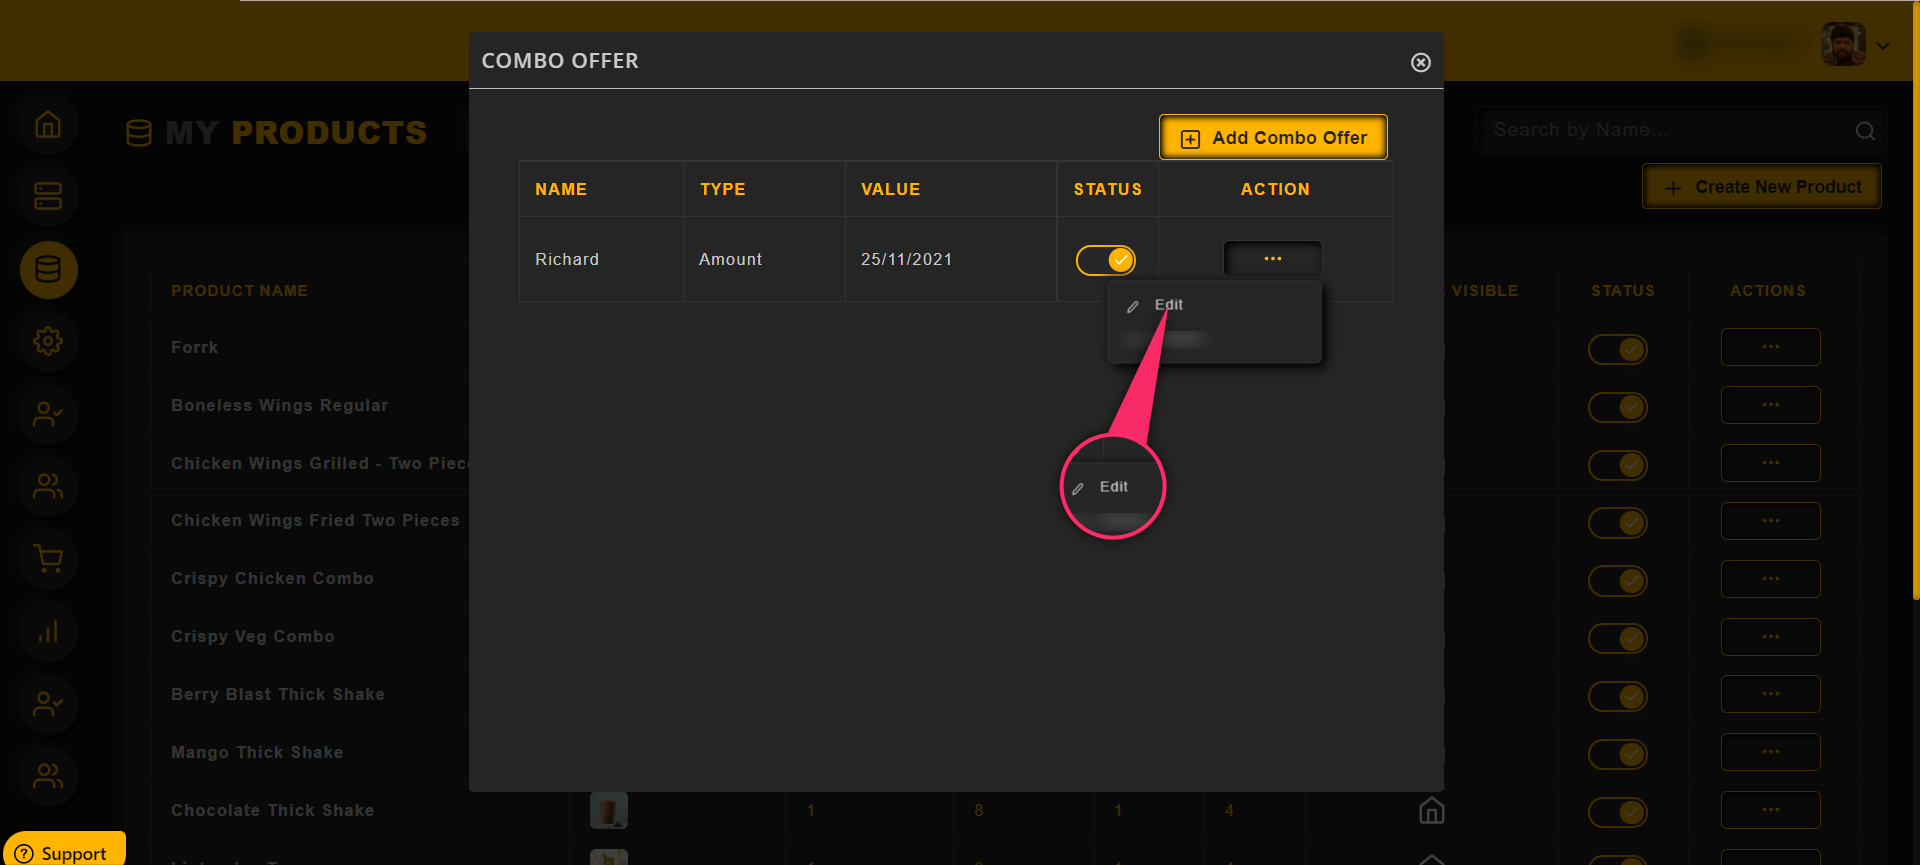
To delete the offer, click on the Action menu and then the Delete option
Category: Website Template
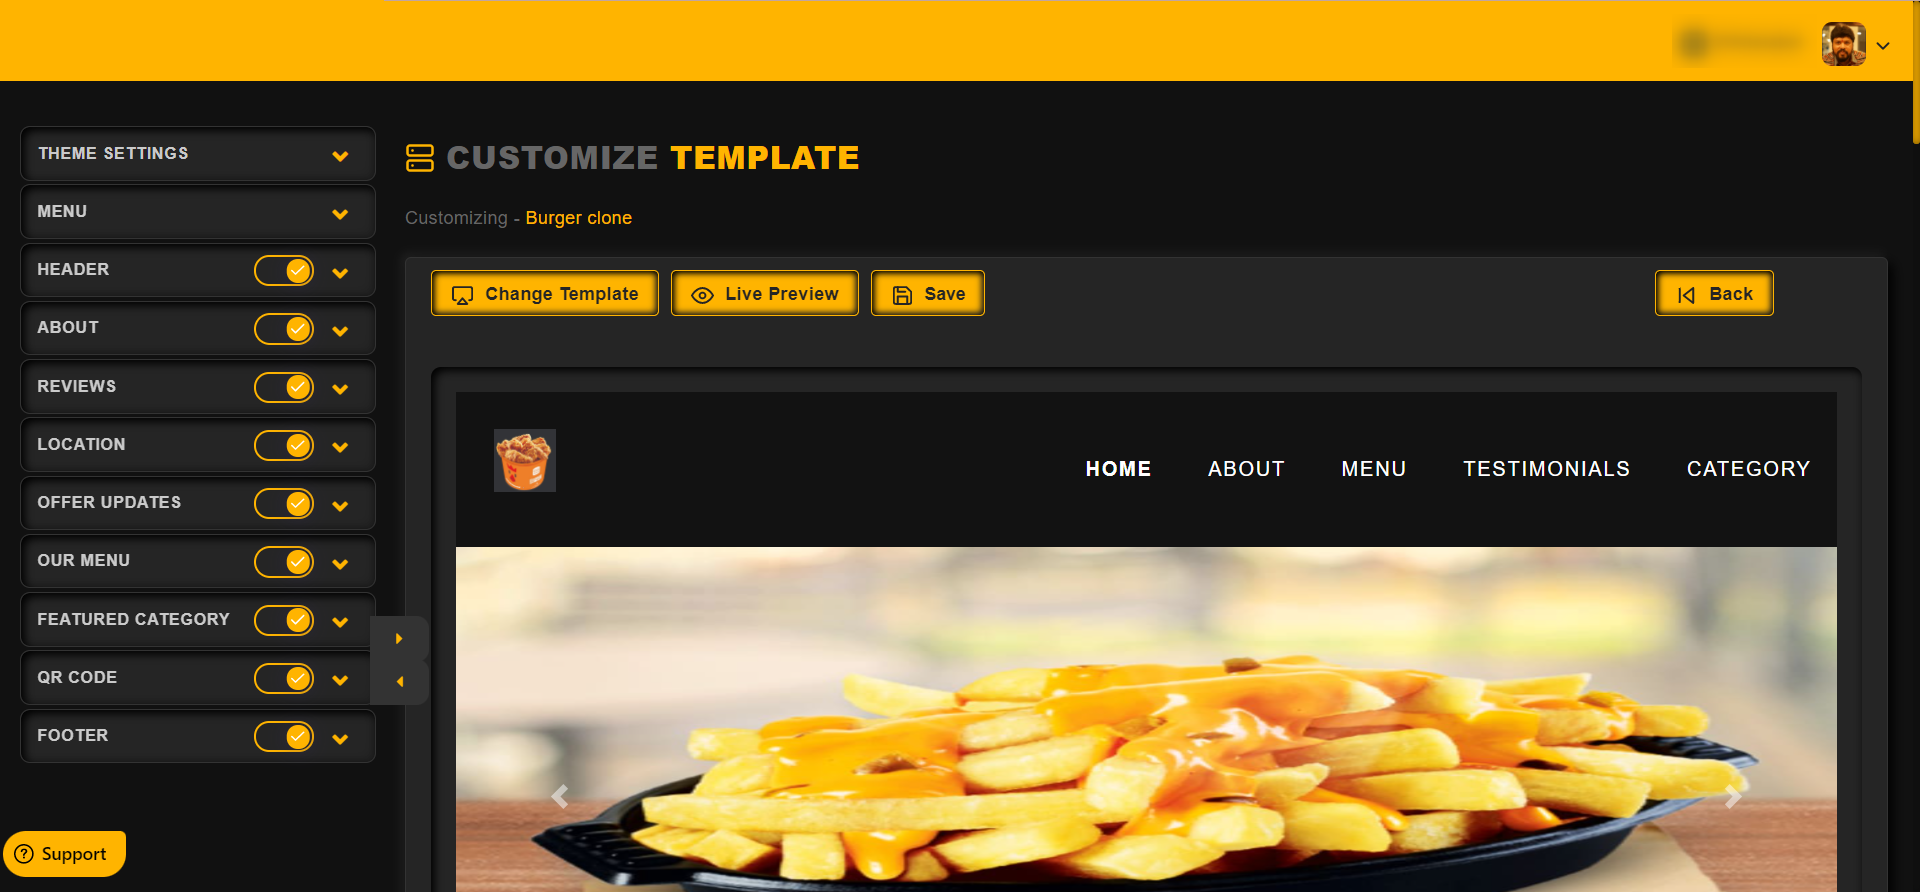
How to edit the template of your website.
One can customize the menu colors in the Menu section as shown in the image below,
Click on the Menu drop down to see the options
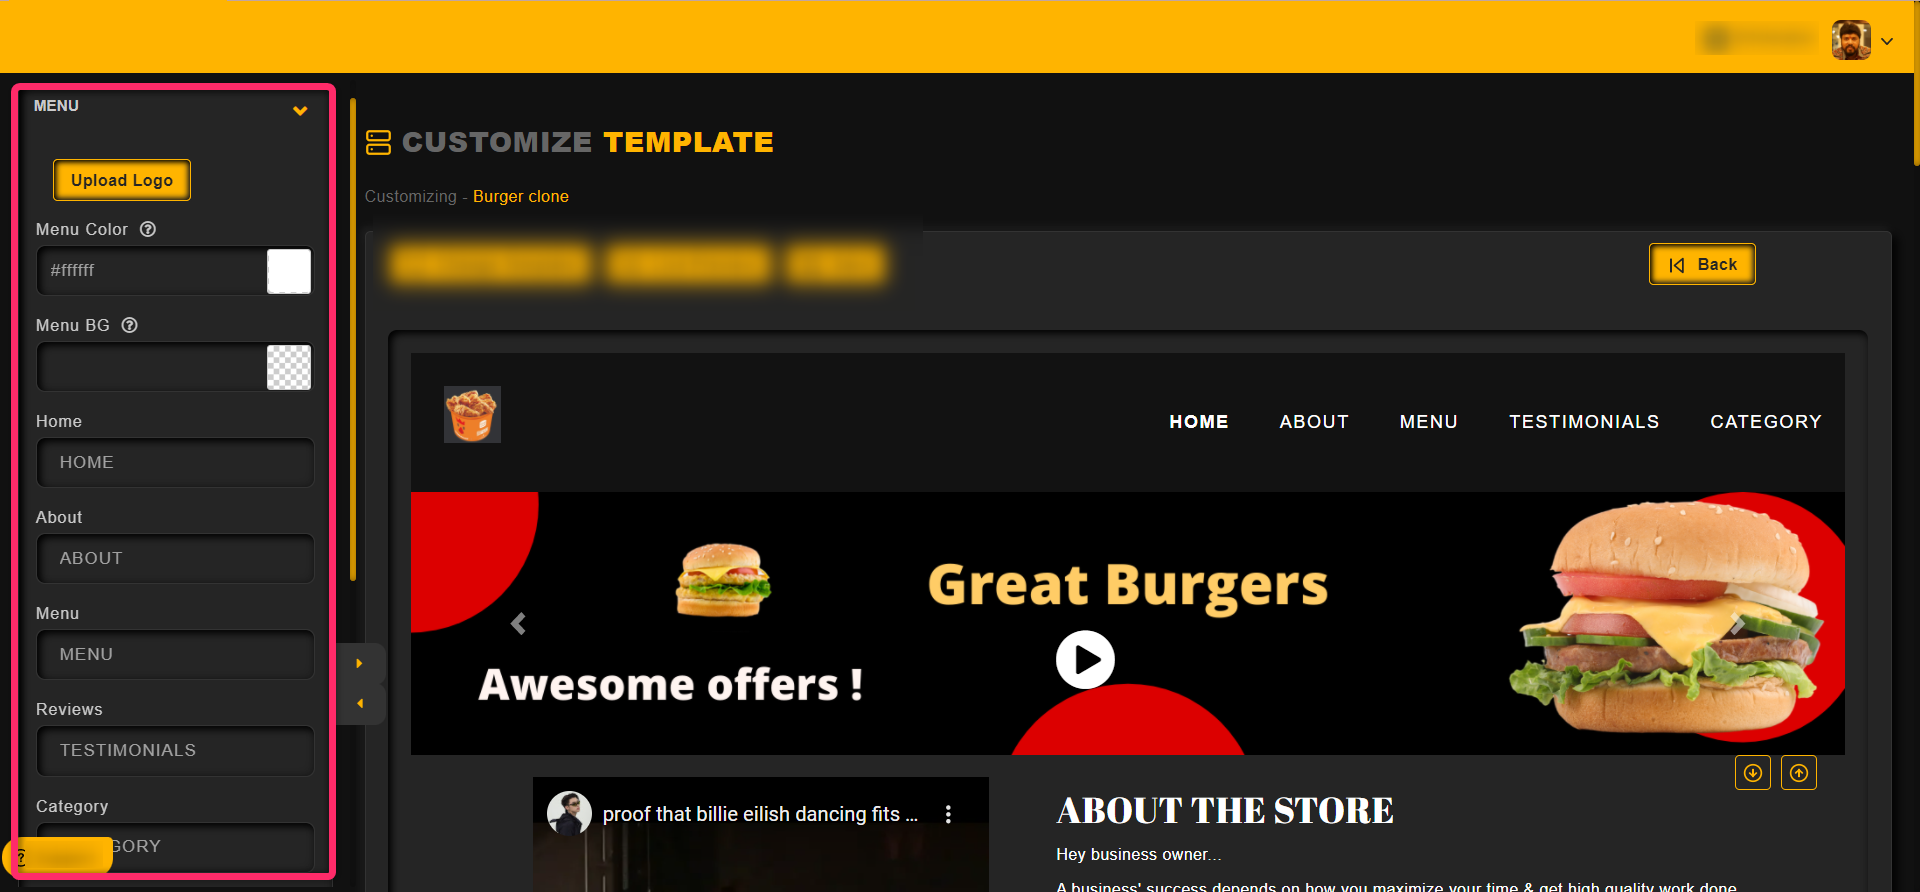
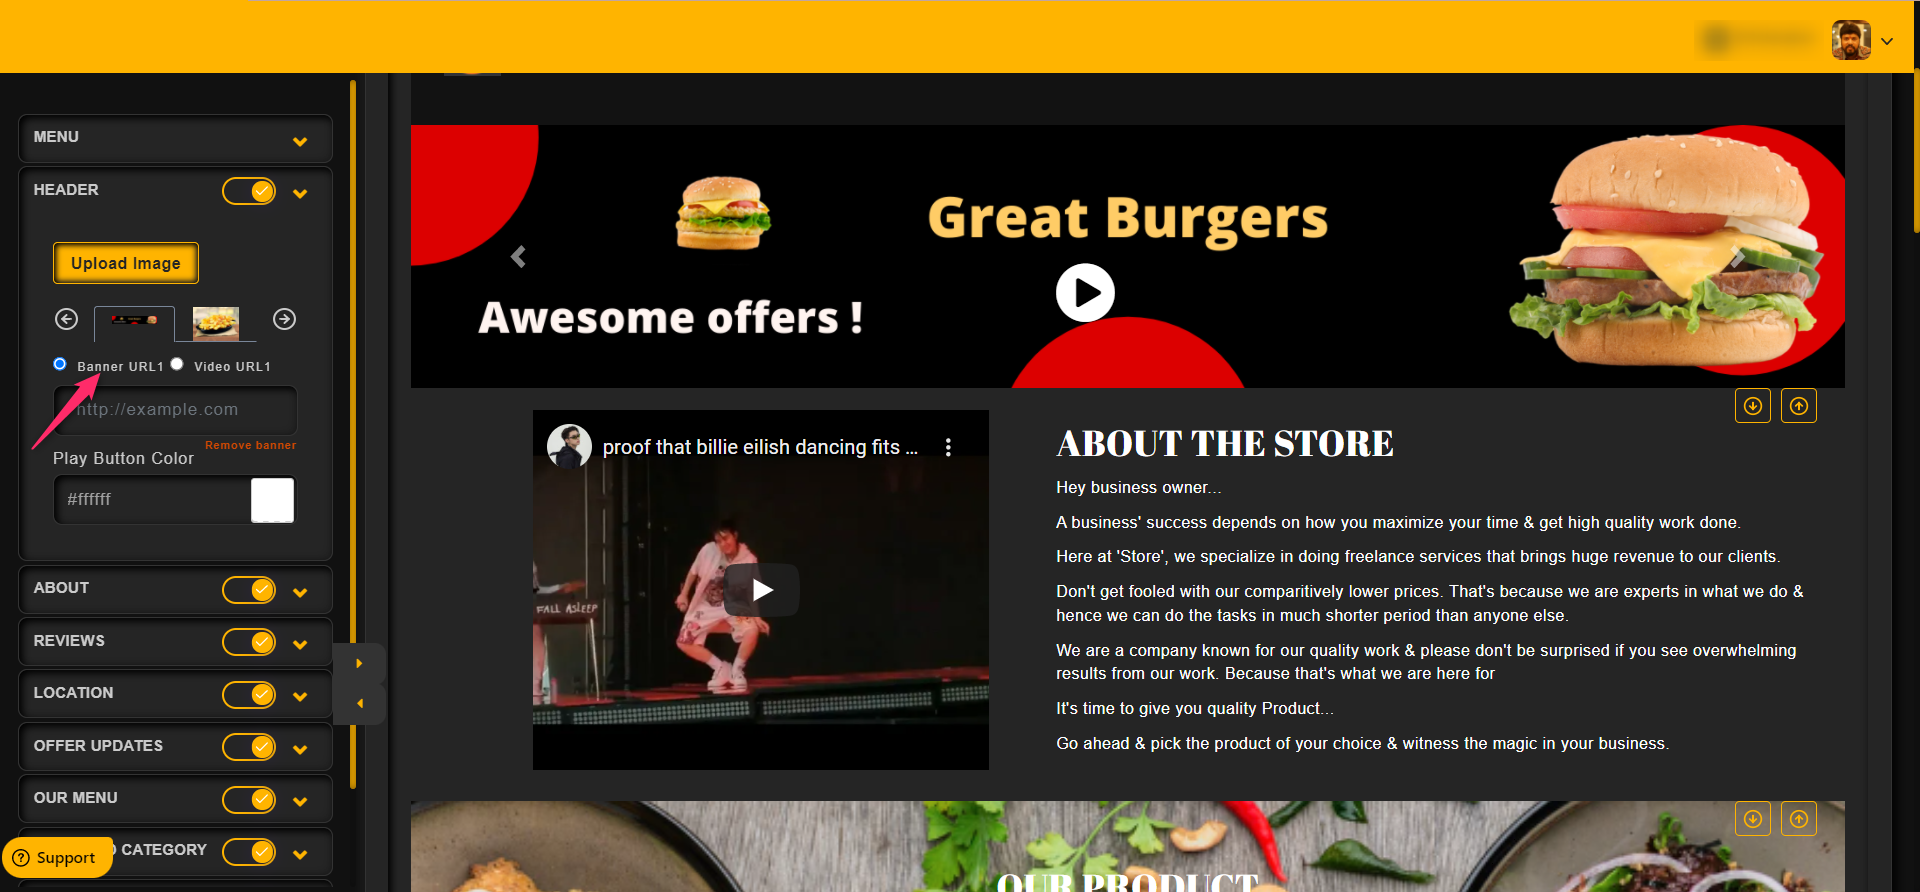
One can customize the Header section as shown in the image below,
Click on the Header drop down to see the options
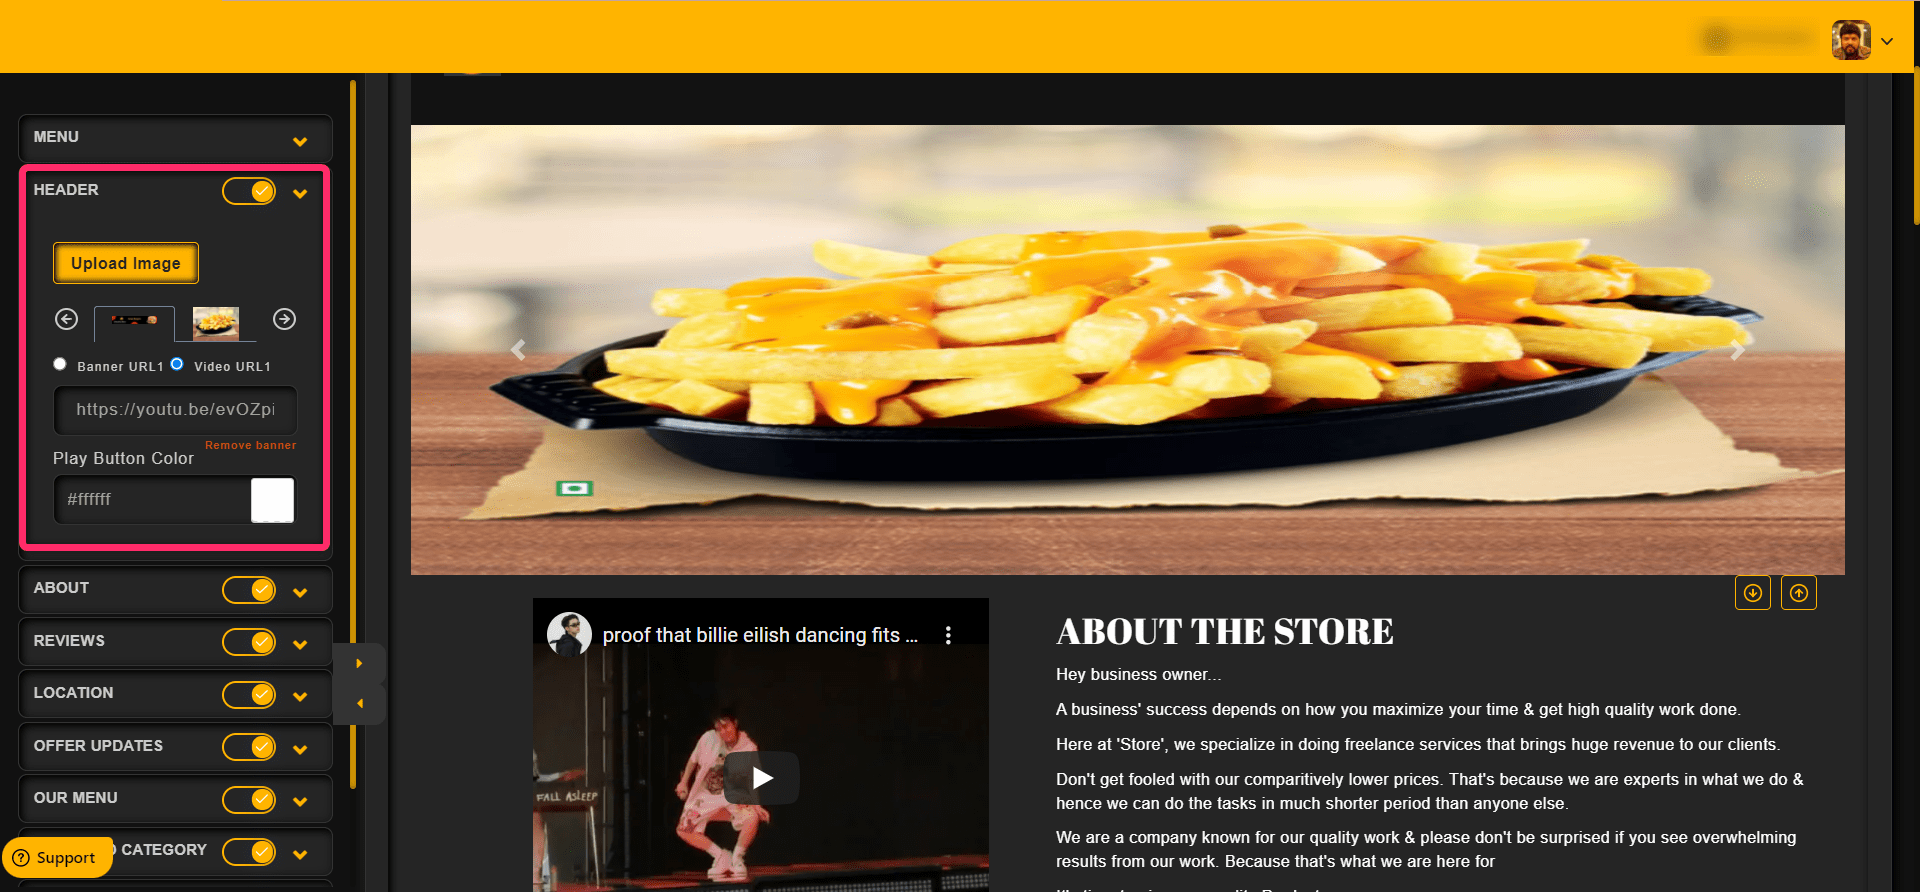
Click on the toggle to enable or disable the header section

Upload Banner image first and then add Banner URL or Video URL in the provided field
To add a Video to the banner, select Video URL and then add the video URL in the text field.
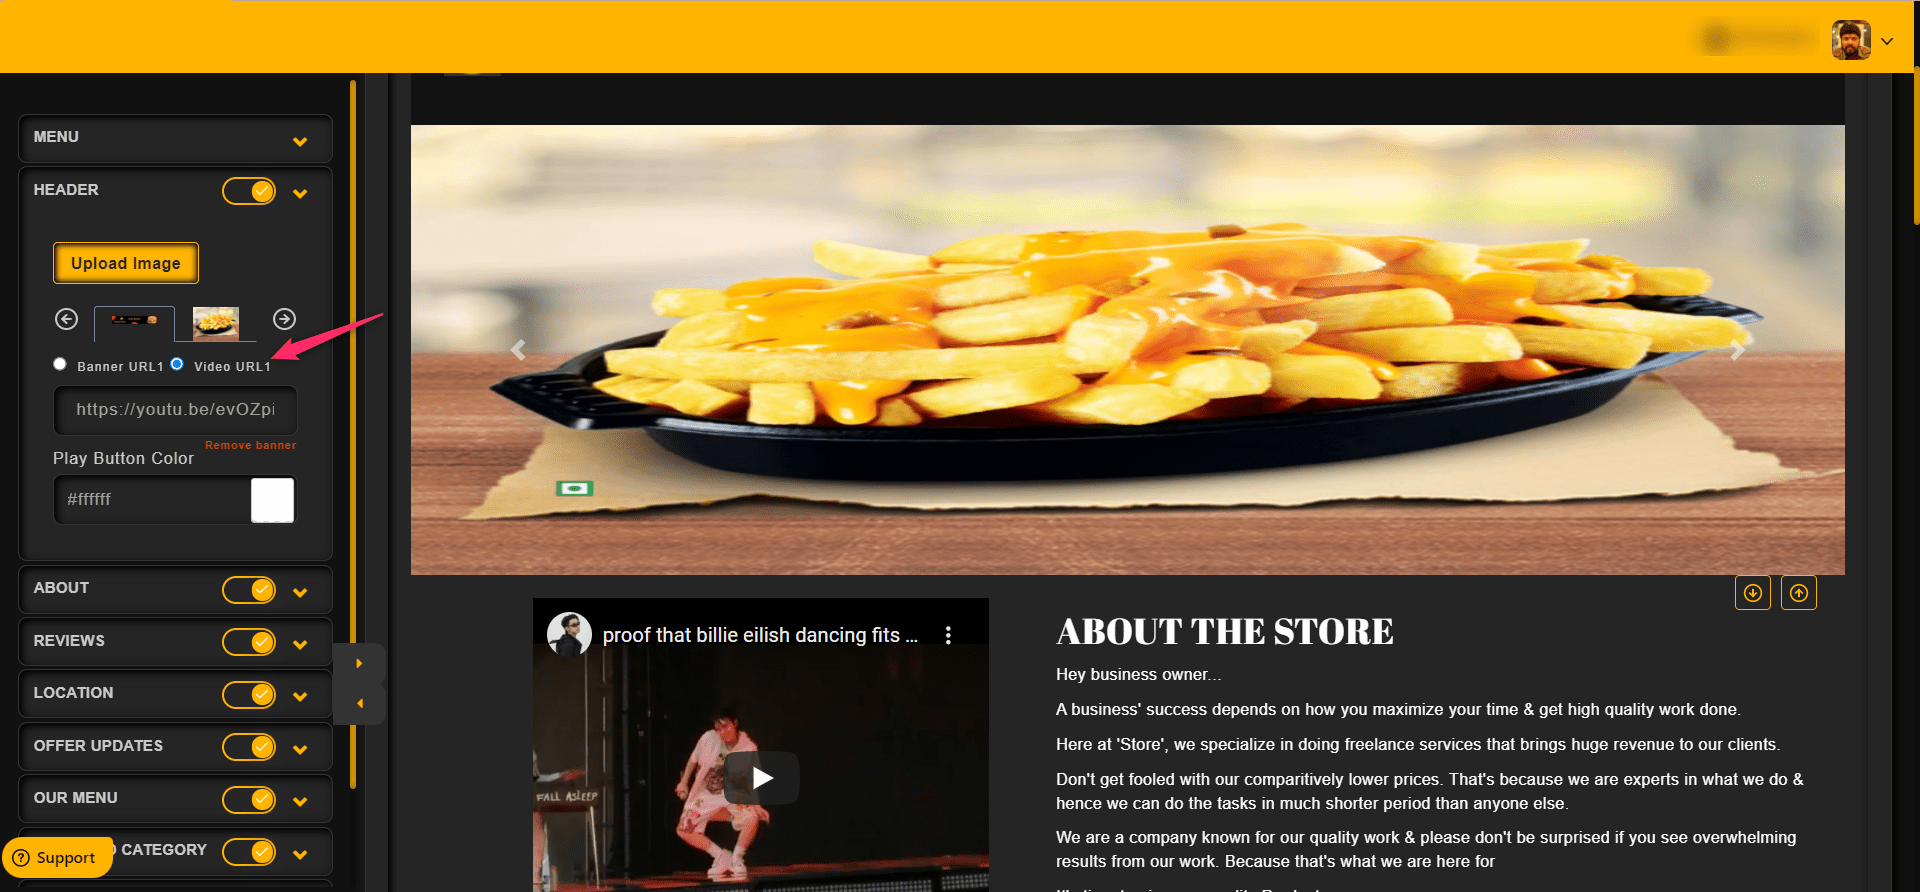
To add a redirection URL to the banner, select Banner URL and then add the URL in the text field
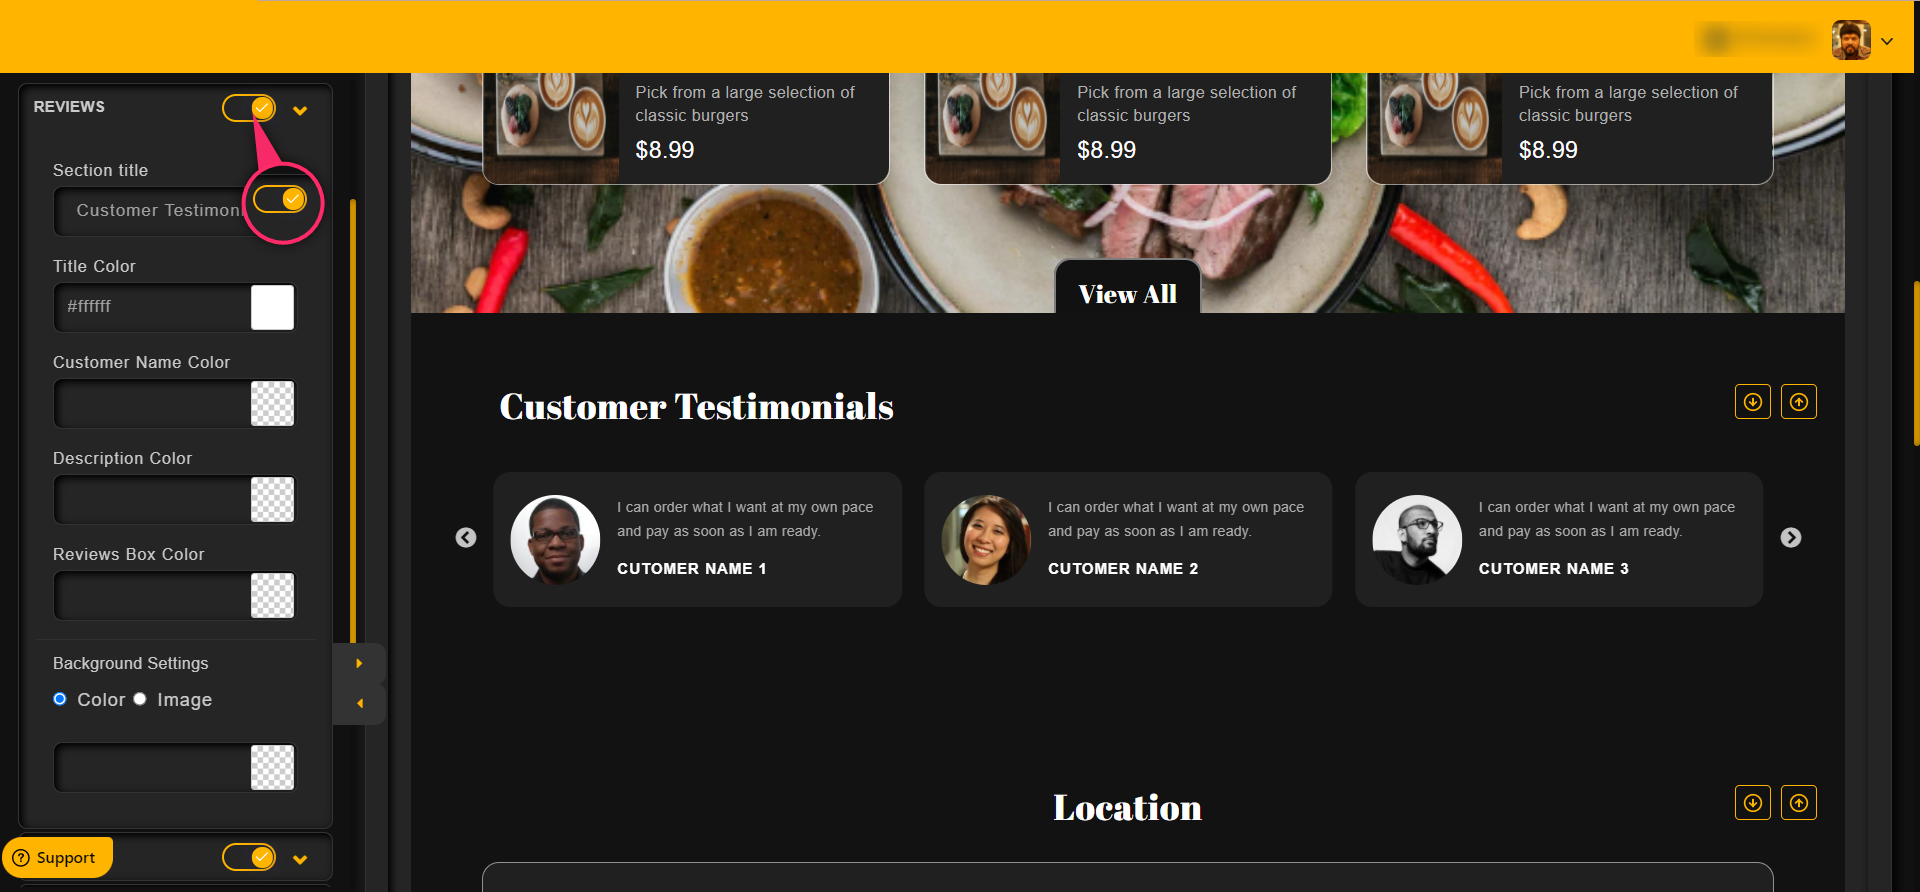
One can customize the Reviews/Testimonials section in the Reviews section as shown in the image below,
Click on the Reviews drop down to see the options

To enable or disable the Reviews section, click on the toggle
One can customize the Location section in the Location as shown in the image below,
Click on the Location drop down to see the options
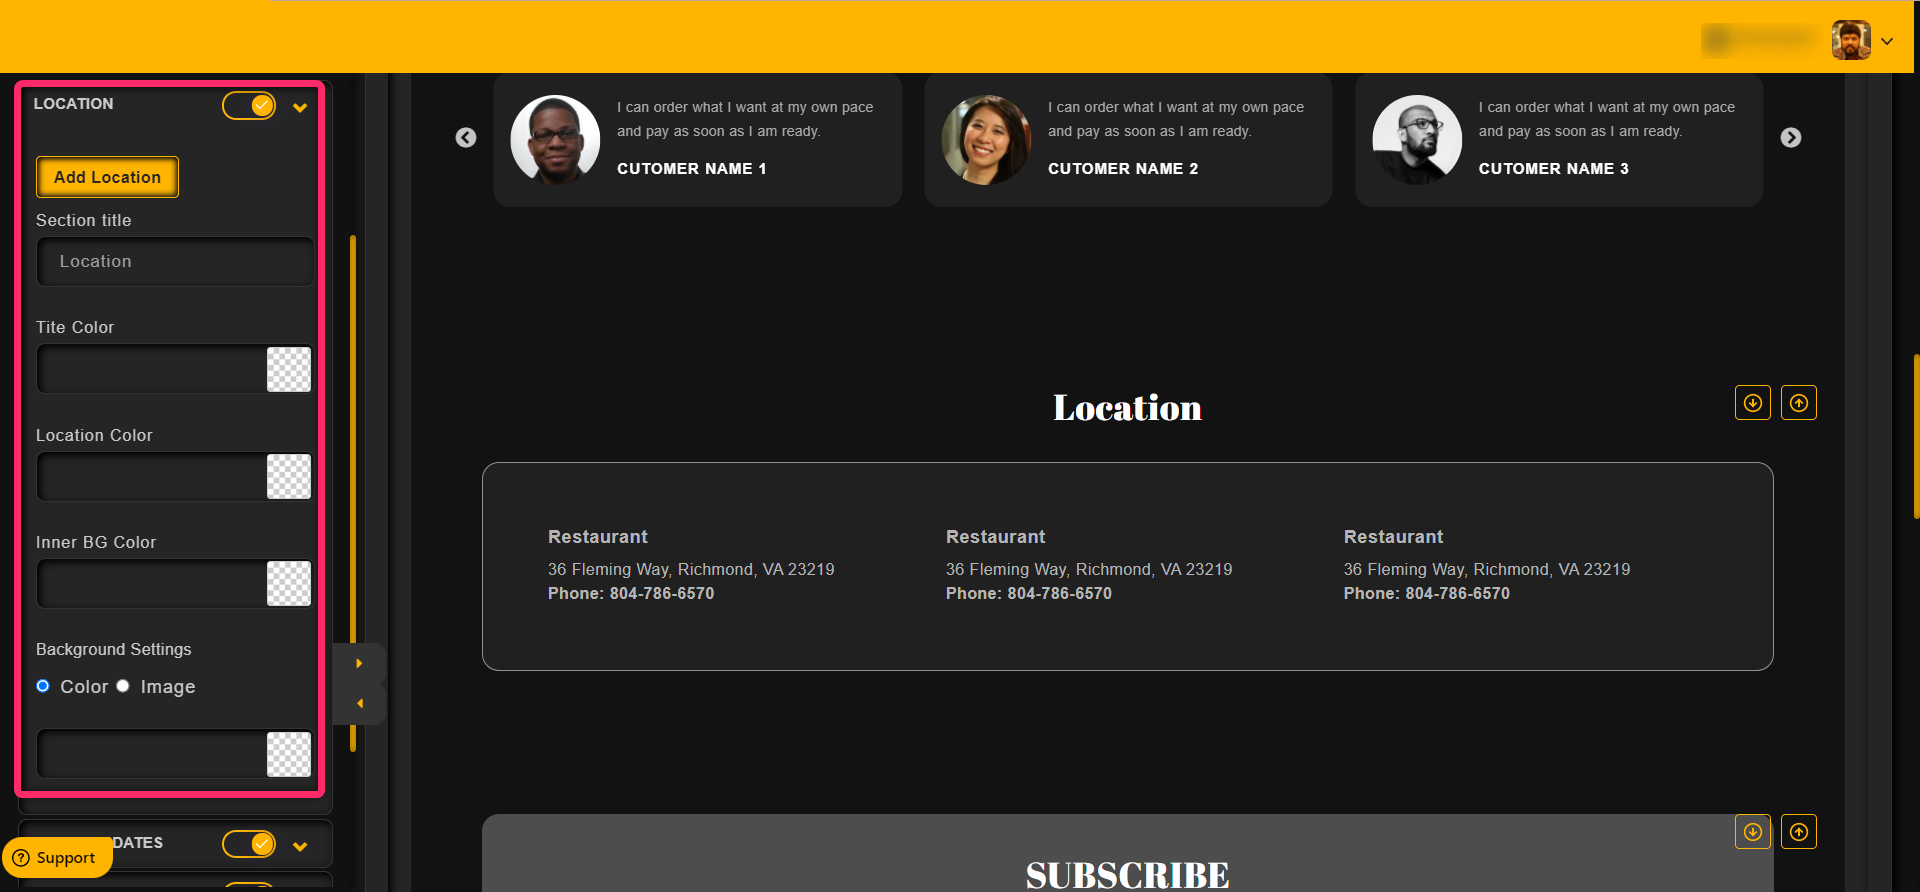
To enable or disable the Location section, click on the toggle

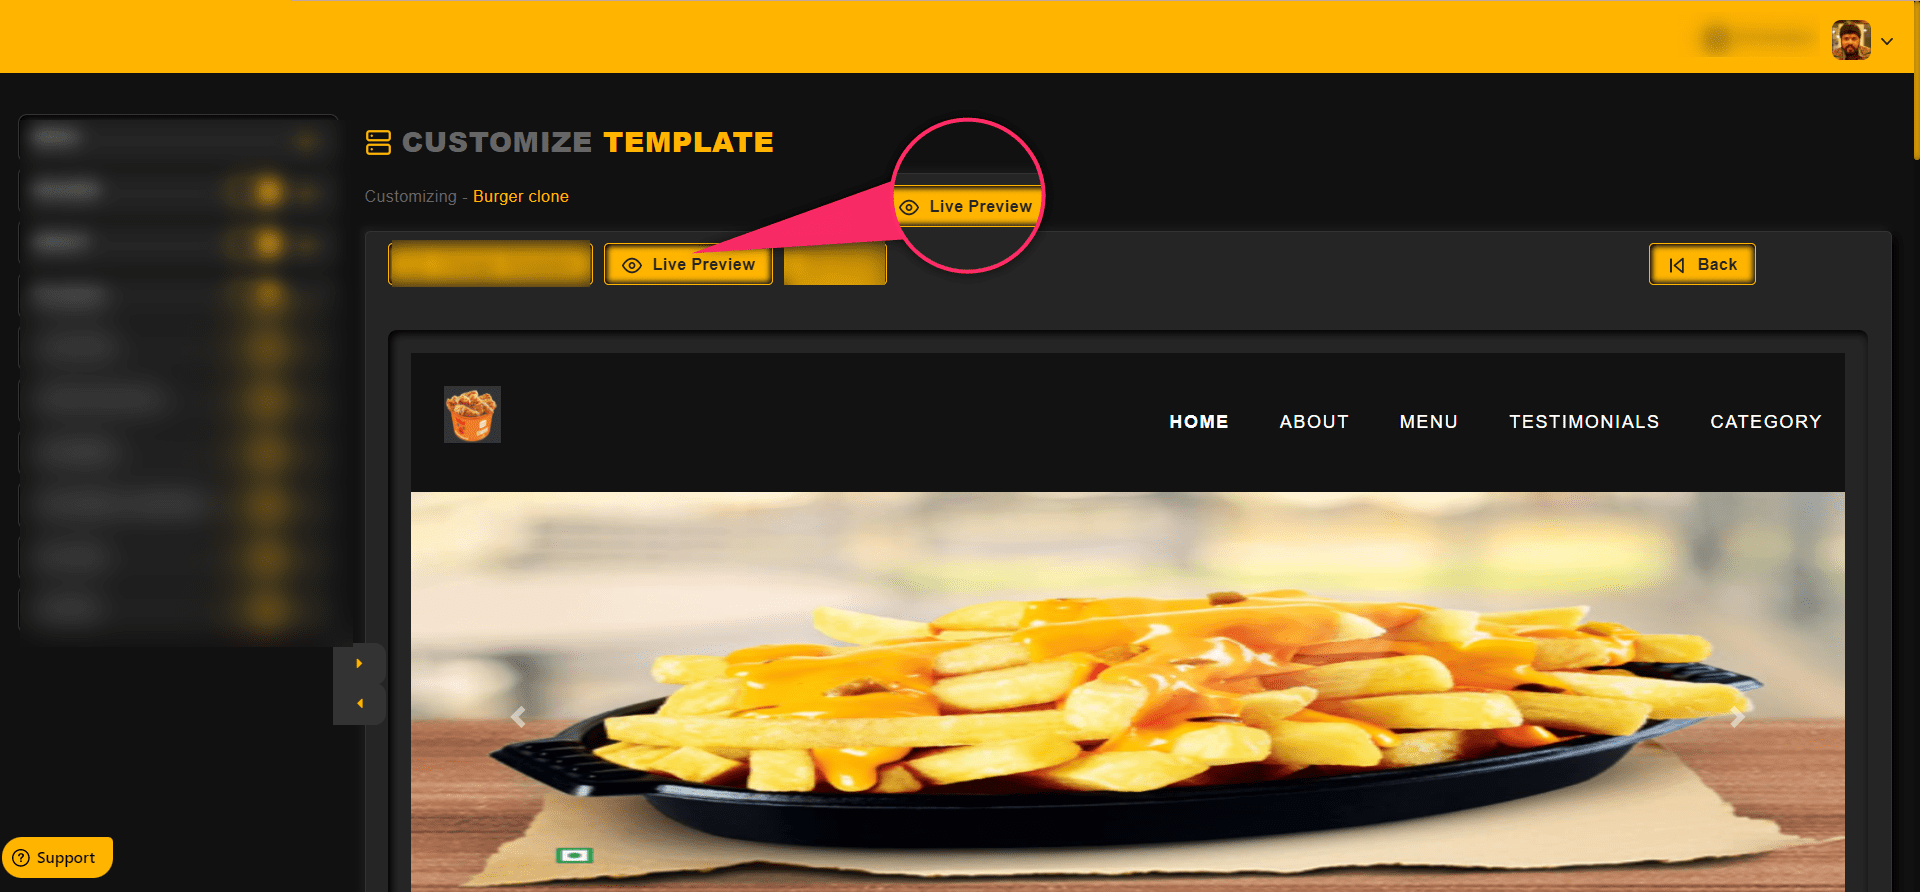
Click on the Live Preview button to preview the whole page with all the completed customizations
One can customize the Featured Categories in the Featured Category section as shown in the image below,
Click on the Featured Category drop down to see the options
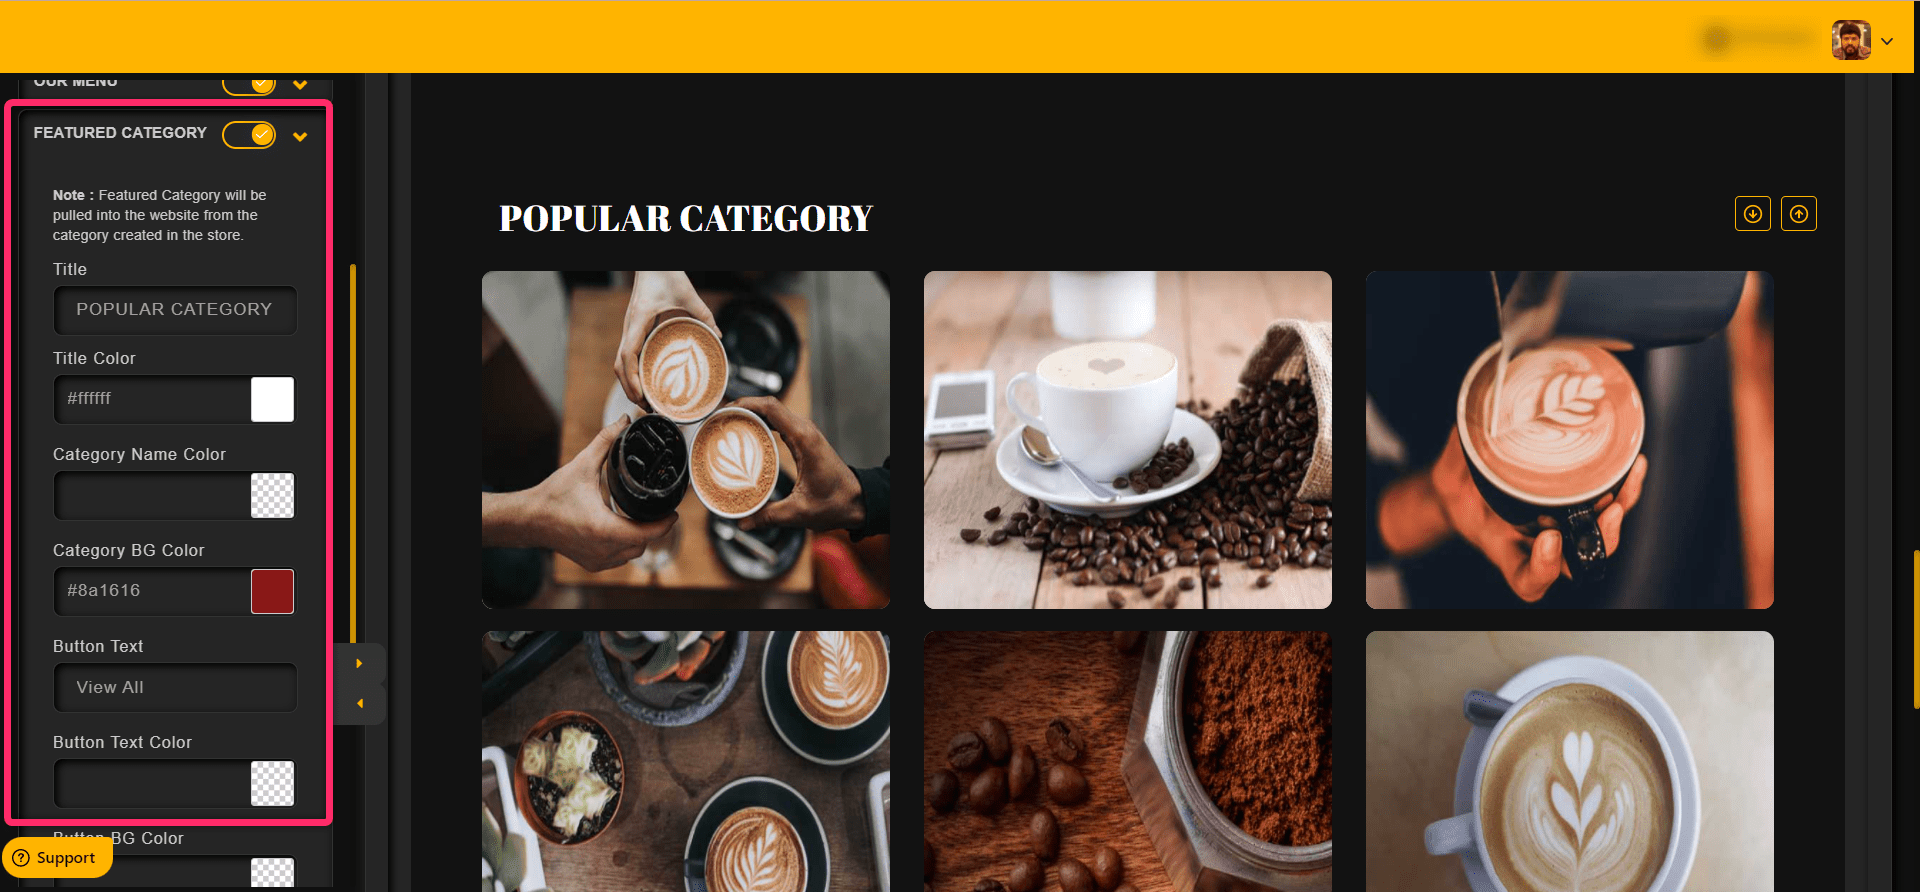
Click on the Toggle to enable or disable the Feature Category section


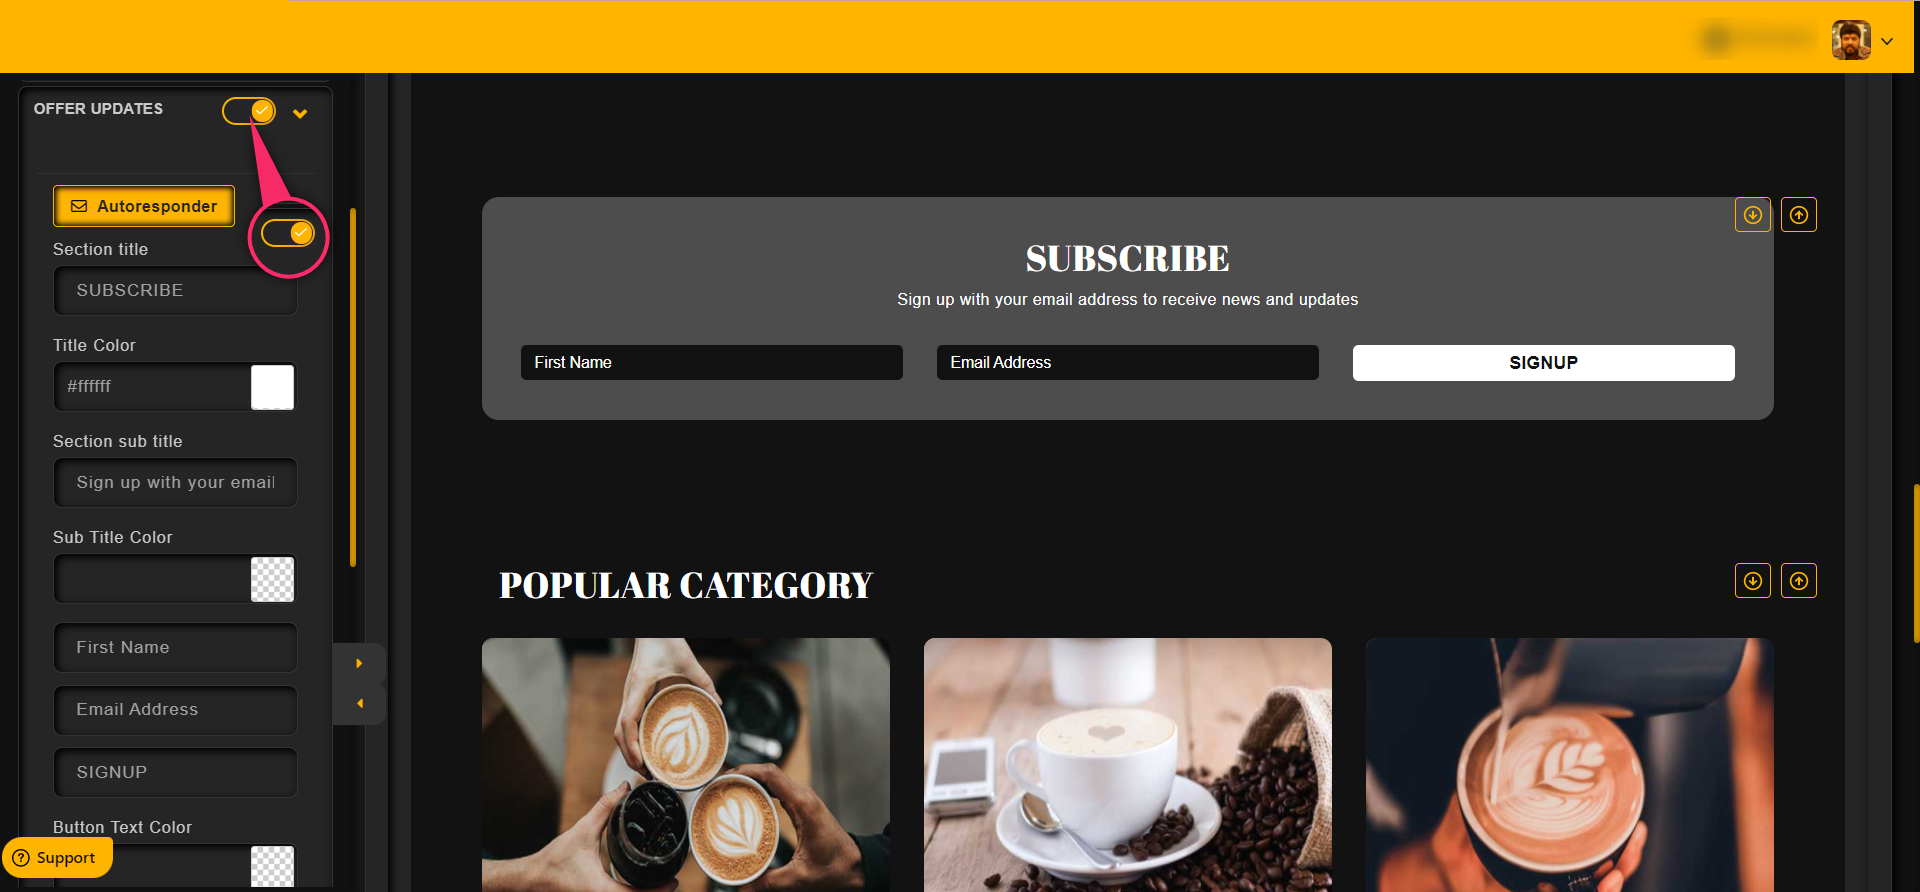
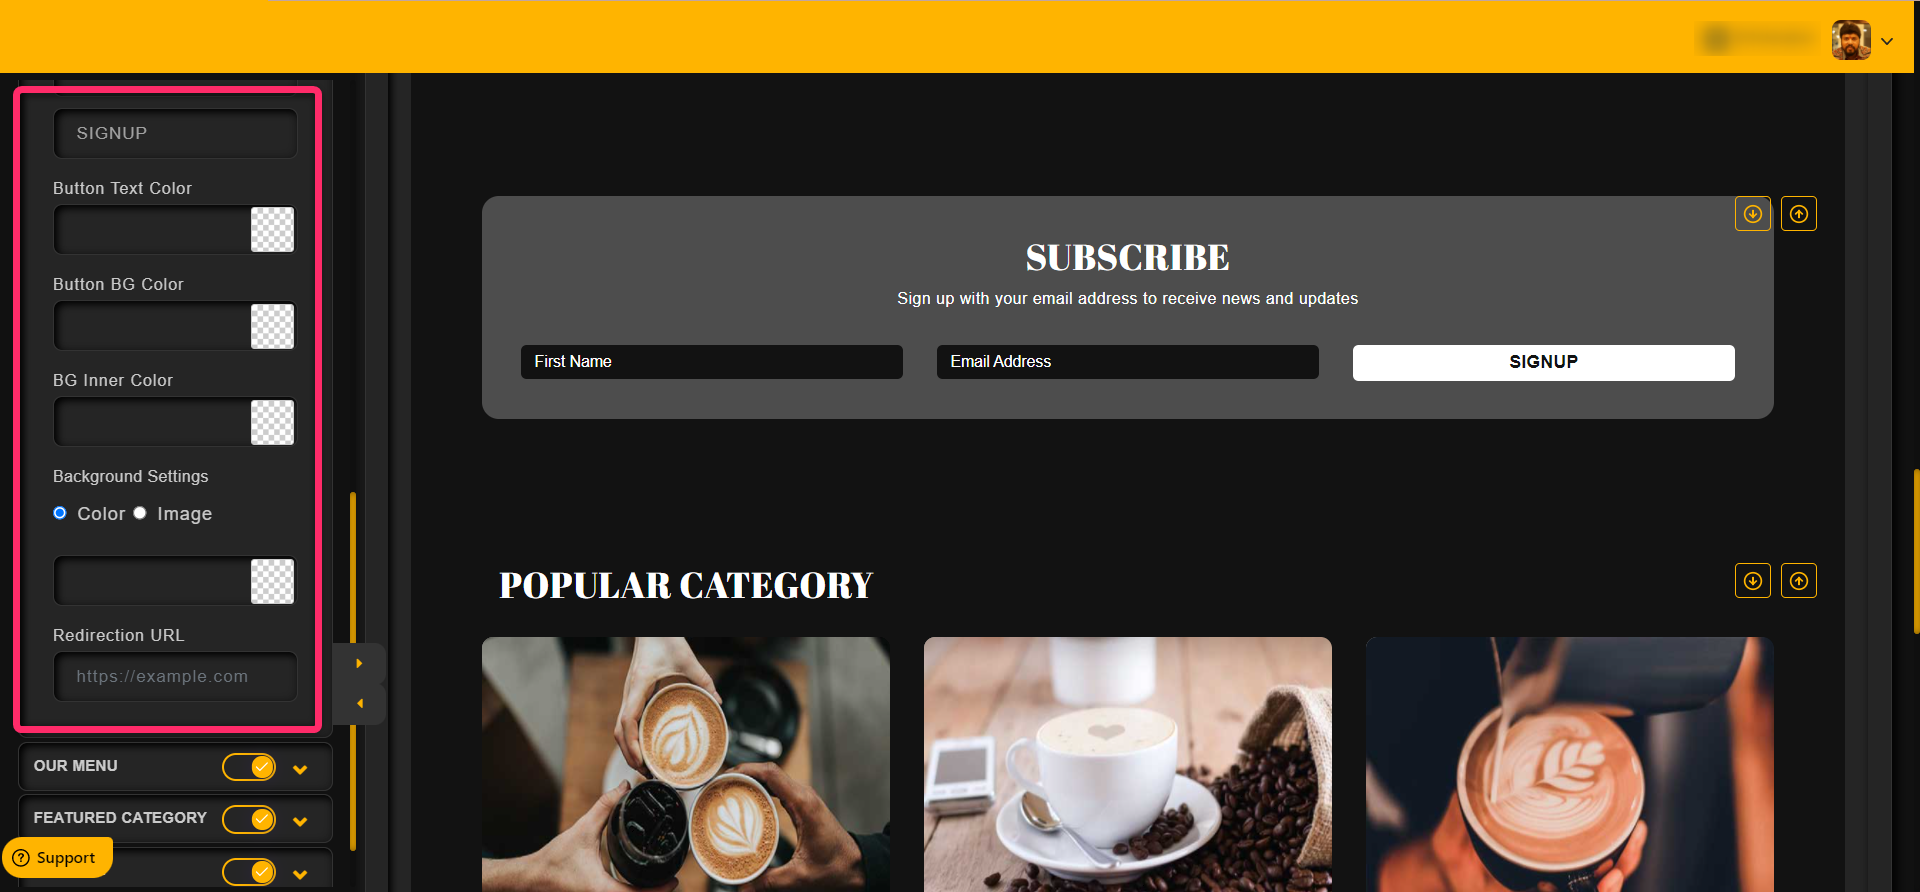
One can customize the Optin section in the Offer Updates section as shown in the image below,
Click on the Offer Updates drop down to see the options
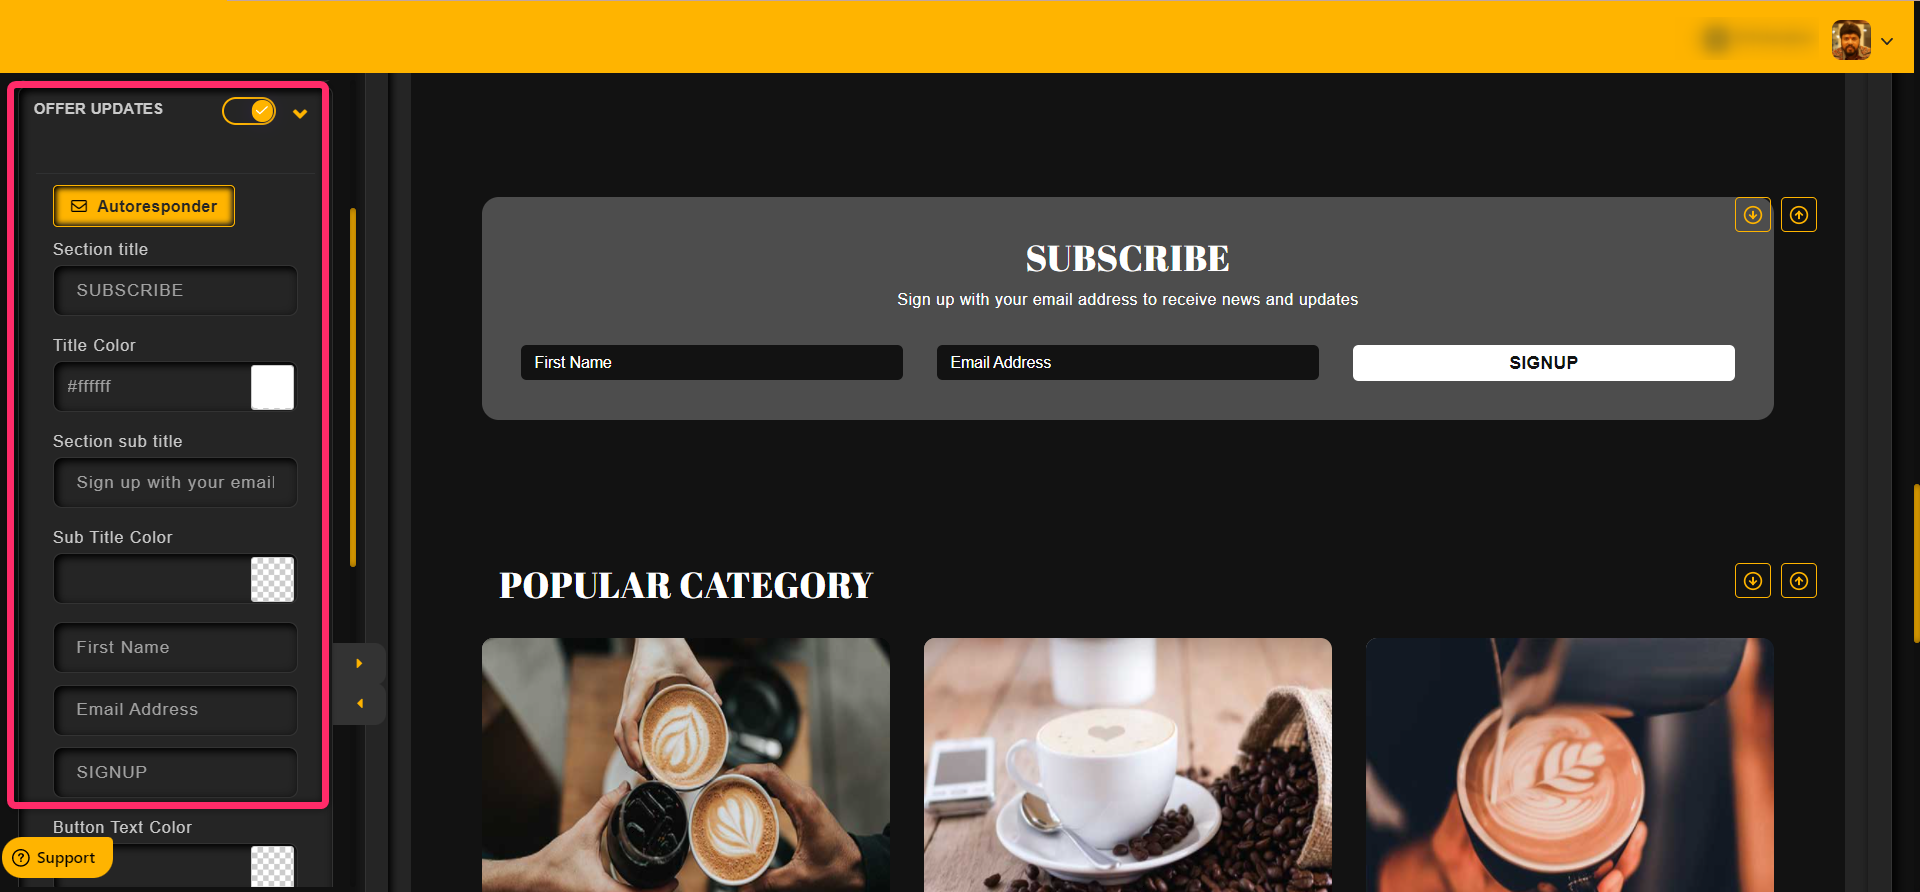
Click on the toggle to enable or disable the optin section
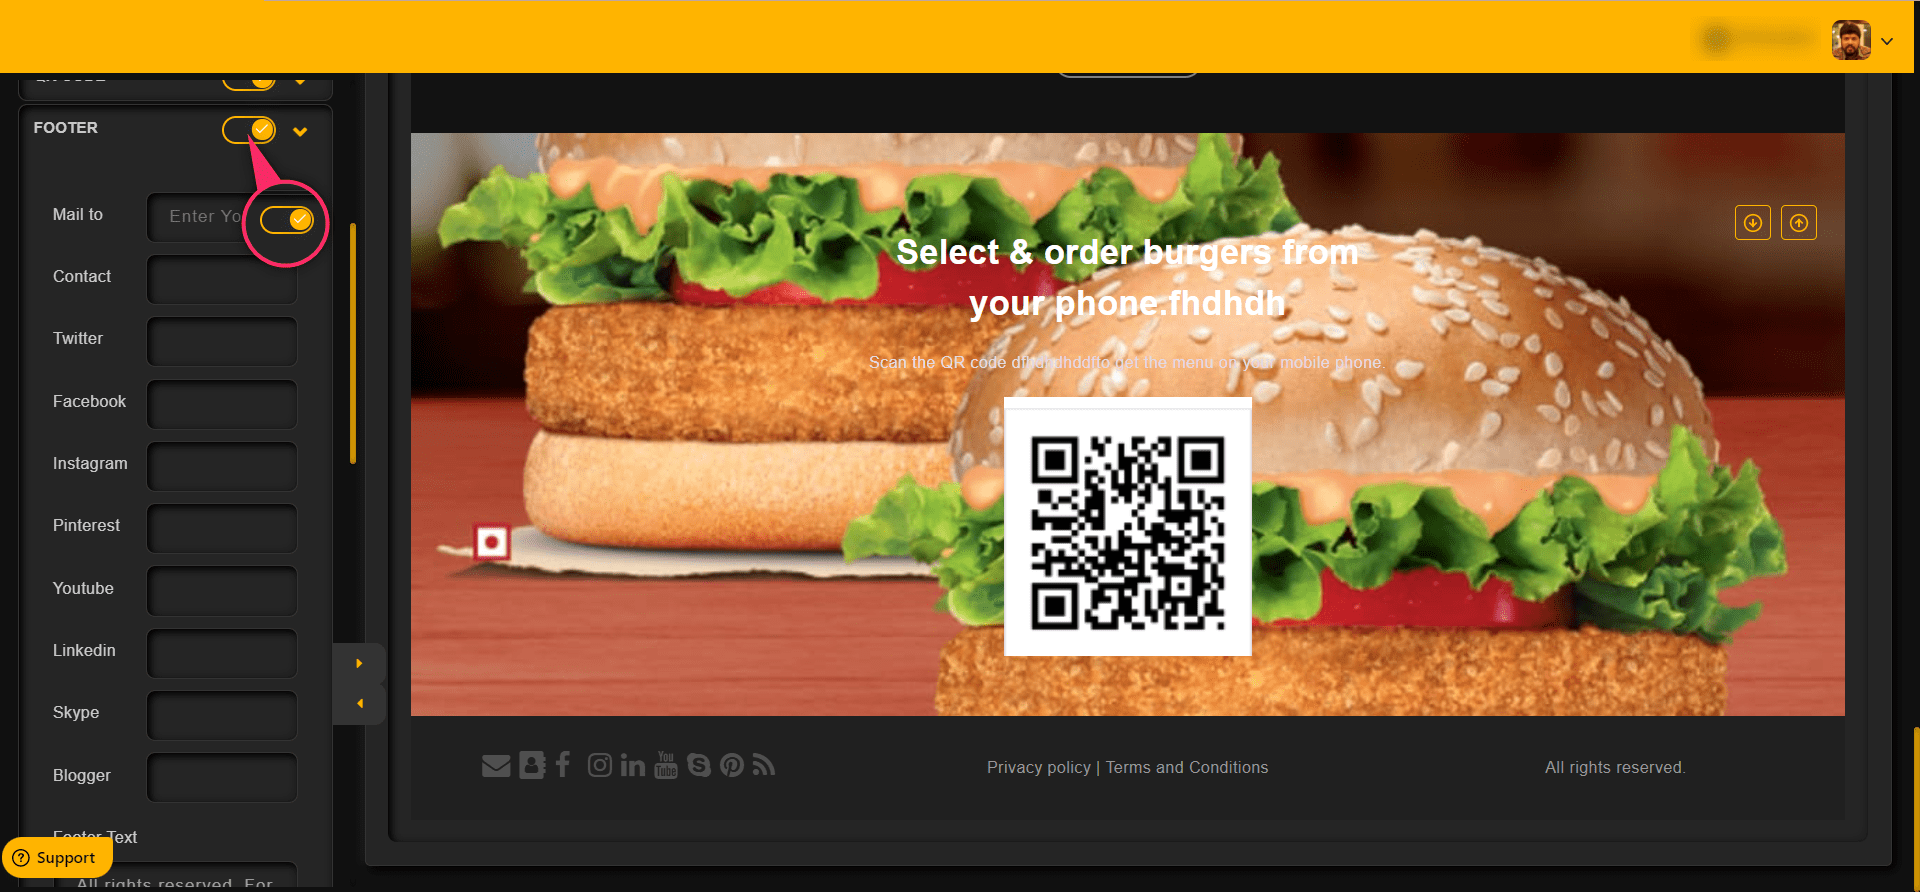
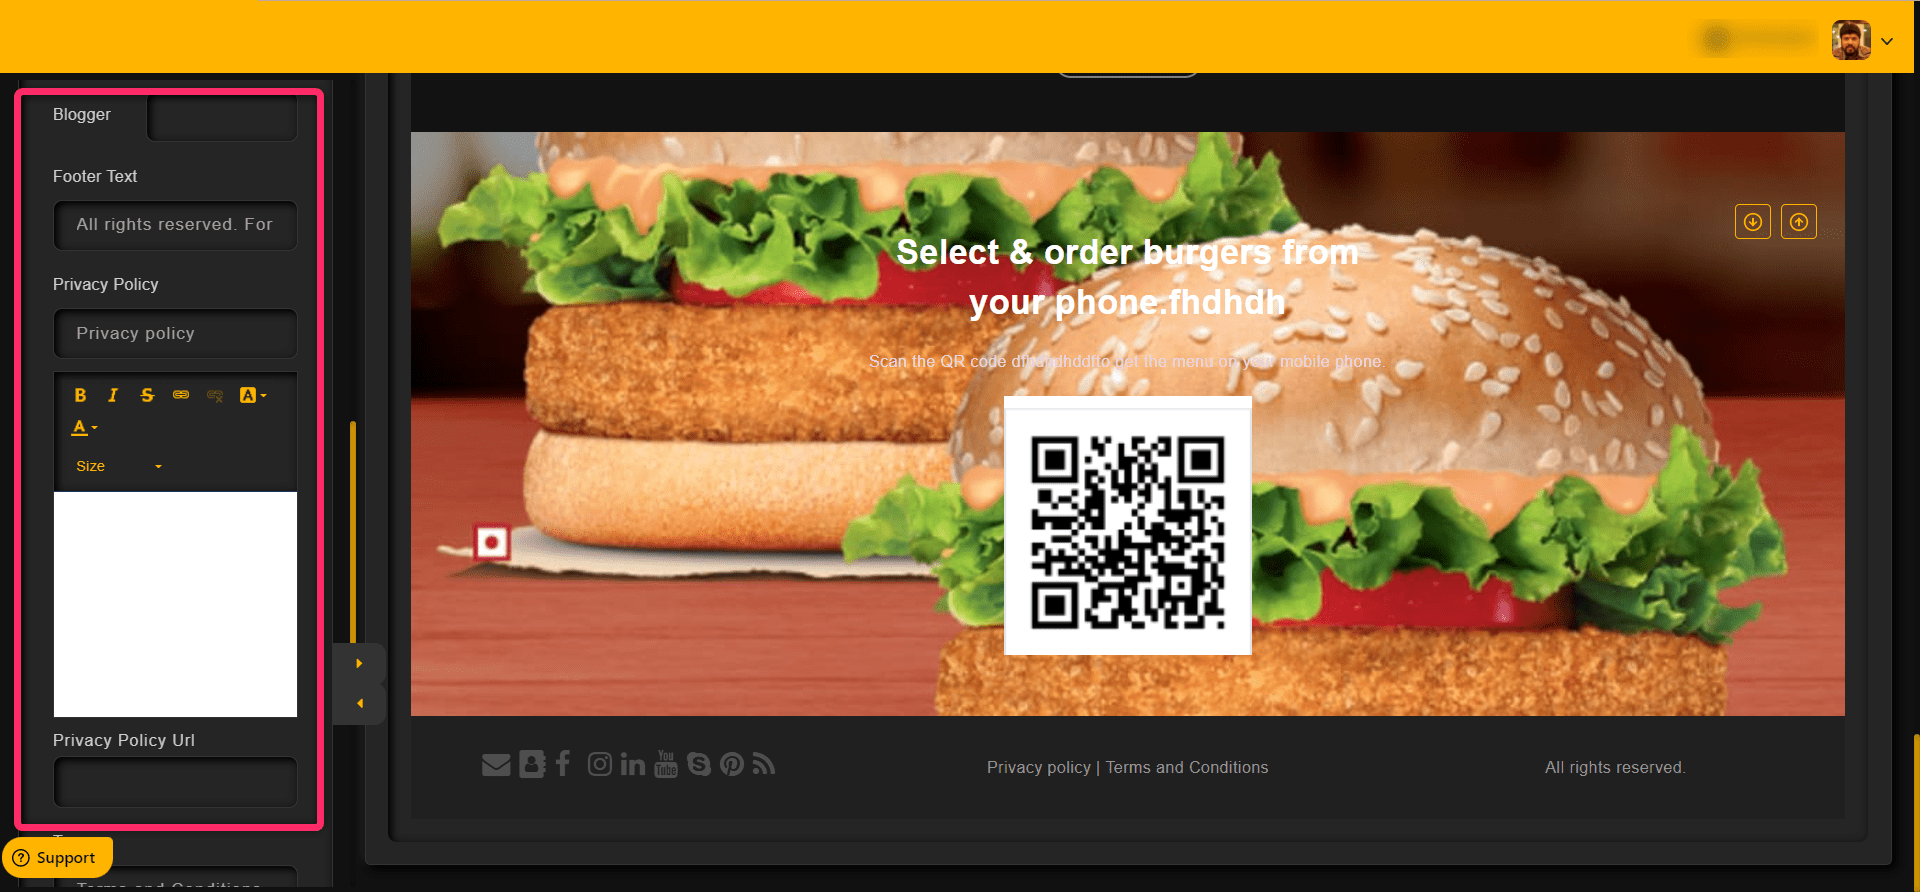
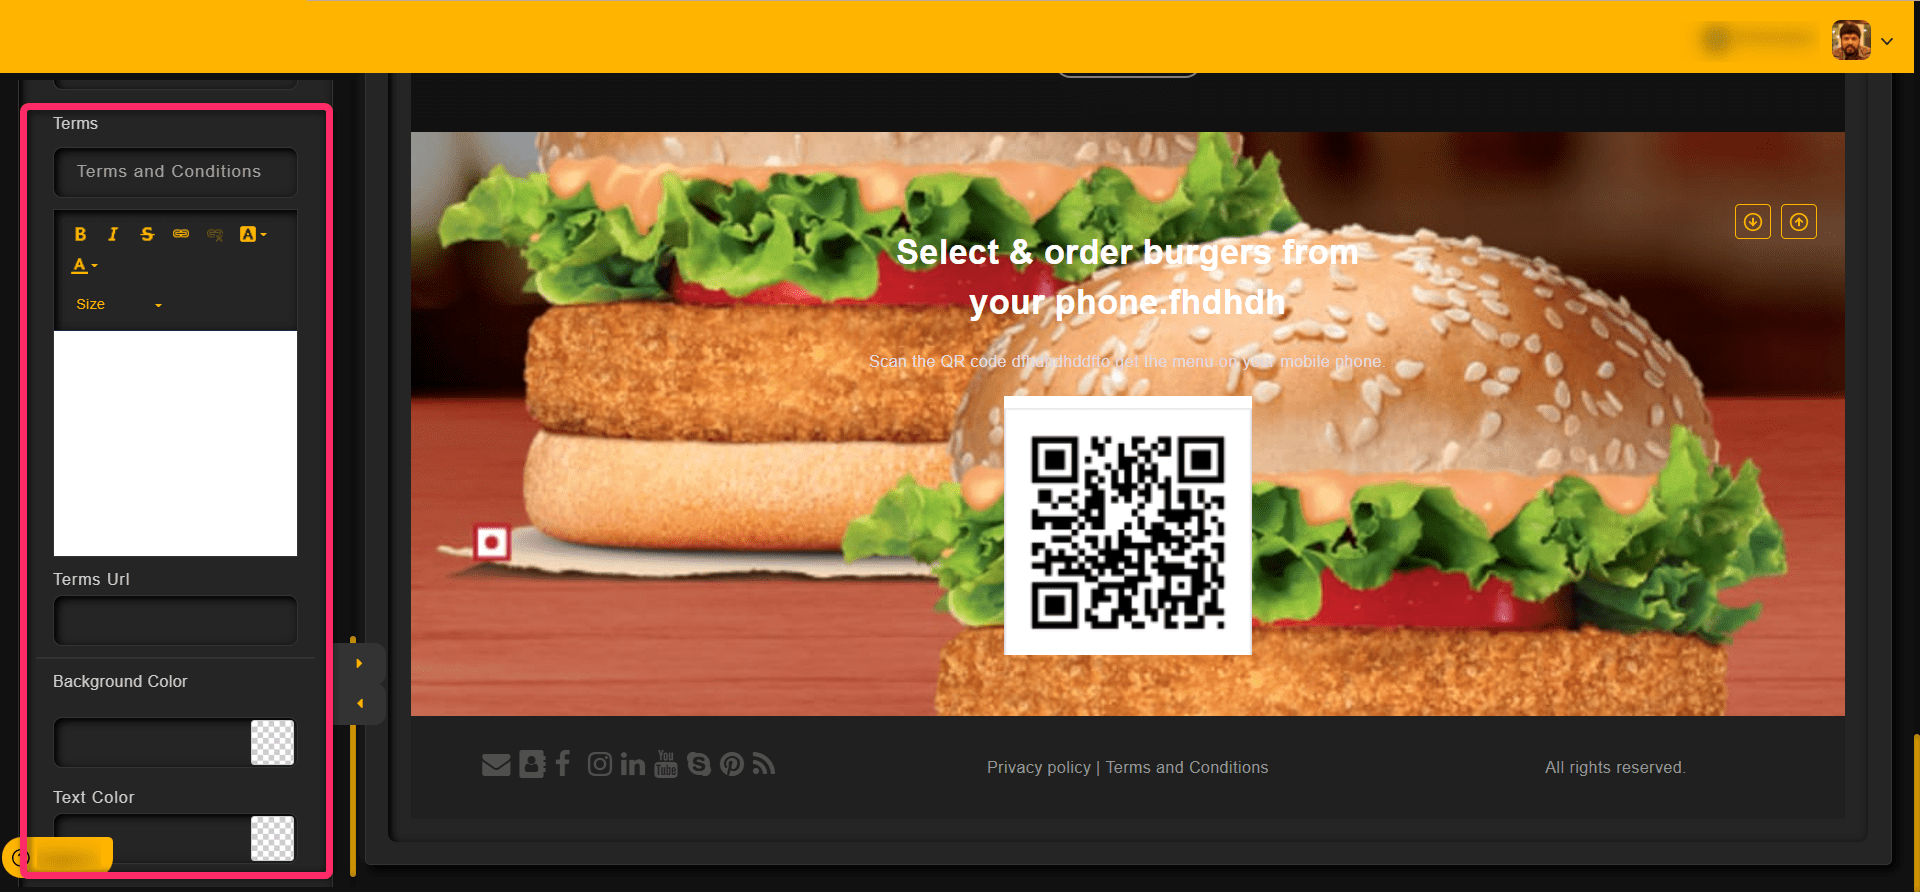
One can customize the Footer section in the Footer as shown in the image below,
Click on the Footer drop down to see the options

Click on the toggle to enable or disable the Footer section from the page
One can change the template of a web page by clicking on the Change Template option as shown in the image below,
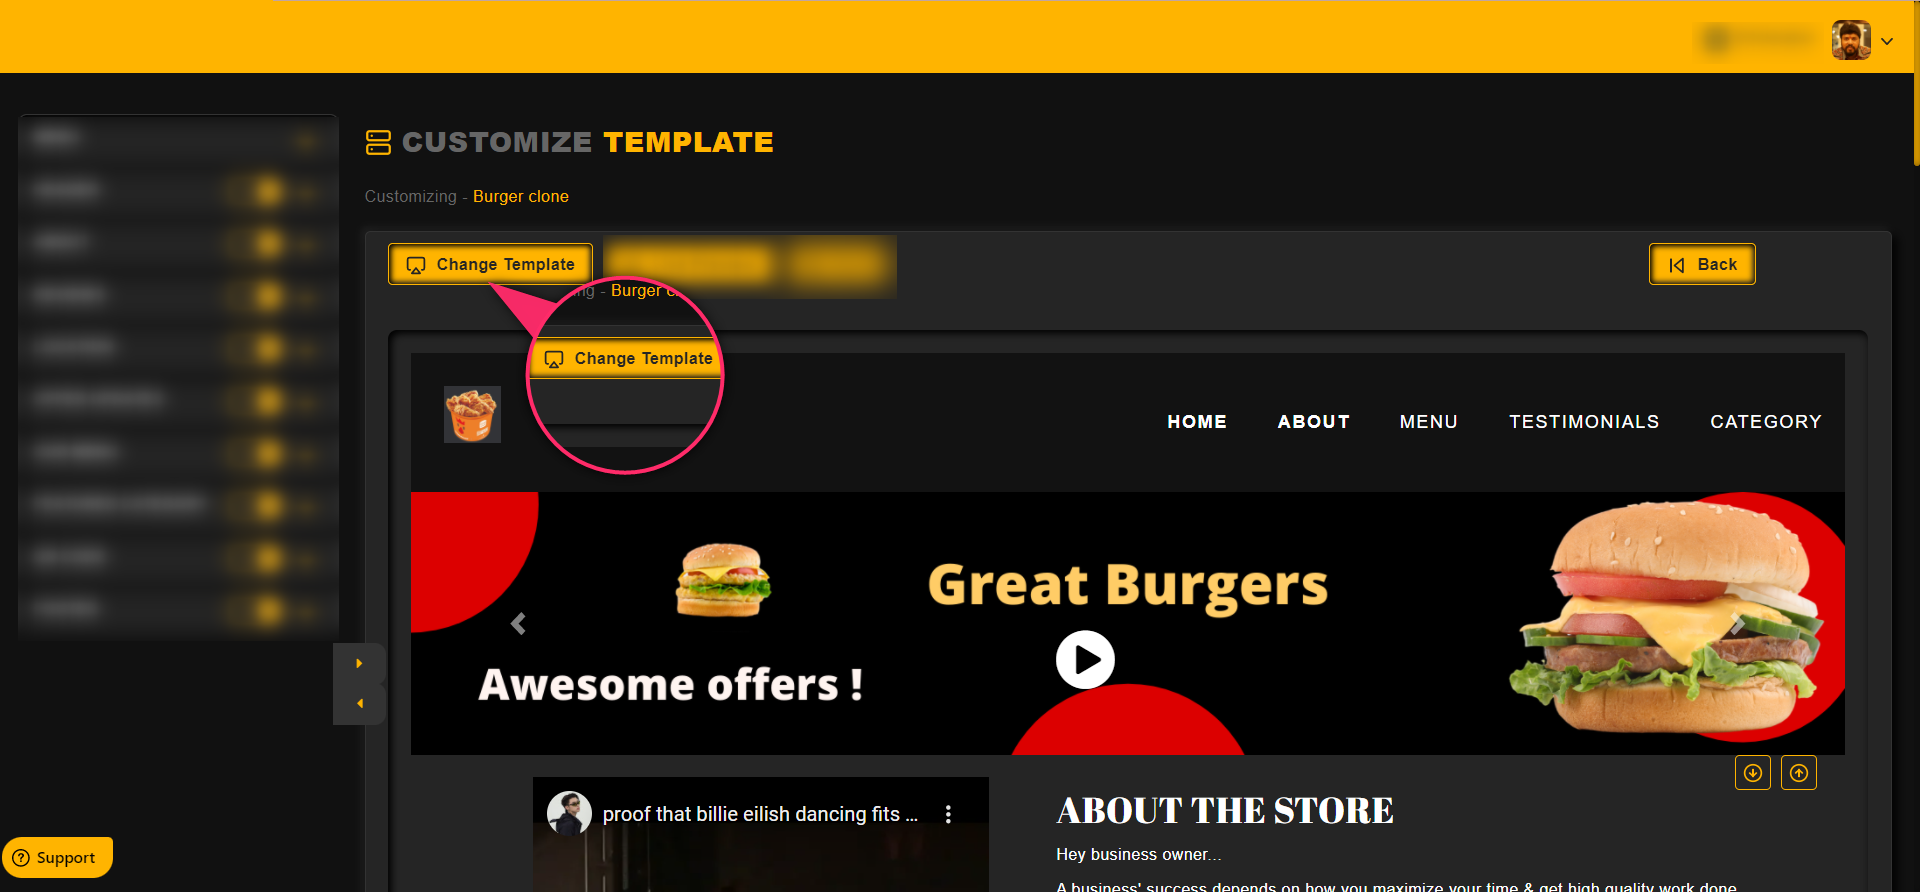
Once a template is selected, a Tick mark will be displayed over the template thumbnail
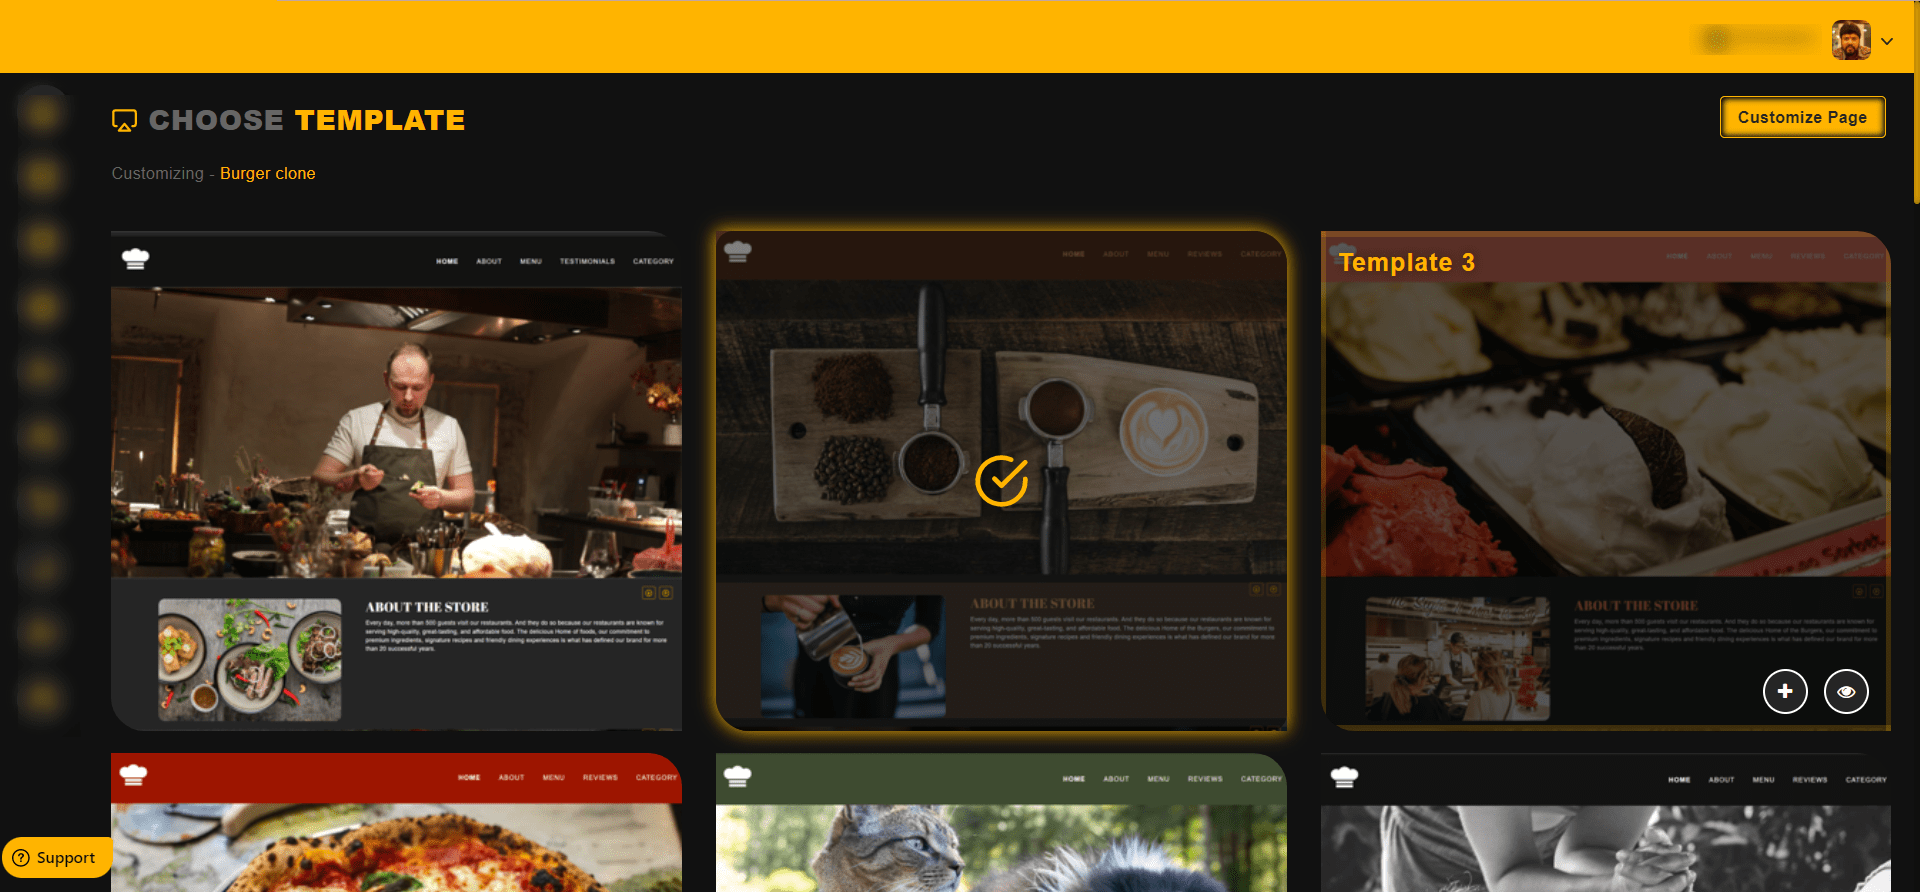
Click on the + icon to select a template from the list

Click on the preview icon or eye icon, to preview the template

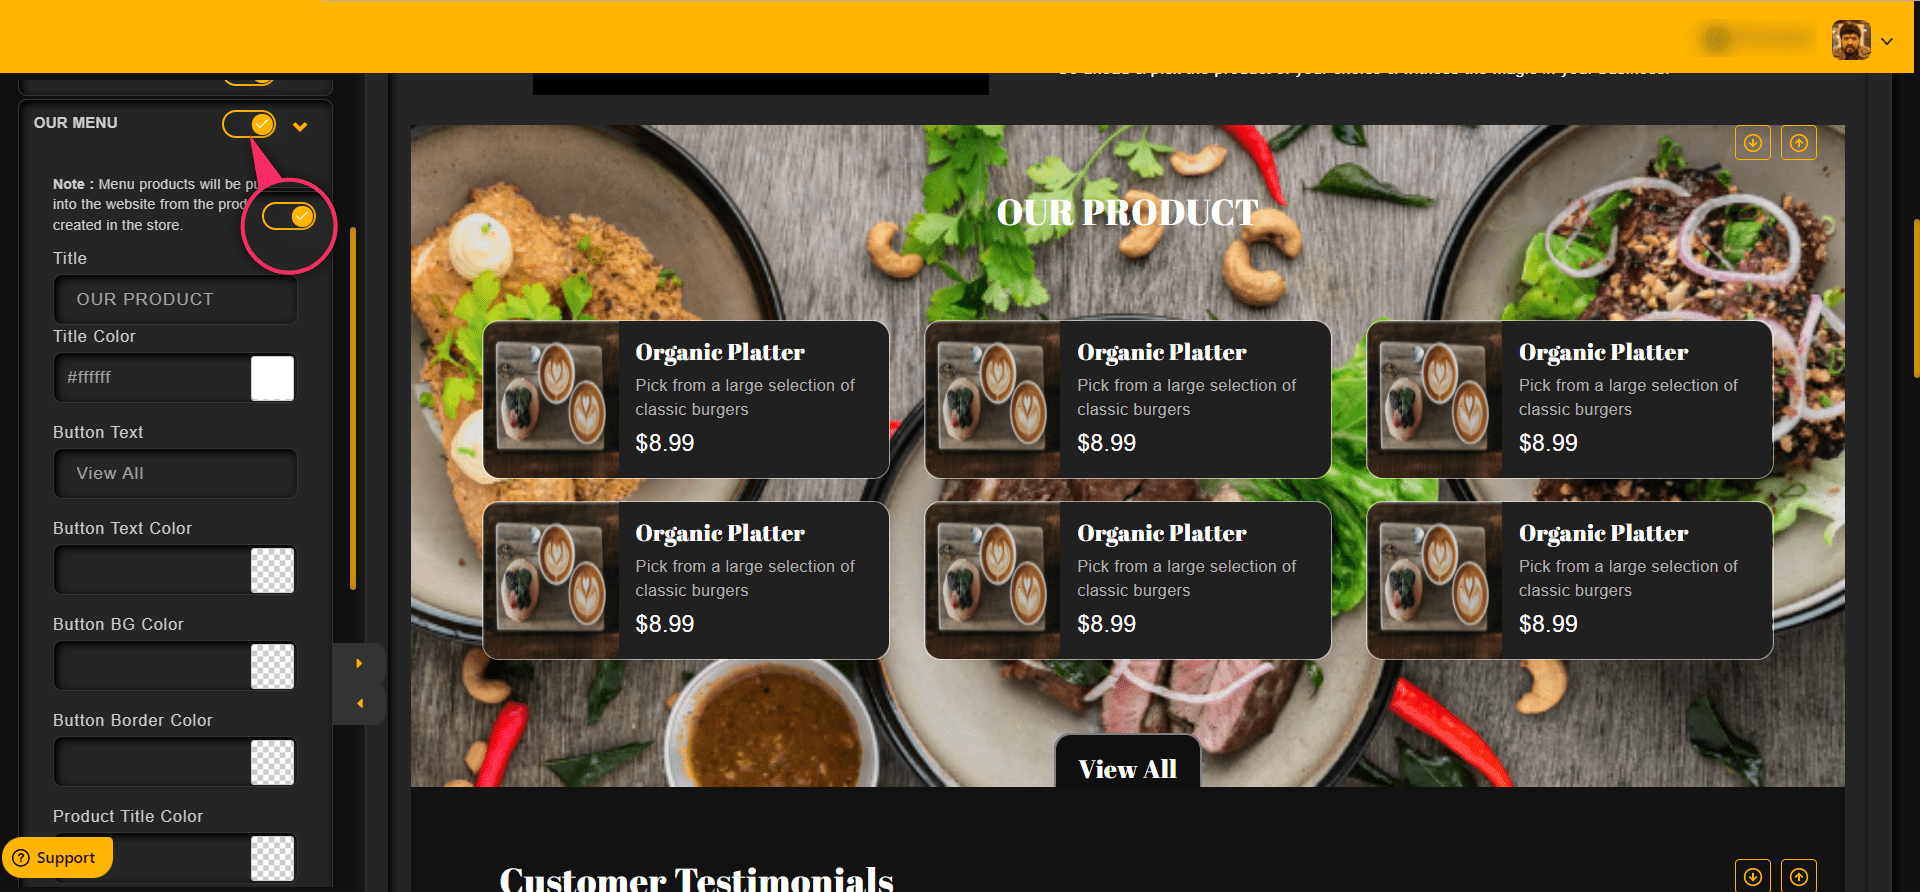
One can customize the Our menus in the Our menu section as shown in the image below,
Click on the Our Menu drop down to see the options
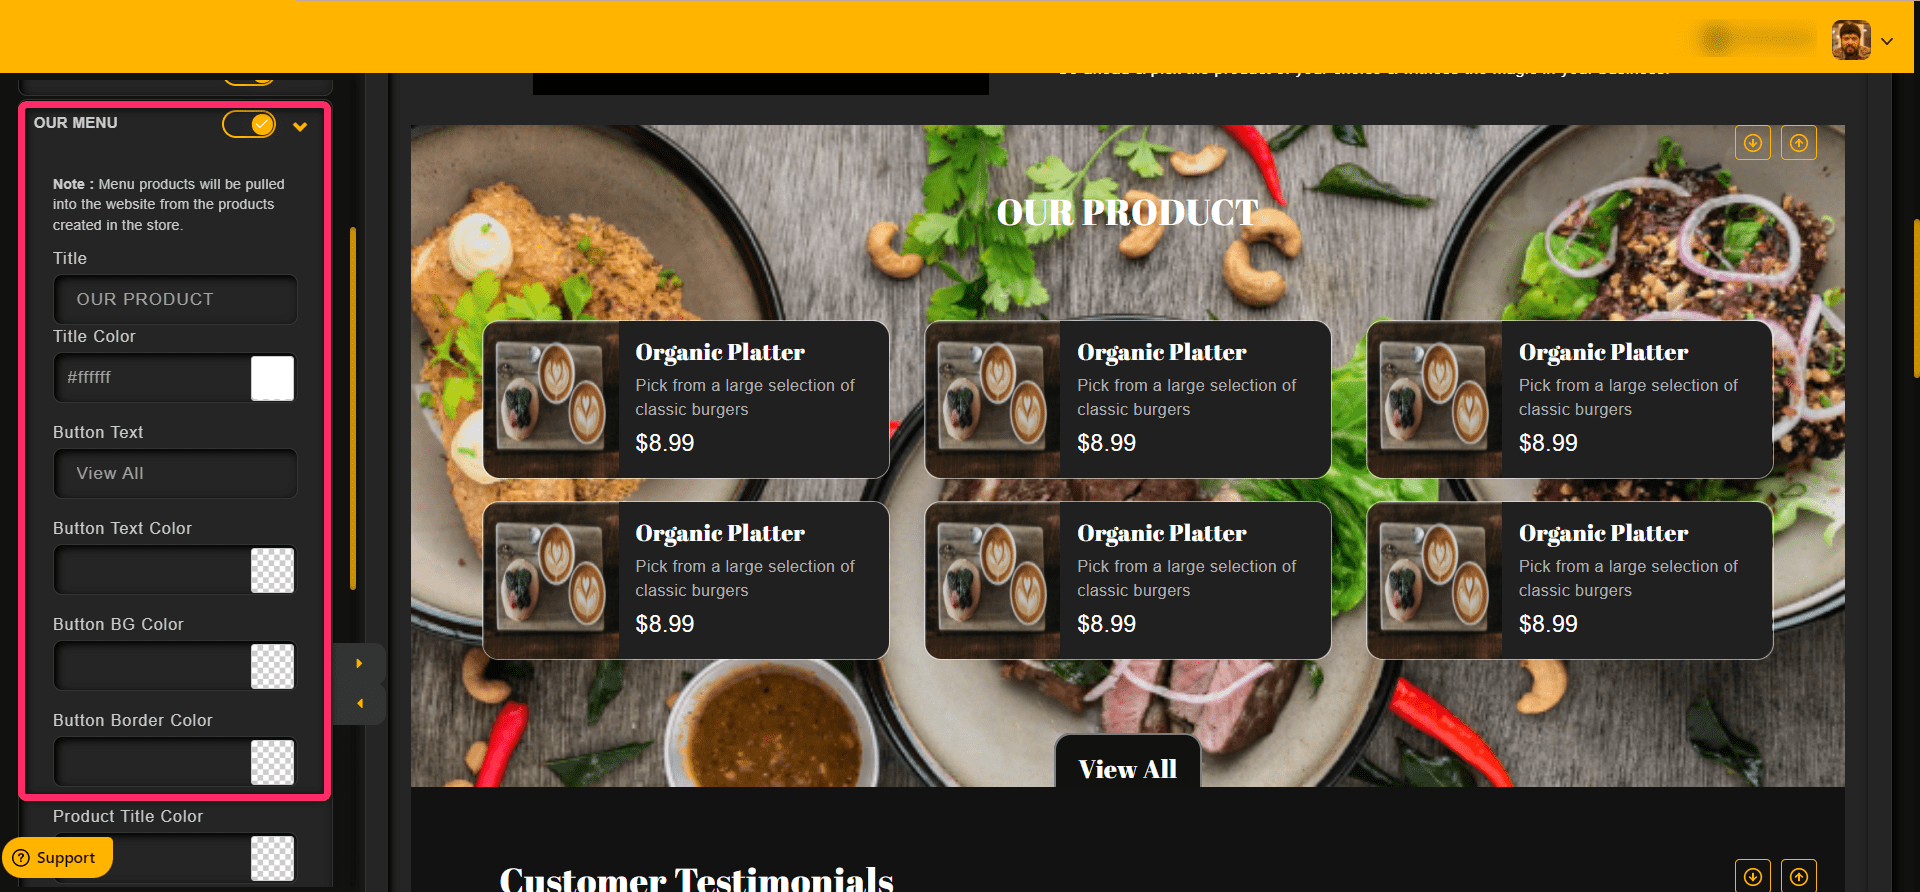
To enable or disable our menus, click on the toggle
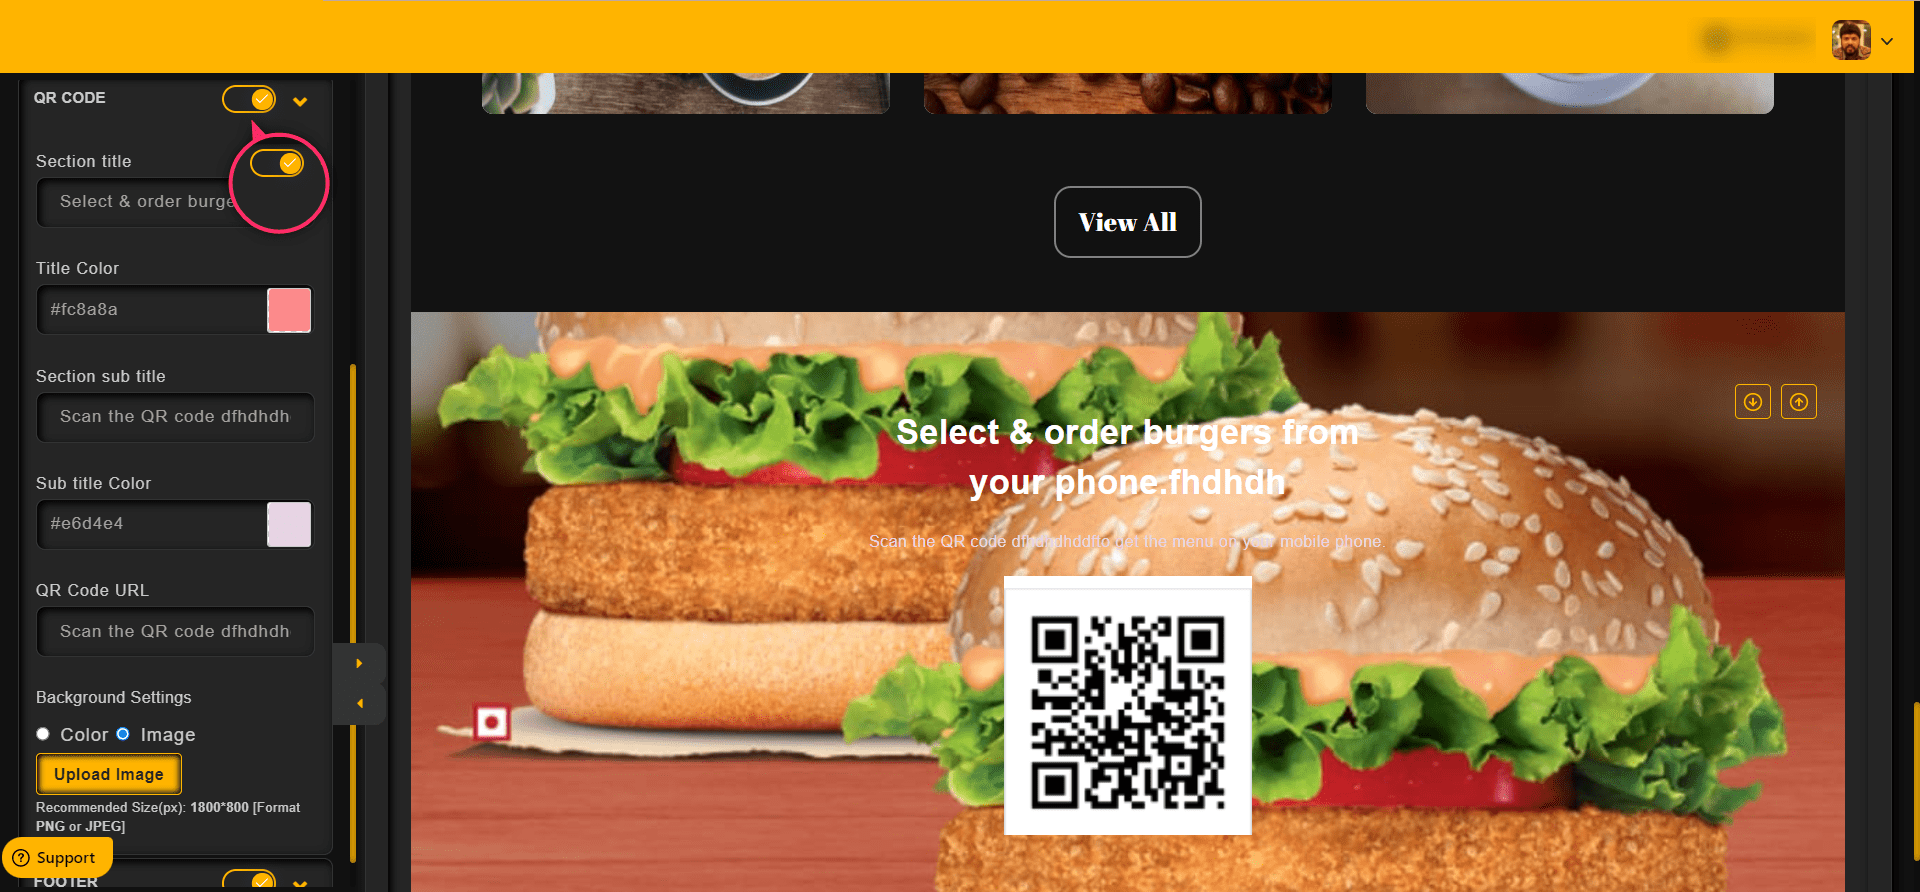
One can customize the QR code section in the QR code as shown in the image below,
Click on the QR code drop down to see the options
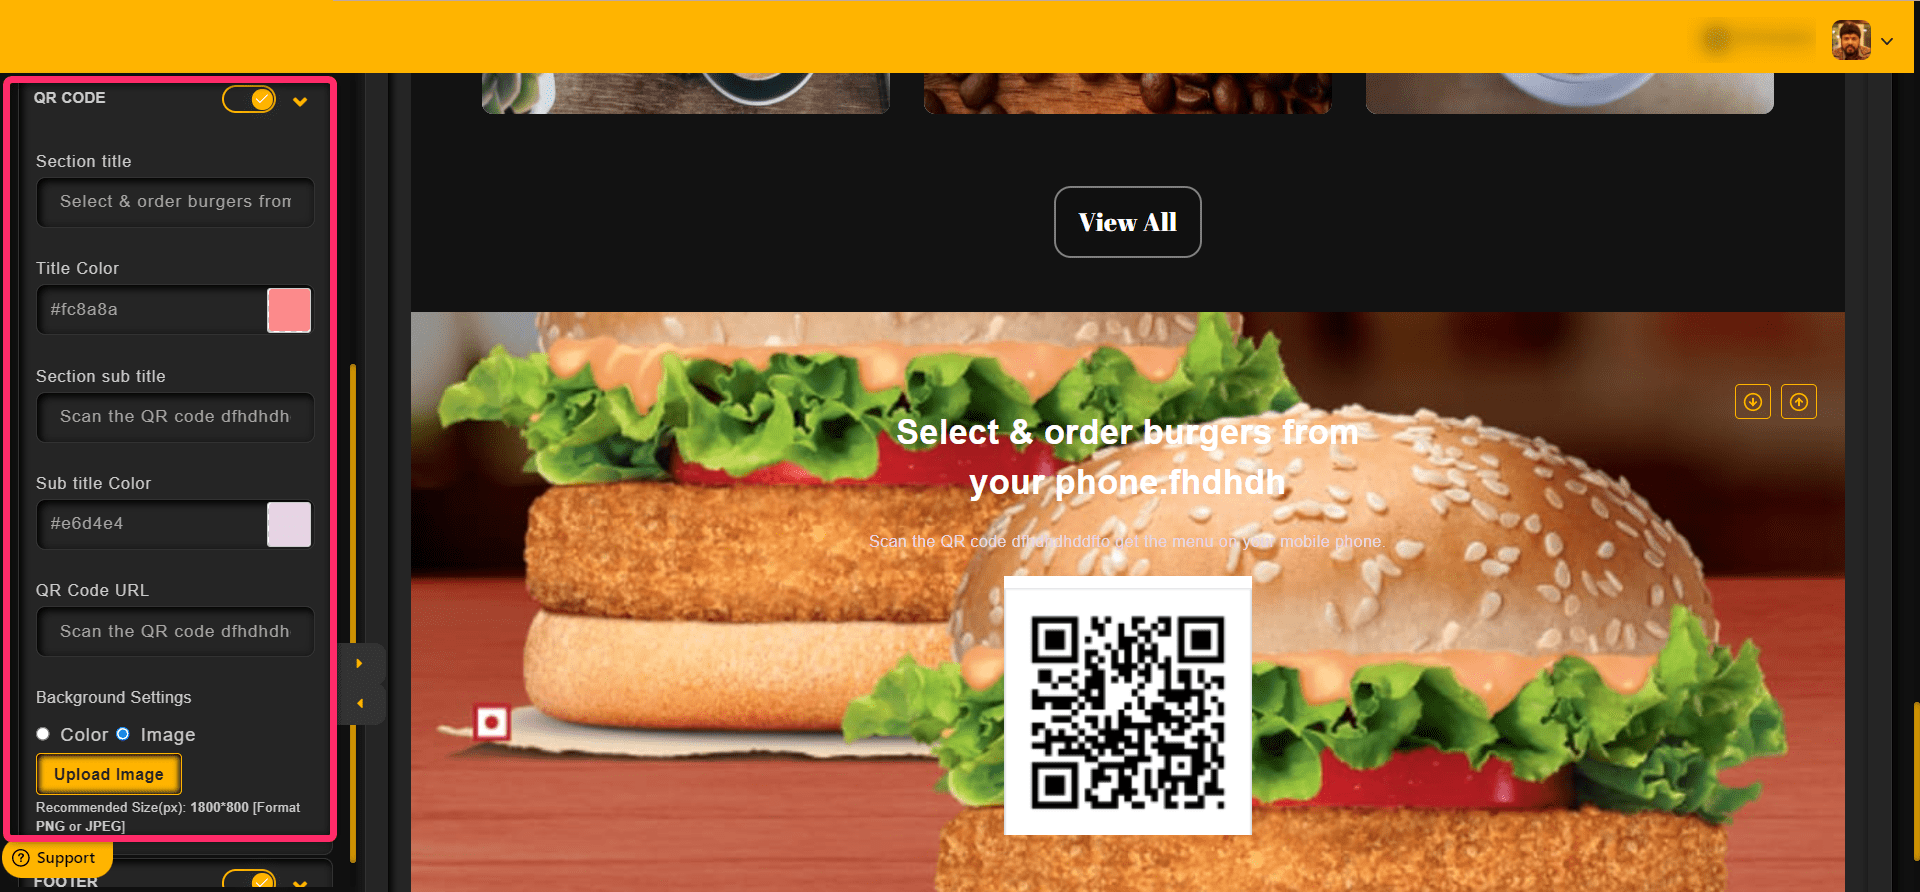
To enable or disable the QR code section from the home page, click on the toggle
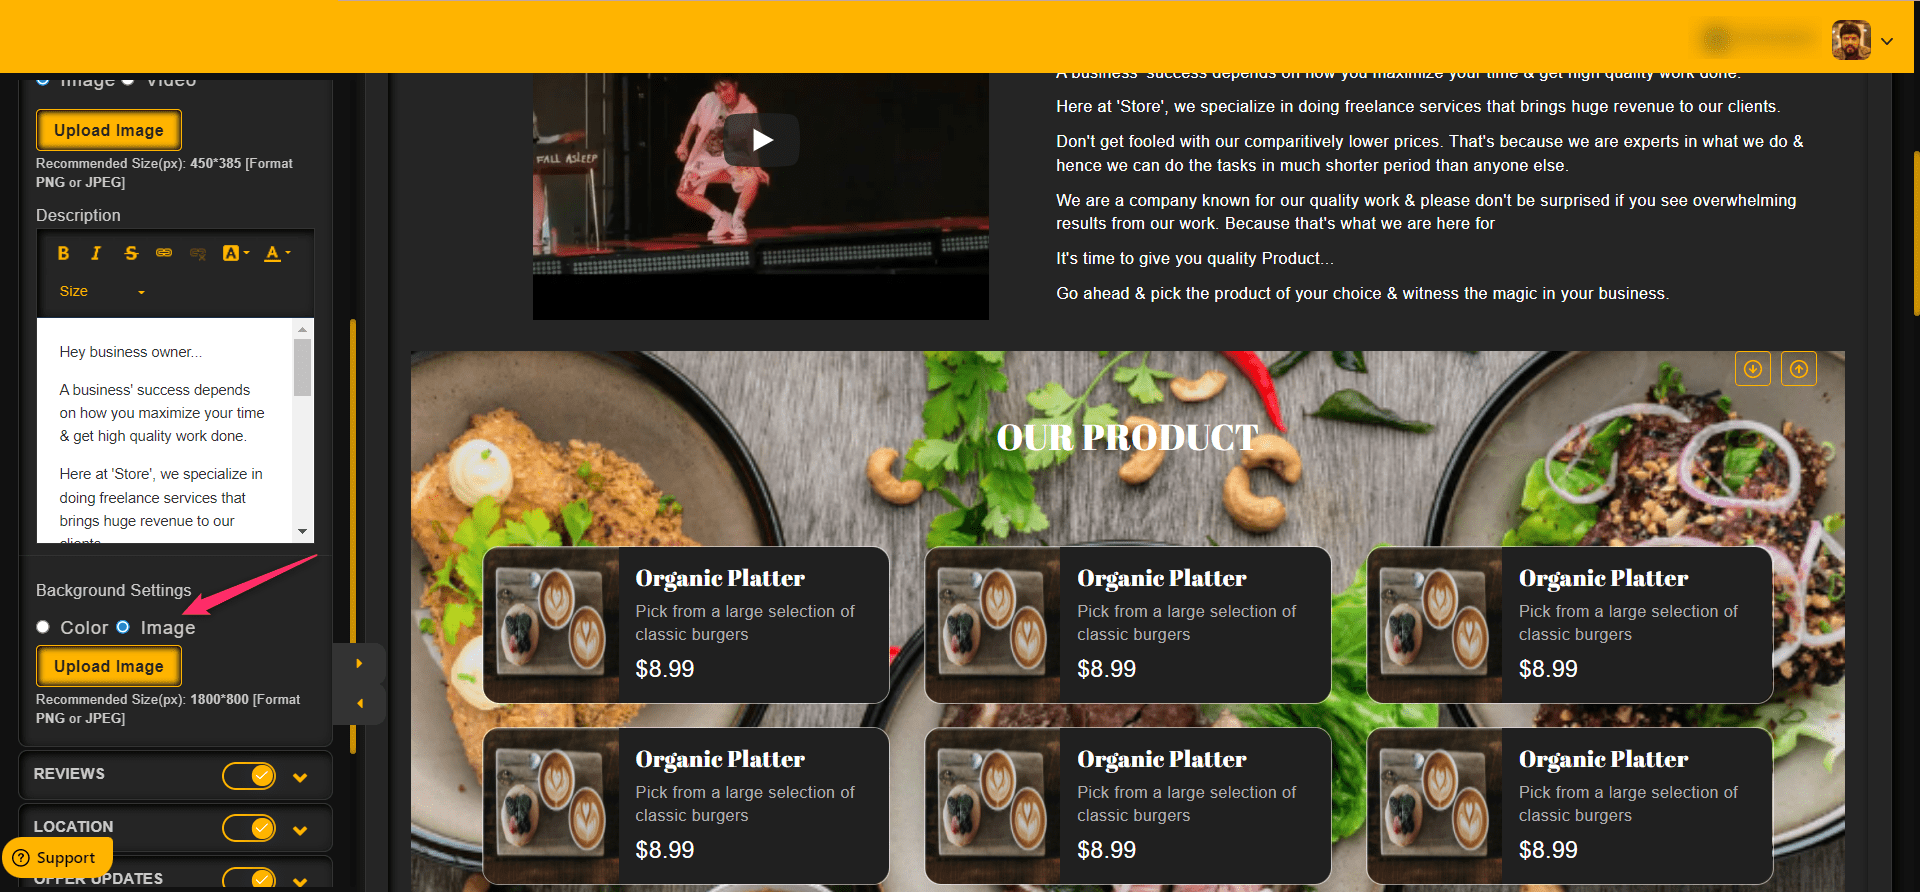
One can customize the About section as shown in the image below,
Click on the About drop down to see the options
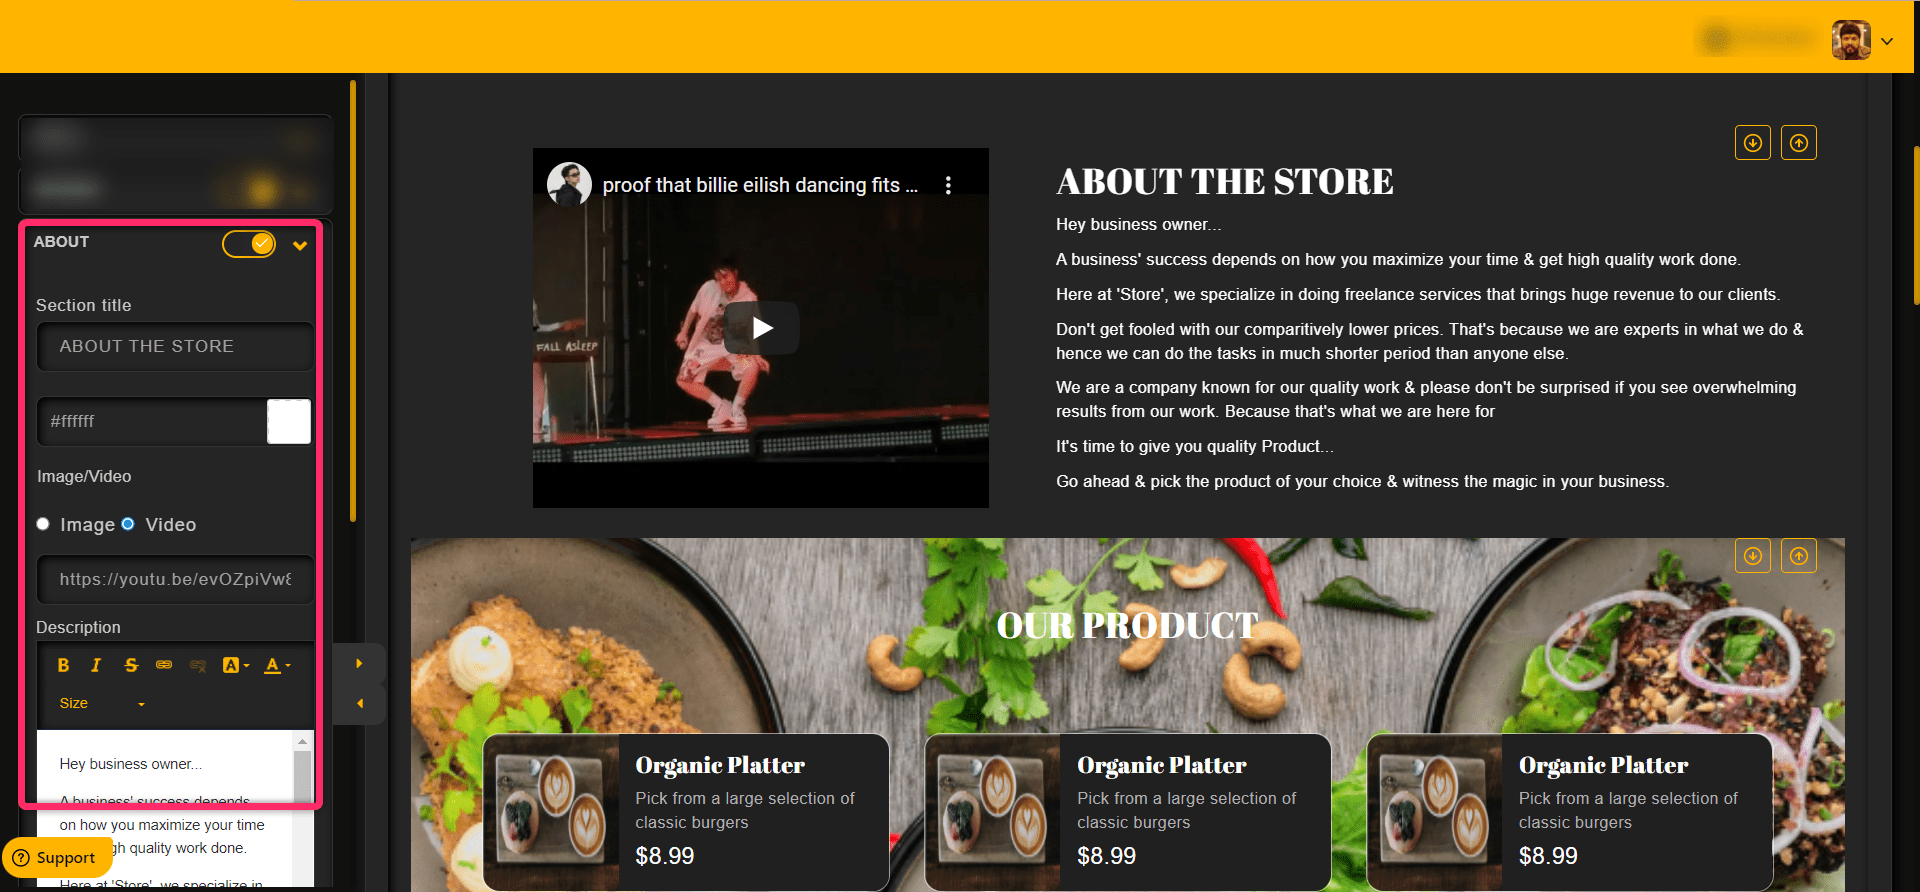
Using the toggle one can enable or disable the about section
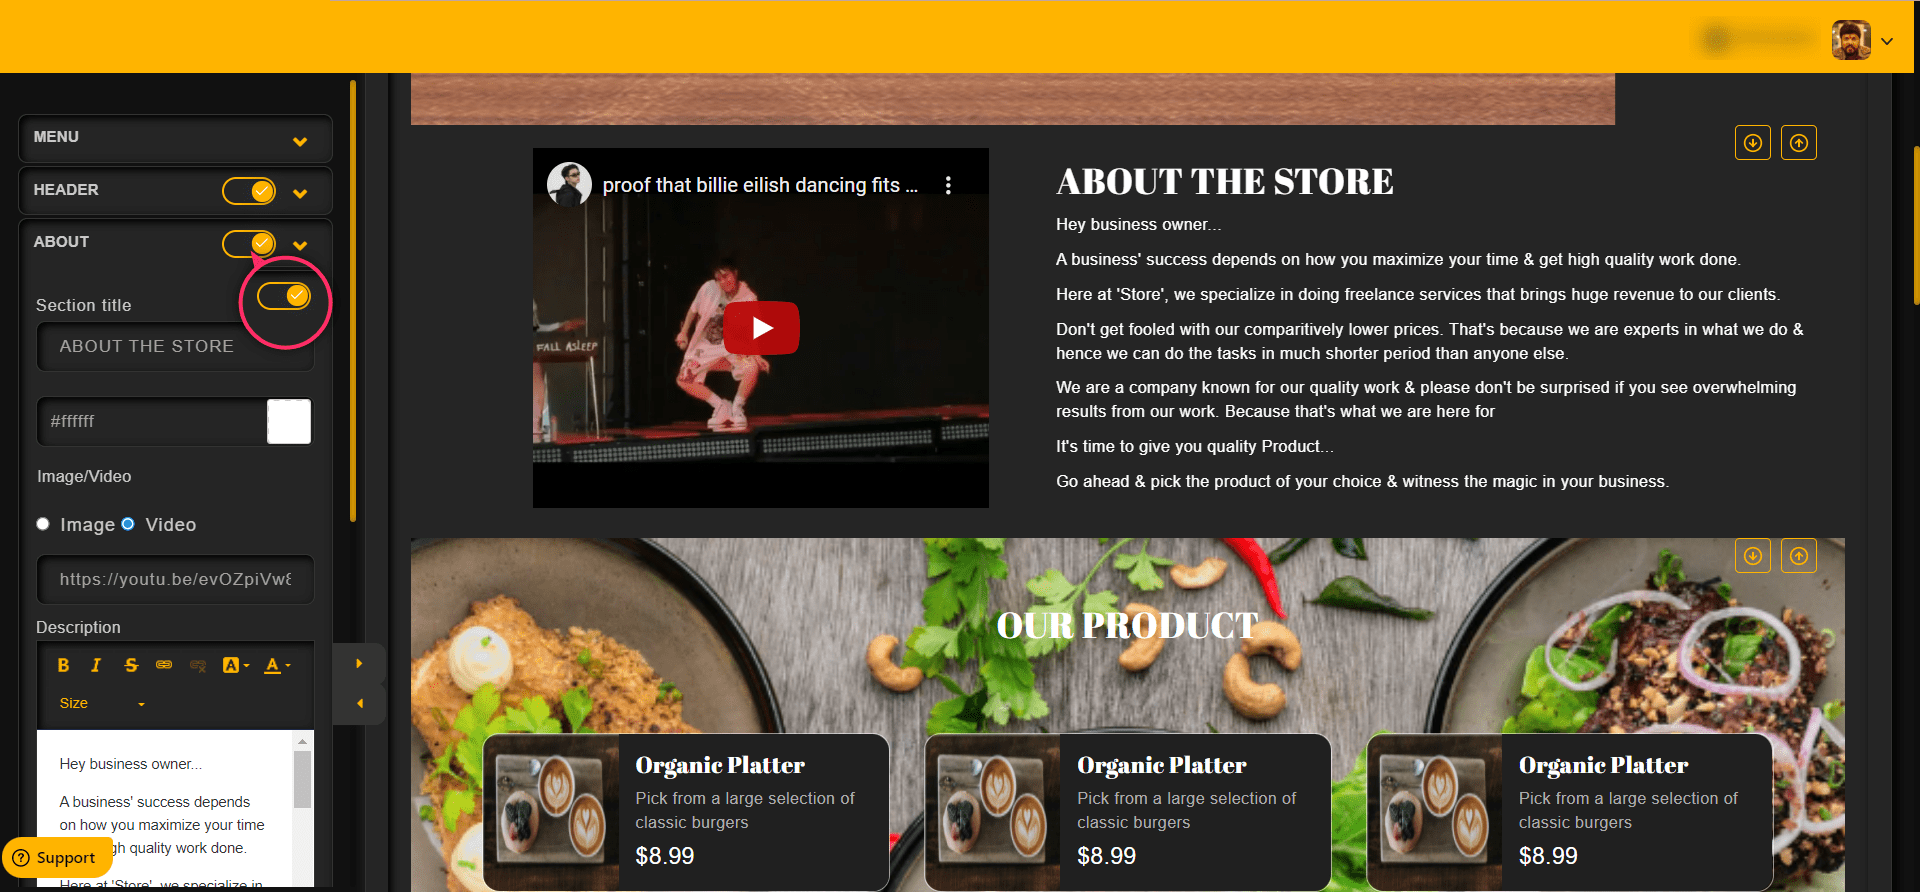
To add a video to the about section, click on the Video and then add a video URL in the field provided

To add an image to the about section, click on the image and then upload the image

To have a background color for the about section,
Choose color in the Background settings and then choose a color
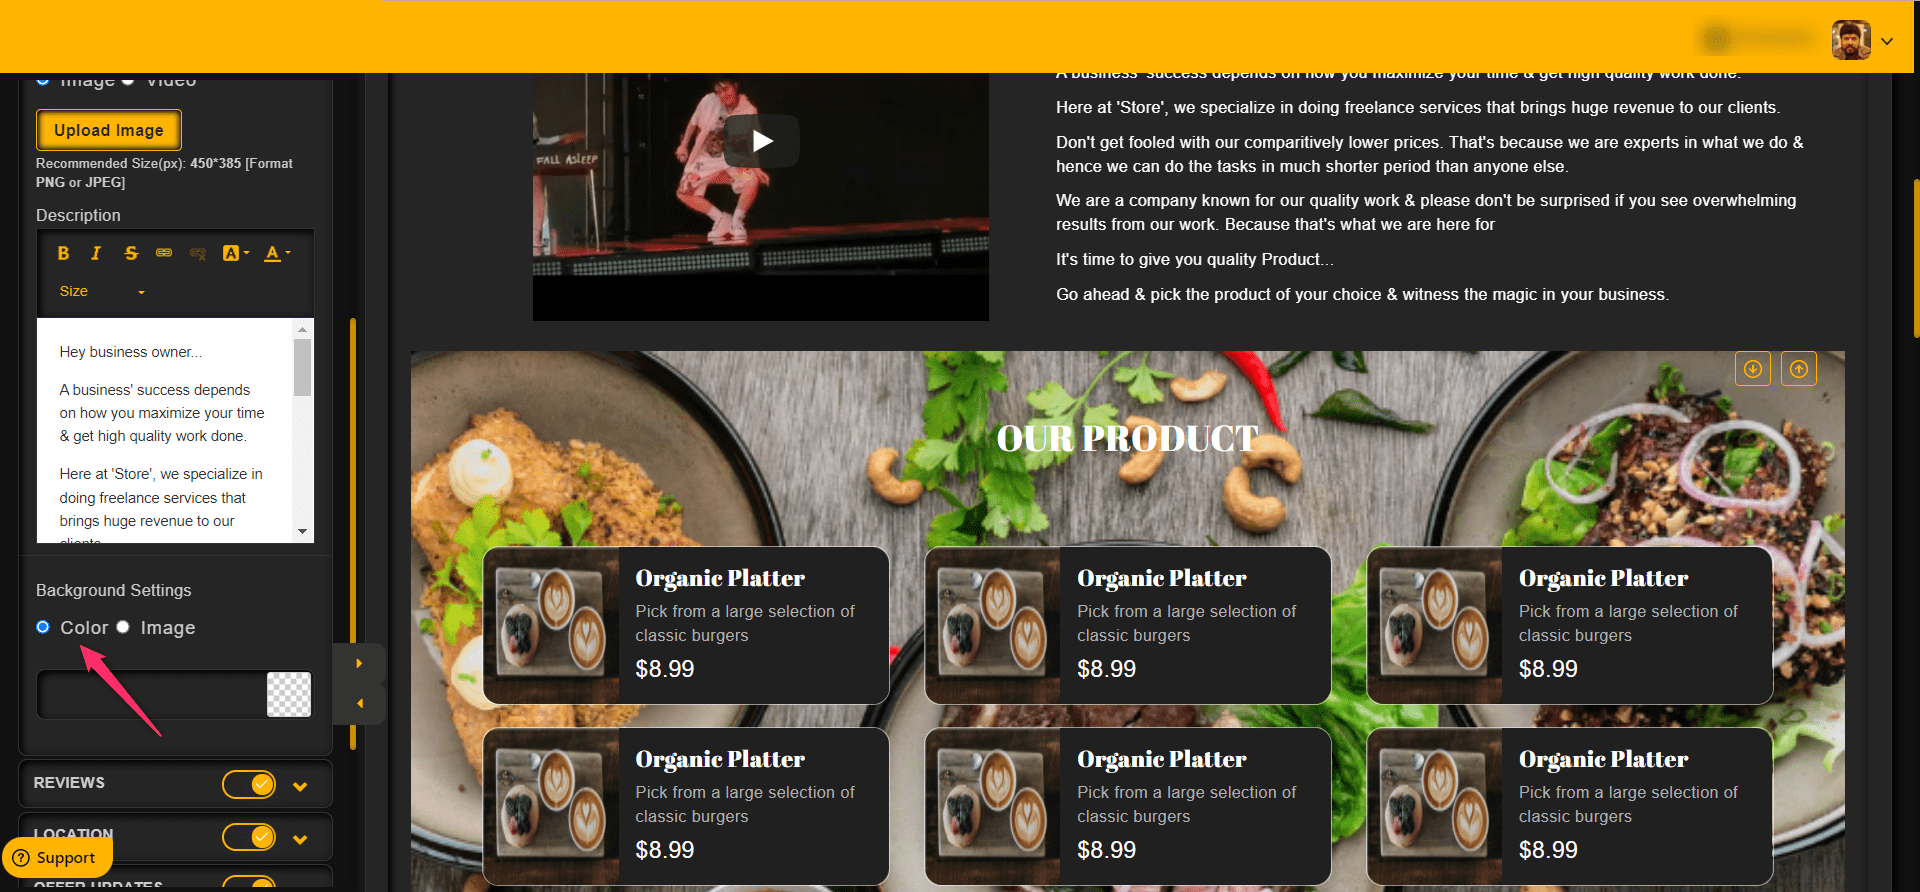
To have a background image for the about section,
Then choose image and then upload the image
Category: Store Details
How to edit or your store
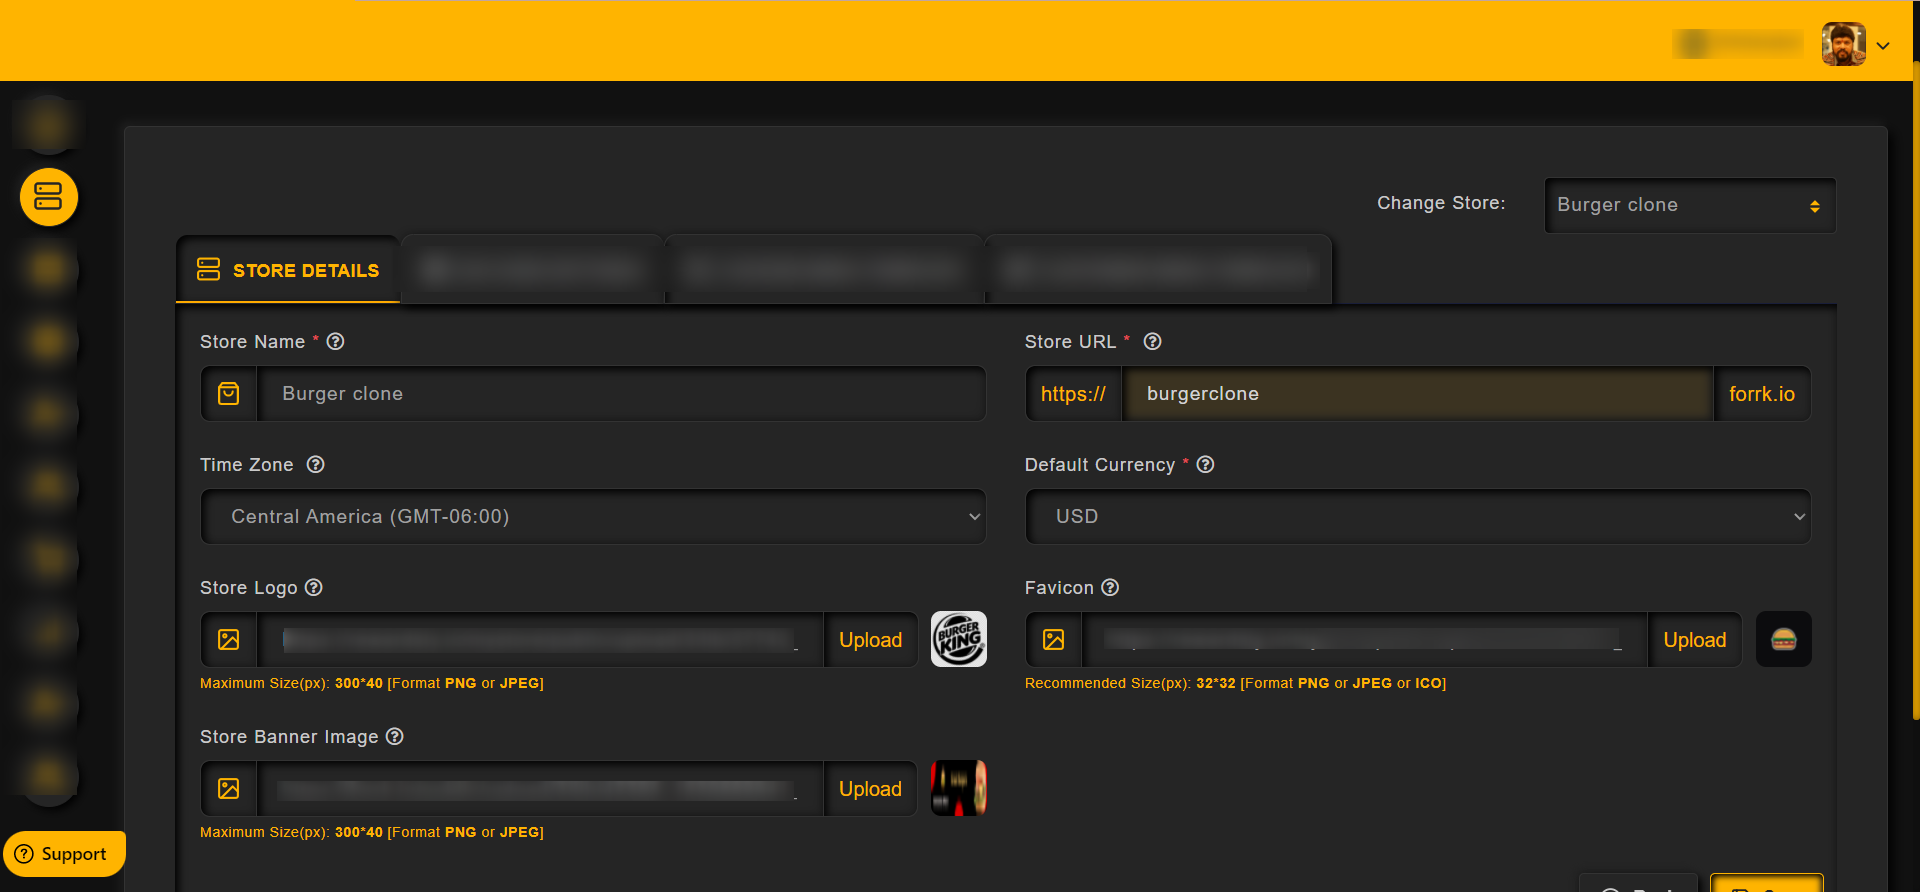
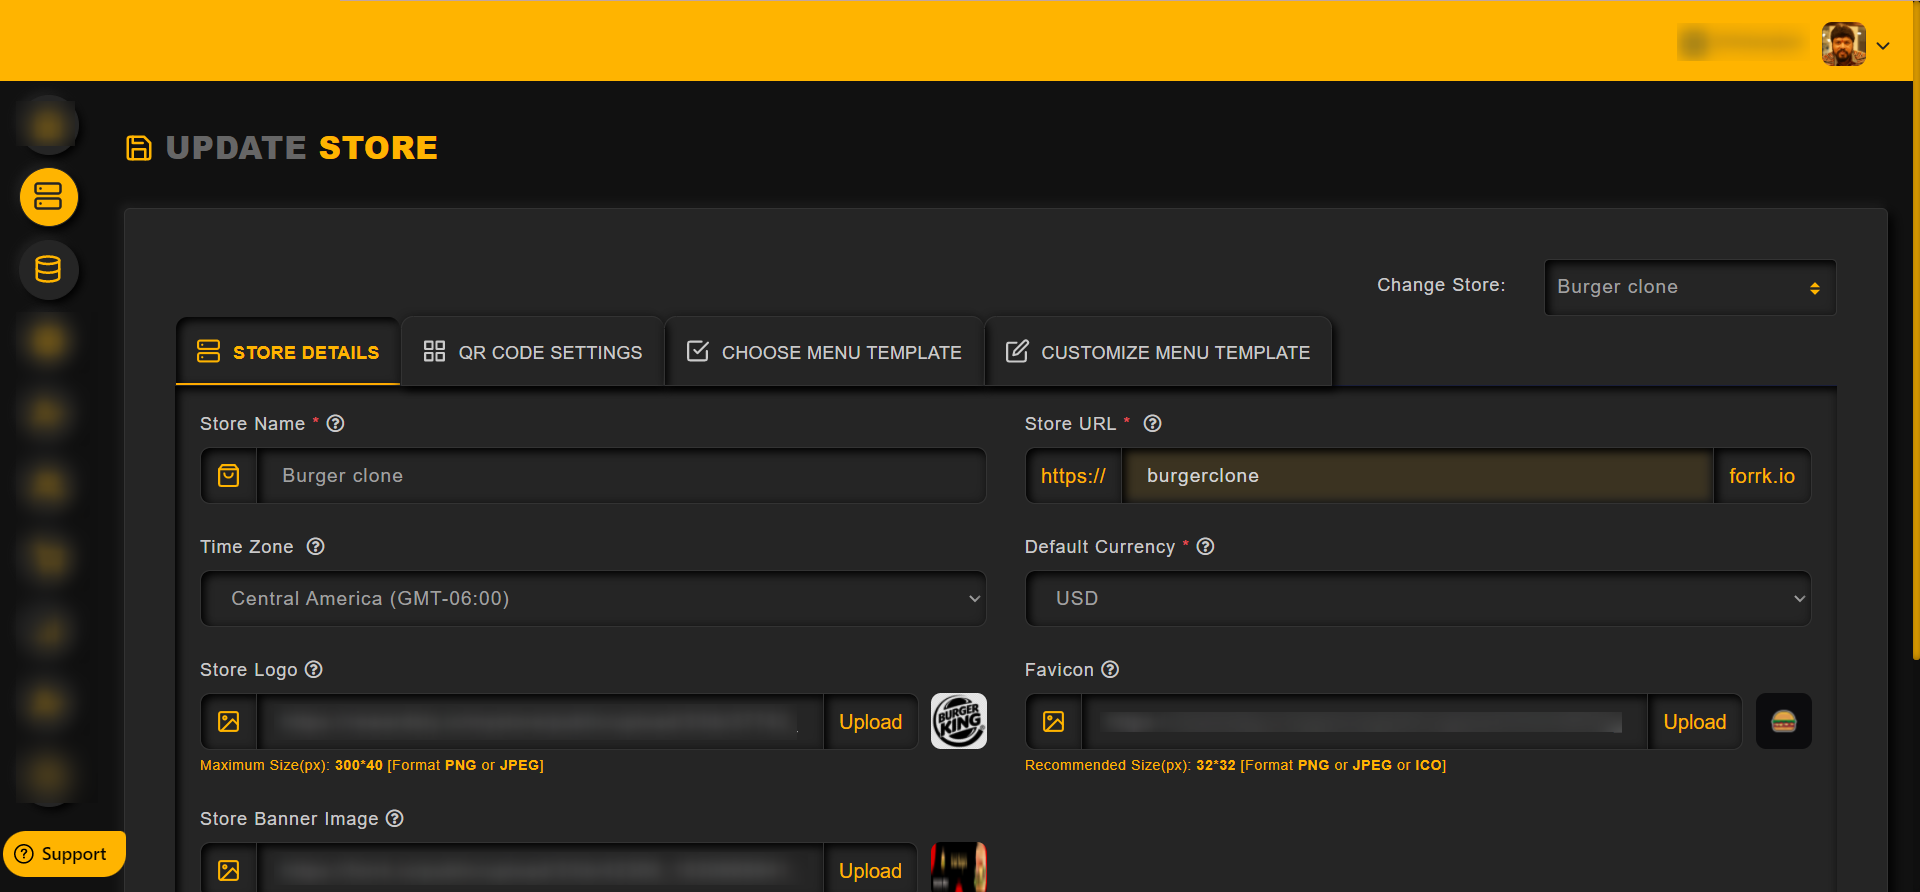
To configure the store details, follow the steps below,
STEP 1 : Click on My store from the left-hand side
STEP 2 : Choose the store.
STEP 3 : Click on the actions menu.
STEP 4 : Clicik on the Edit option as shown in the image below.
Now, enter the store details in the corresponding fields

To configure the QR code and QR code page, follow the steps below
Click on the QR Code settings option as shown in the image below

In this section, an admin can customize the Store Template based on their requirements
– Change Colors for all the text and section of the template in this section
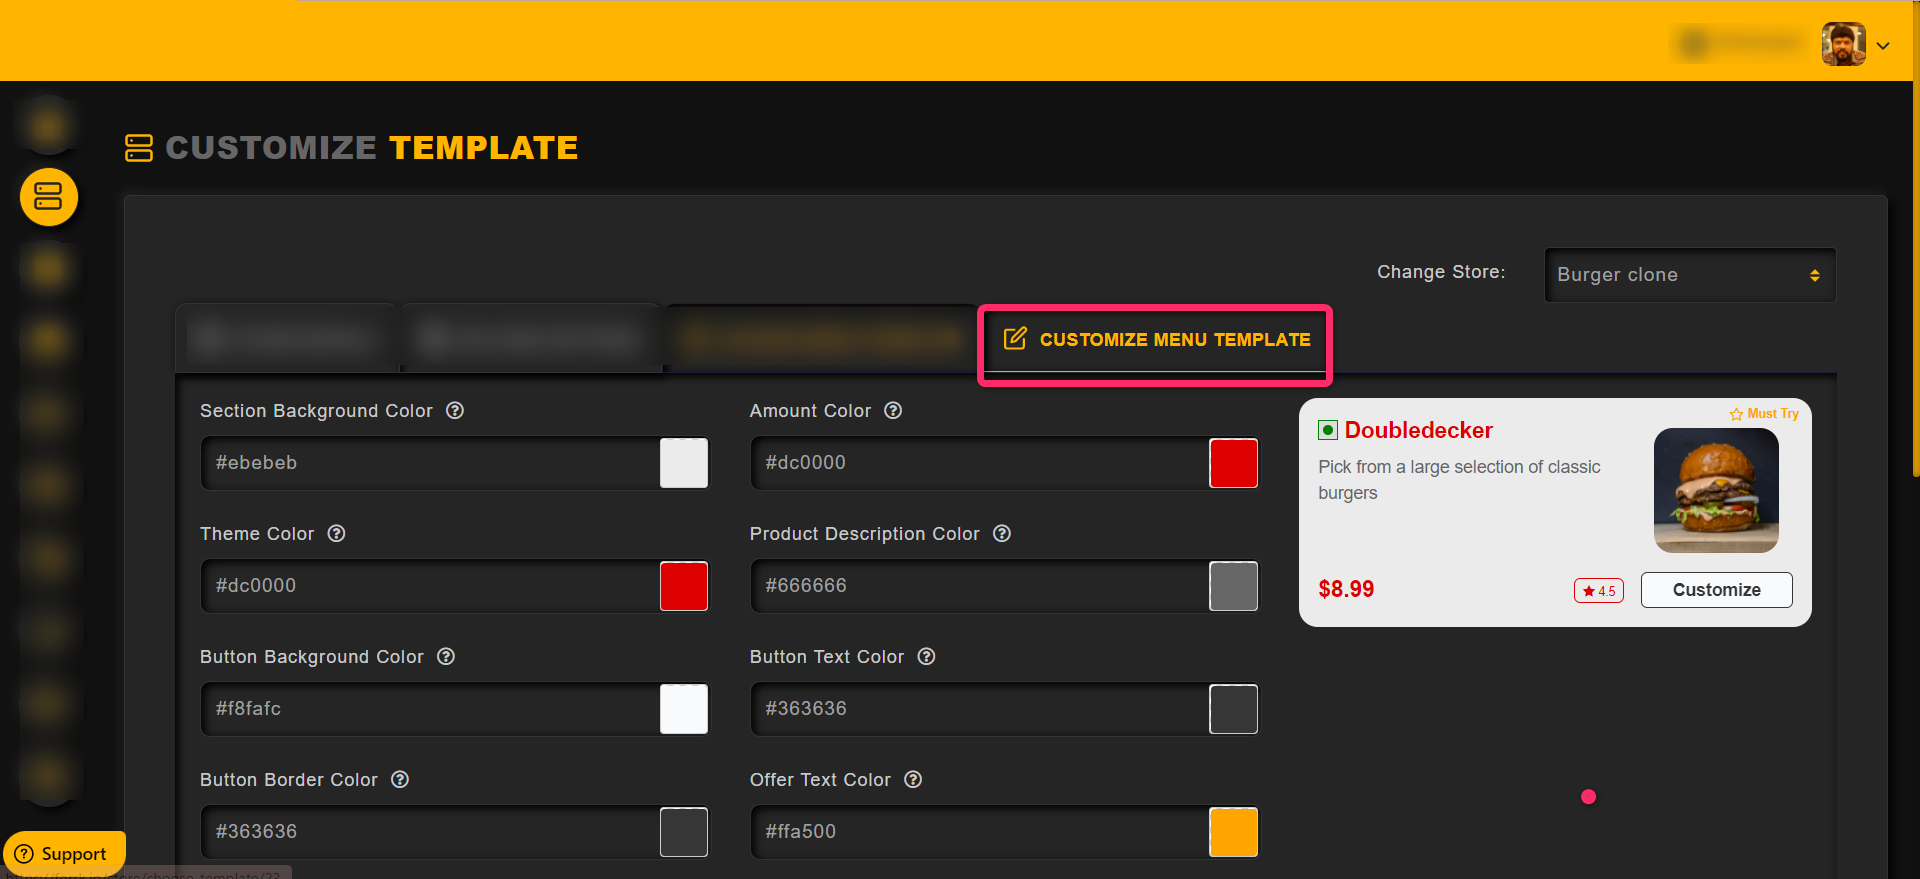

Click on the Save button after configuring the colors
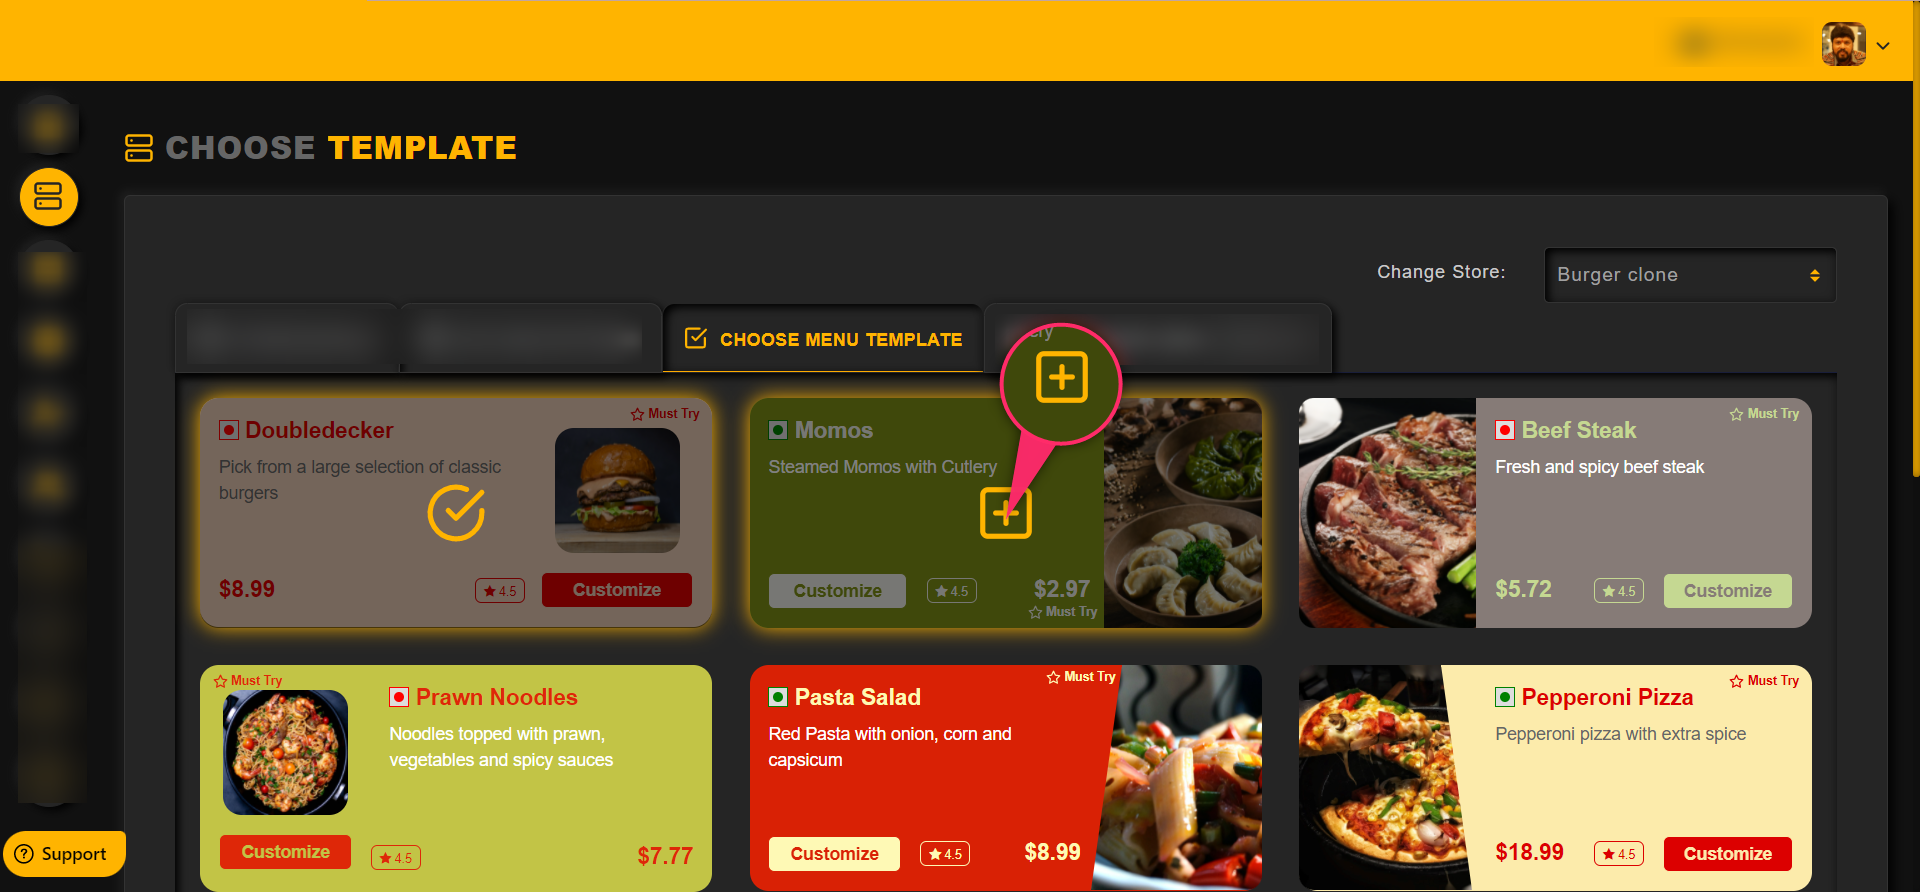
To choose a template for te store from the given wide range of templates,
Click on the Choose Menu Template as shown in the image below,

Click on the + icon to choose the template for a store
Category: Managing Orders
How to manage your orders
One can view all the orders by clicking on the My Orders option from the left side menu as shown in the image below,

Orders list will be displayed based on the store and admin can choose a store from the drop down at the top
One can view all the Live rders by clicking on the My Orders option from the left side menu and then the Live Orders as shown in the image below,
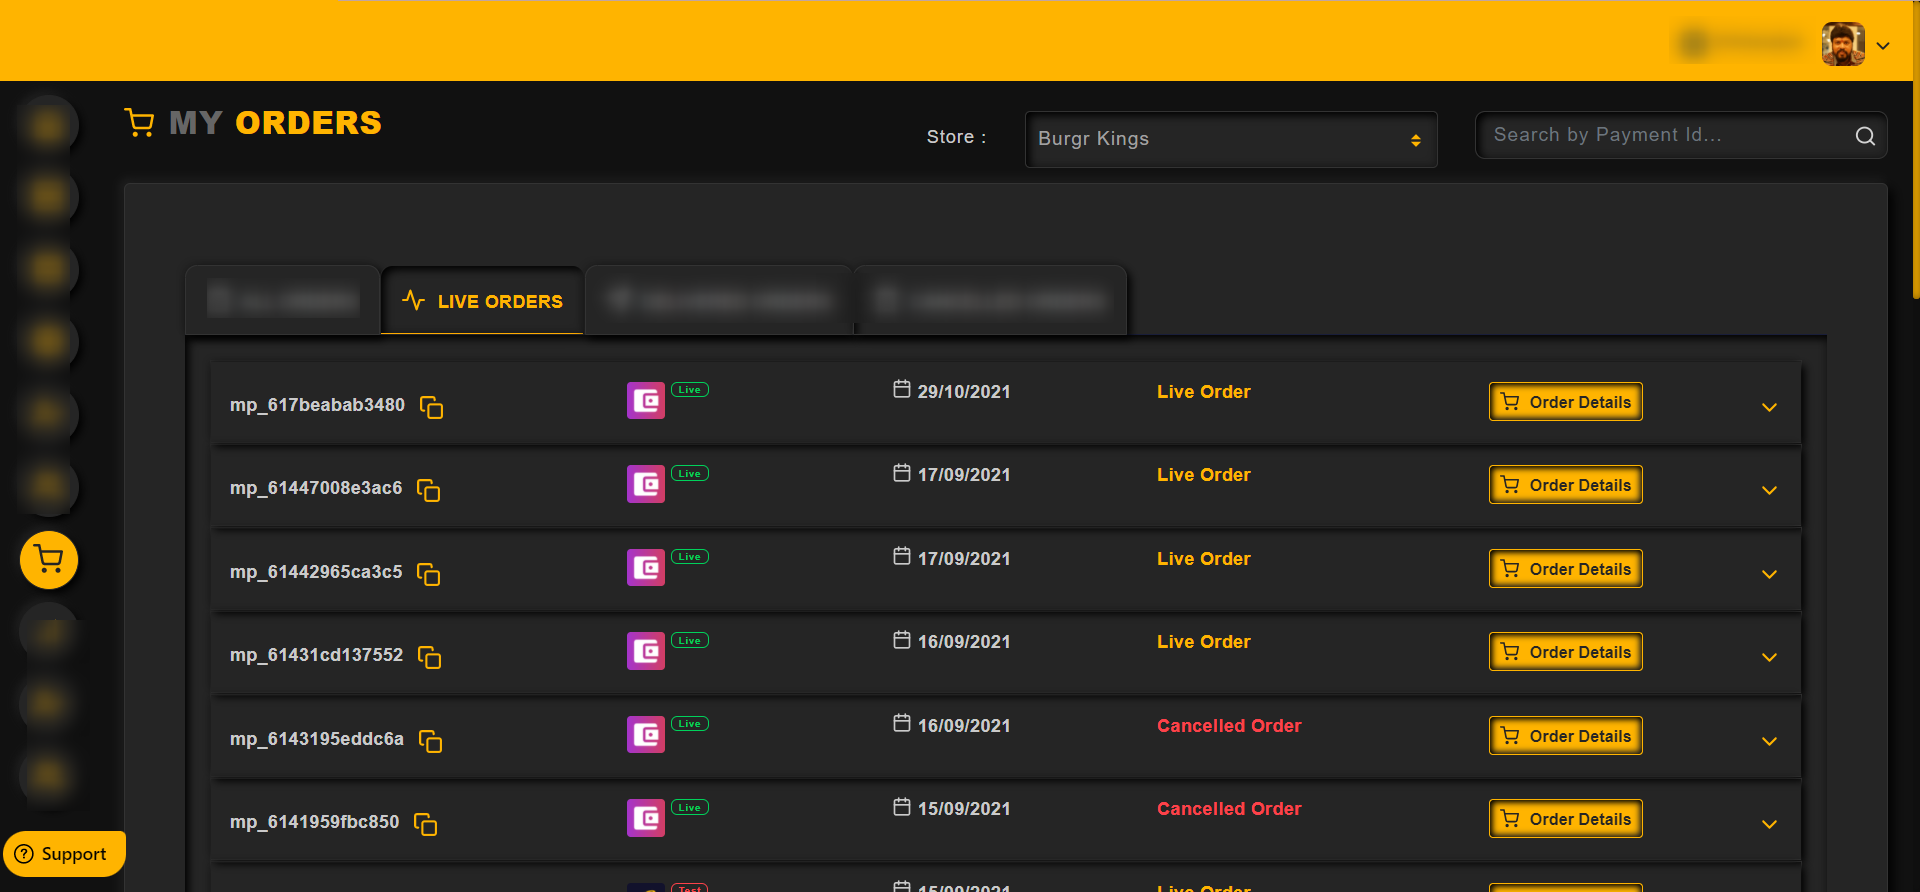
Orders list will be displayed based on the store and admin can choose a store from the drop down at the top
One can view all the Delivered orders by clicking on the My Orders option from the left side menu and then the Delivered Orders option as shown in the image below,

Orders list will be displayed based on the store and admin can choose a store from the drop down at the top.
One can view all the Canceled orders by clicking on the My Orders option from the left side menu and then the Canceled Orders as shown in the image below,

Orders list will be displayed based on the store and admin can choose a store from the drop down at the top
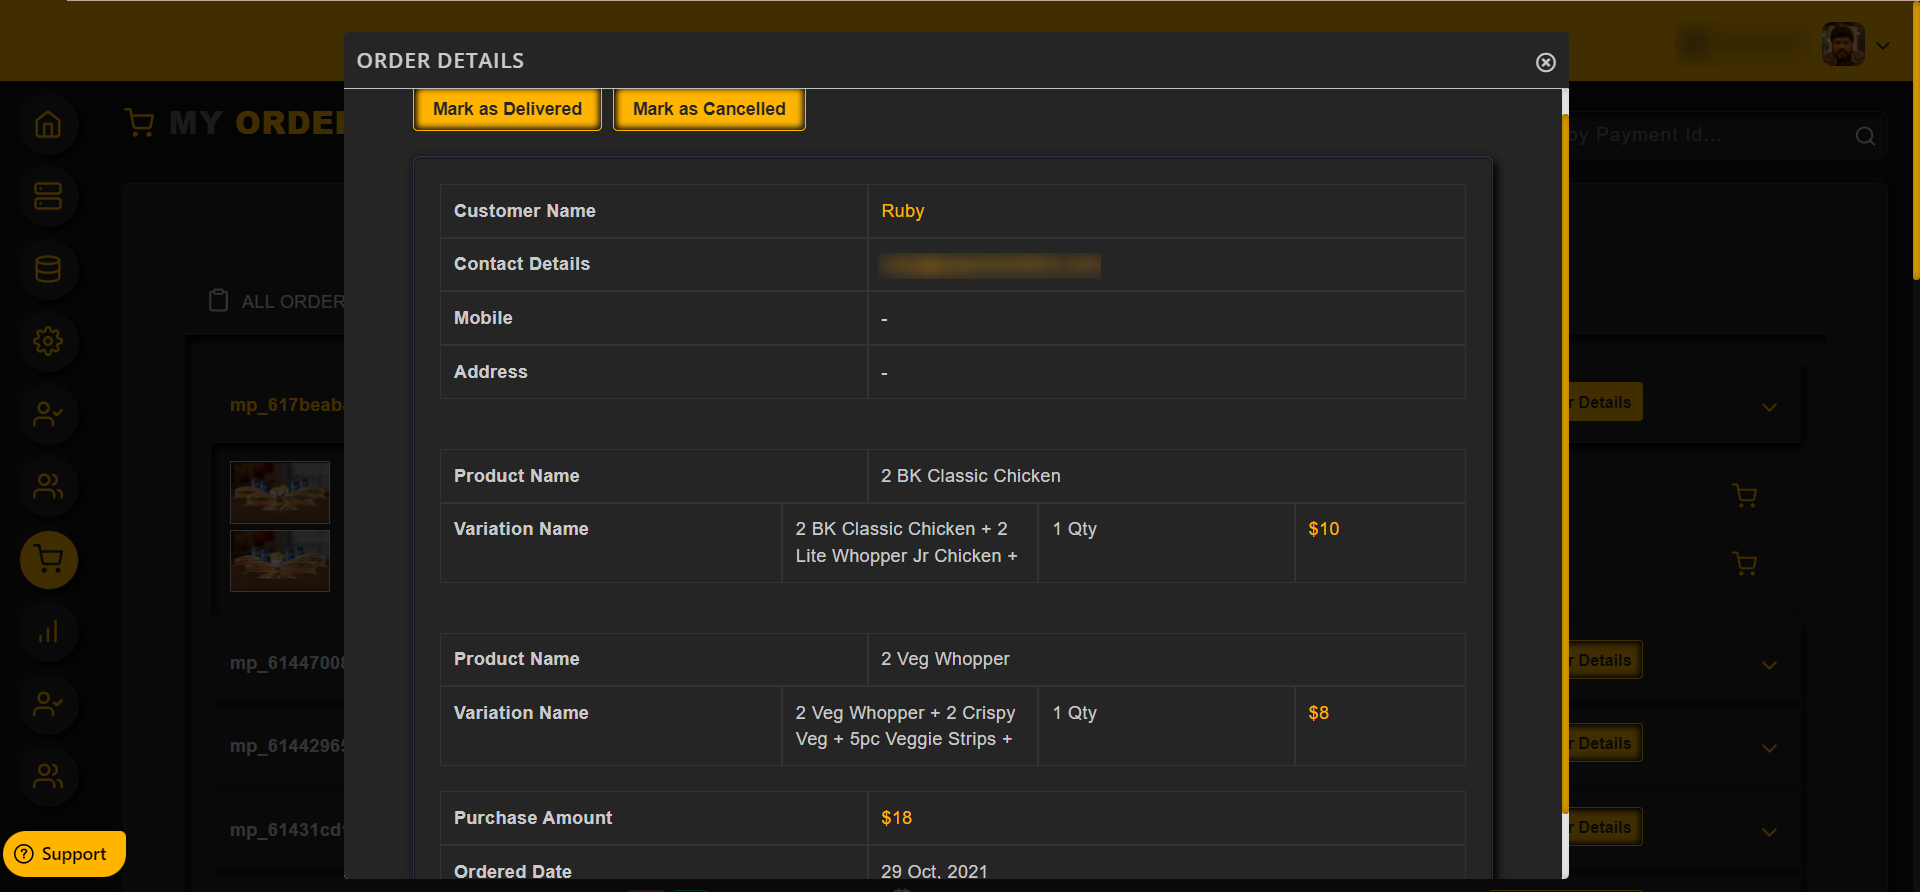
For the Live Orders,
Admin can click on the Order Details in the Live Orders to view more details about the order
And they can mark the order as delivered if the payment is received or cancelled if the payment is not received
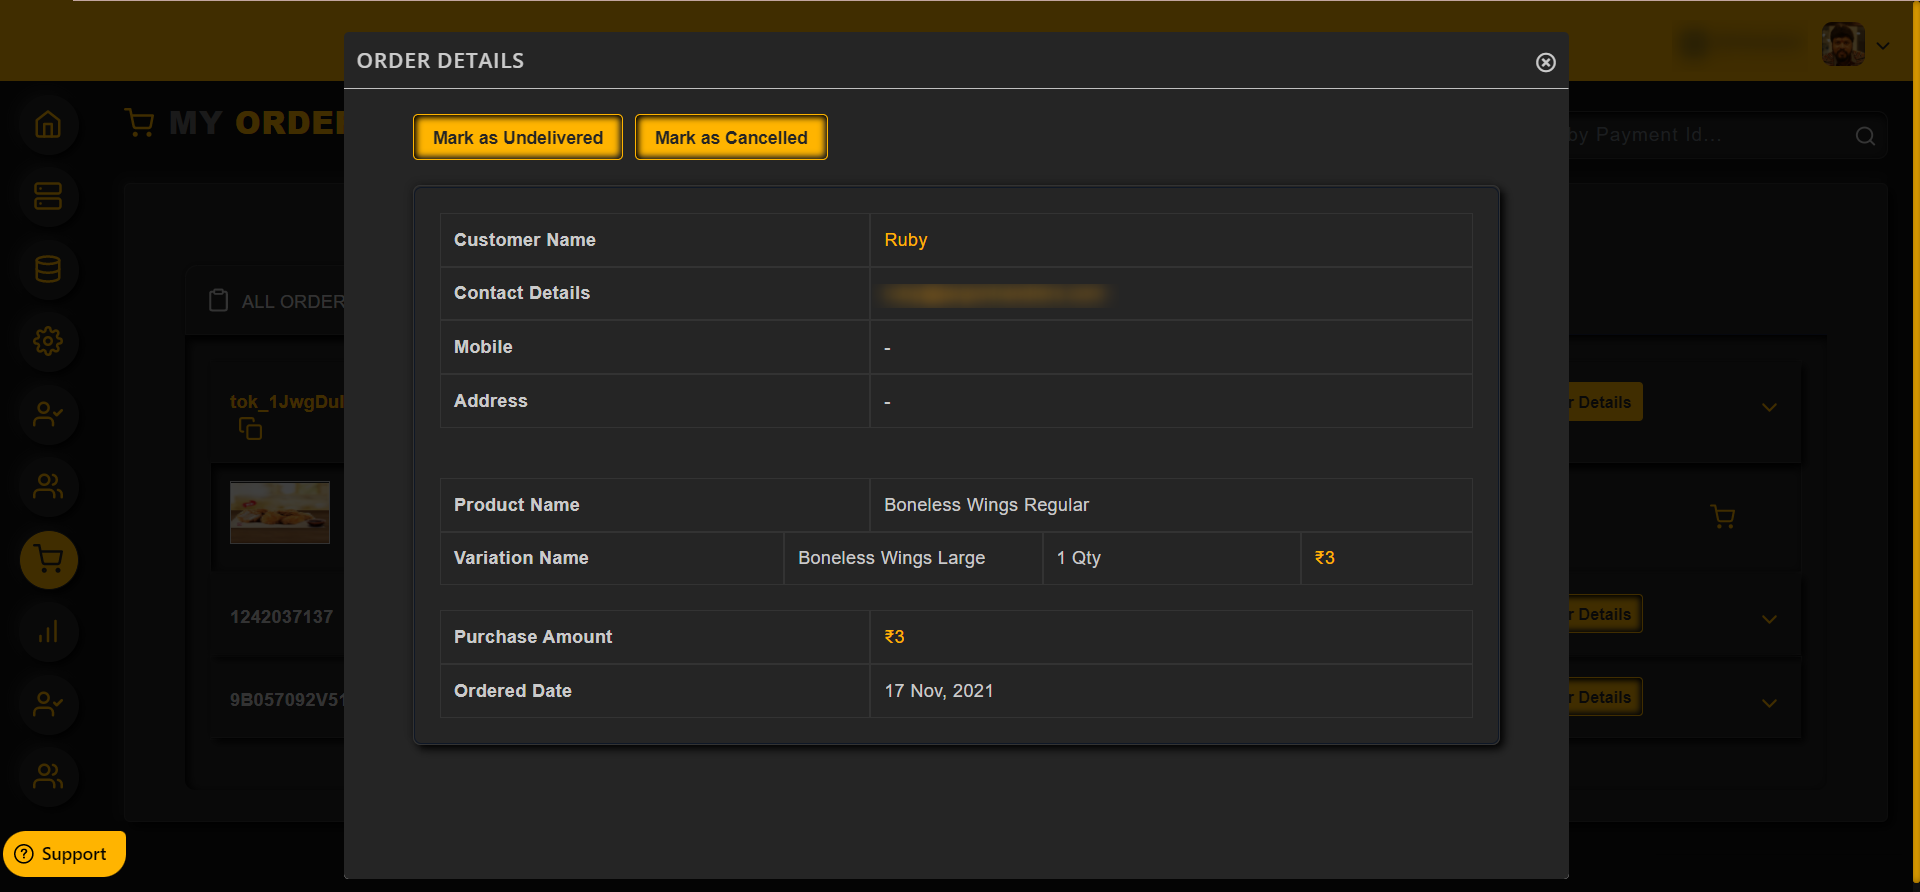
For the Delivered Orders,
Admin can click on the Order Details in the Delivered Orders to view more details about the order
And they can mark the order as undelivered or cancelled if the payment is not received
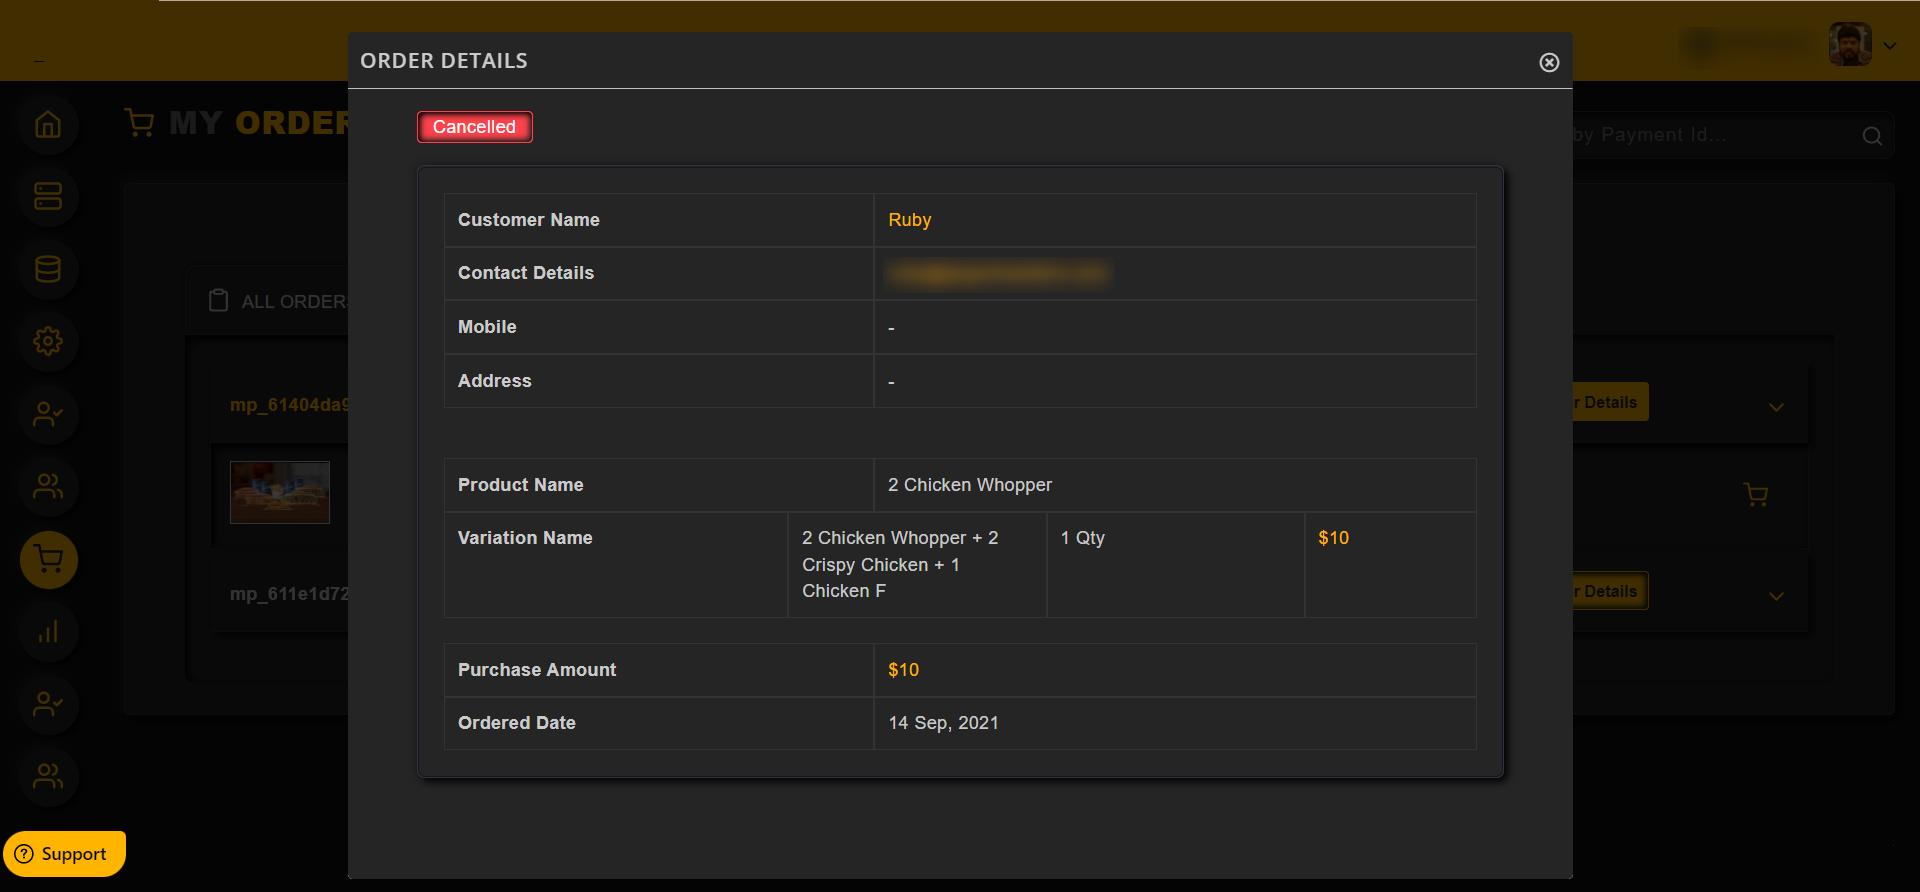
For the Cancelled Orders,
Admin can click on the Order Details in the Delivered Orders to view more details about the order
And they can see the status as Cancelled as shown in the image below,
Category: Frequently Asked
Some answers to frequently asked questions
If you use Gmail SMTP, then follow the below steps:
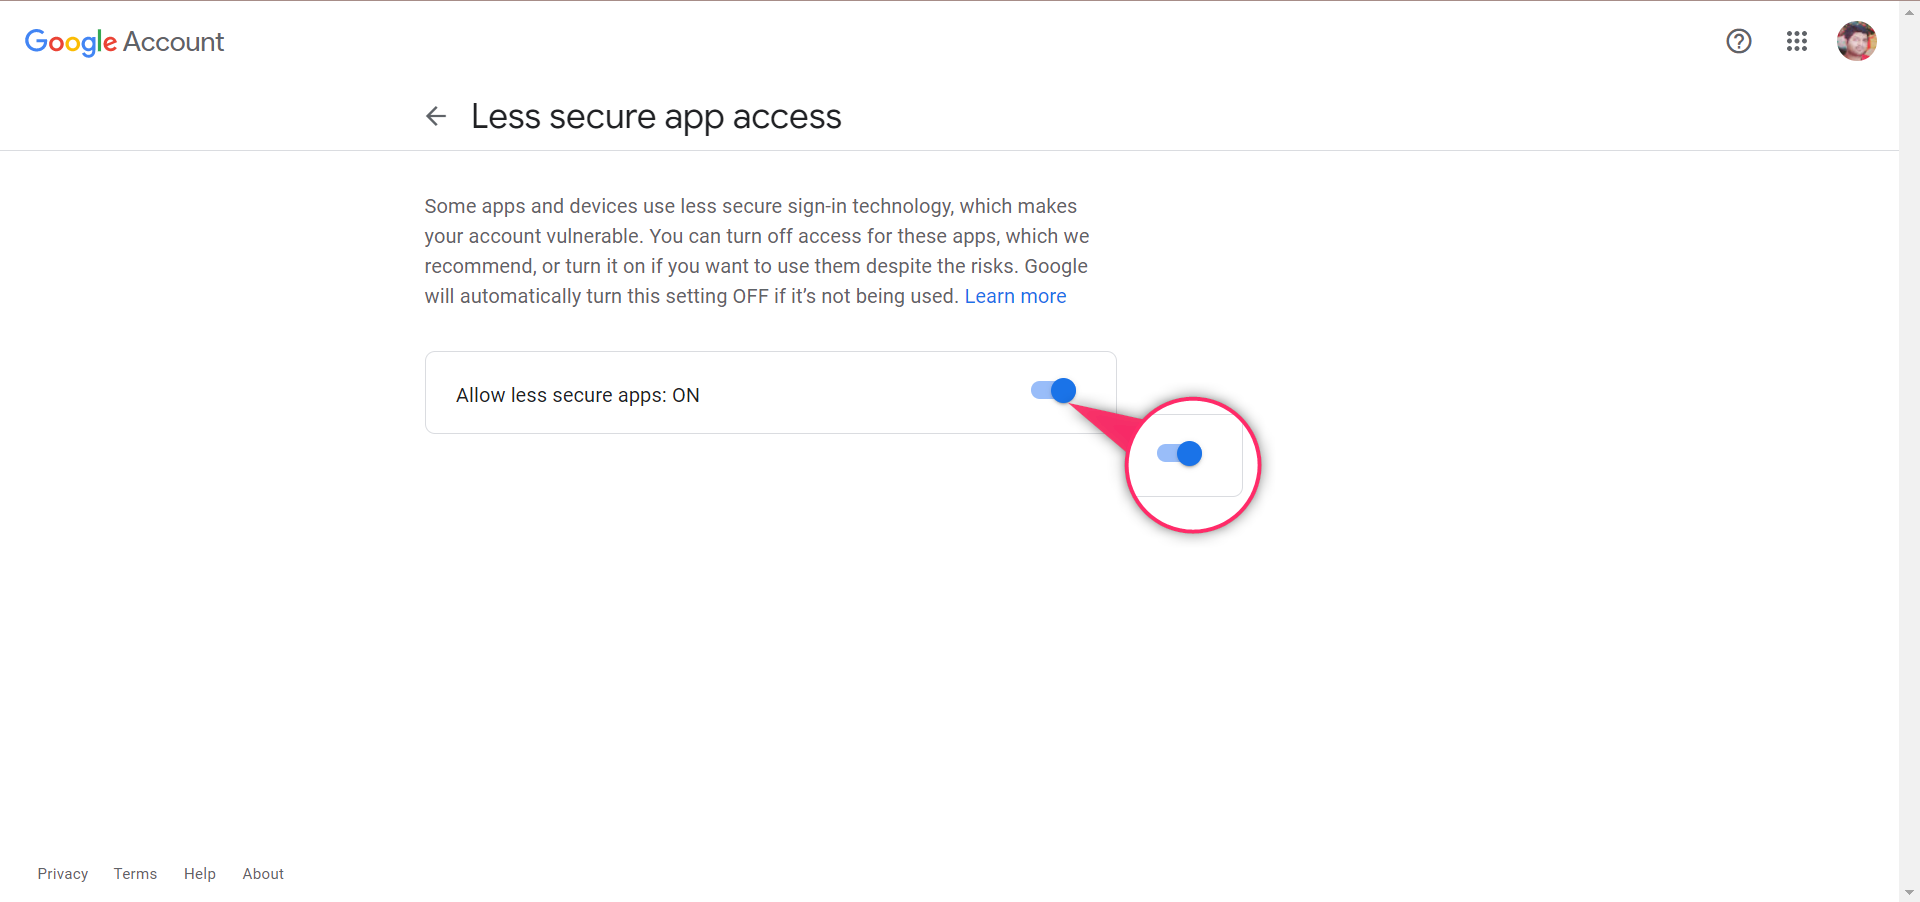
Step 1: You have to Click here and select Turn ON Access for less secure apps.
Step 2: Provide the below details and save it.
Smtp Server : ssl://smtp.gmail.com
Smtp Port : 465
Smtp Username : Gmail address
Smtp Password : Gmail login password
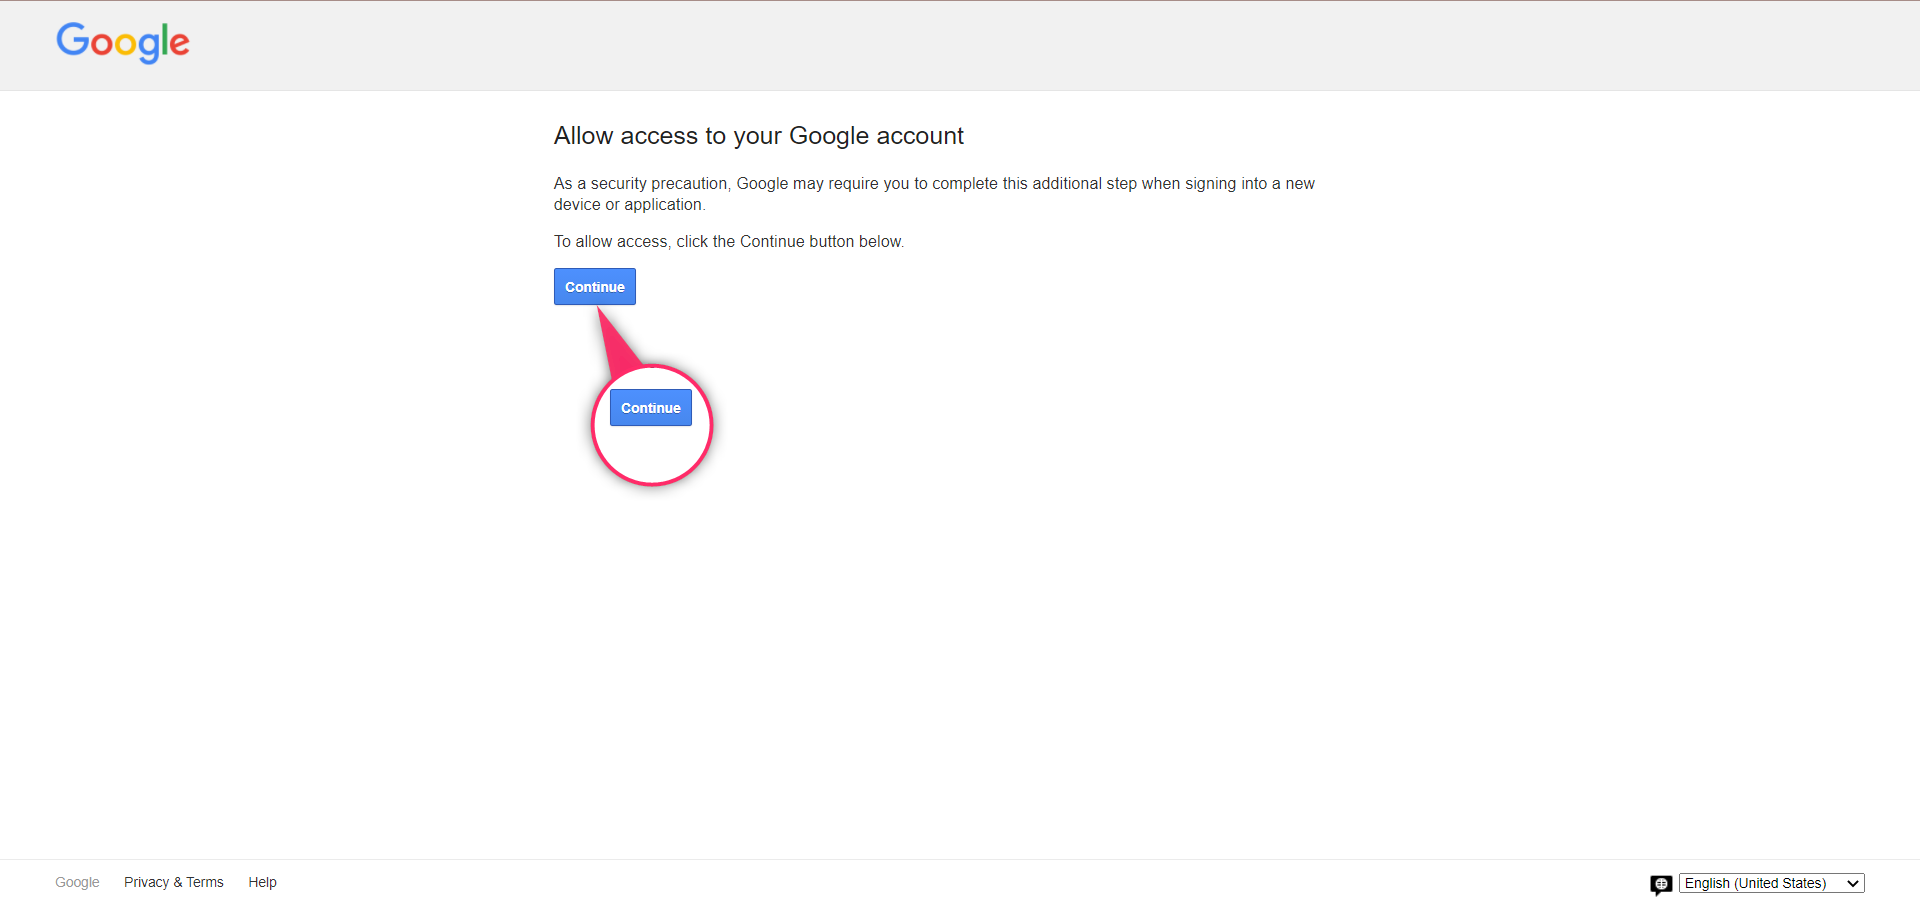
Note: Still having difficulties in Gmail SMTP integration?
Please Click here and allow access to google accounts for security purpose by clicking on the Continue button
Kindly disable the 2-step verification and then do the Step 1 and step in the Note
To enable/disable the 2-step verification, Click here and then Turn off the option

To integrate Mailgun SMTP follow the steps below,
Step 1: Login to the Mailgun account
Step 2: Click on the Sending >> Domains
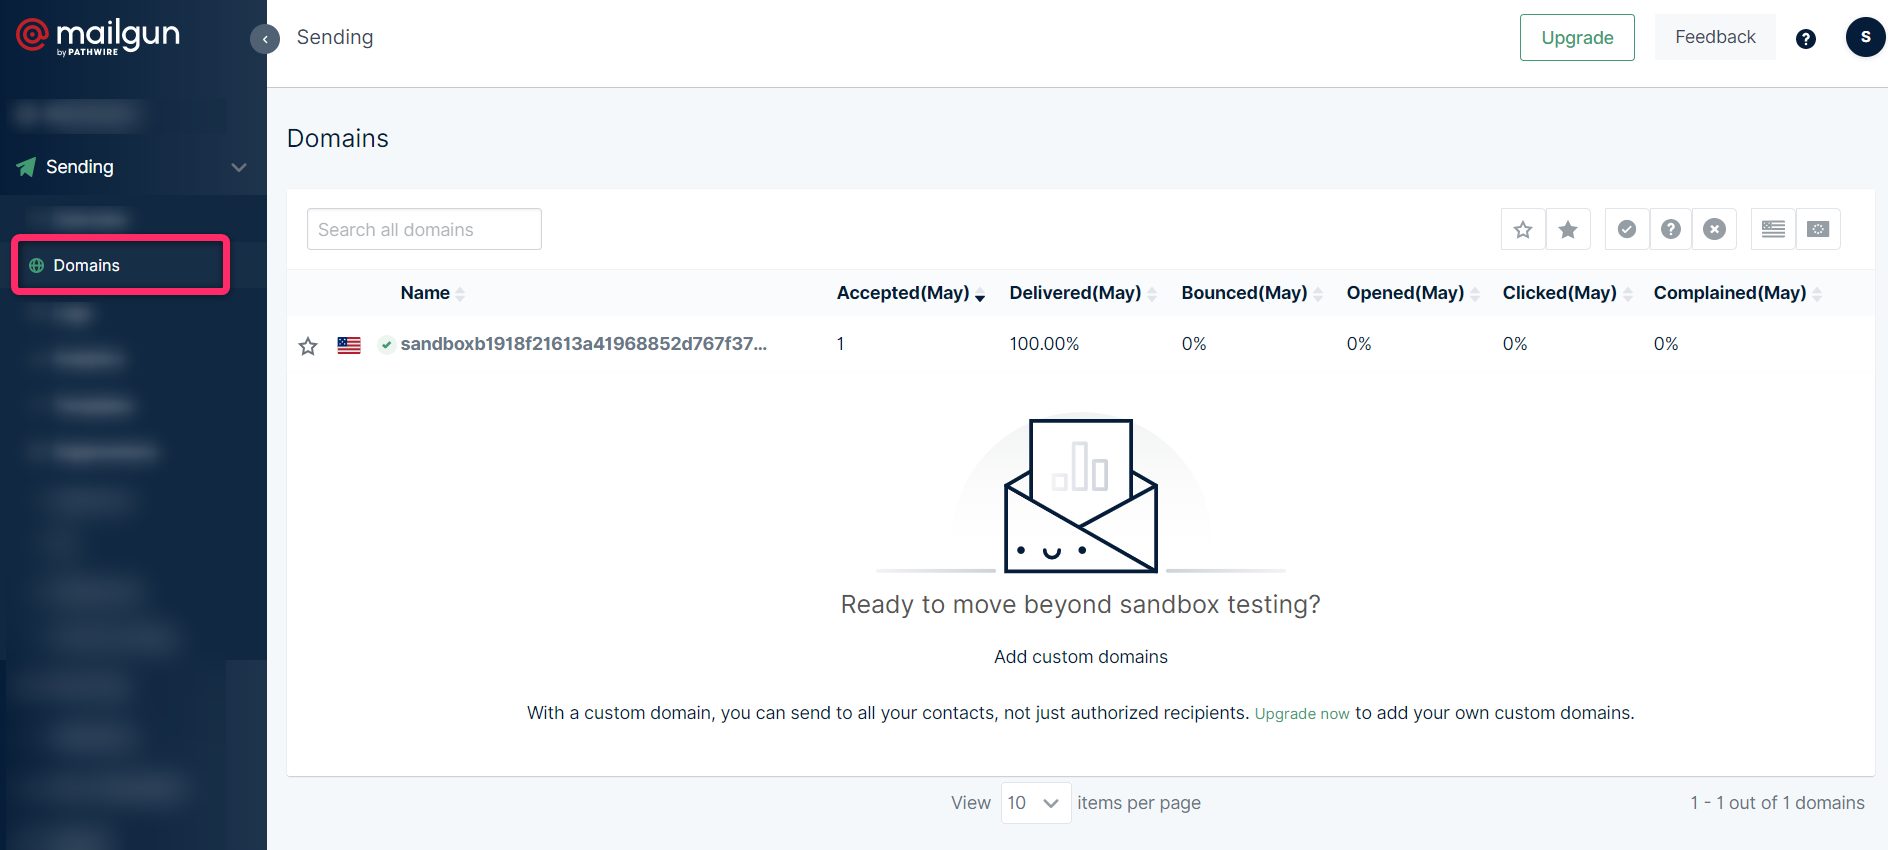
Step 3: Click on the domain
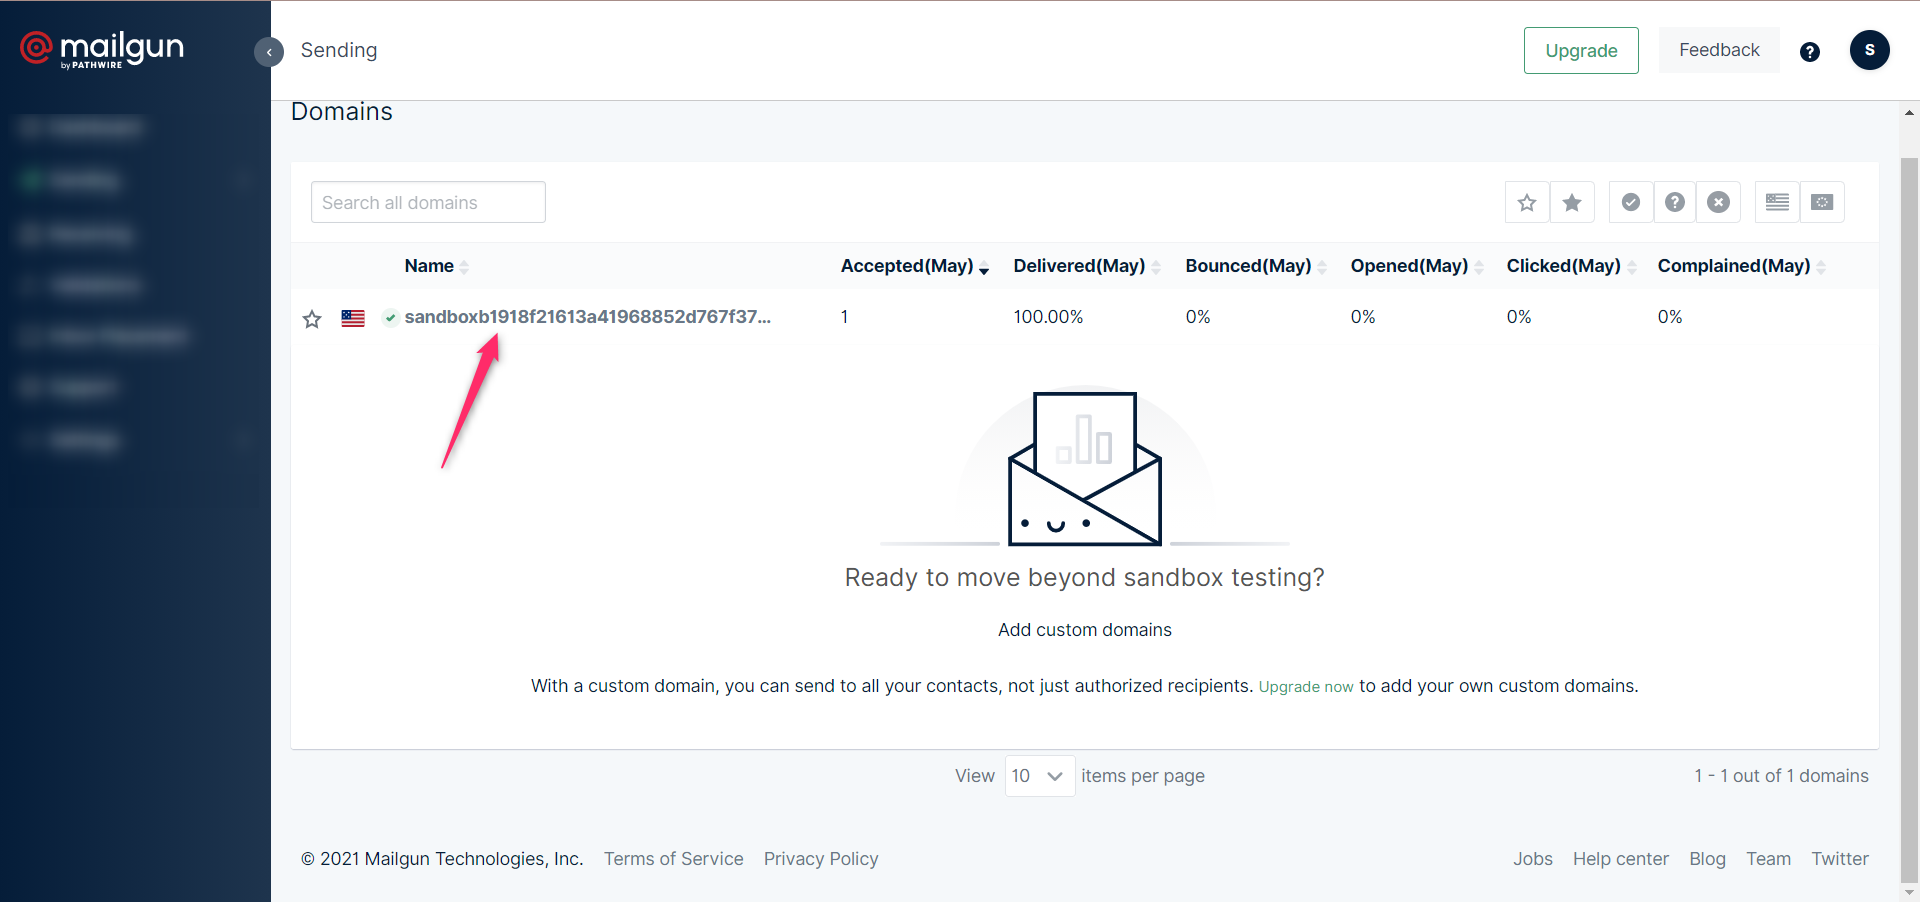
Step 4: Click on the Select button under SMTP as shown in the image below,

Step 5: Grab your SMTP credentials as shown in the image below,
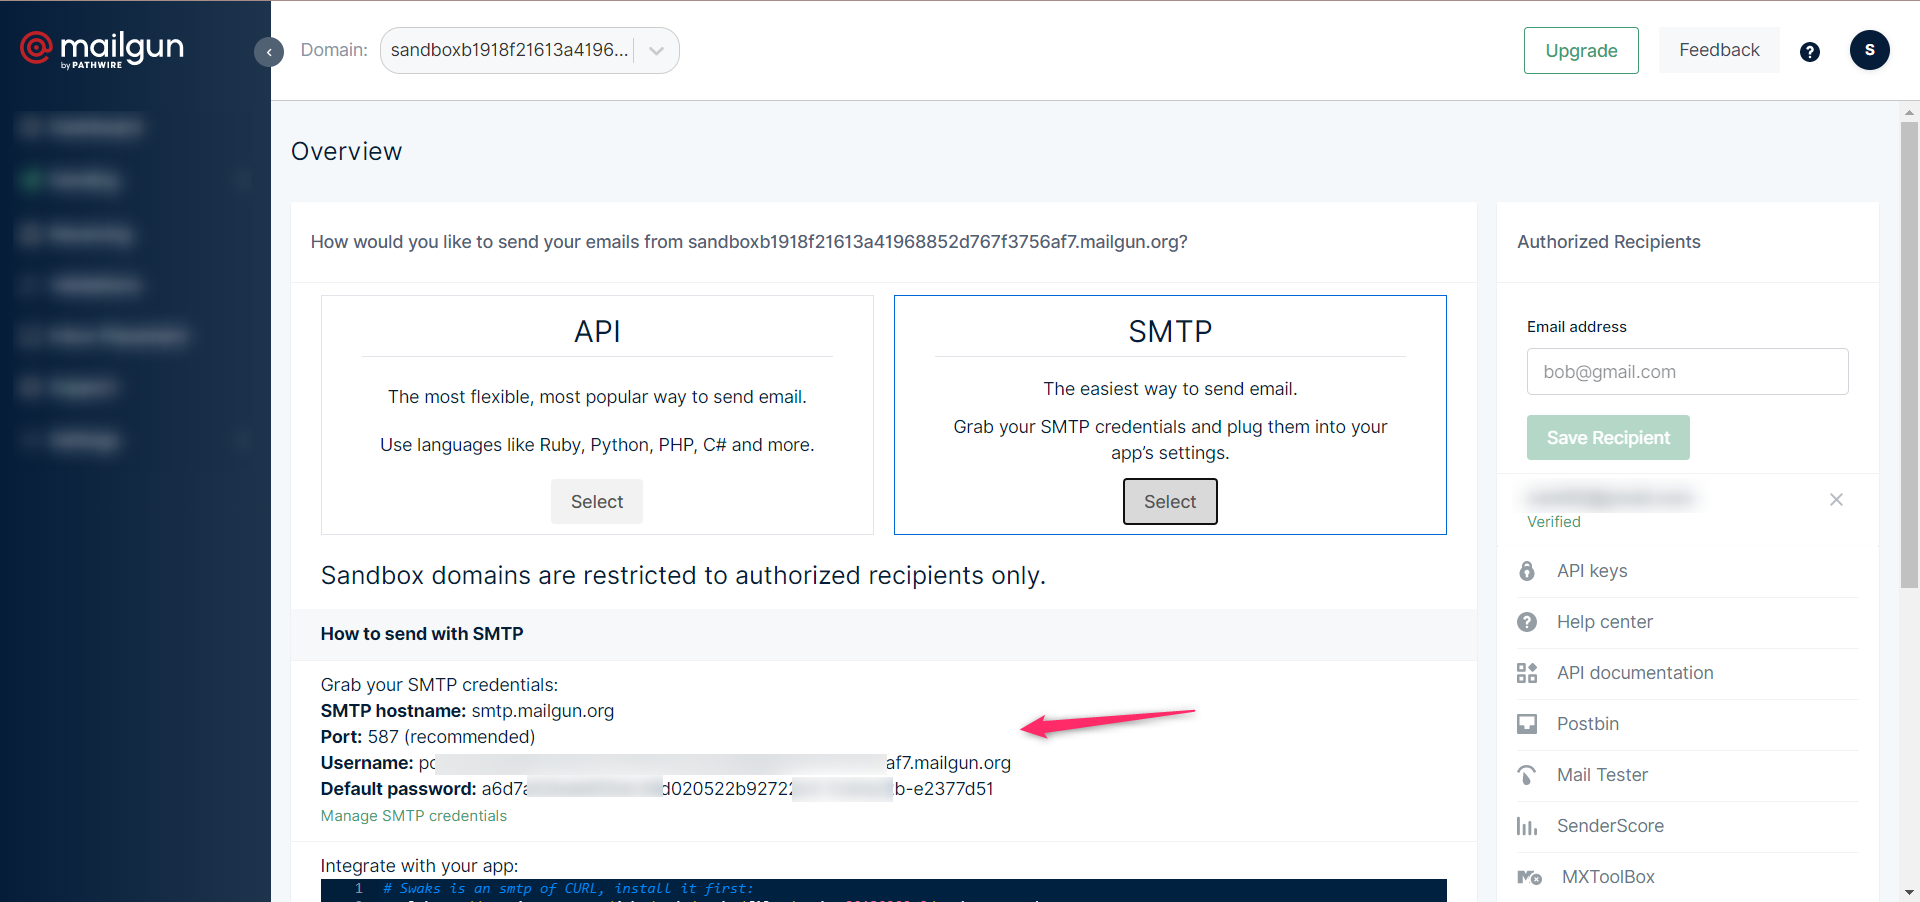
Copy the SMTP credentials and paste it in the QROST Integration
To integrate Sendinblue SMTP follow the steps below,
Step 1: Login to the Sendinblue account
Step 2: Click on the SMTP & API >> SMTP
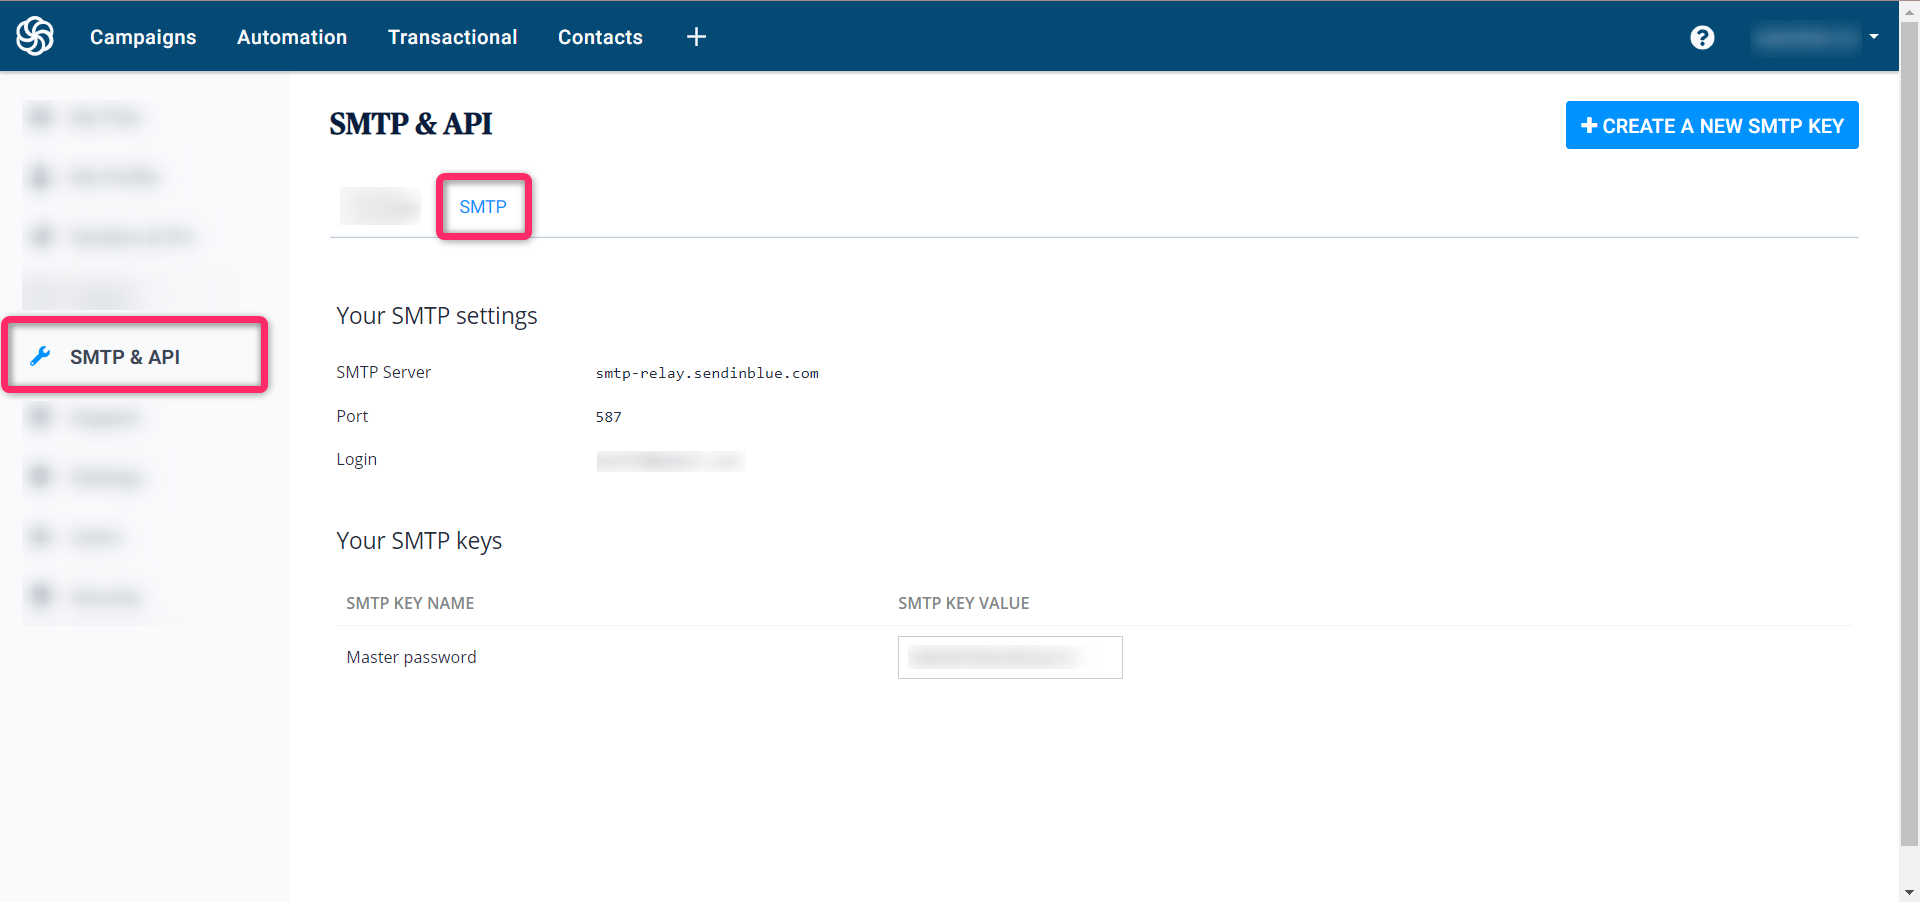
Step 3: Copy the SMTP credentials and paste it in the QROST integration
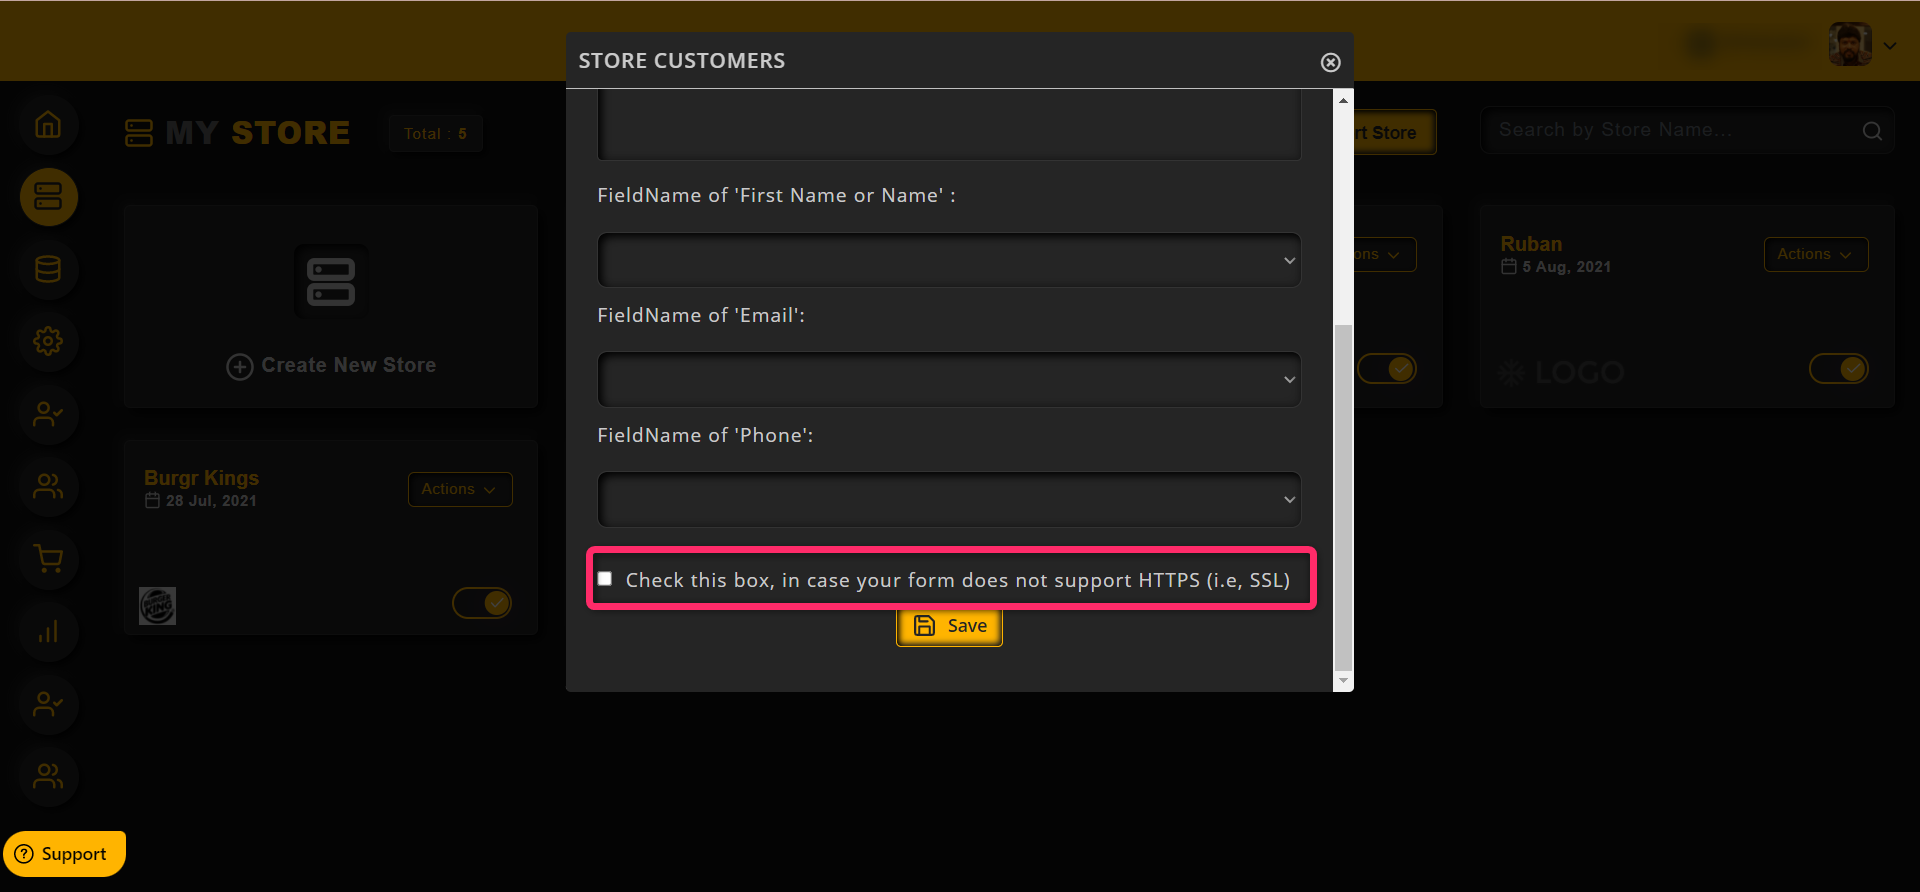
To integrate other Autoresponders those are not listed under the integration, follow the steps below,
Step 1: Click on My Store >> Actions >> Autoresponder
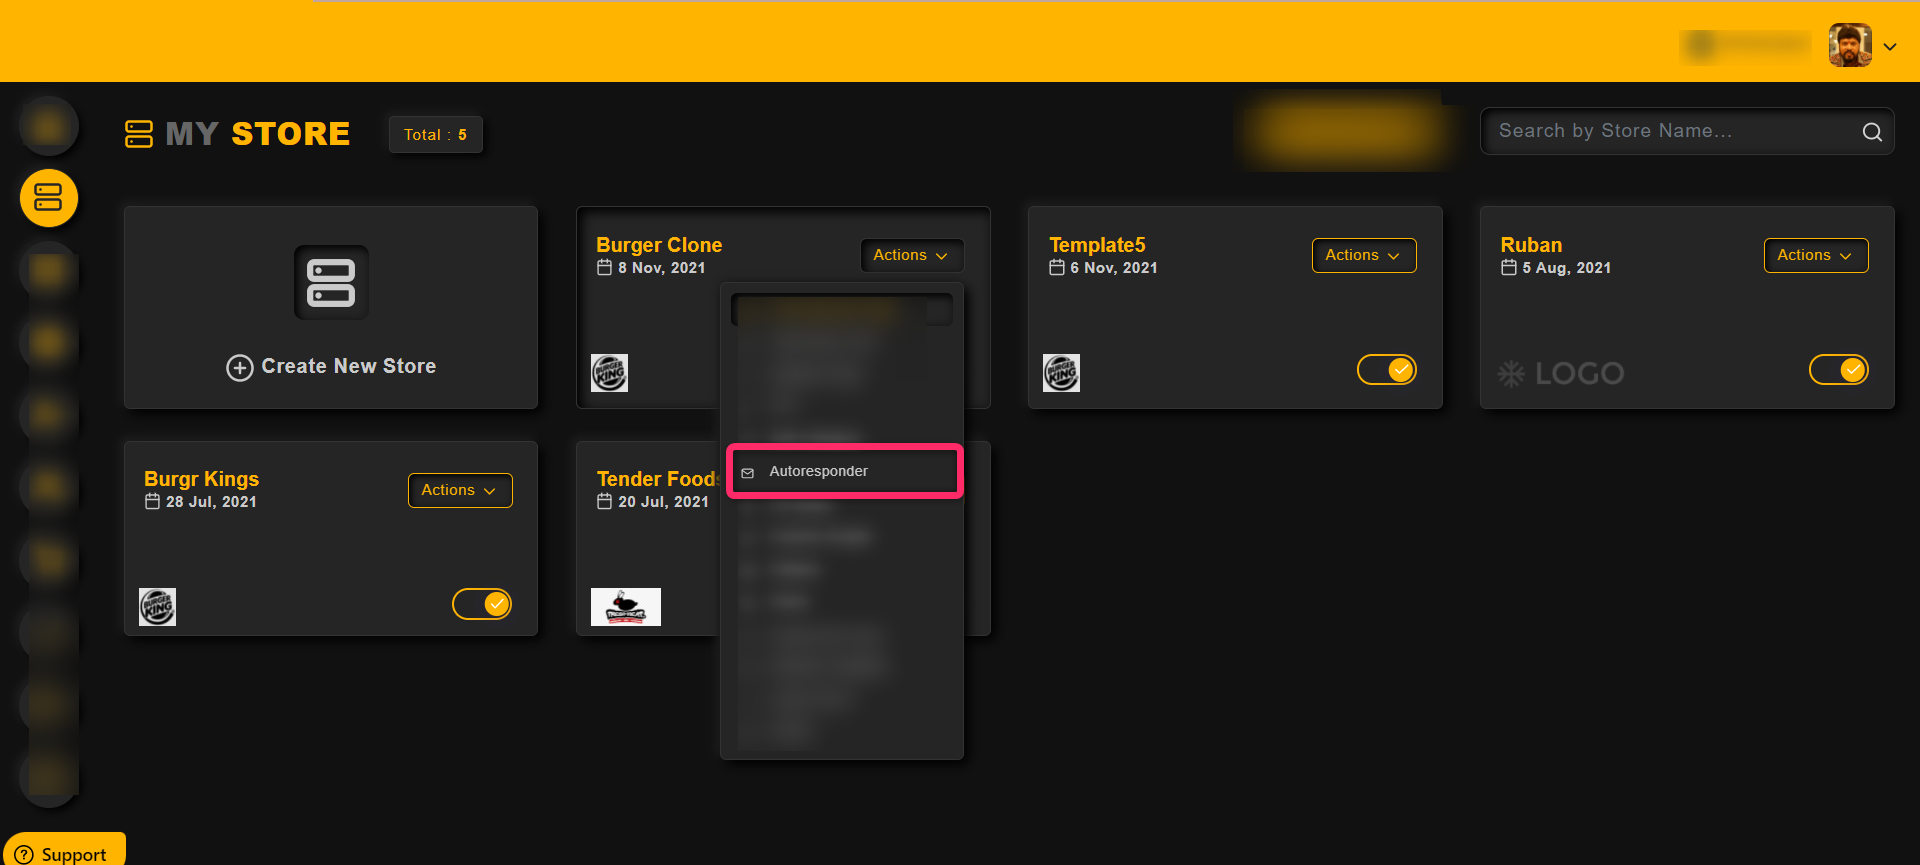
Step 2: Then choose Others from the Autoresponder drop down and then paste the HTML form code in the text field provided, as shown in the image below,

Note: Check this box, in case your form does not support HTTPS (i.e, SSL)
Category: Subscriber
How to manage your subscribers
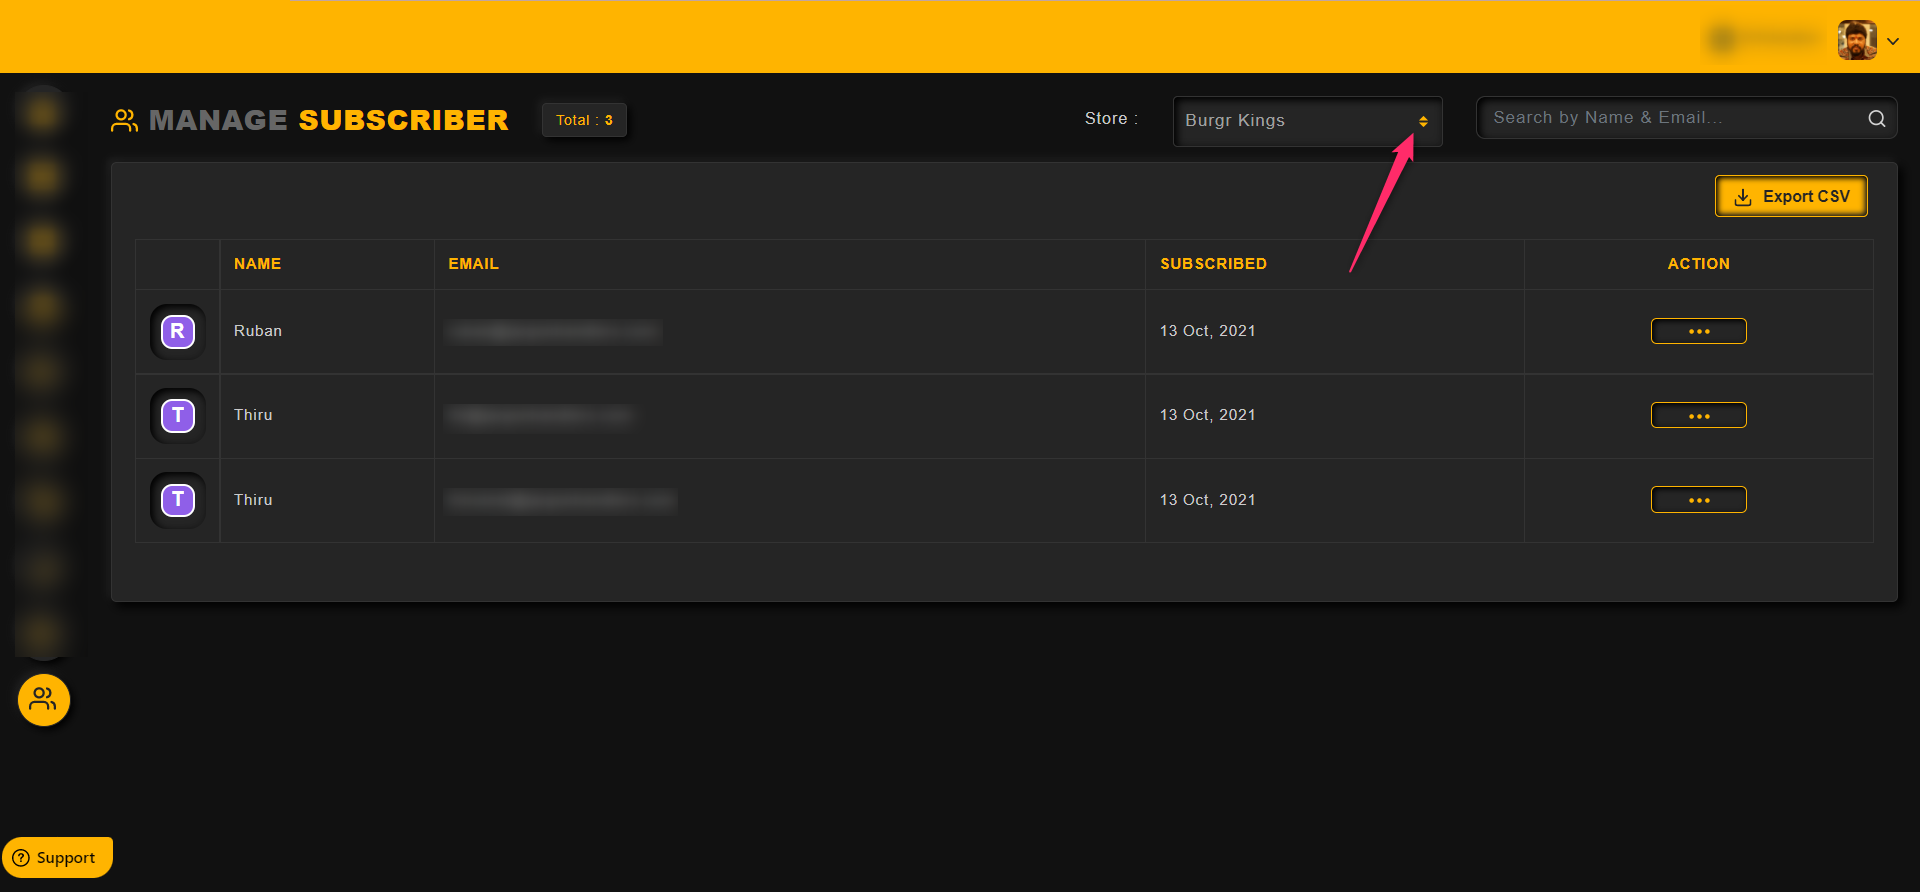
All the subscribers will be listed in the Subscriber Dashboard section as shown in the image below,

Admin can see the subscribers based on the store and one can choose a store from the drop down as shown in the image below,
Admin can do operation like delete a subscriber using the action menu

To delete a subscriber from the list, click on the Action menu and then Delete option as shown in the image below,

To export/download the subscribers list to the local device,
Click on the Export CSV button as shown in the image below
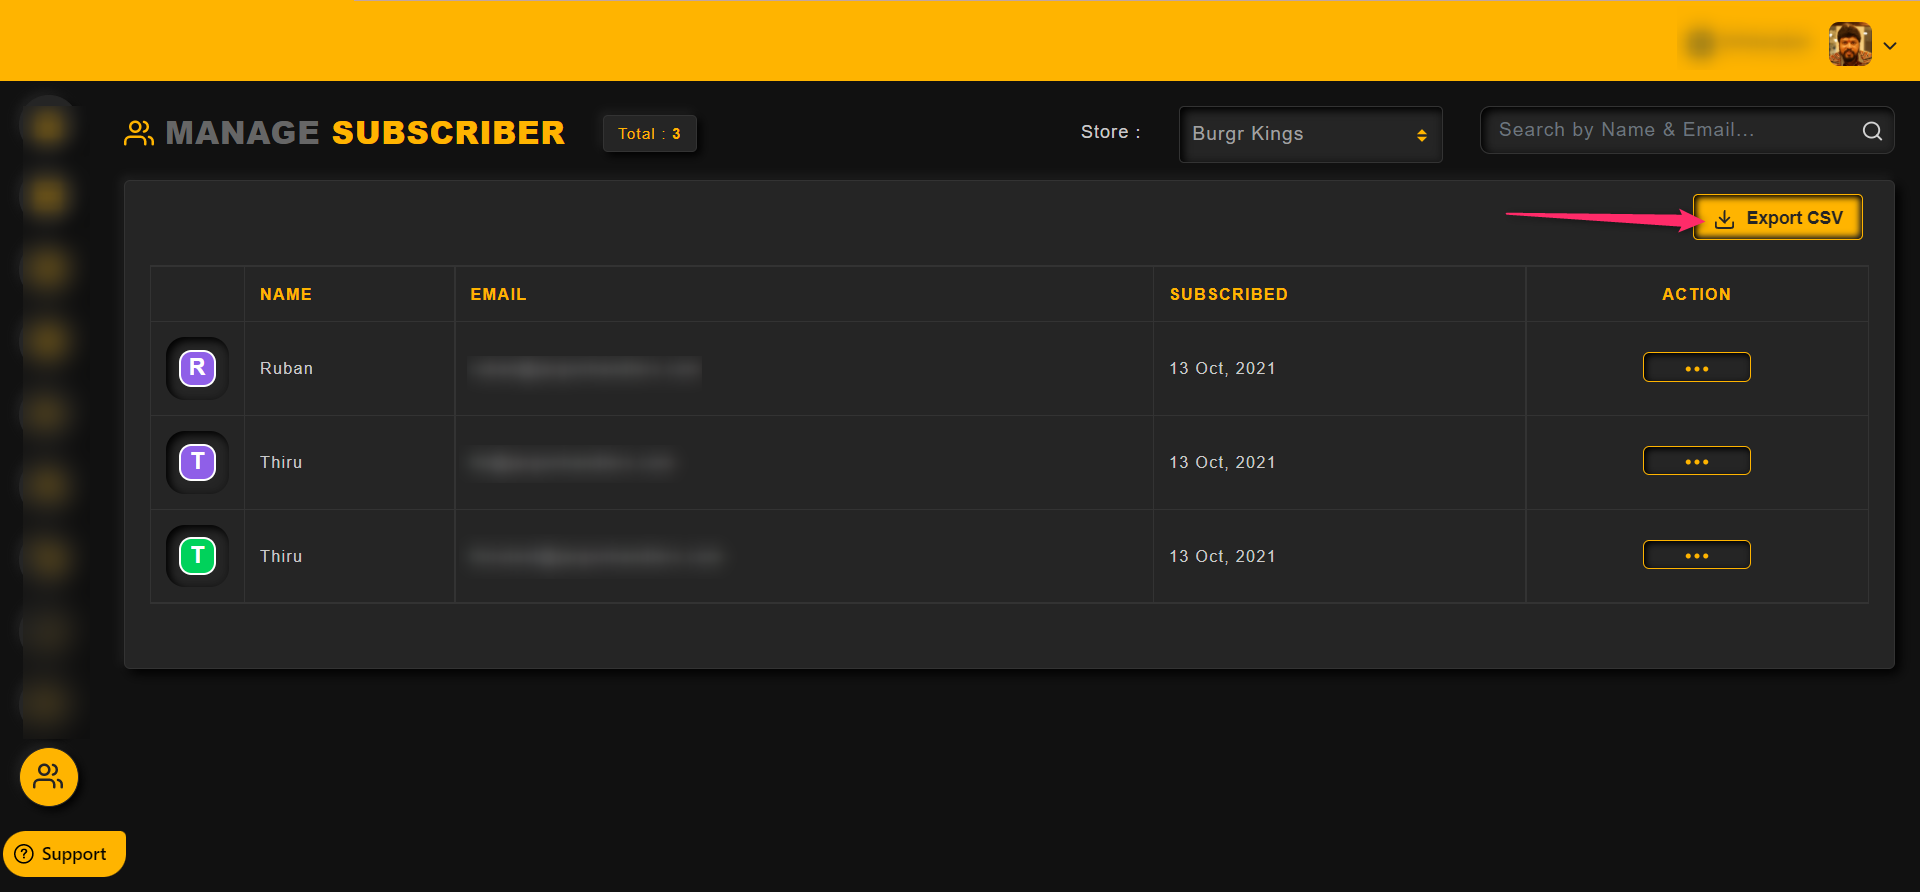
Now, the CSV file will be downloaded and one can find the same in the downloads folder
Category: Analytics
How to manage your analytics
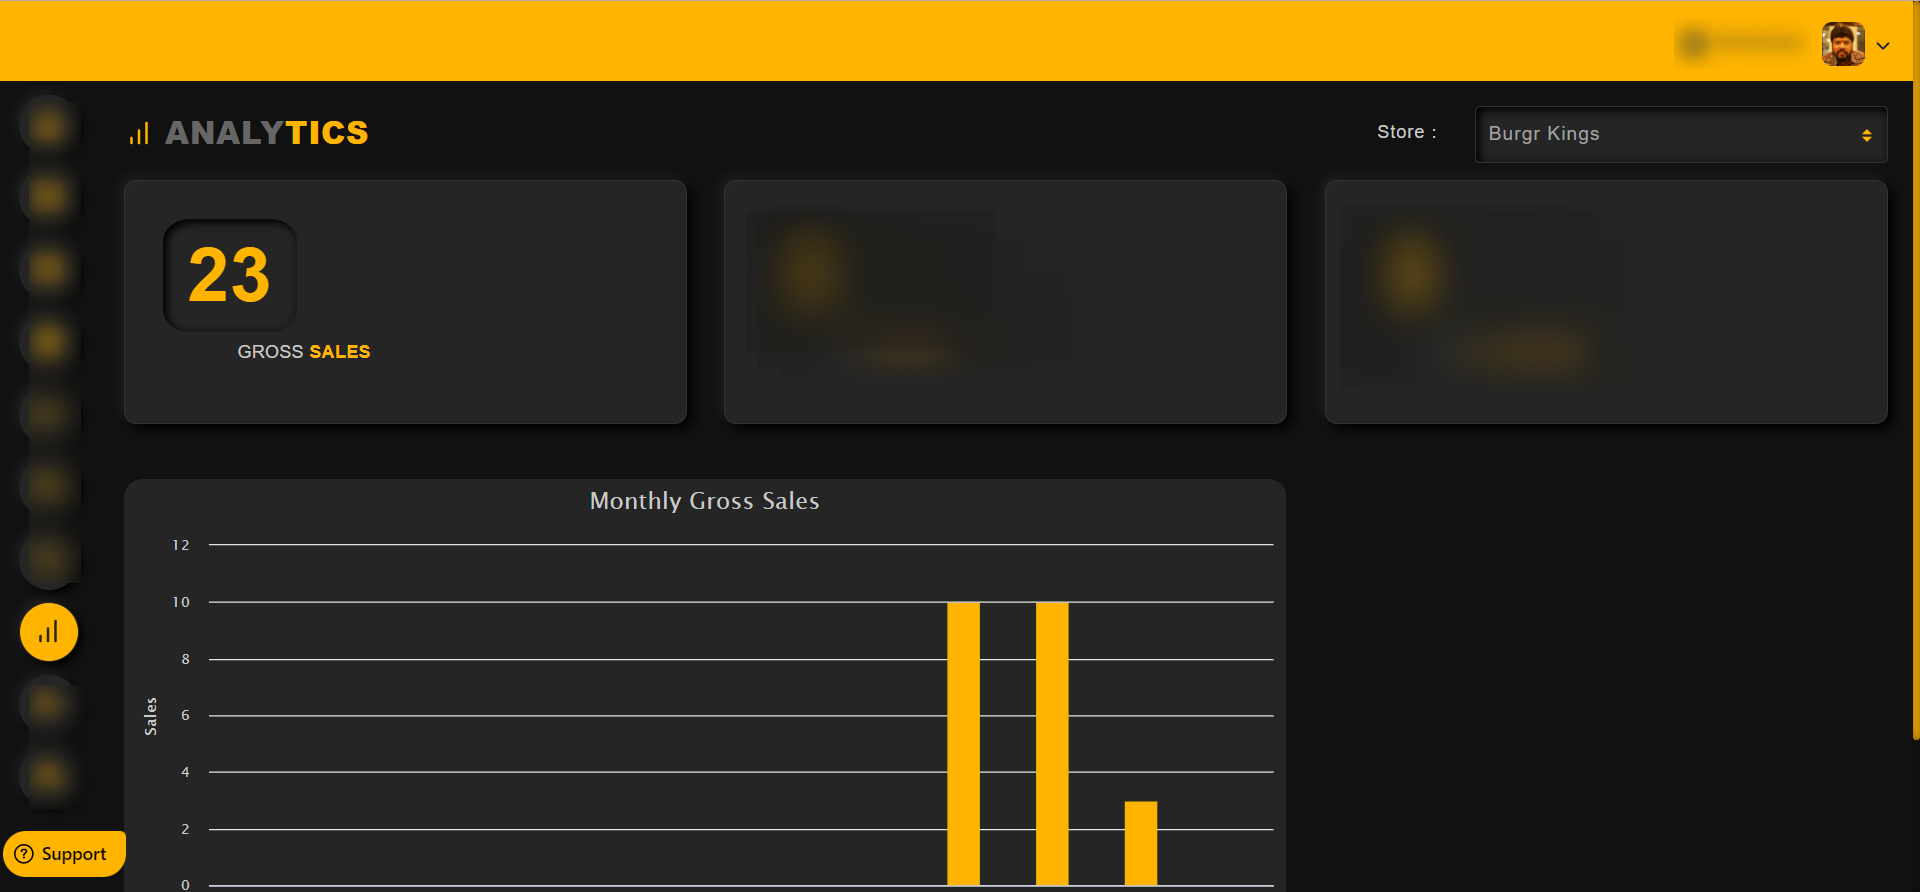
To view the Gross Sales, Click on the Analytics and then one can see the Gross sales as shown in the image below,
Admin can choose a store from the drop down at the top and view the gross sales based on the stores
To view the orders, Click on the Analytics and then one can see the Orders as shown in the image below,
Admin can choose a store from the drop down at the top and view the Overall Orders based on the stores

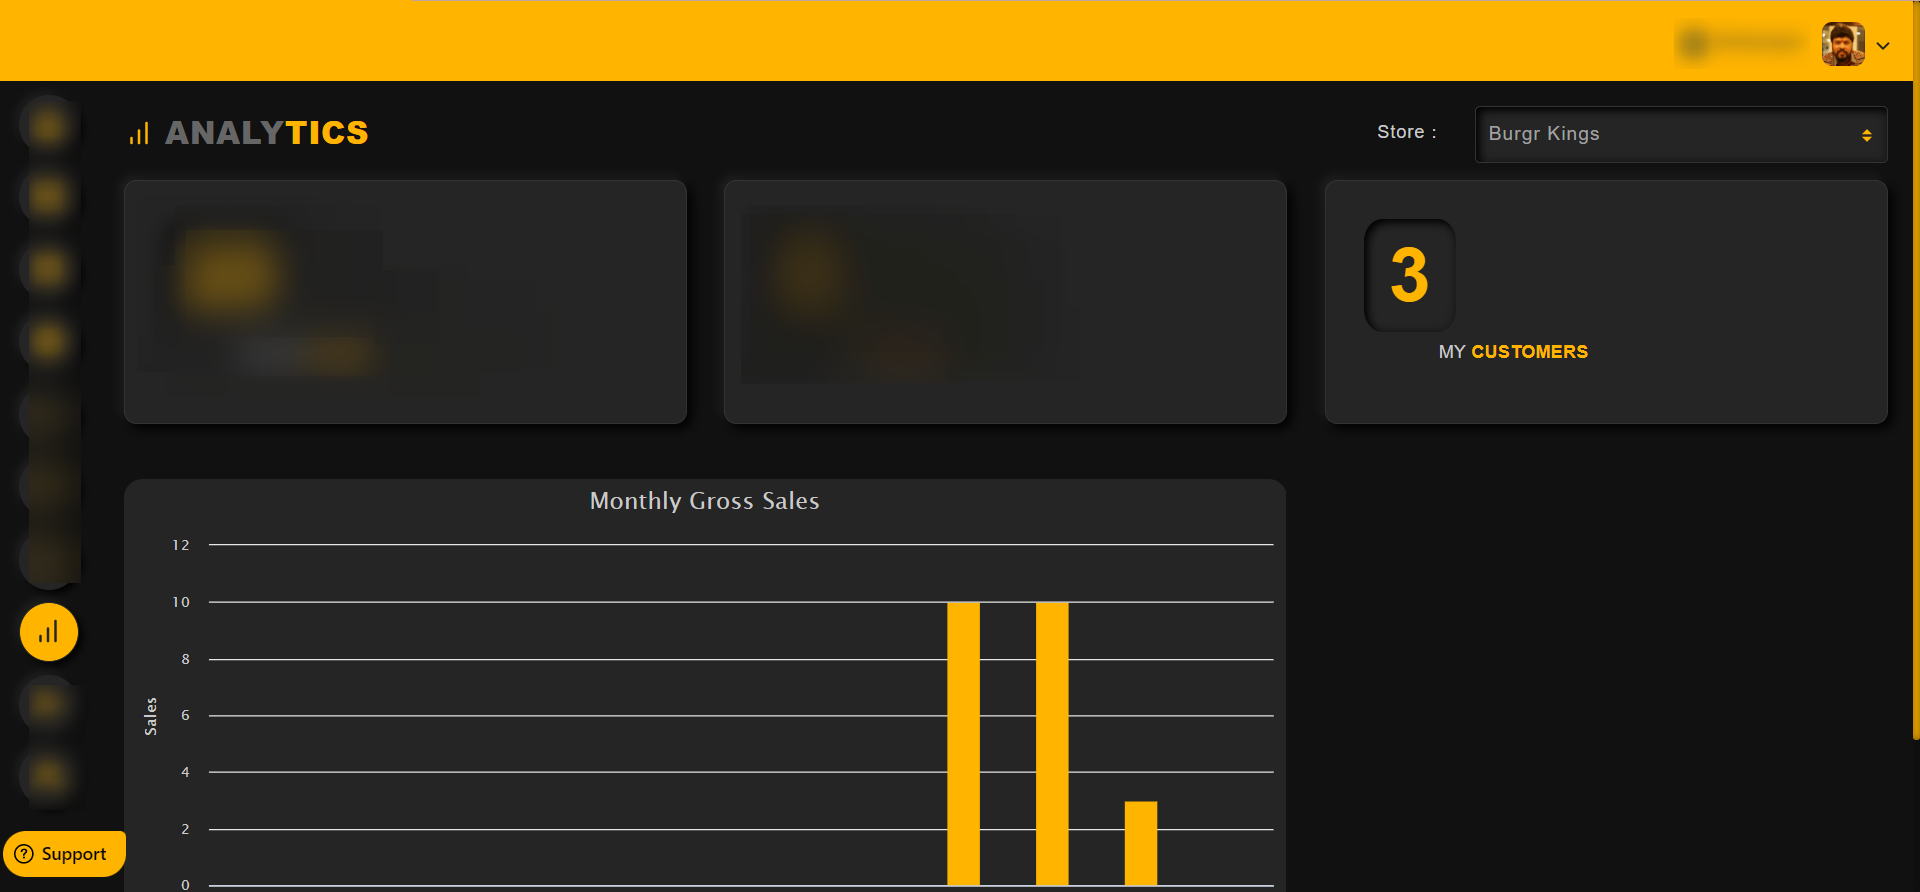
To view the Monthly Gross Sales graph, Click on the Analytics and then one can see the Monthly Gross sales in the form of a bar graph as shown in the image below,
Admin can choose a store from the drop down at the top and view the Monthly gross sales based on the stores

To view the Total Customers, Click on the Analytics and then one can see the customers total as shown in the image below,
Admin can choose a store from the drop down at the top and view the total customers in all the stores one by one
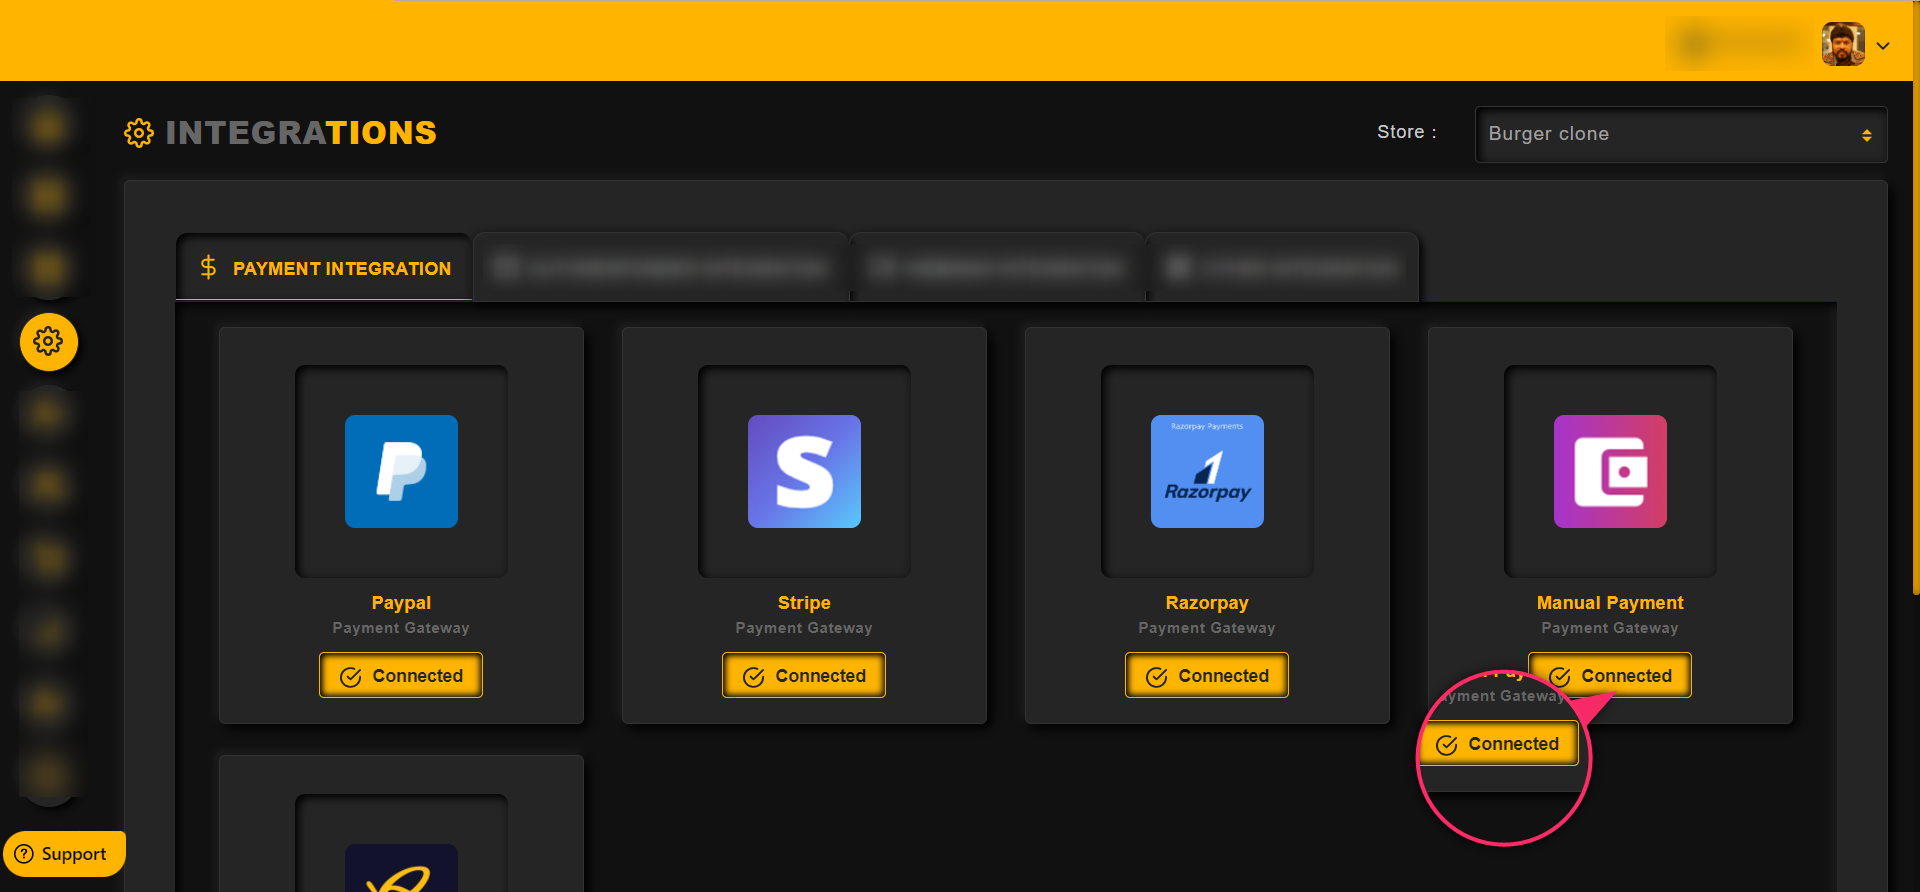
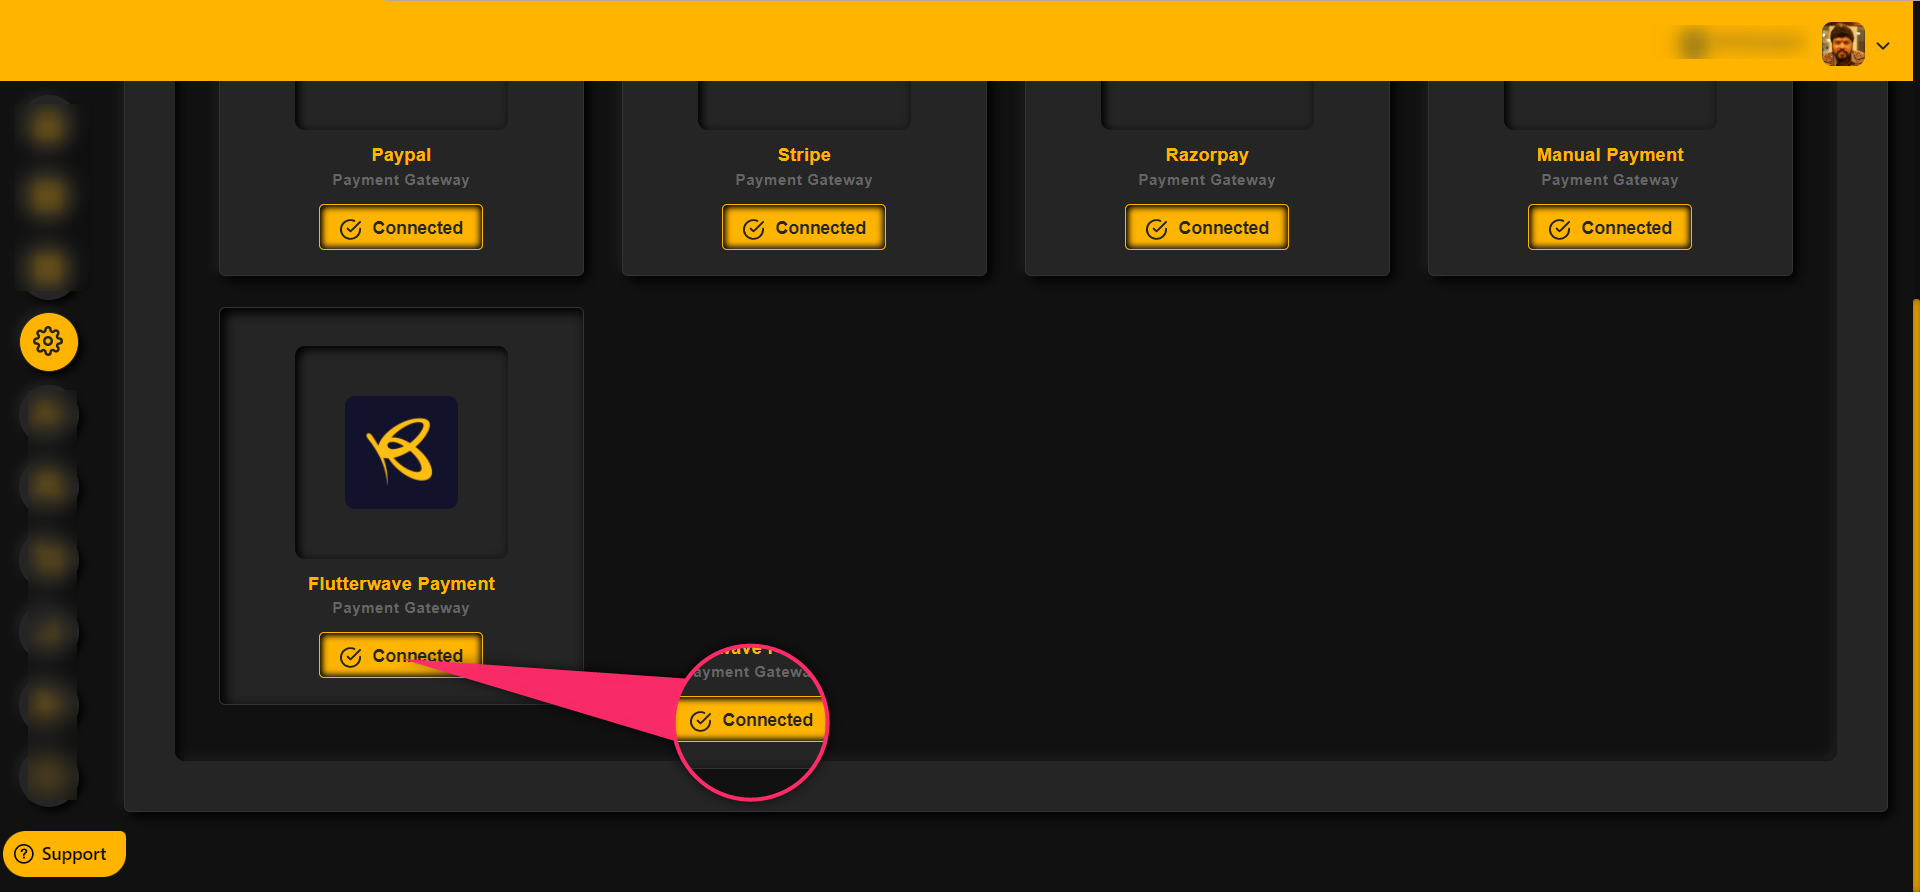
Category: Integrations
How to set your integrations

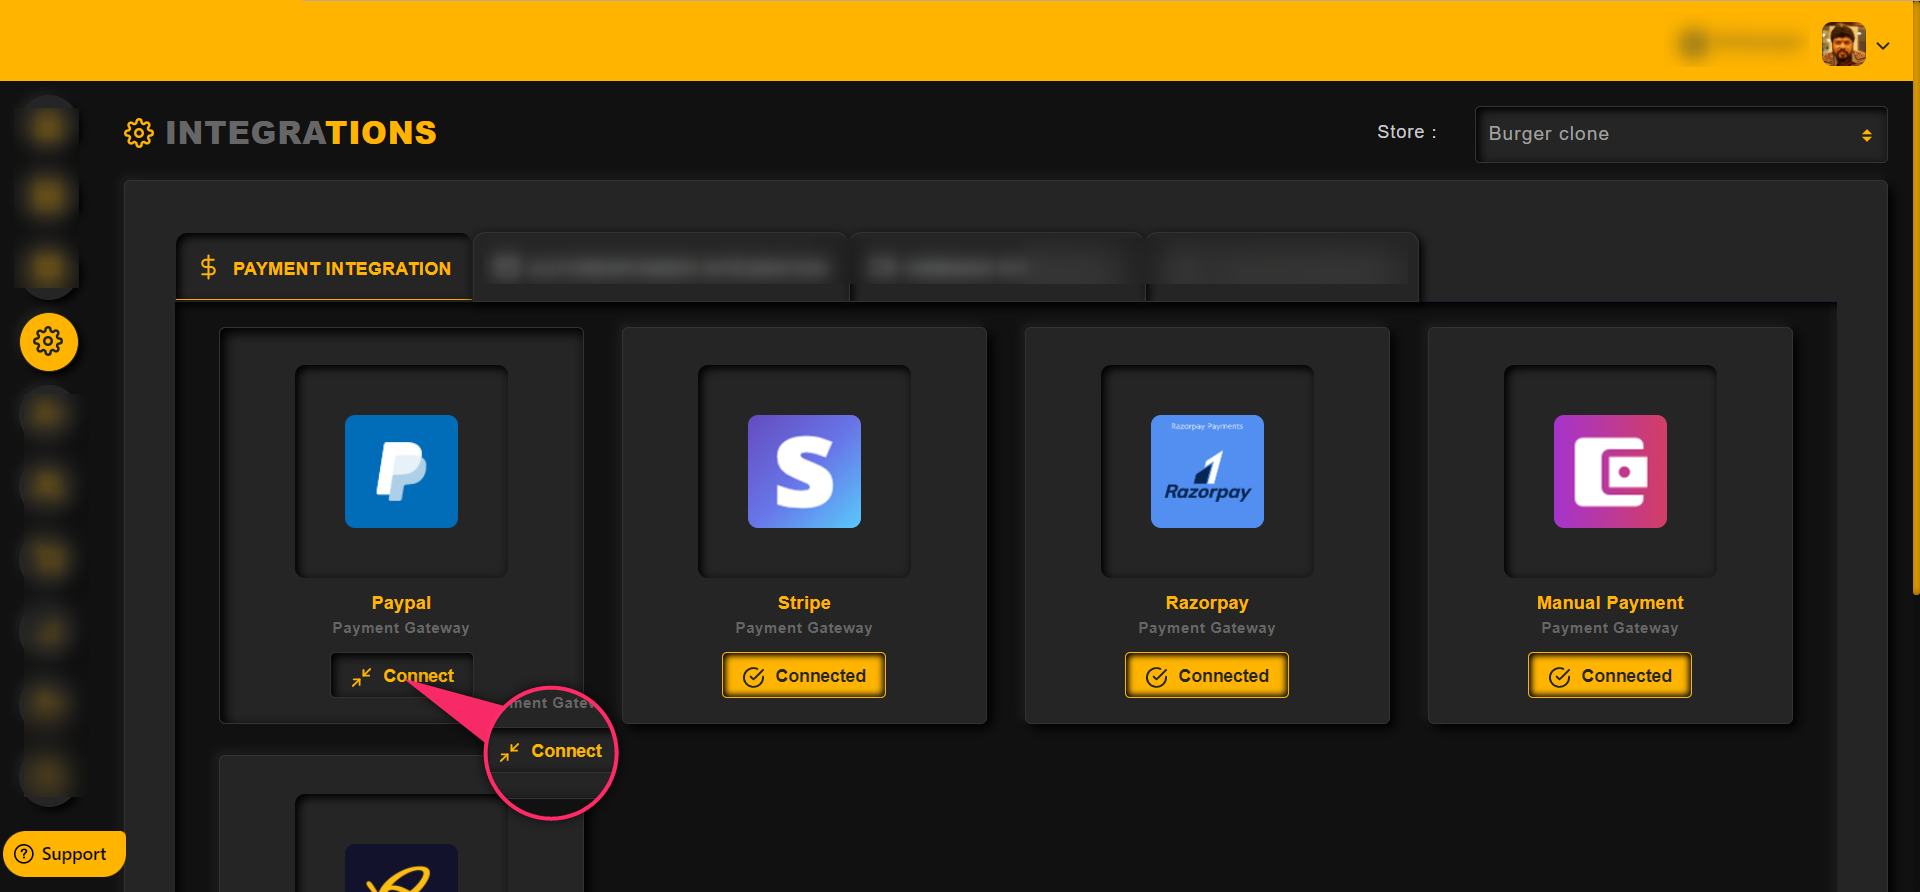
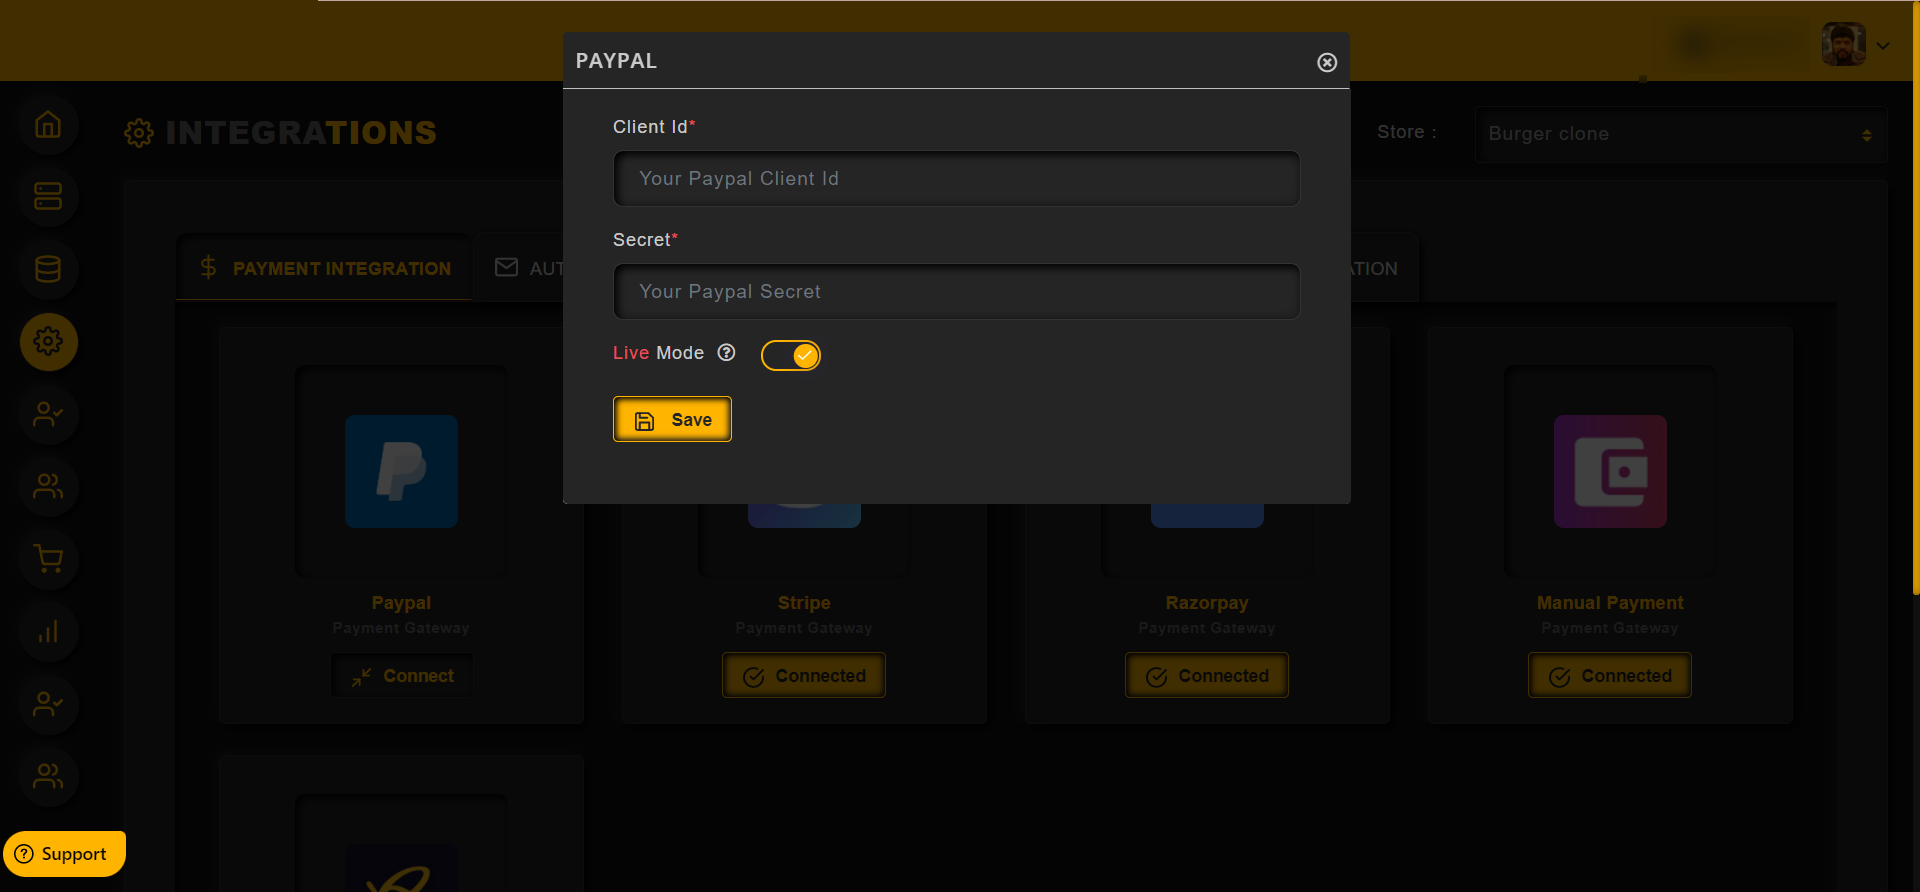
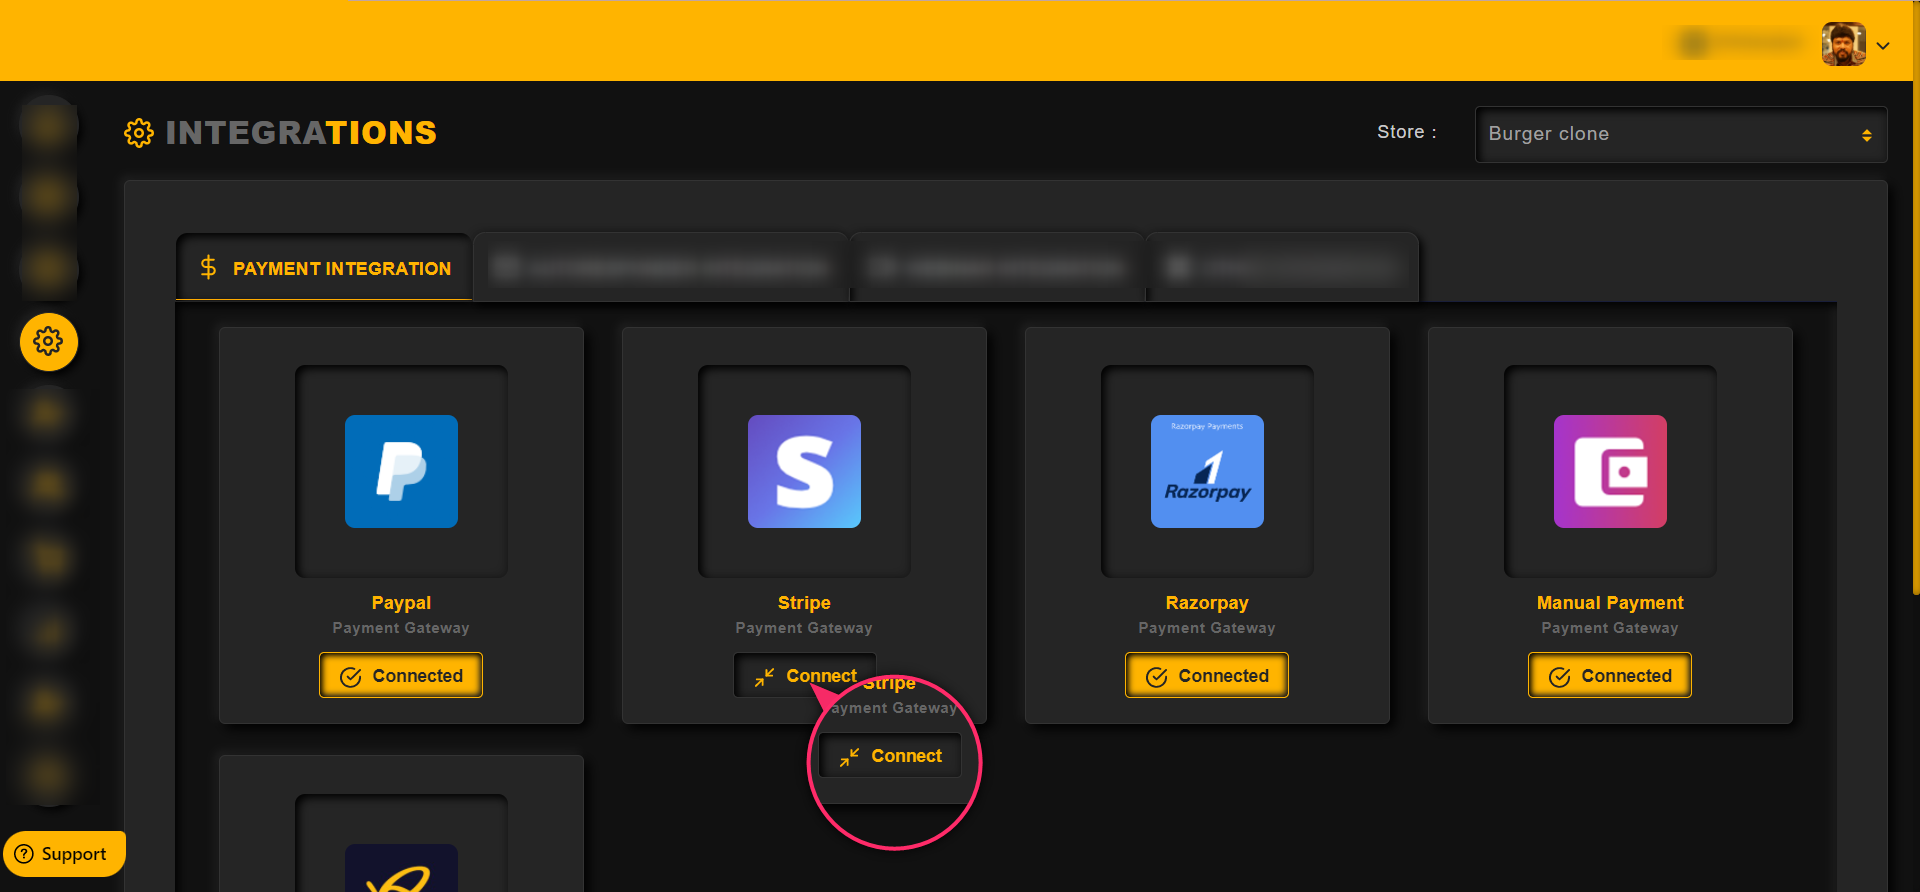
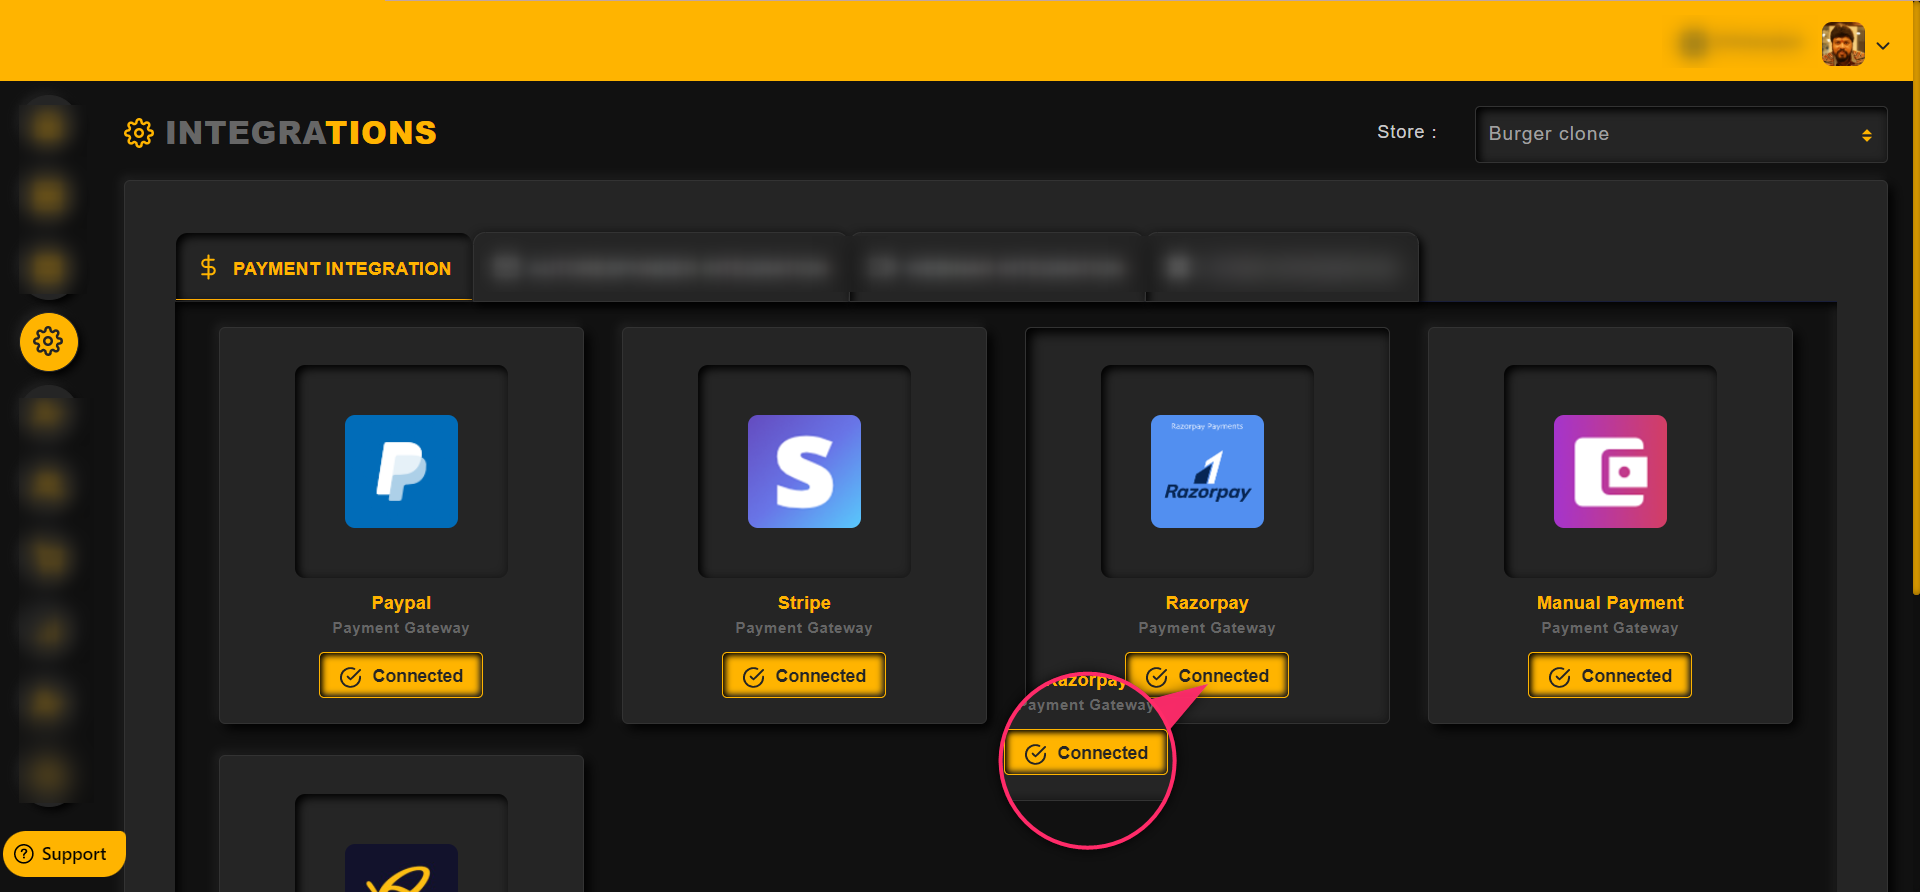
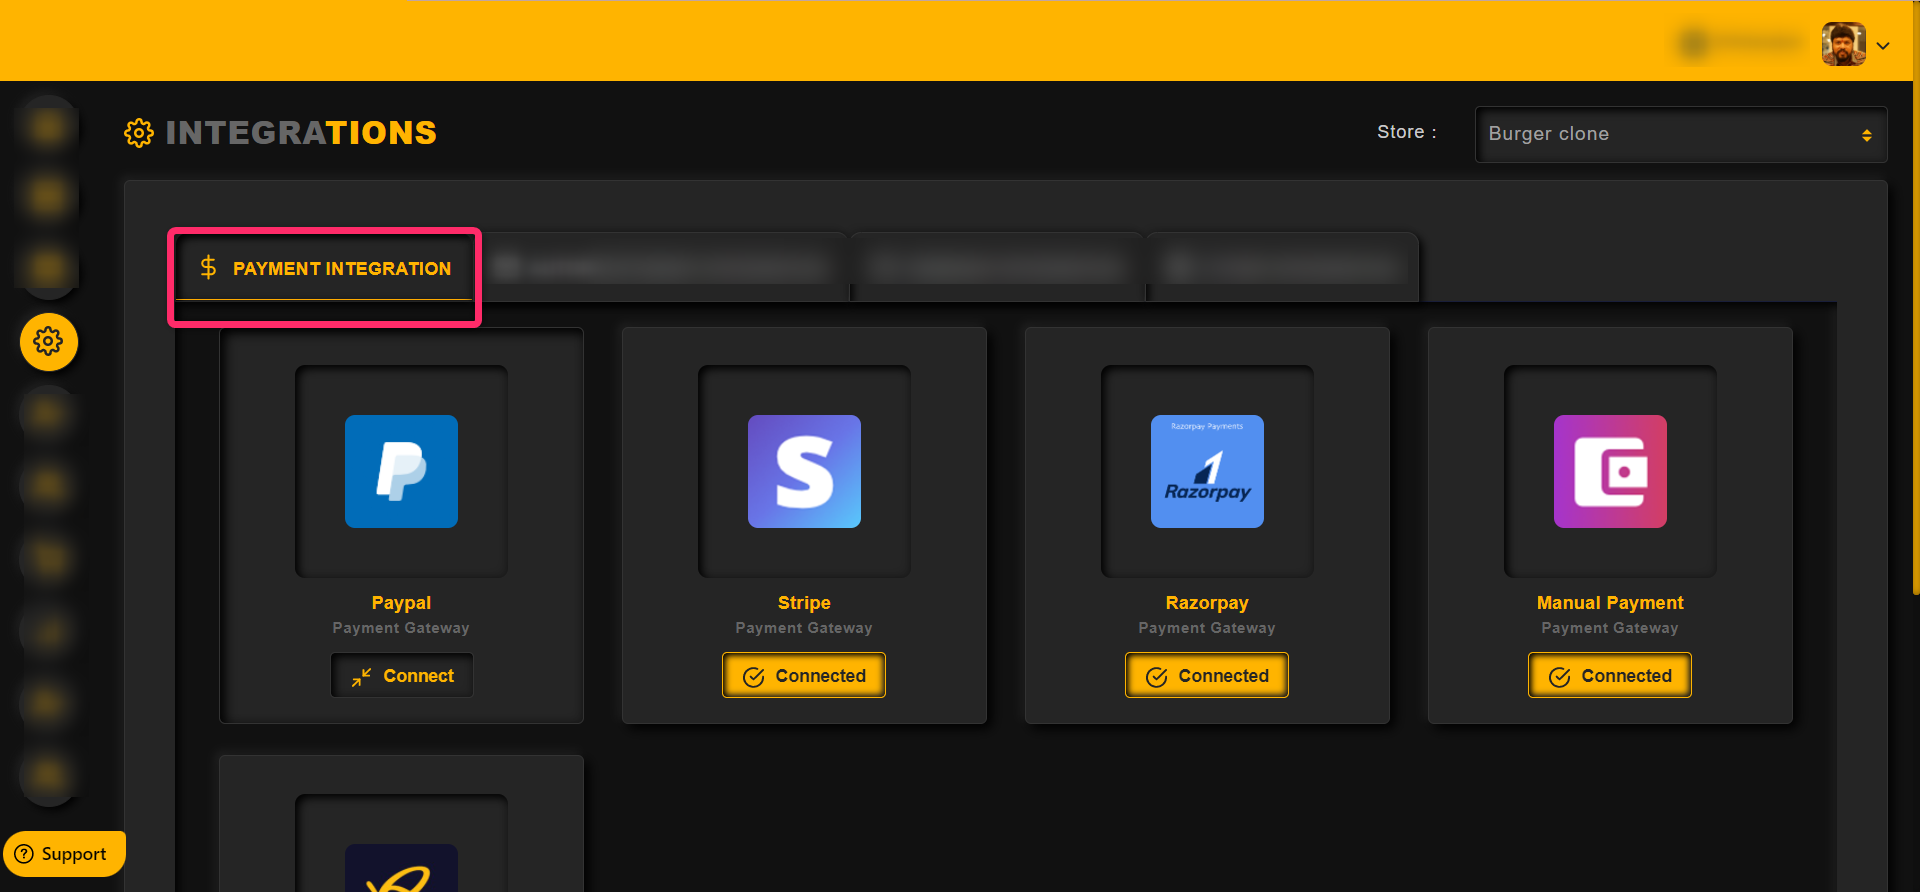
To integrate PayPal with QROST,
Go to Integrations >> Payment Integration
Click on Connect button as shown in the image below,
Enter the Client ID and Secret code in the provided fields
Then click on Save button
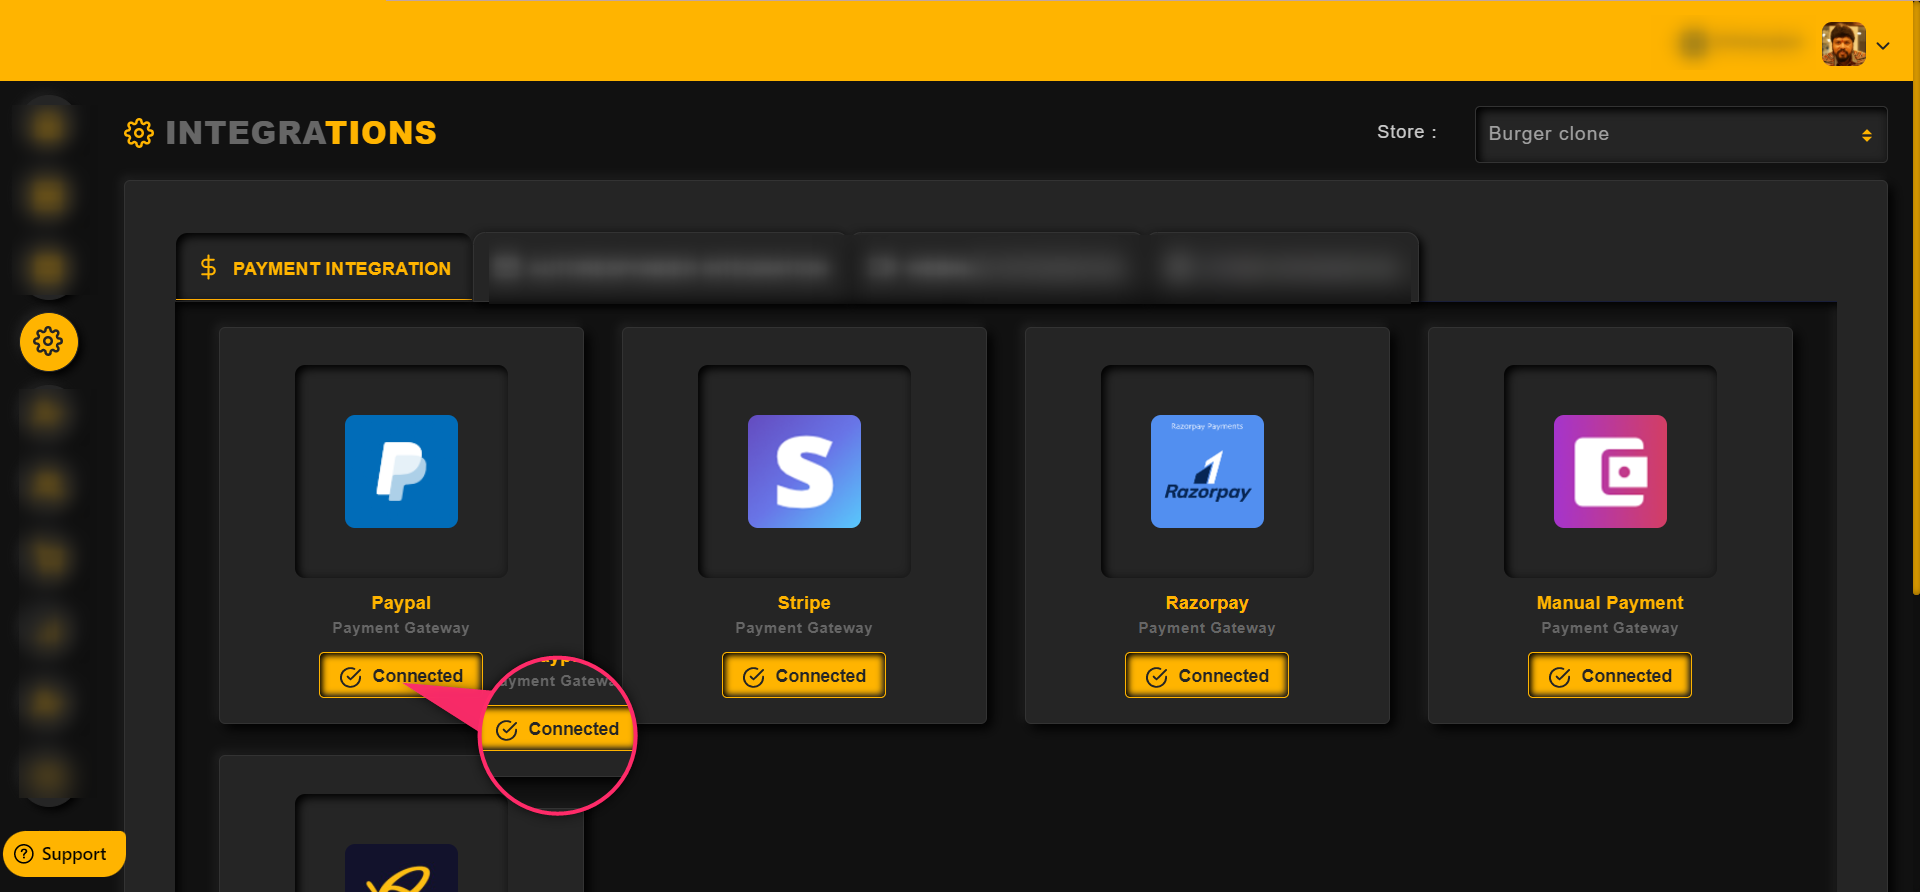
Once the payment gateway is integrated, then the button will be changed to Connected as shown in the image below,
For live mode, enable the toggle switch as shown in this image below,
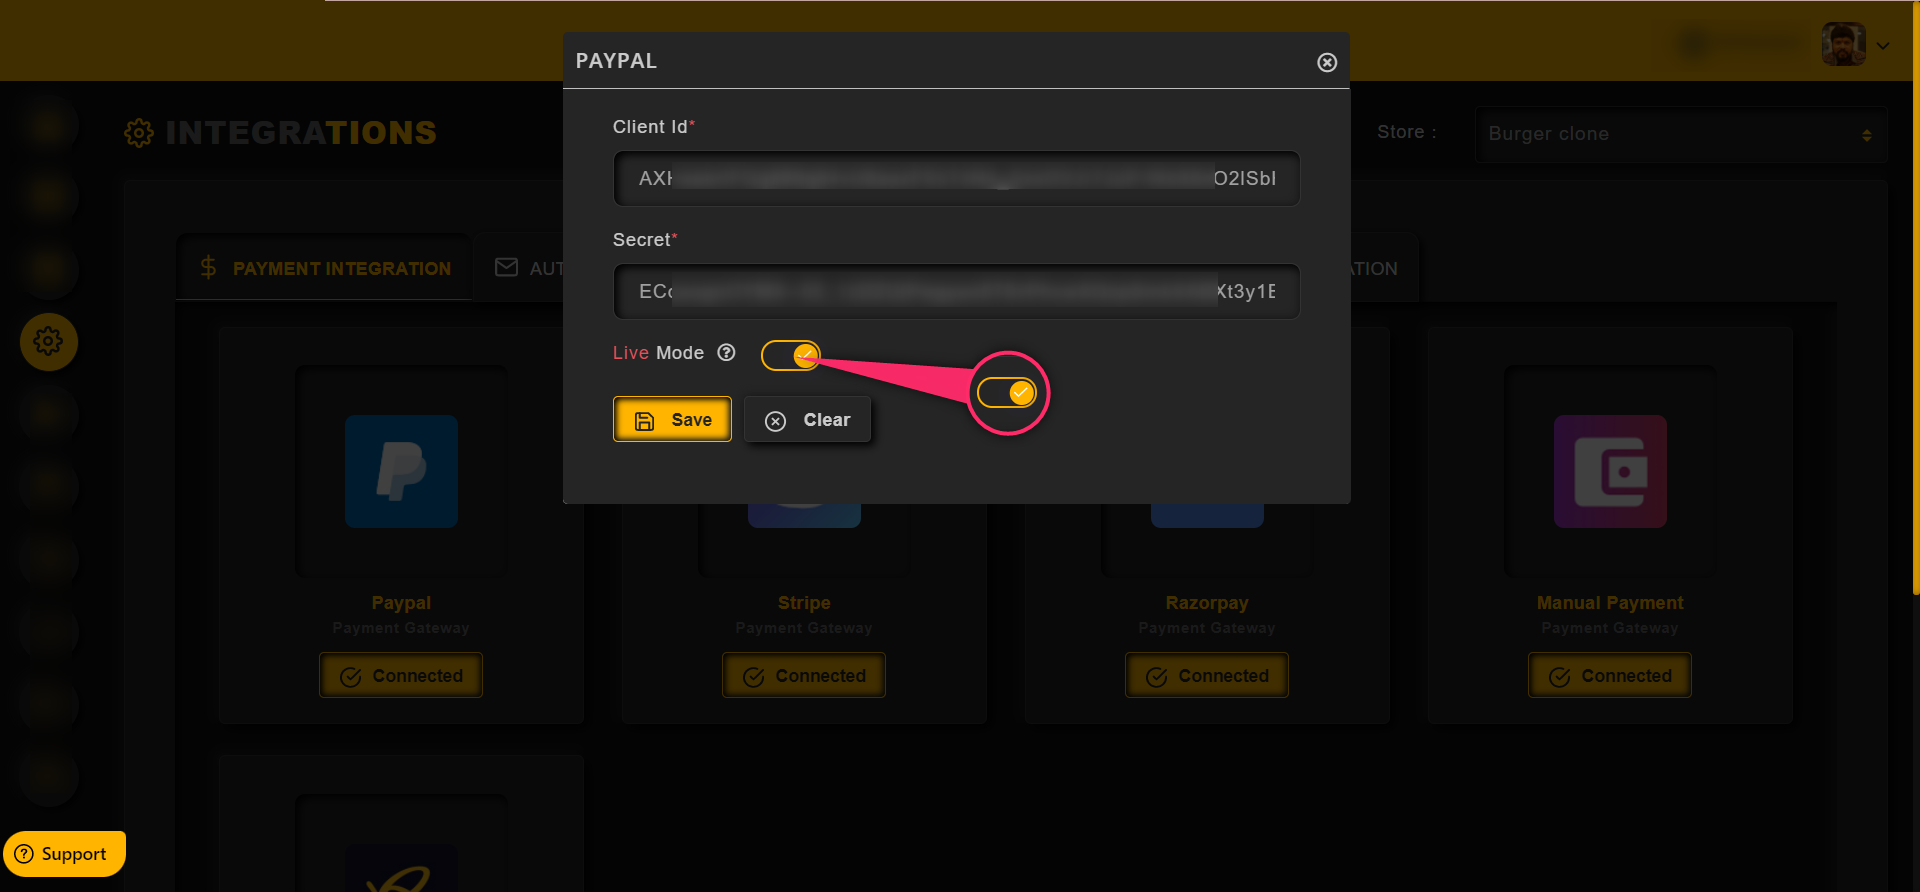
For Test mode, disable the toggle.
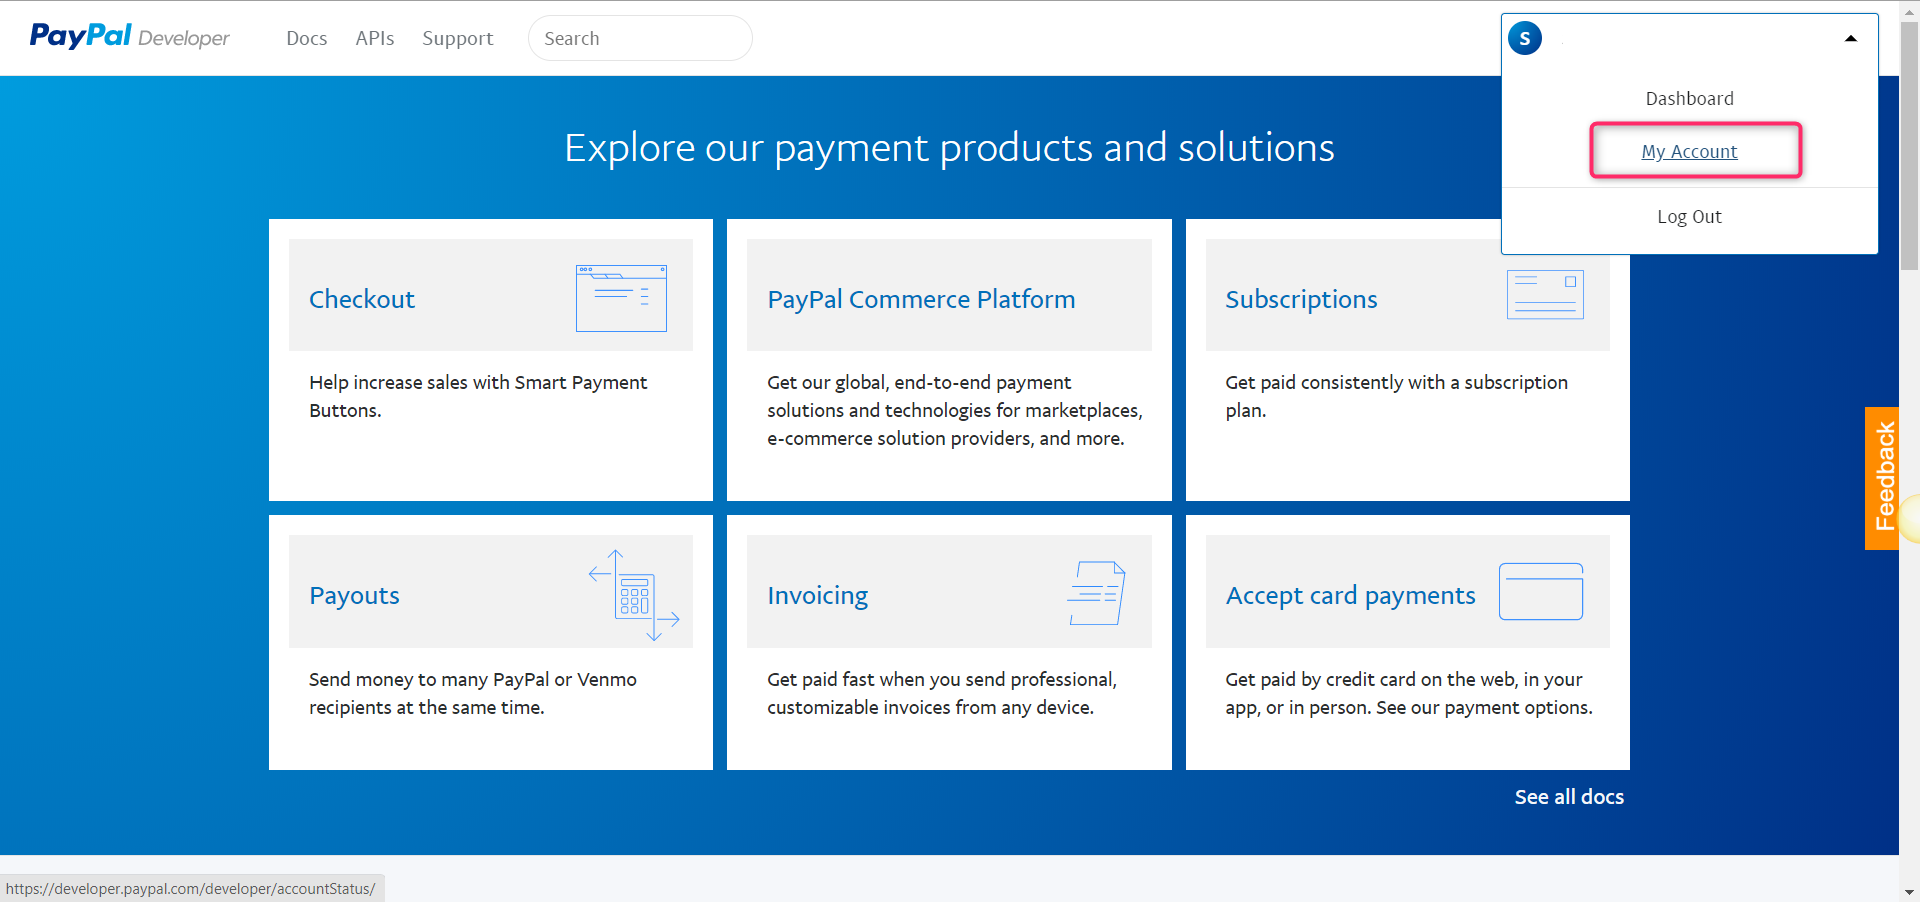
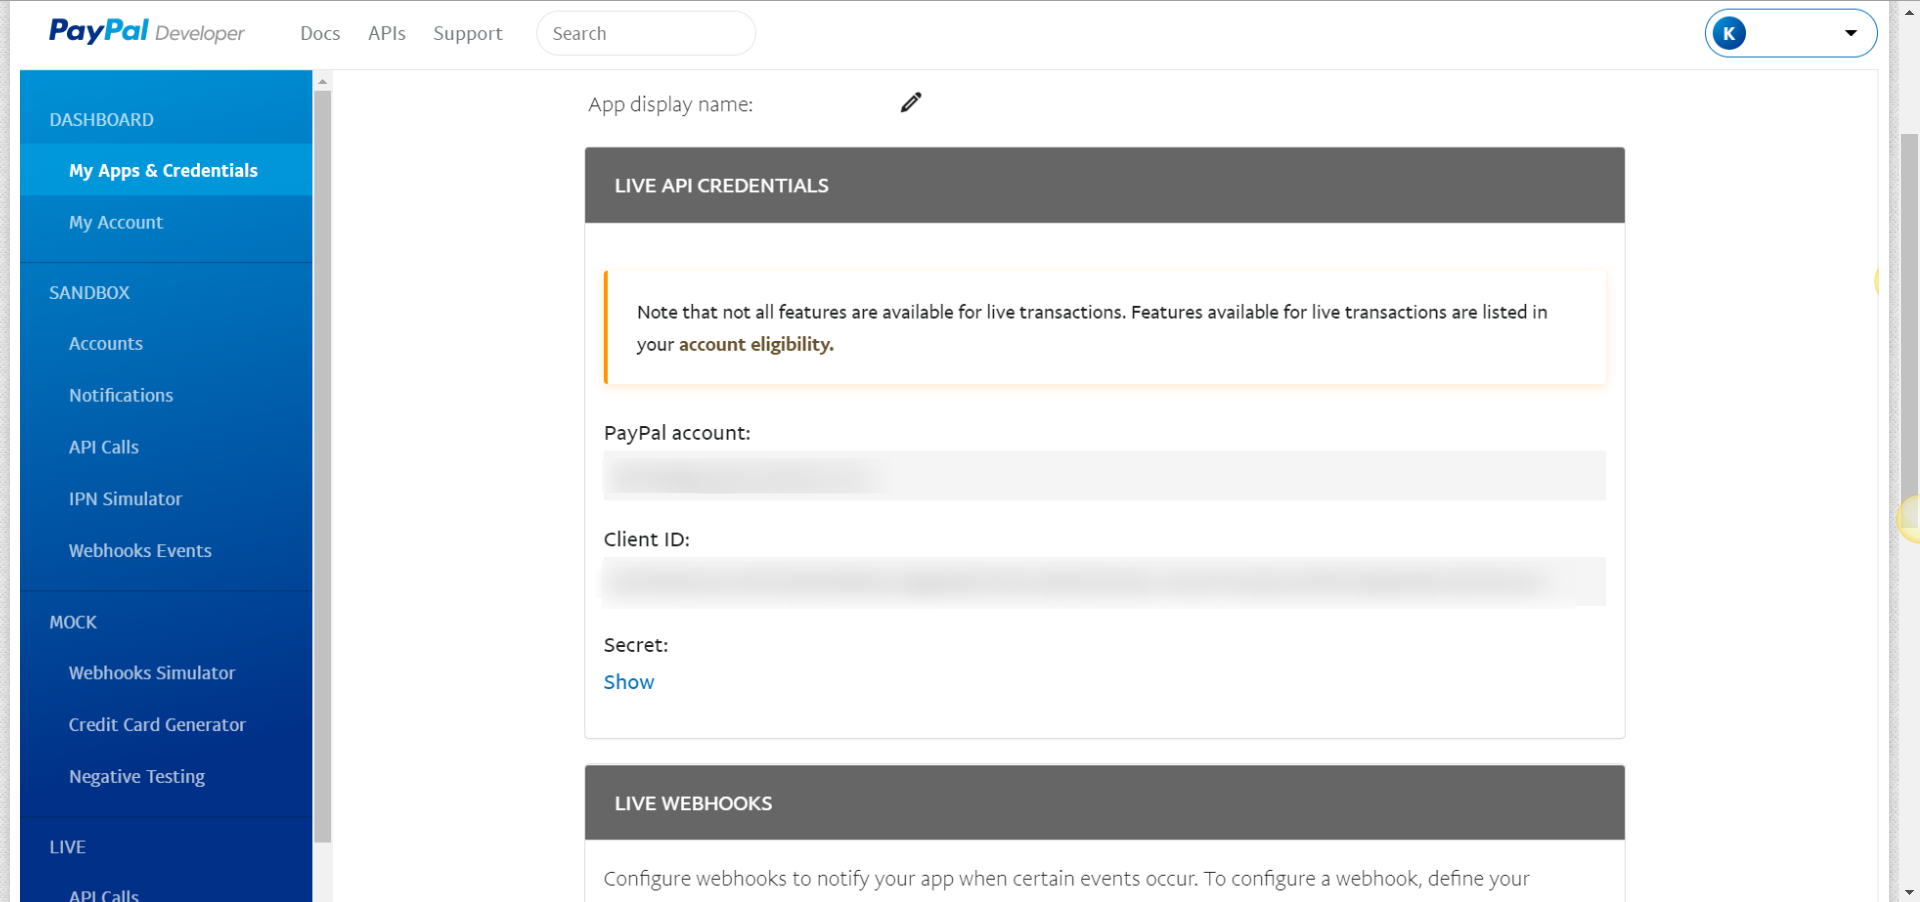
To get the API details from the PayPal, follow the steps below
Click on the developer from the bottom menus, then click on My Account as shown in the image below,
Click on “My Apps & Credentials”
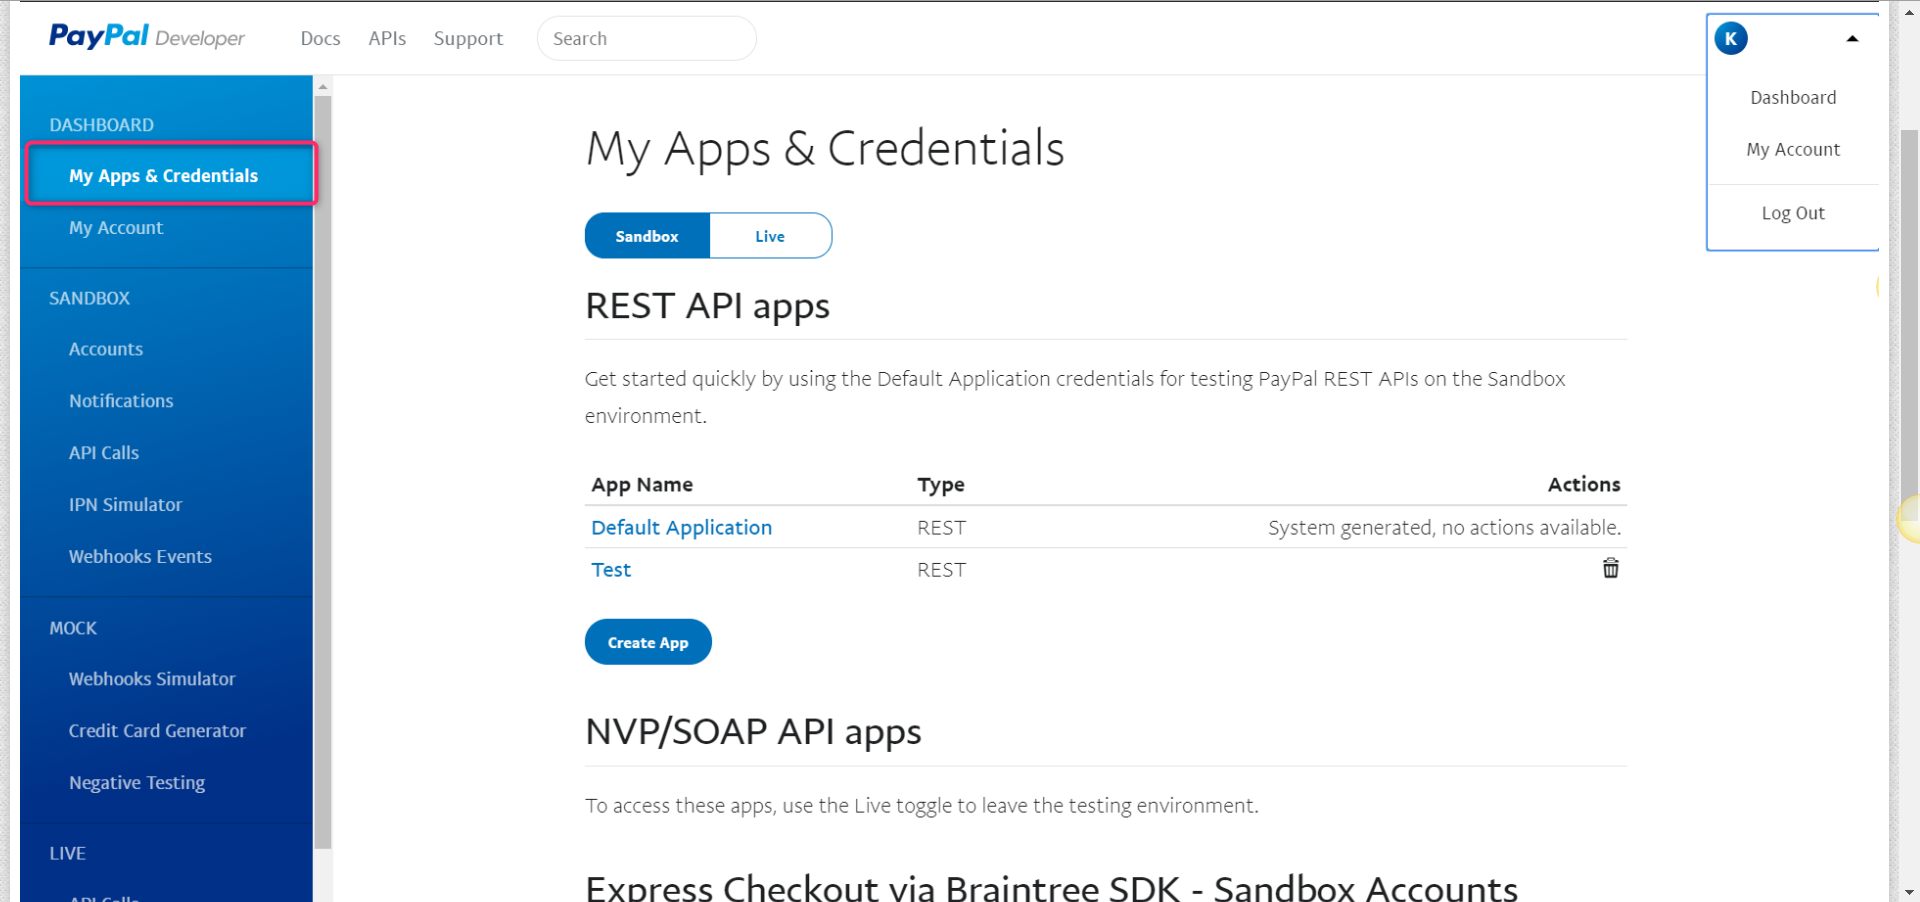
Then click on Live as shown in the image below

Click on the App which is to be integrated
Copy the Client ID and the Secret code from here and paste it in the Integration
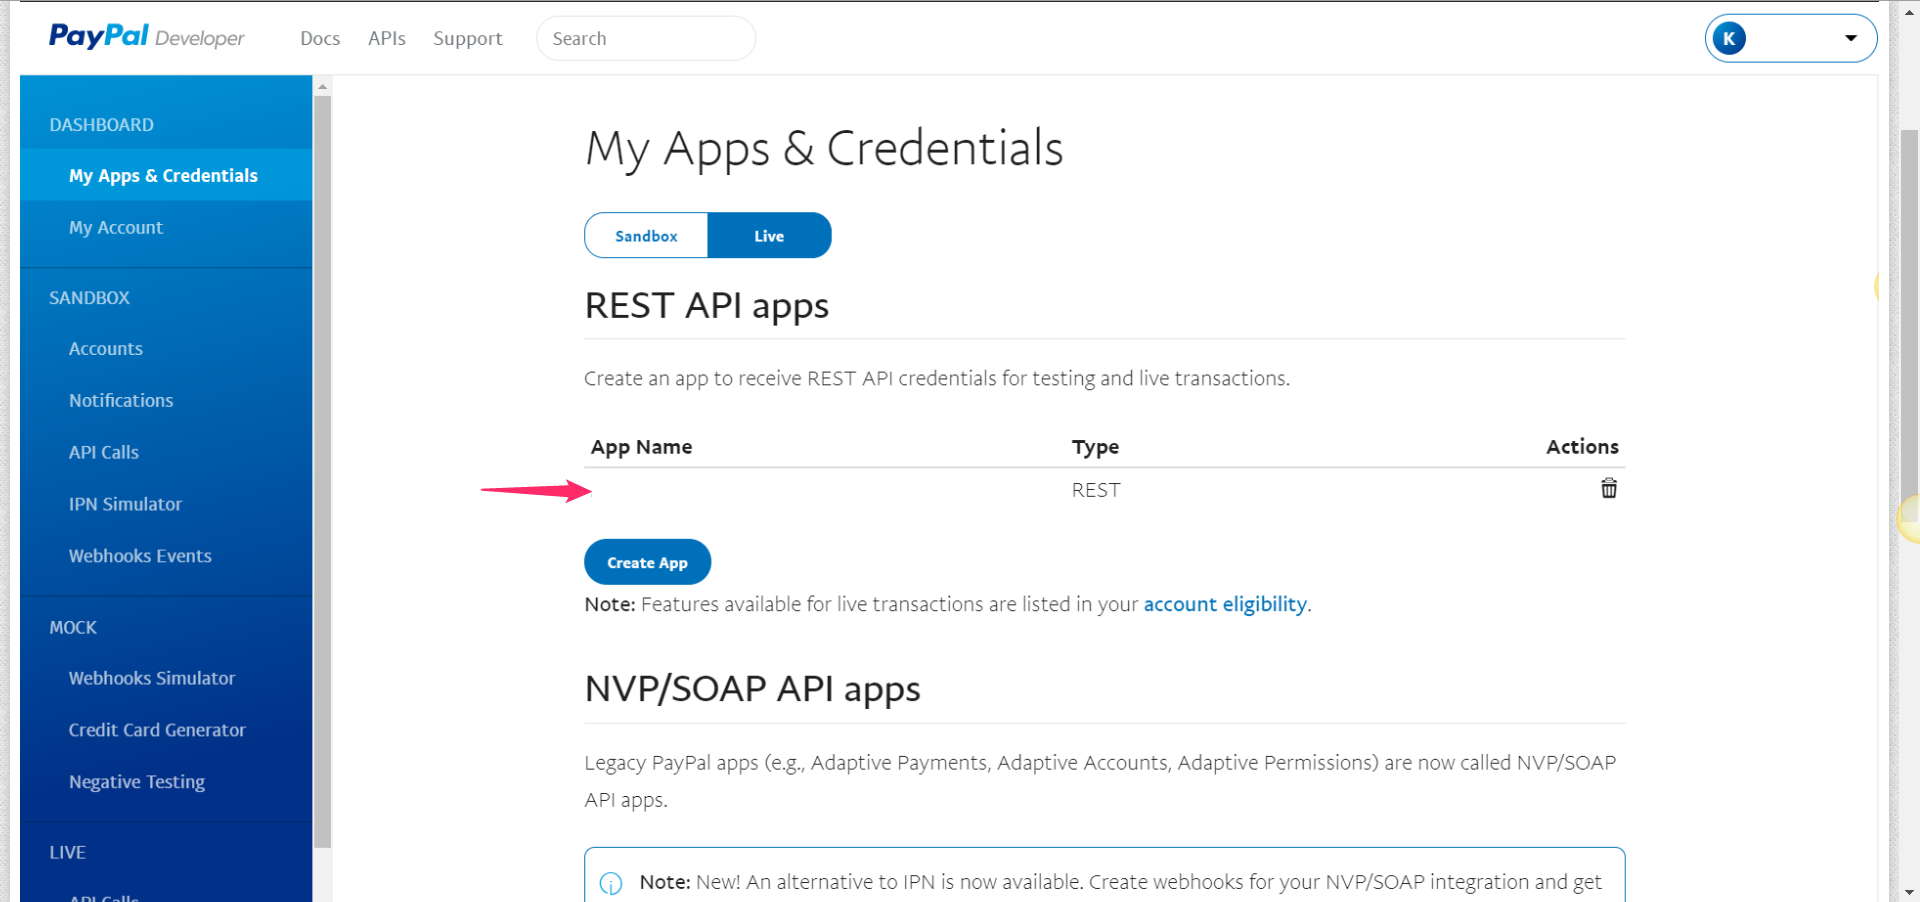
Please verify your client and secret id if you face the error message when you do test purchase,
Error Message – Please cross check your Paypal Client Id and Secret.
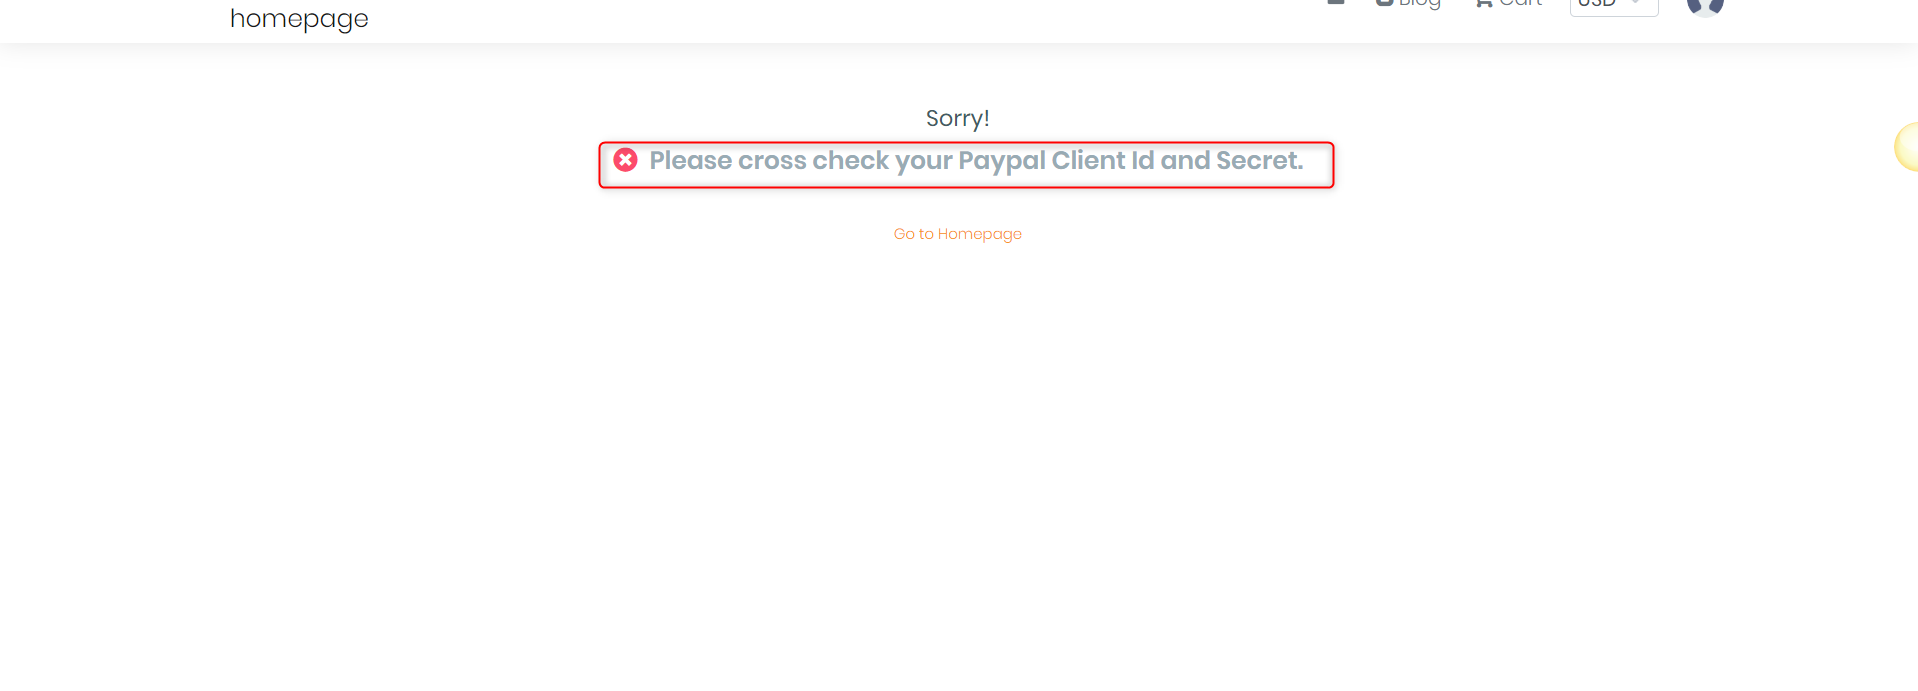
If you still face the same error message after verifiying your client and secret id. Please try creating a new app to generate new client and secret id. Refer the screen shot below,
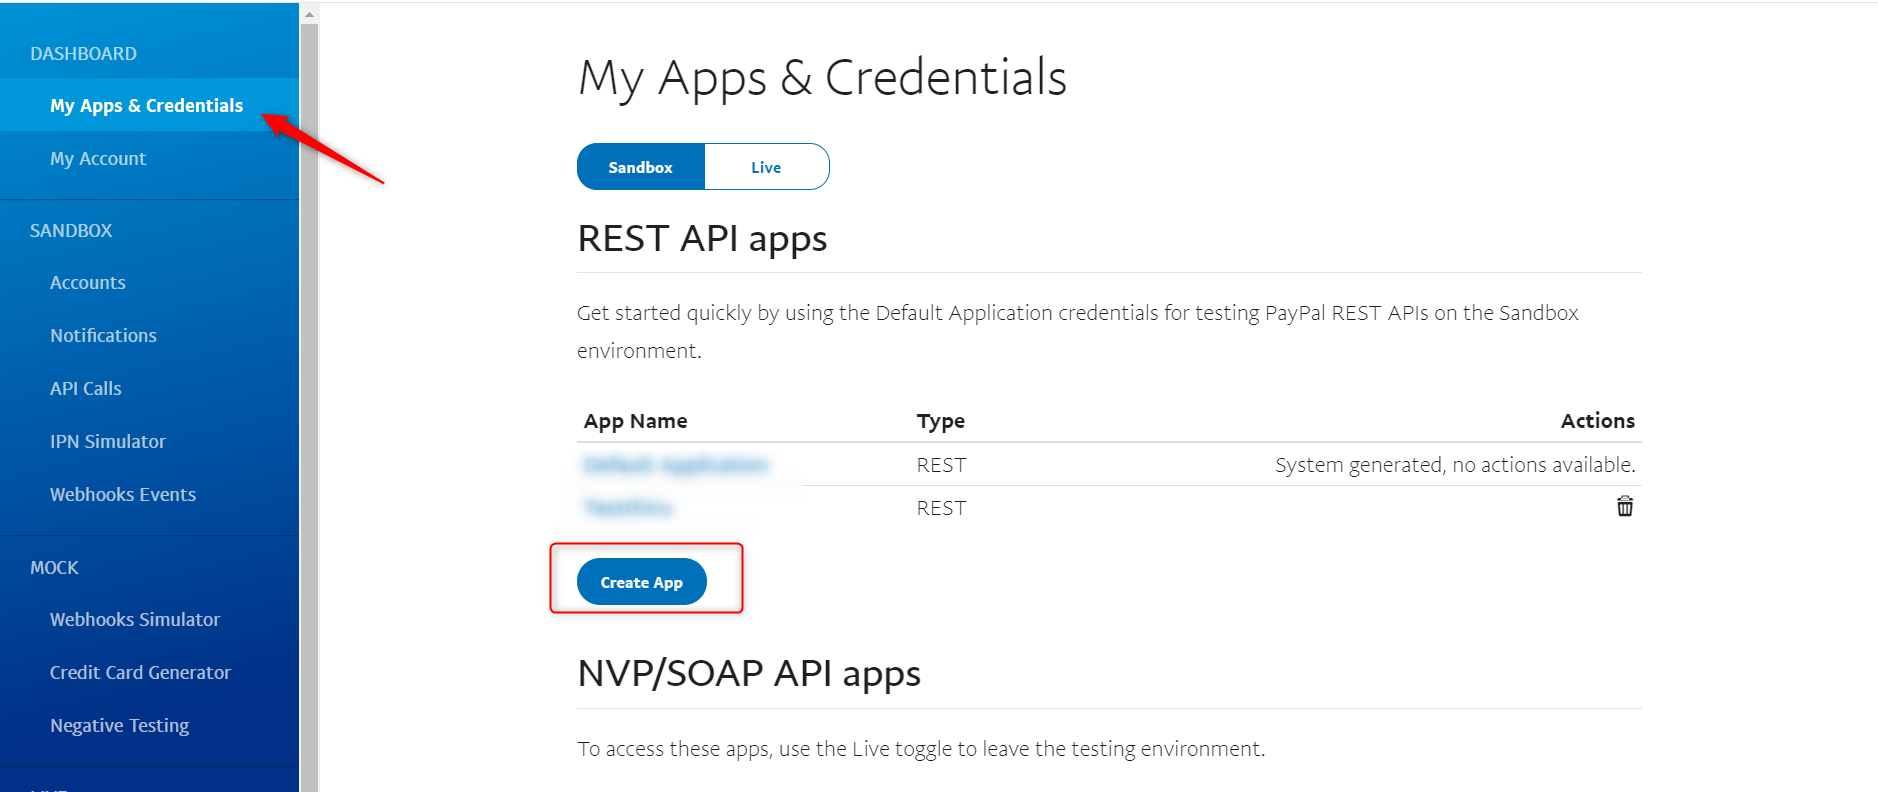
For Test purchase create under sandbox menu and Live pruchase create under Live menu
To integrate Stripe with QROST,
Go to Integrations >> Payment Integration
Click on Connect button as shown in the image below,
Enter the Stripe Key and Secret Key in the provided fields
Then click on Save button
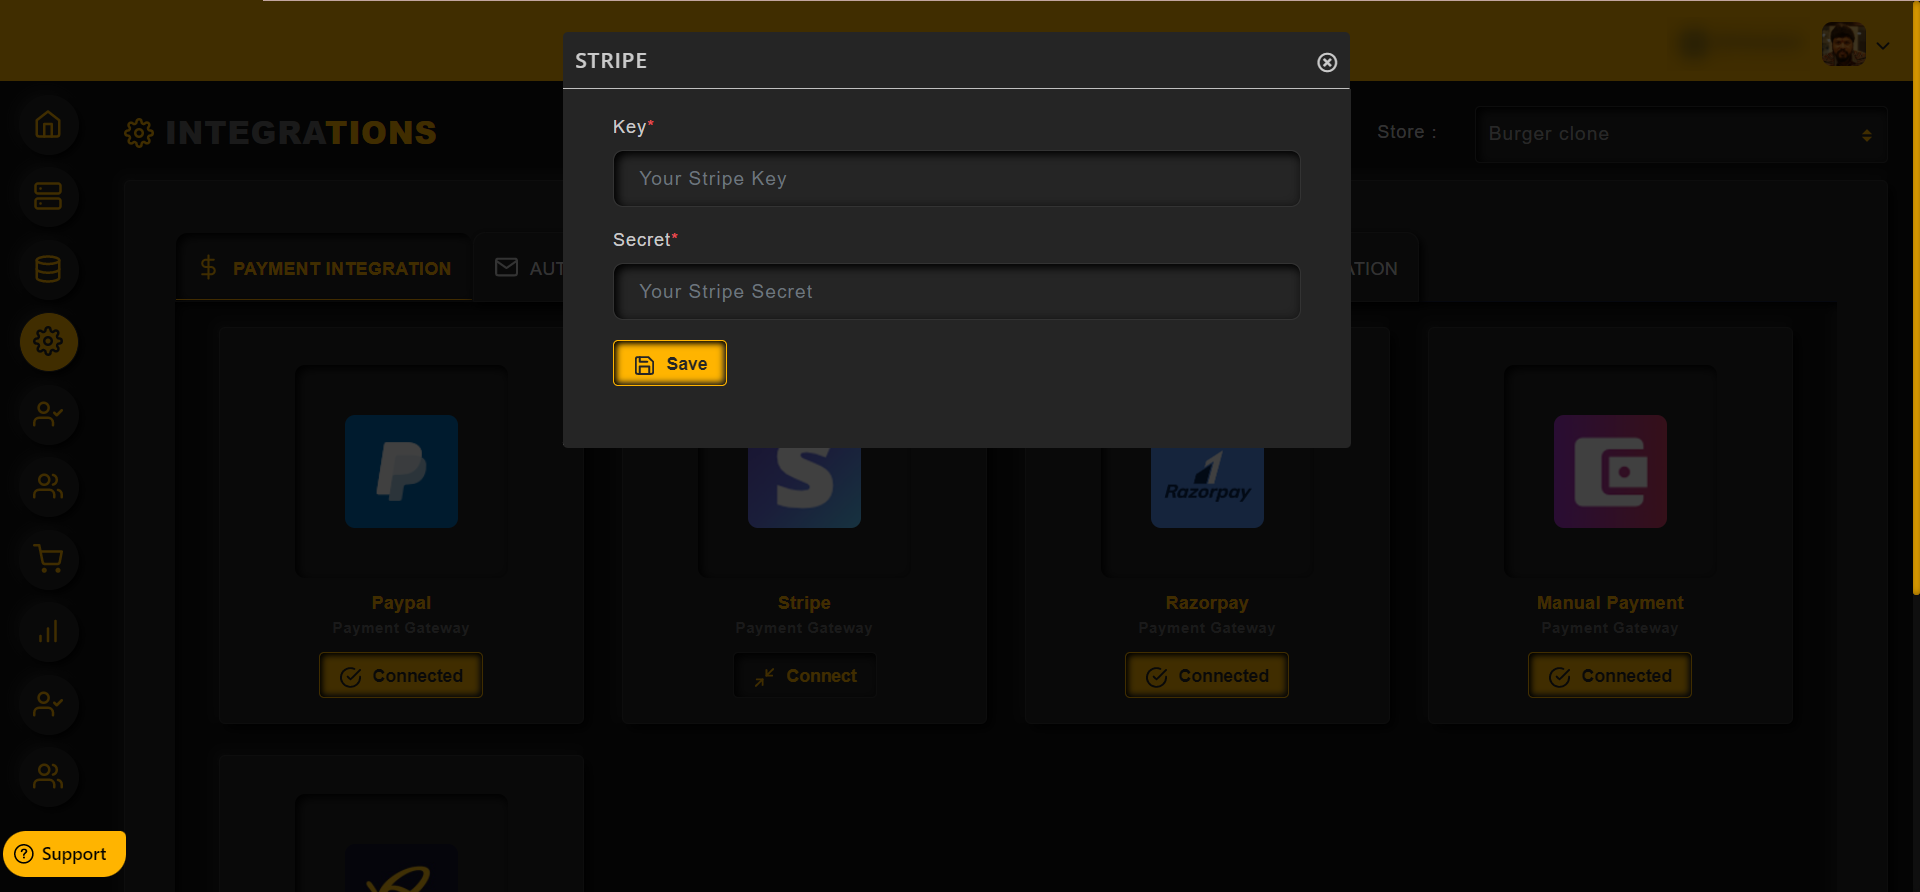
Once the payment gateway is integrated, then the button will be changed to Connected as shown in the image below,

To get the API details from the Stripe, refer the image below
Copy the keys and from here and paste it in the QROST Integration
To integrate Razorpay with QROST,
Go to Integrations >> Payment Integration
Click on Connect button as shown in the image below

Enter the Key ID and Key Secret in the provided fields
Then click on Save button
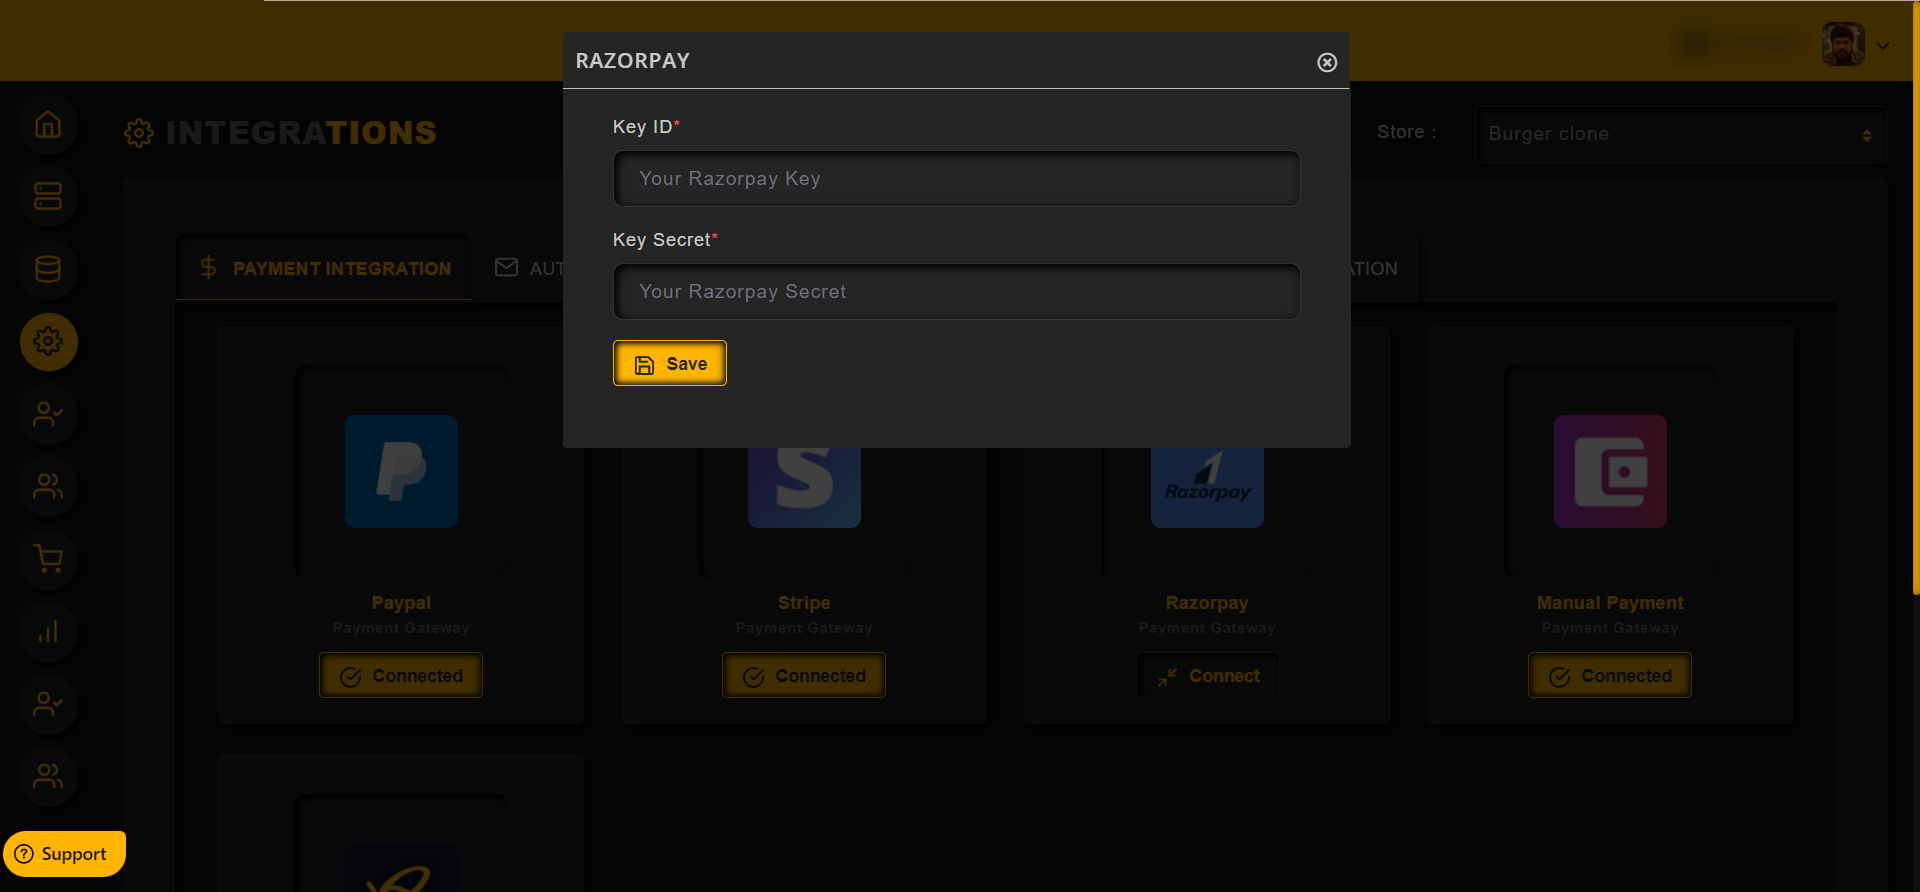
Once the Razorpay payment gateway is integrated, then the button will be changed to Connected as shown in the image below,
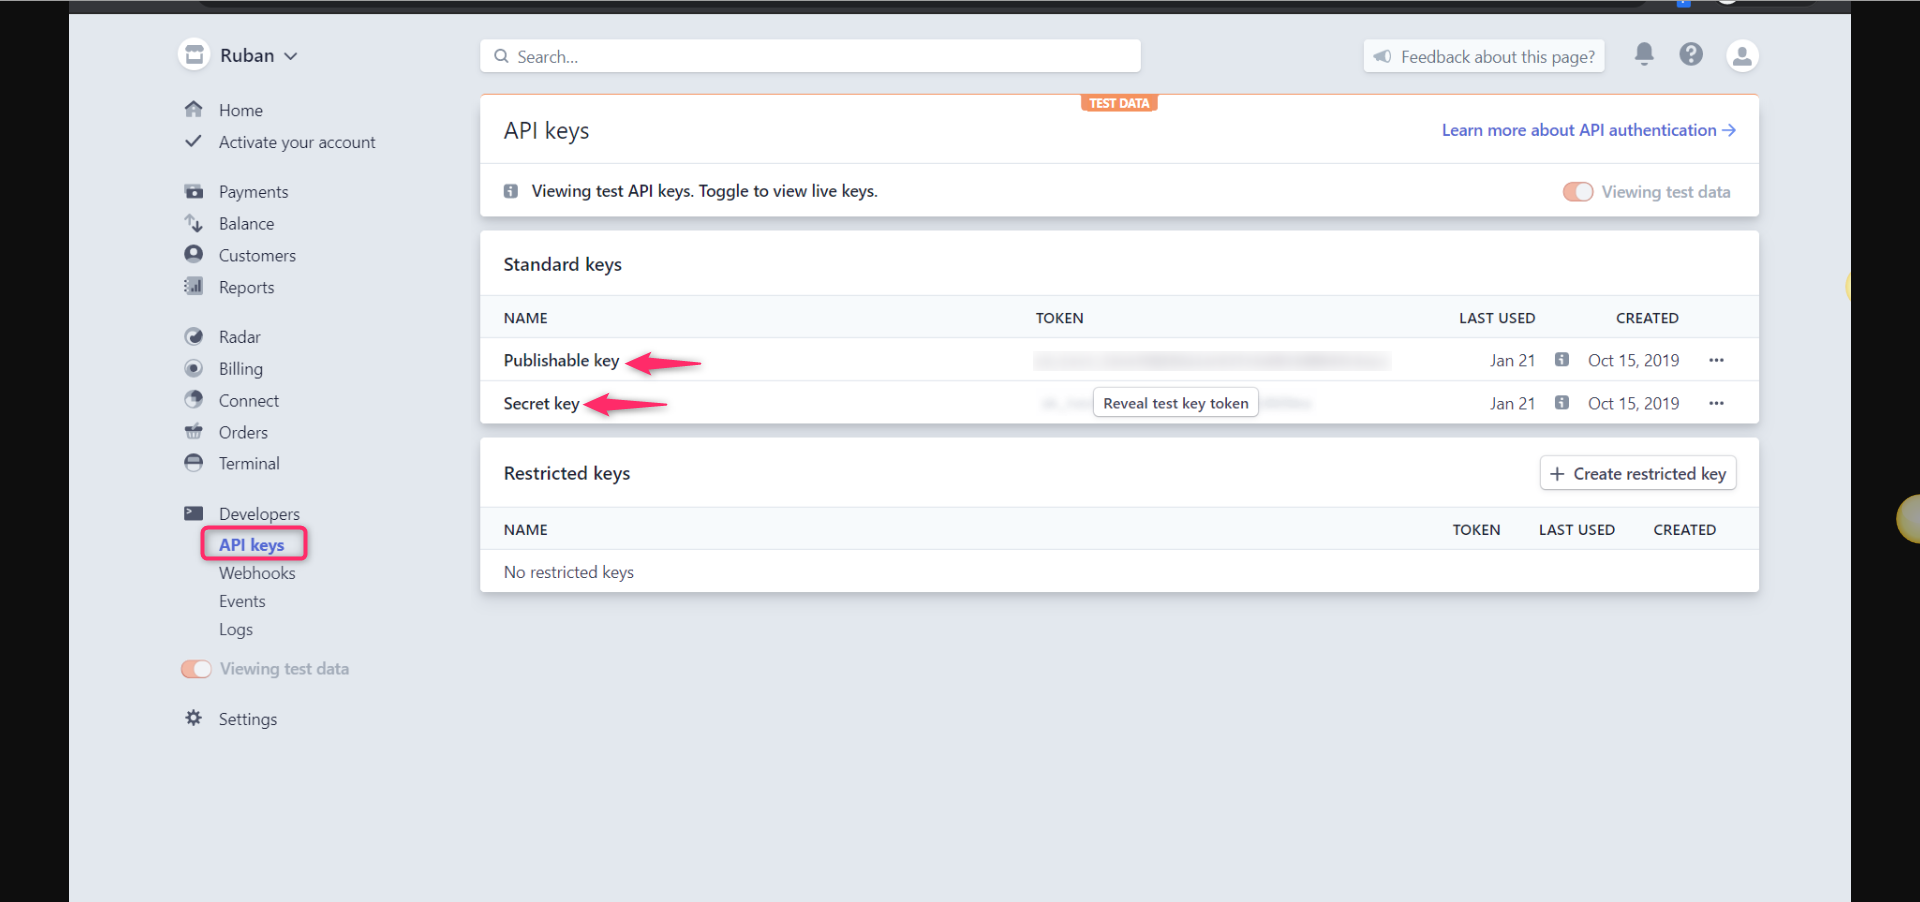
To get the API details from the Razorpay.
Login to your Razorpay account and click on the setting -> API Keys -> Regenerate Key button, as shown in the image below
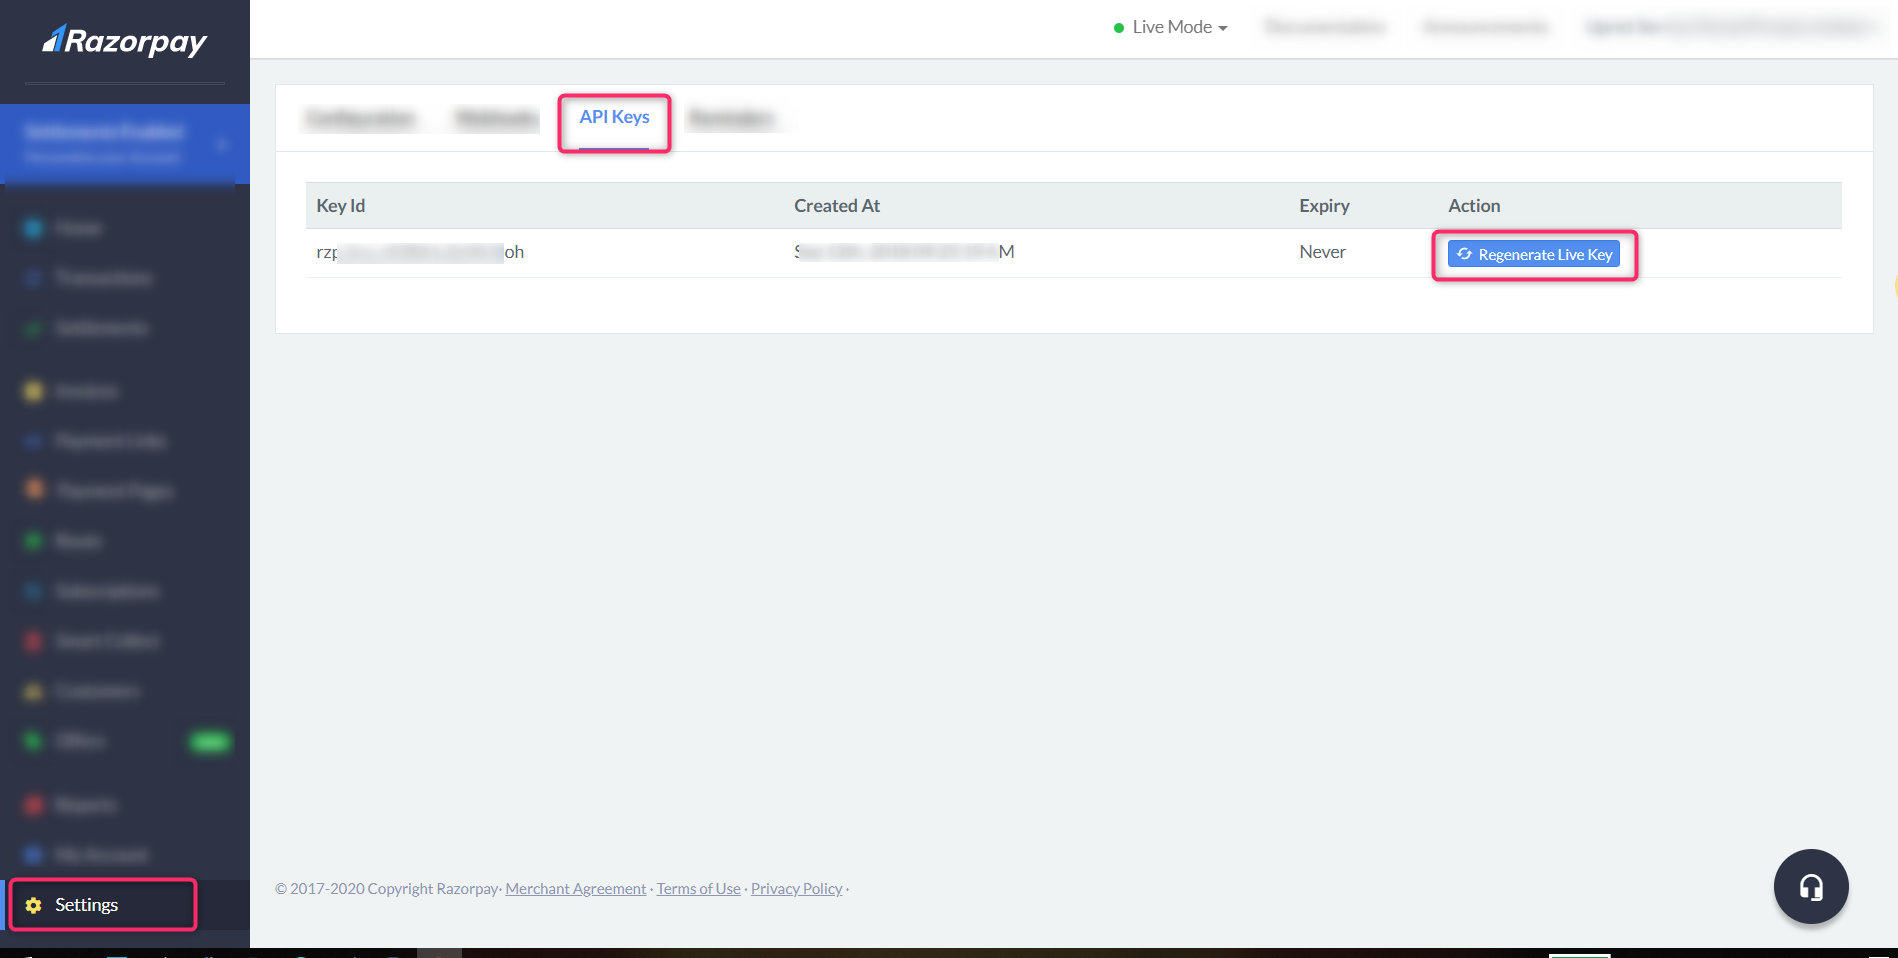
Copy the Key ID and the Key Secret from here and paste it in the QROST Integration.
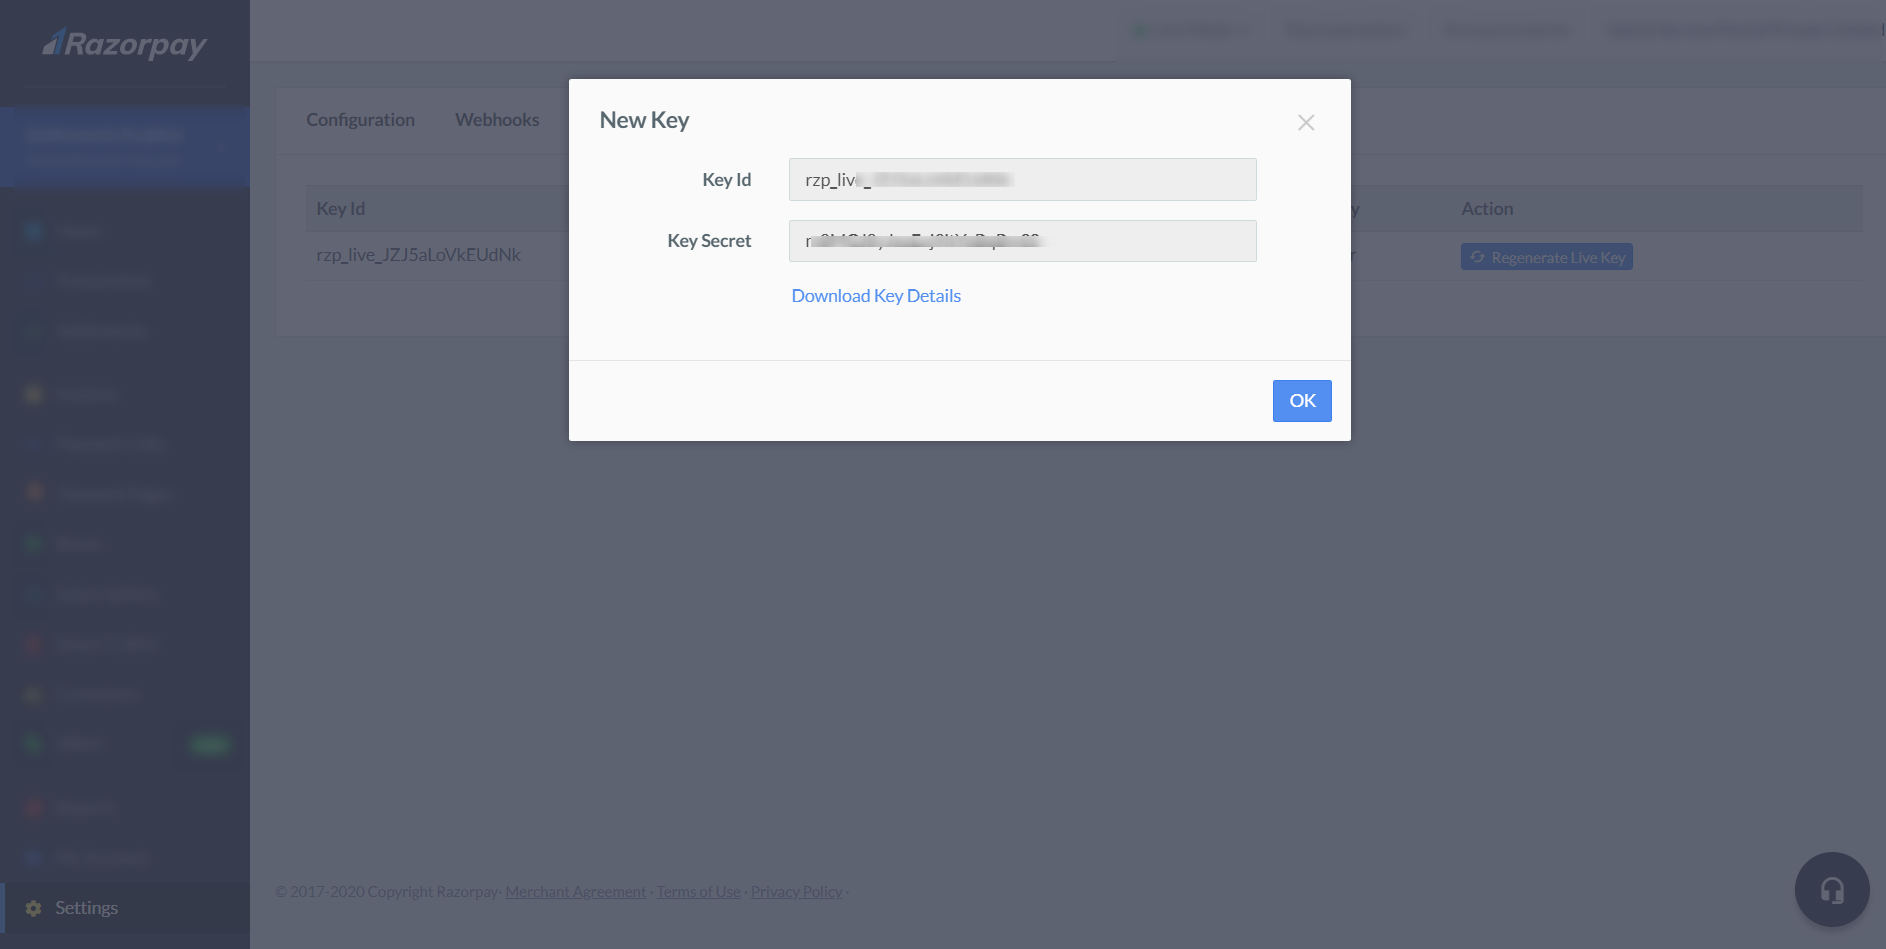
For Test purchase use the Test key ID and Key secret. For the real time purchase use the Live key ID and Key secret, as shown in the image below

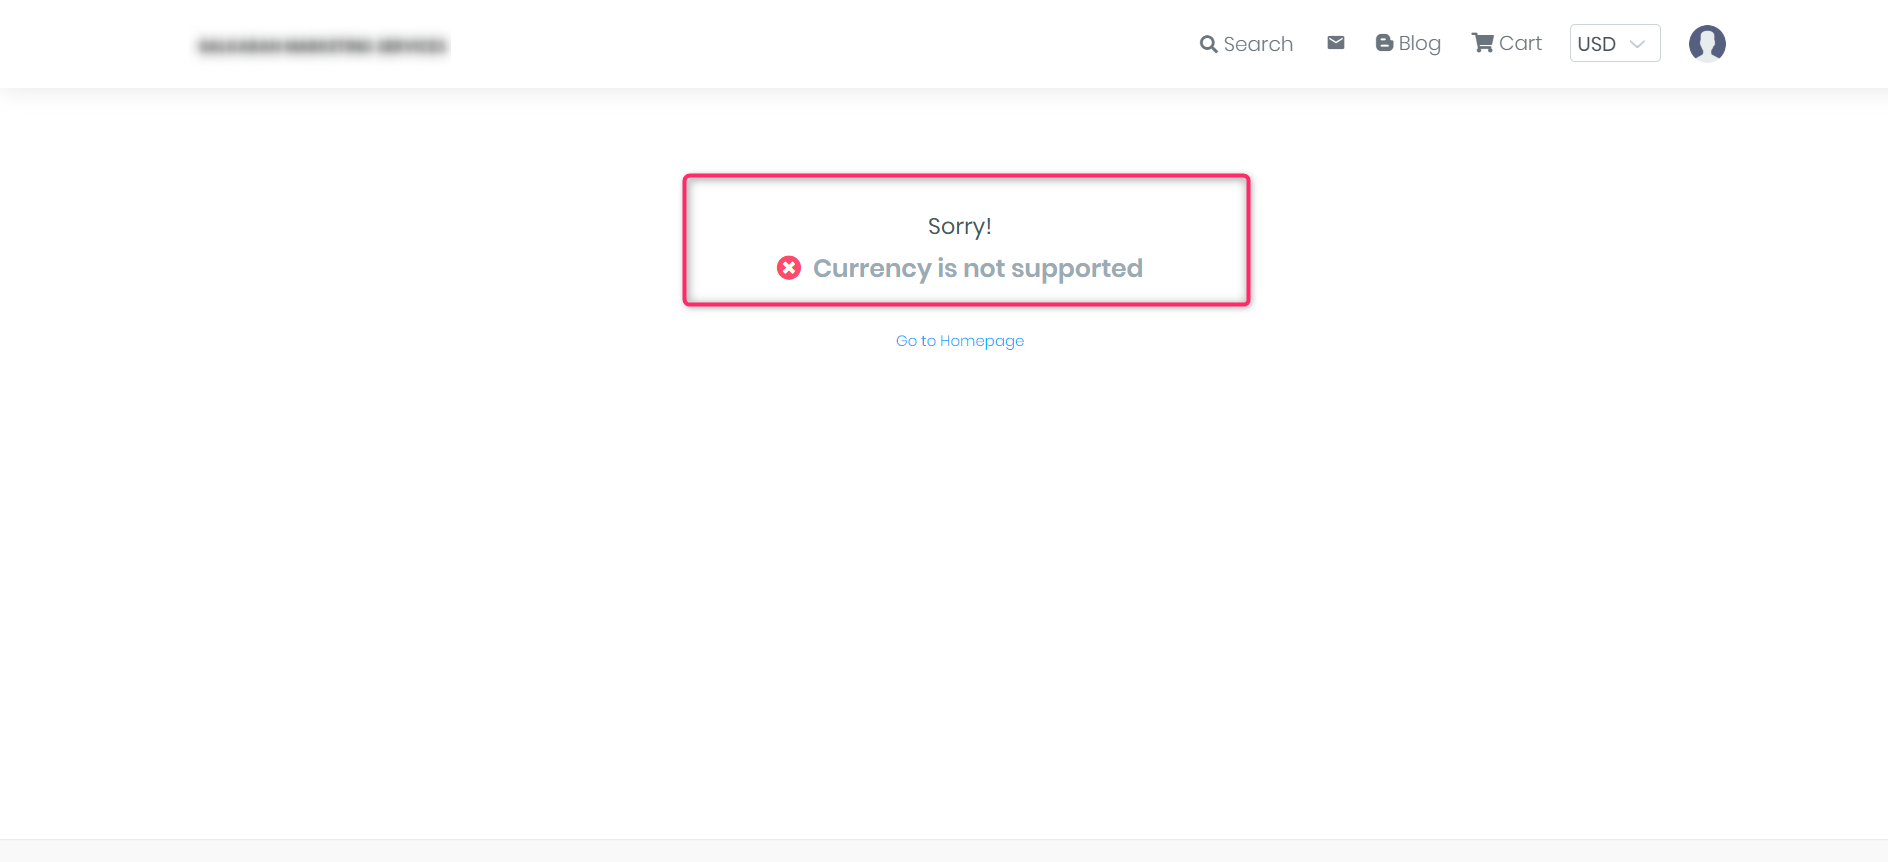
If you face “currency not supported” issue in your product checkout, Please make sure you have enabled “International Payment” in your Razorpay configuration as shown in the image below.

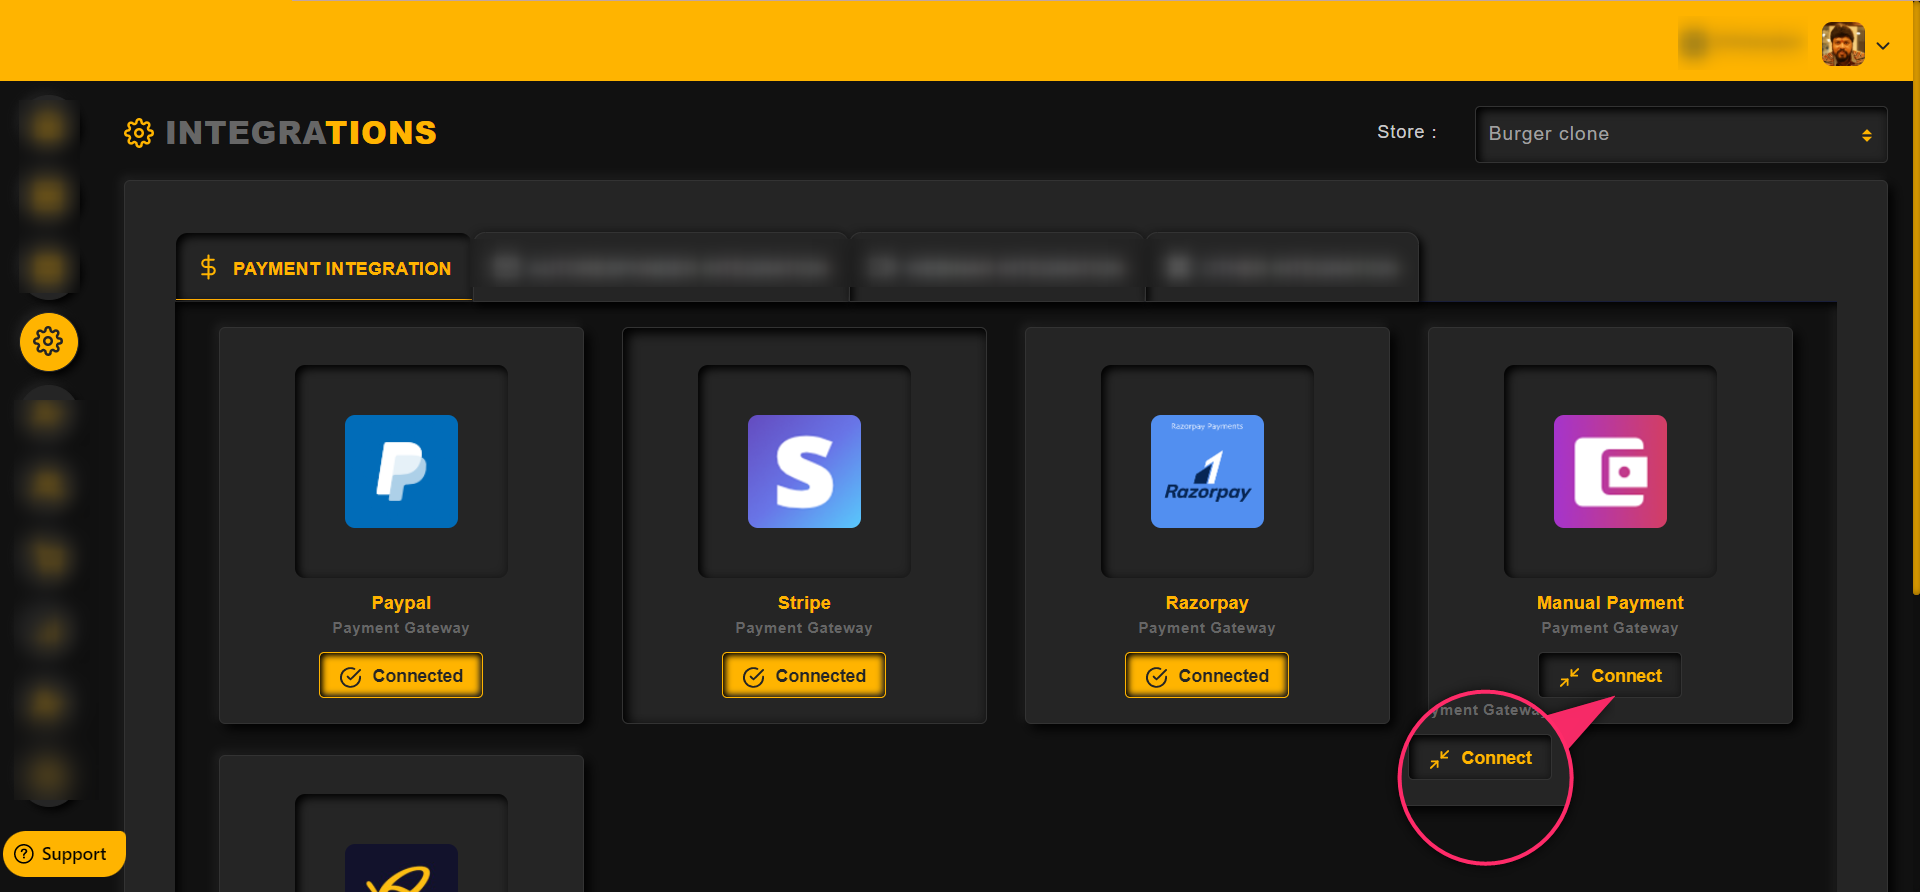
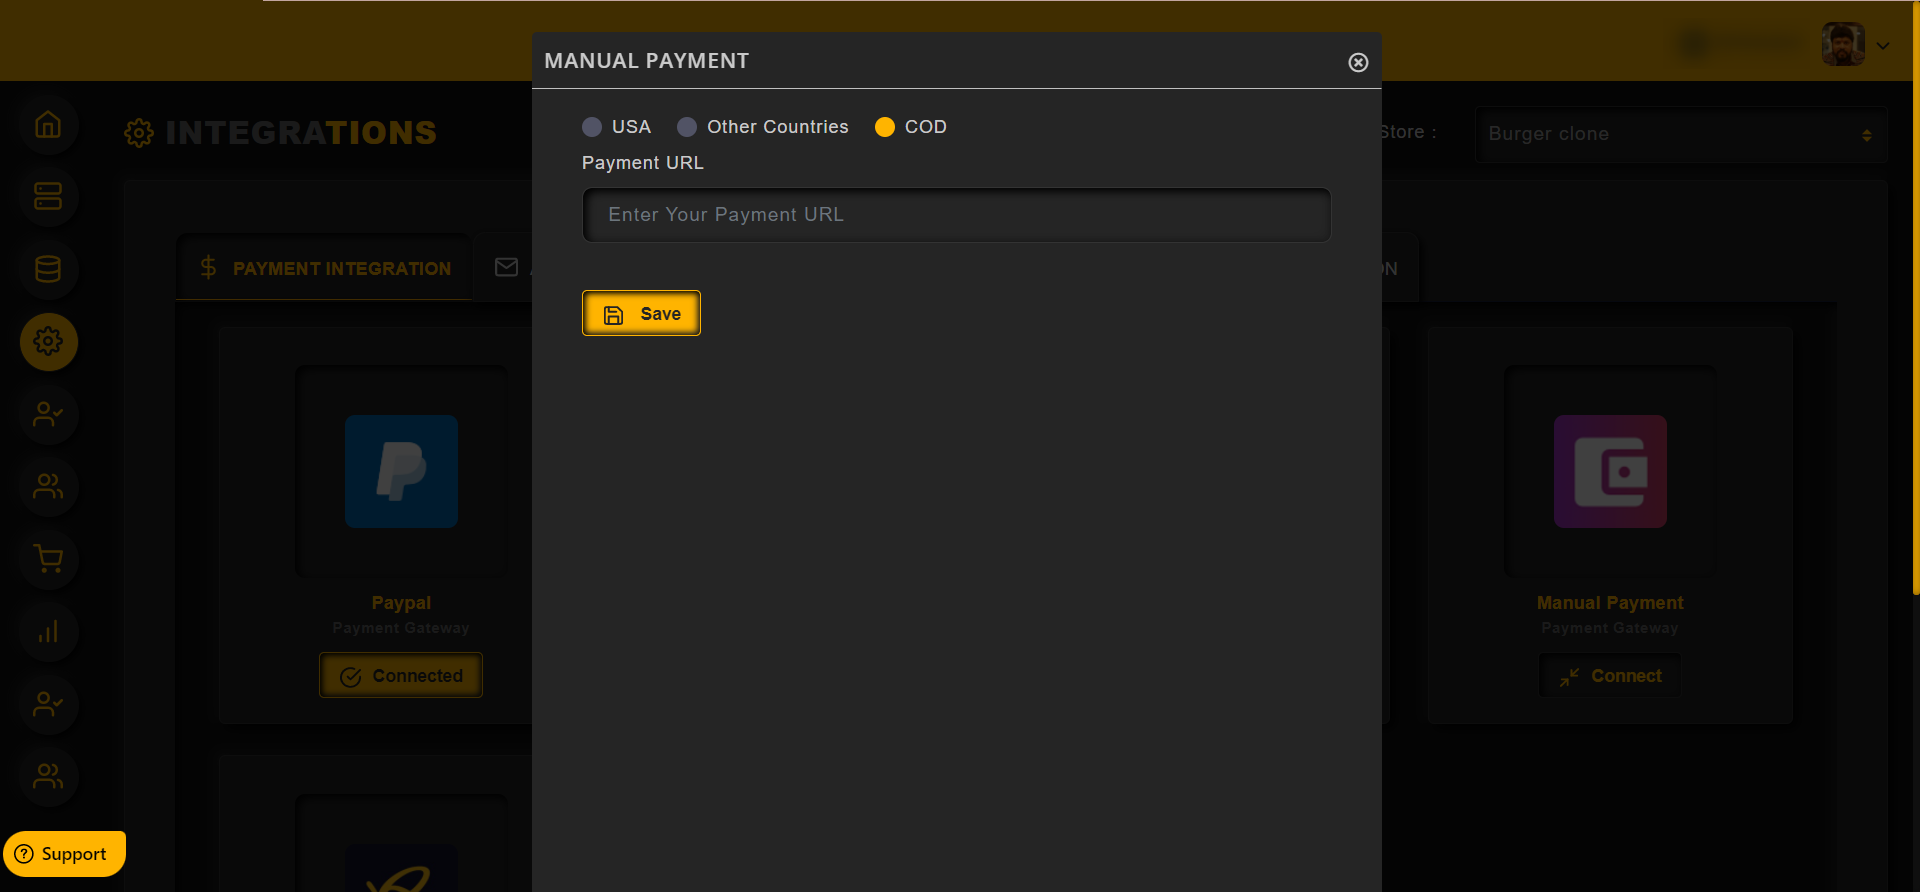
To integrate Manual Payments with QROST, follow the steps below:
1. Go to Integrations >> Payment Integration
2. Click on the Connect button as shown in the image below,
3. To receive payments from the US based customers, enable the USA


If the admin wants to test the flow, then disable the Live mode ( by turn off the toggle switch), then it will be changed to a test mode
If the admin wants to do a live purchase or make it live for the customers, then enable the toggle to turn on the Live mode
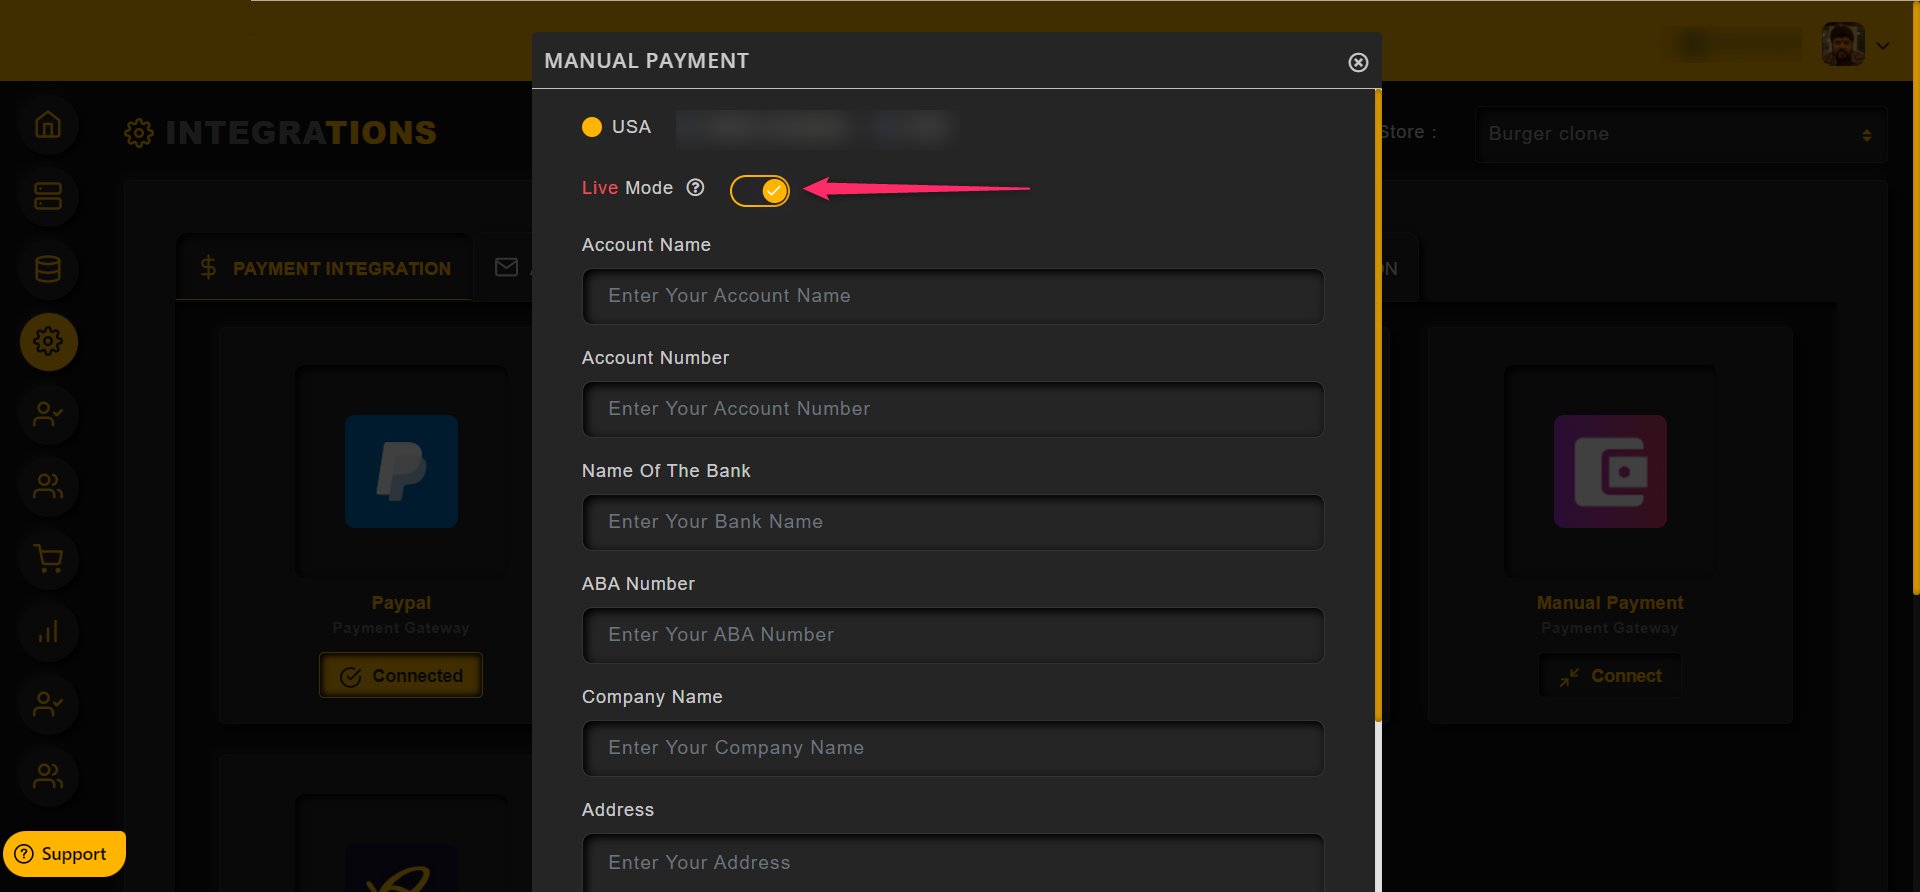
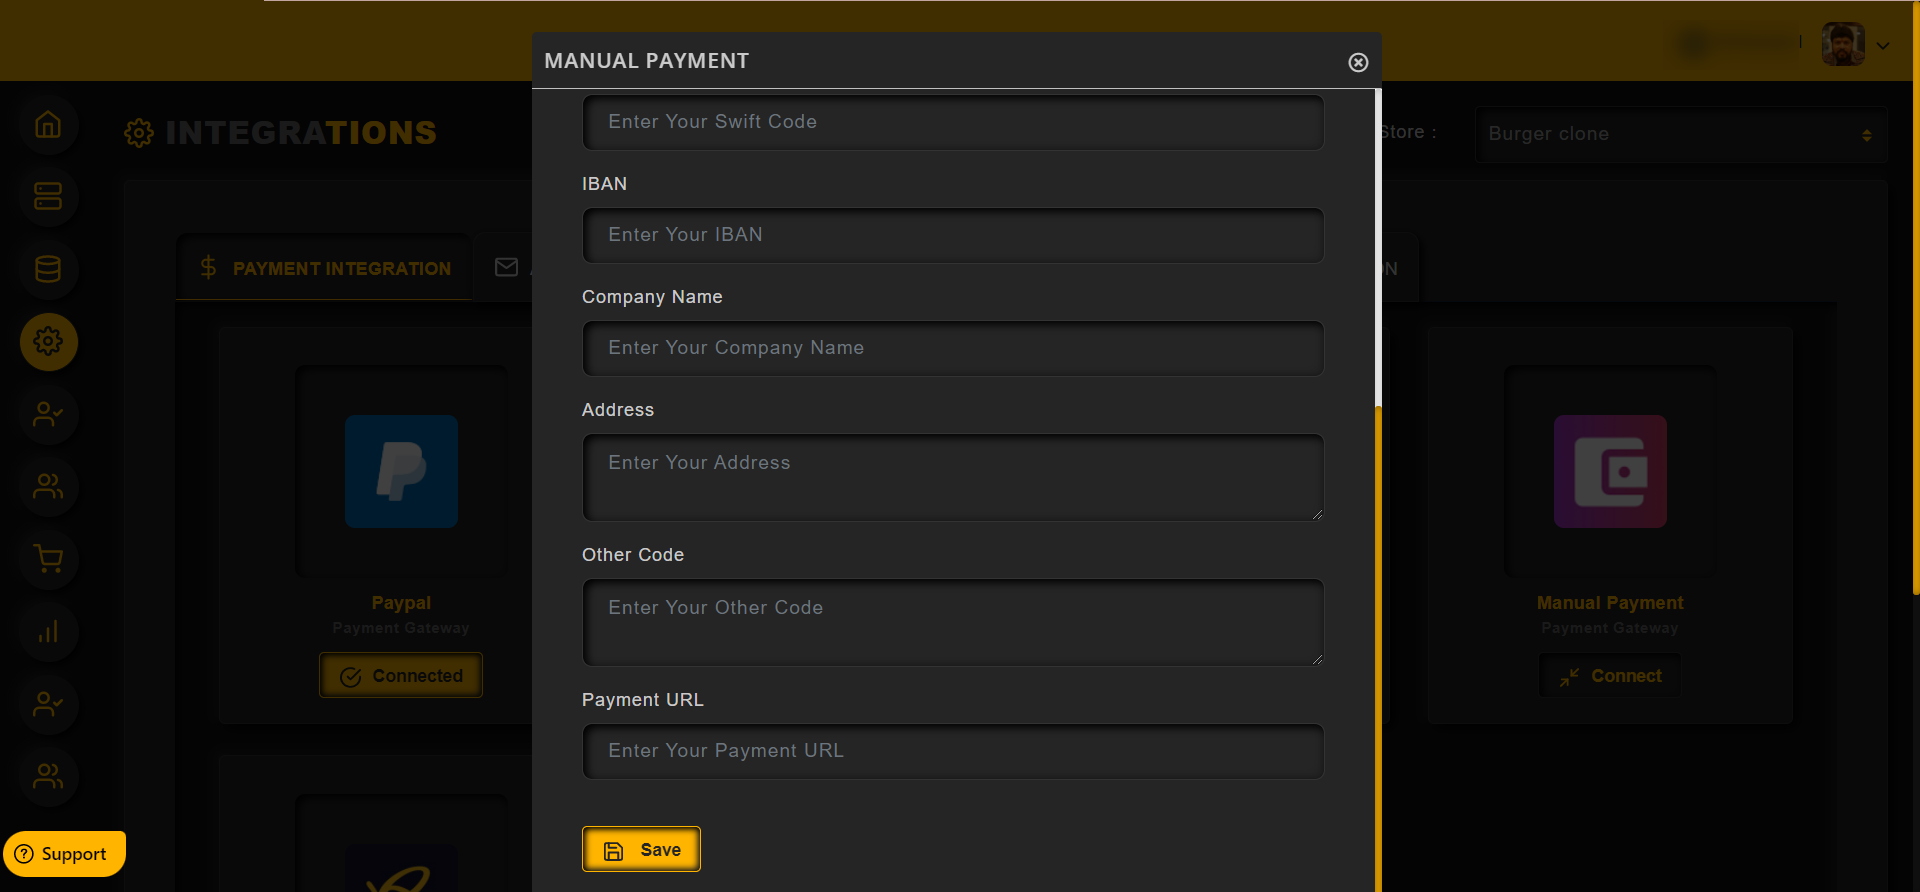
Then enter the bank details in the text field provided
All these details will be displayed for the end user when they choose Manual payments while purchase
Then the users can send the payments to the bank directly via wire transfer
Admin can add their direct payment in the field provided, so that the end user can directly visit the payment page and pay
4. To receive payments from the customers who are residing in other countries (other than USA), enable the Other Countries as shown in the image below
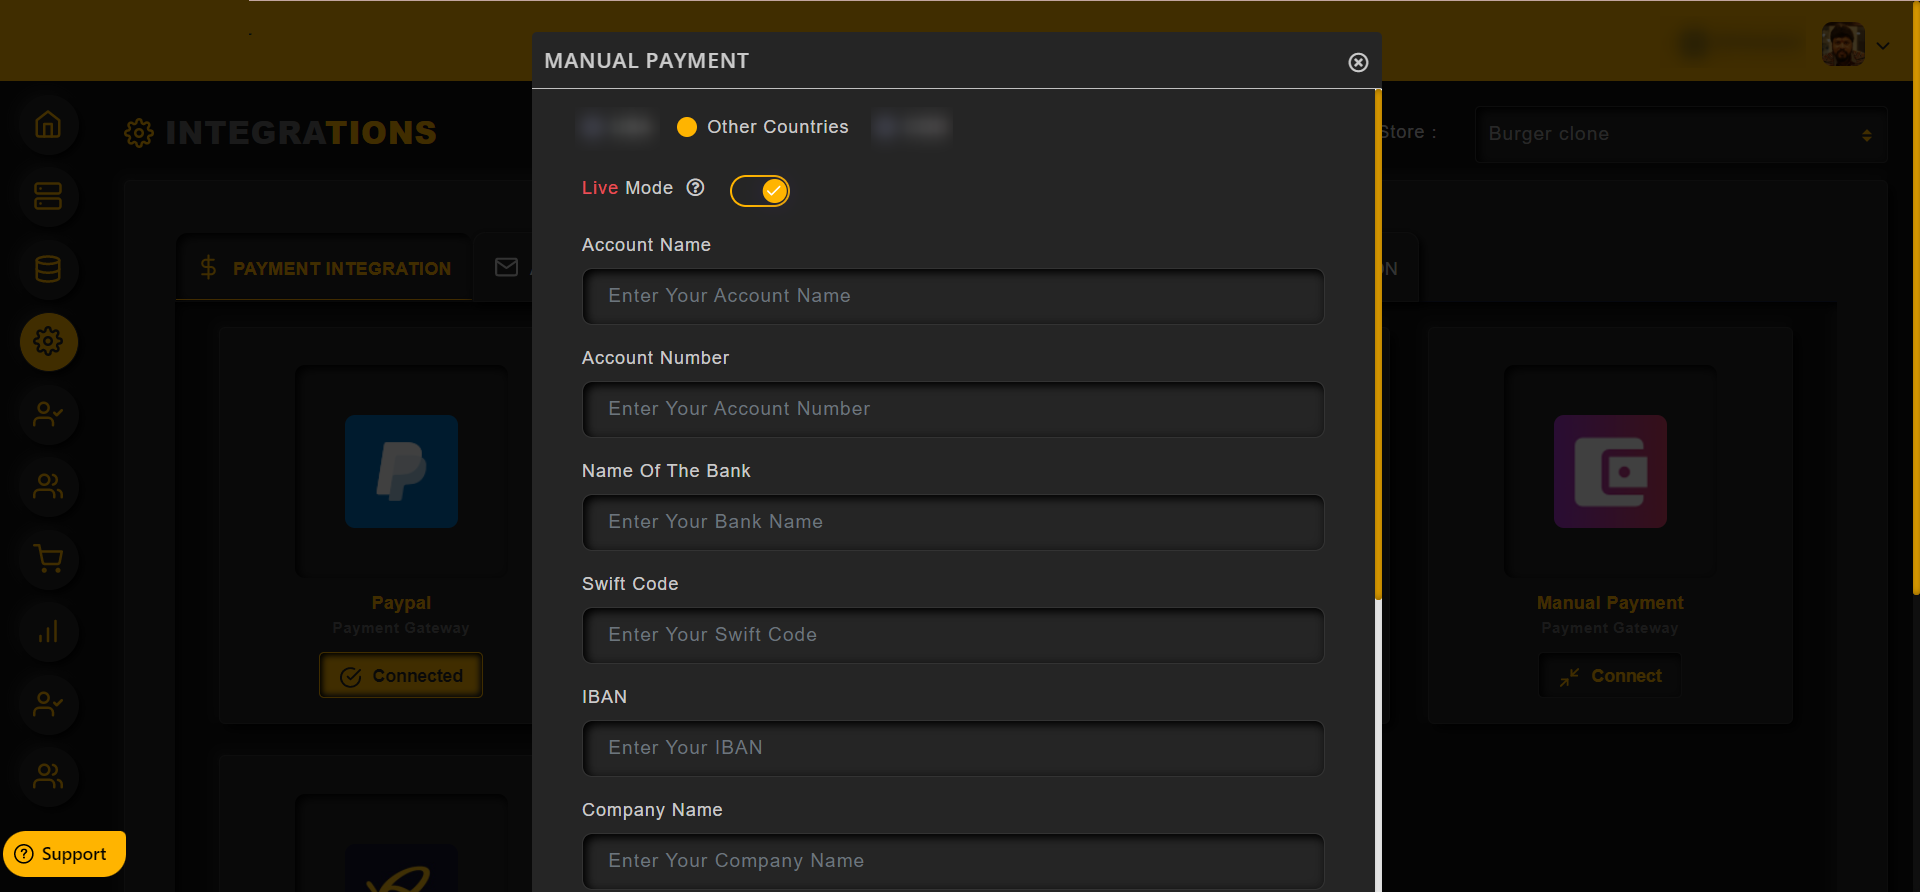
If the admin wants to test the flow, then disable the Live mode ( by turn off the toggle switch), then it will be changed to a test mode
If the admin wants to do a live purchase or make it live for the customers, then enable the toggle to turn on the Live mode

Then enter the bank details in the text field provided
All these details will be displayed for the end user when they choose Manual payments while purchase
Then the users can send the payments to the bank directly via wire transfer
Admin can add their direct payment in the field provided, so that the end user can directly visit the payment page and pay
5. If the admin wants to get the payment while delivery, then enable the COD
Admin can add their direct payment in the field provided, so that the end user can directly visit the payment page and pay
Once the Manual payment is integrated, then the button will be changed to Connected as shown in the image below.
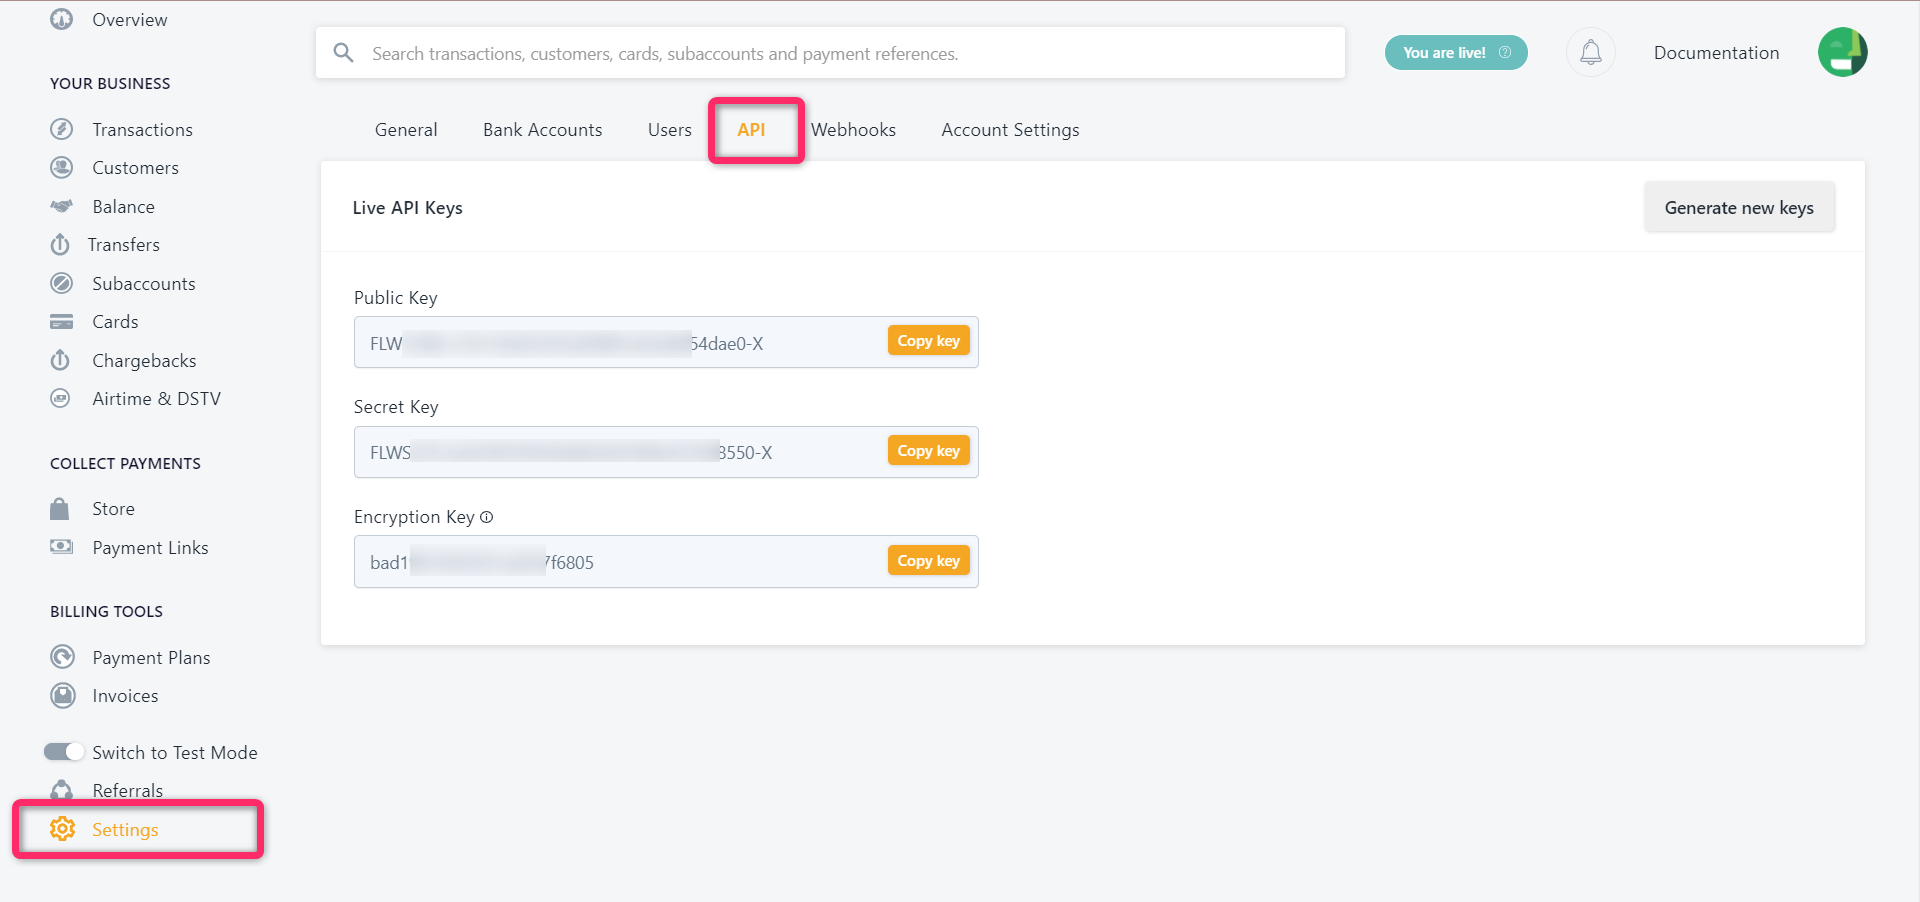
To integrate Flutterwave with Forrk,
1) Go to Integrations >> Payment Integration

2) Click on the Connect button as shown in the image below.

3) Enter the Public Key, Secret Key and Encryption Key in the provided fields and then click on Save button
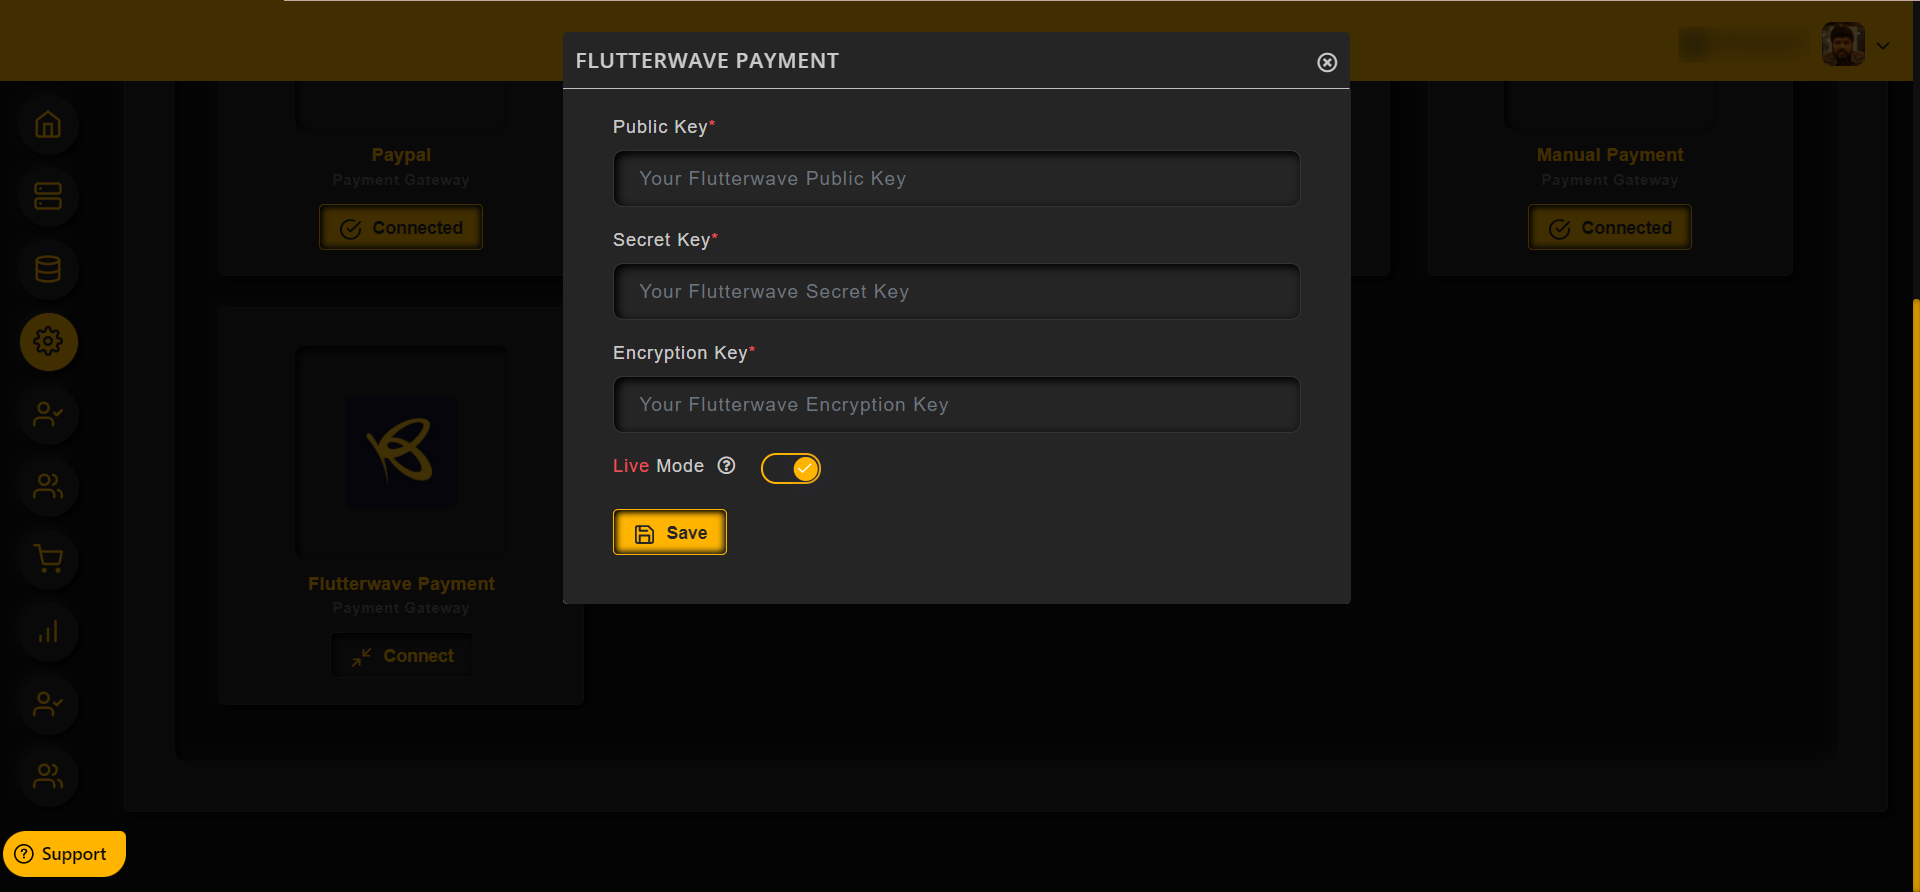
4) Once the Flutterwave payment gateway is integrated, the button will be changed to Connected.
Note:
If the admin wants to test the flow, then disable the Live mode ( by turn off the toggle switch), then it will be changed to a test mode
If the admin wants to do a live purchase or make it live for the customers, then enable the toggle to turn on the Live mode

To get the API details from the Flutterwave
1) Login to the Flutterwave account and click on the setting -> API , as shown in the image below
You can generate new keys by using the Generate New Keys button
2) Copy the Keys from API section and paste it in the QROST Integration.
Category: Manage Customer
How to manage your customers
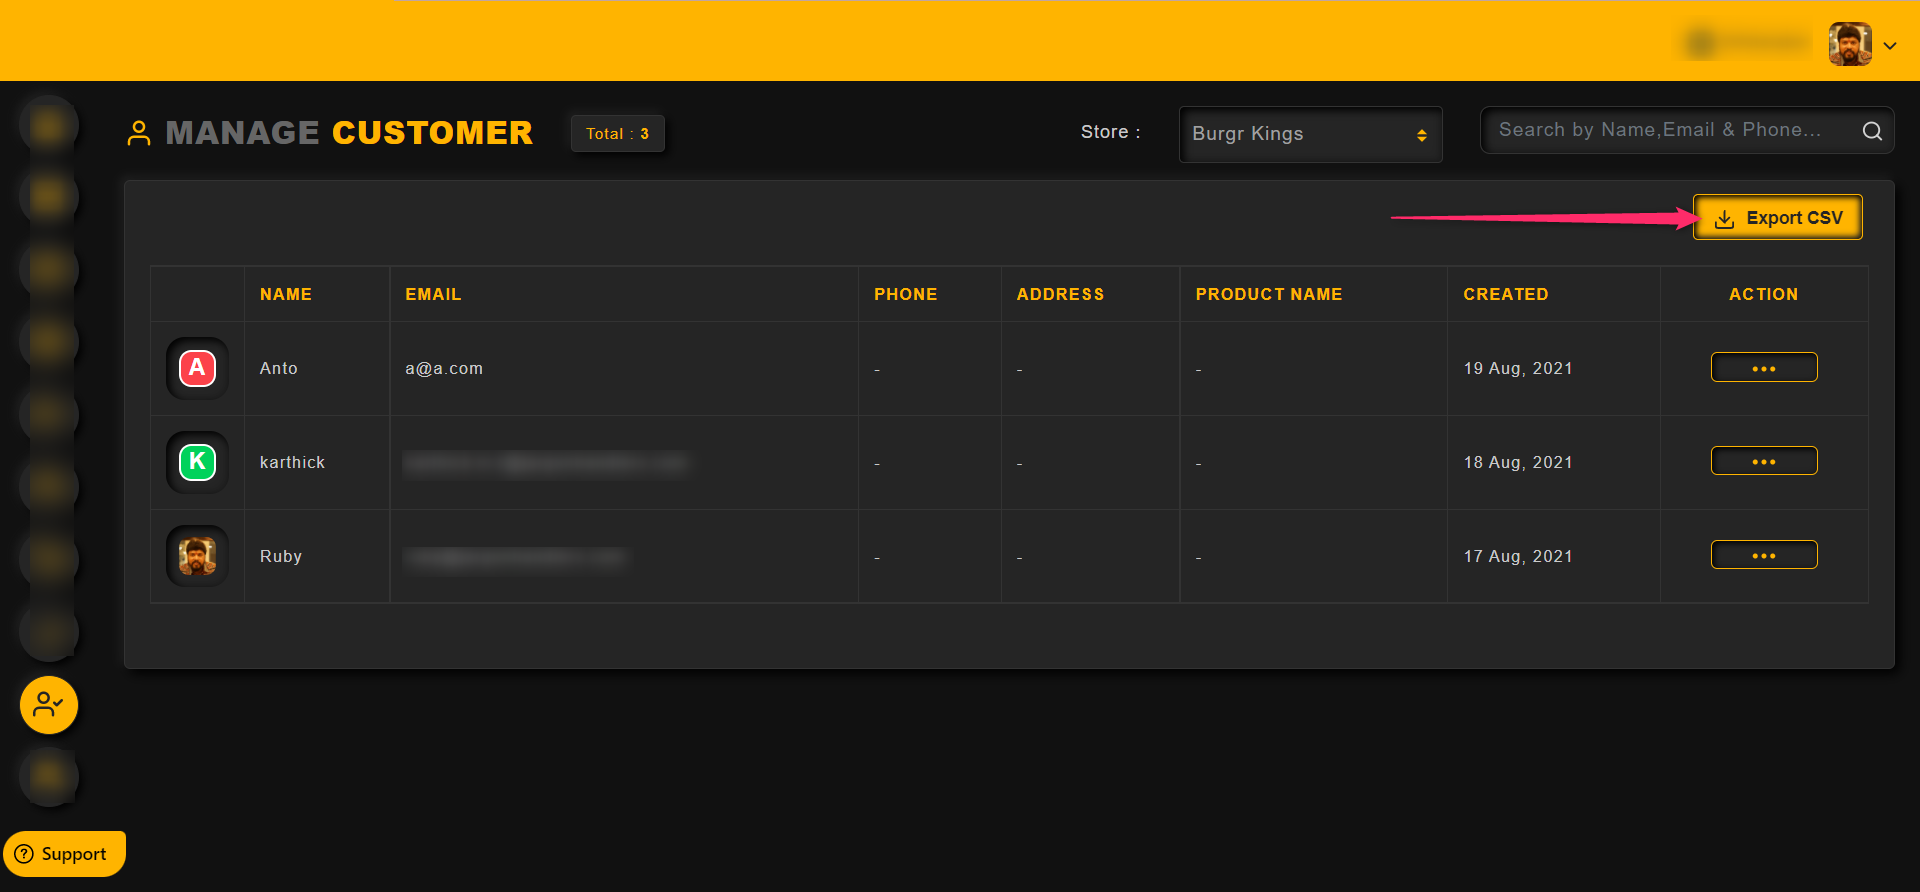
All the customers will be listed in the Manage Customer Dashboard section as shown in the image below,
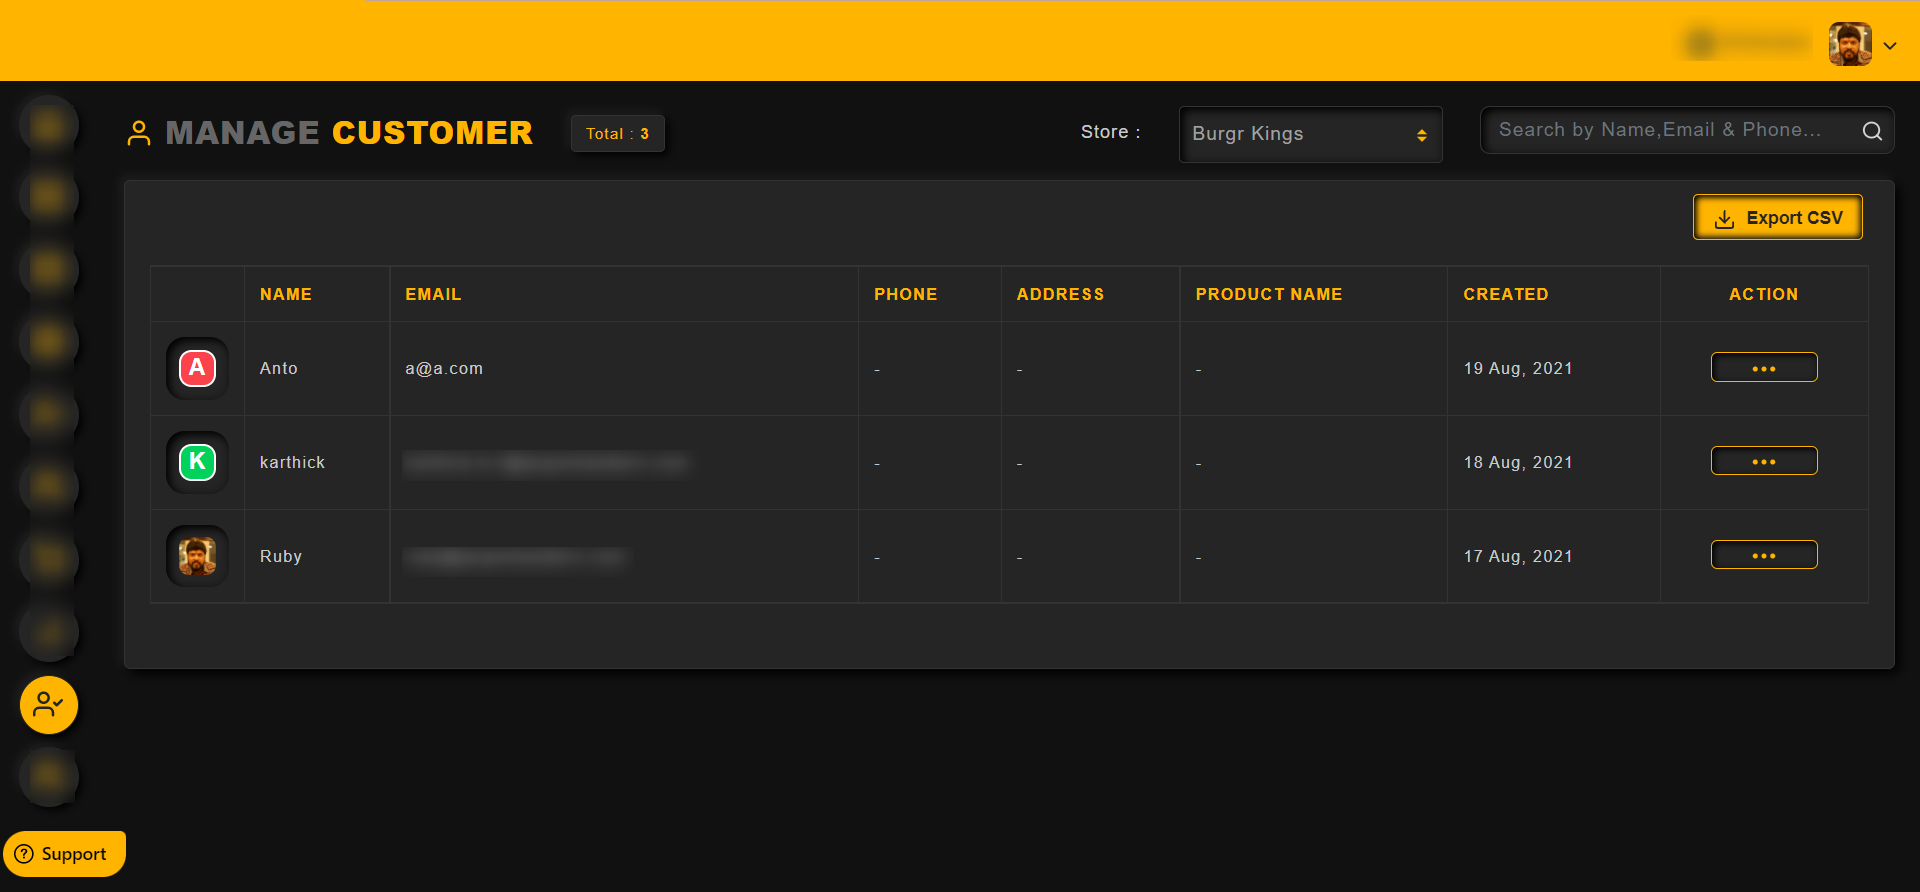
Admin can see the Customers based on the store and one can choose a store from the drop down as shown in the image below,

Admin can do operations like Edit, delete a customer using the action menu
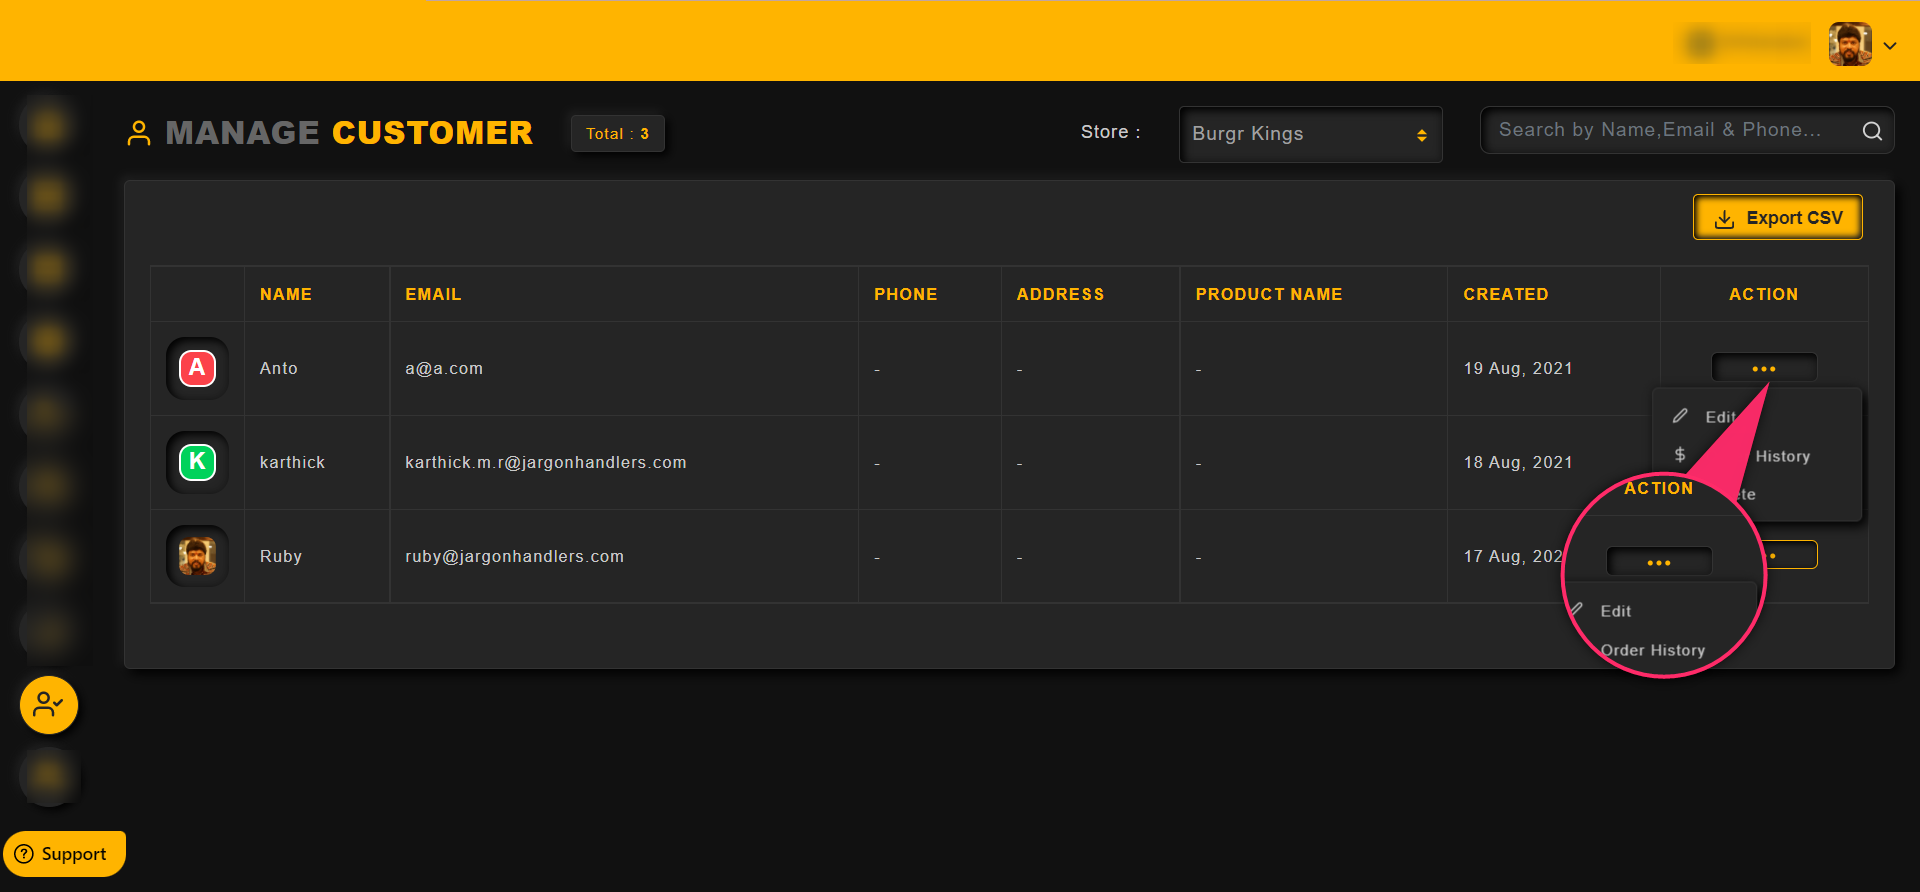
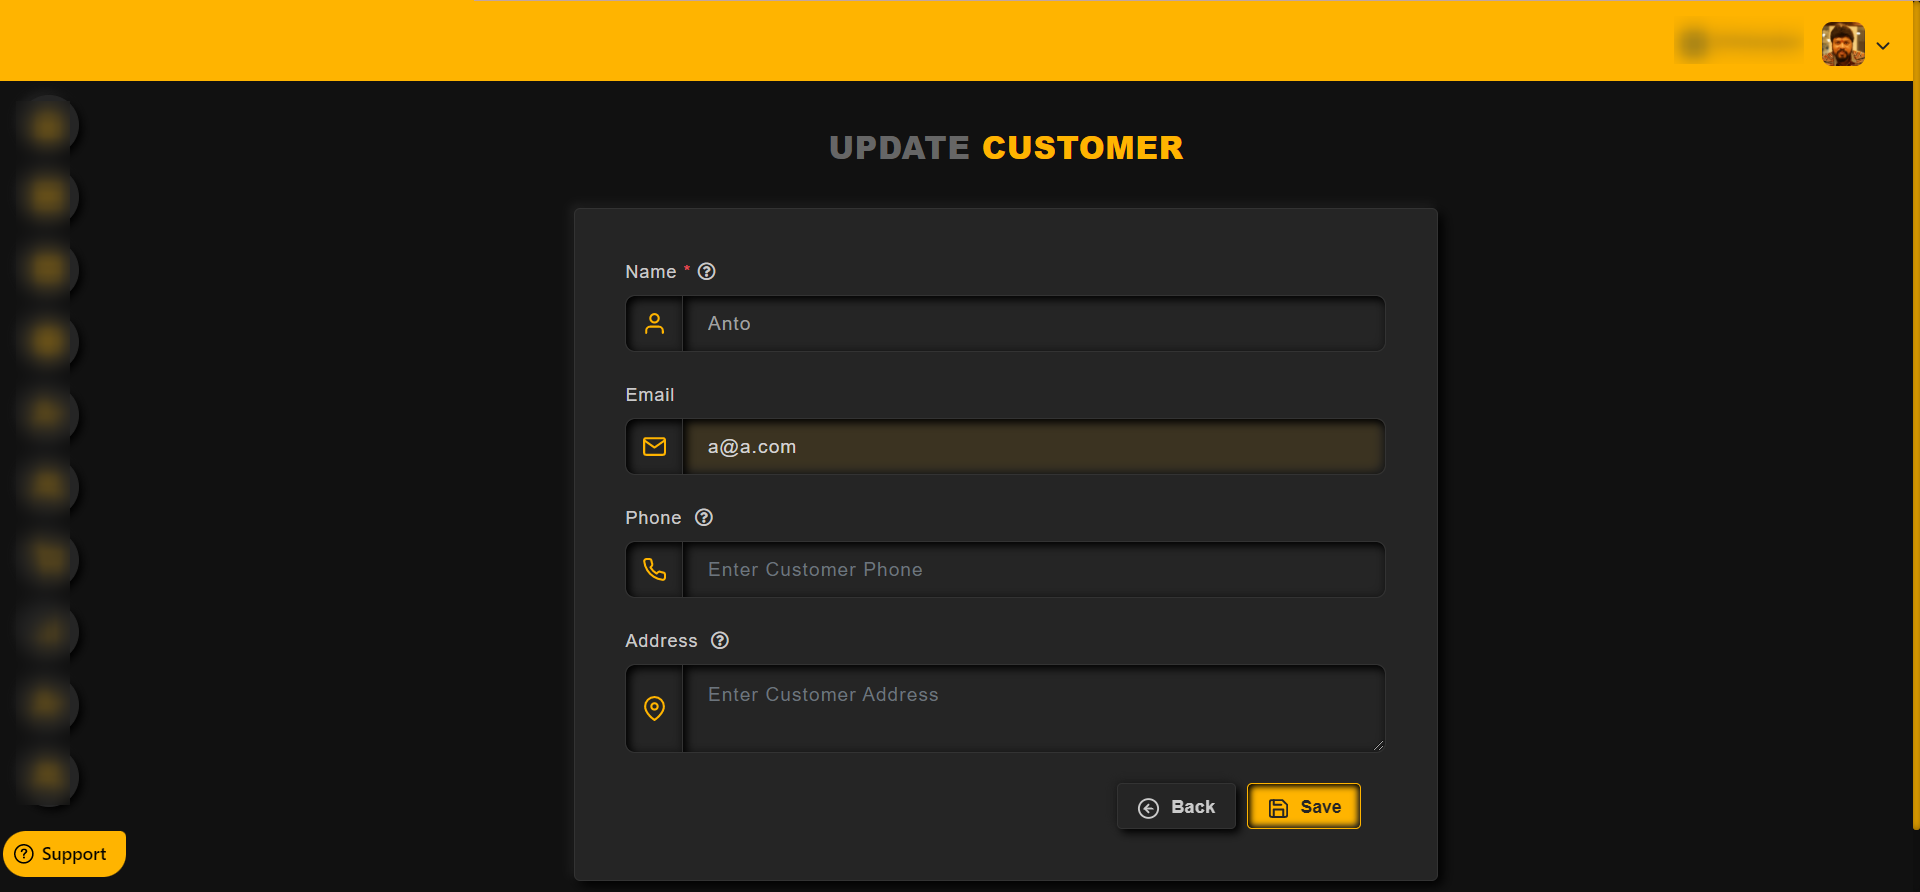
To edit a customer, click on the Action menu and then click on the Edit option as shown in the image below,
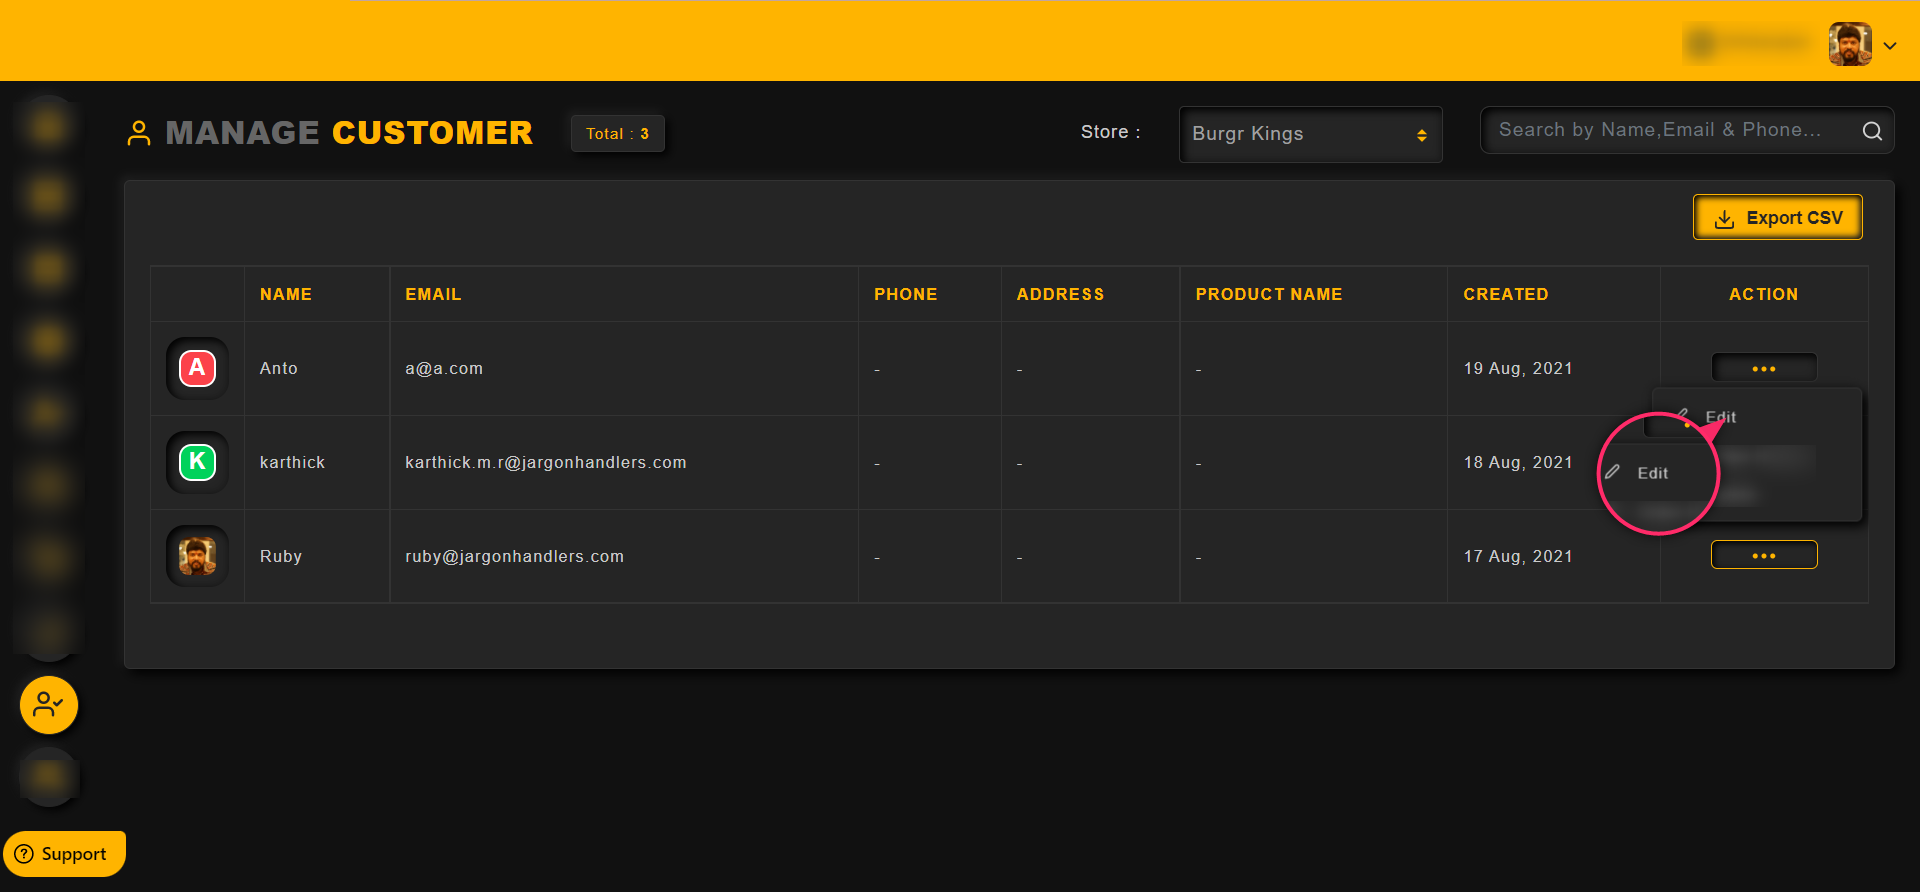
Admin can update the Customer name, customer’s contact number, and contact address
Note: Customer’s Email cannot be updated from the admin end
To export/download the Customers list to the local device,
Click on the Export CSV button as shown in the image below
Now, the CSV file will be downloaded and one can find the same in the downloads folder
To delete a customer from the list, click on the Action menu and then Delete option as shown in the image below,

To view the order history of that particular customer,
Click on the Action menu and then click on the Order History option as shown in the image below,


Category: My Store
How to manage your store
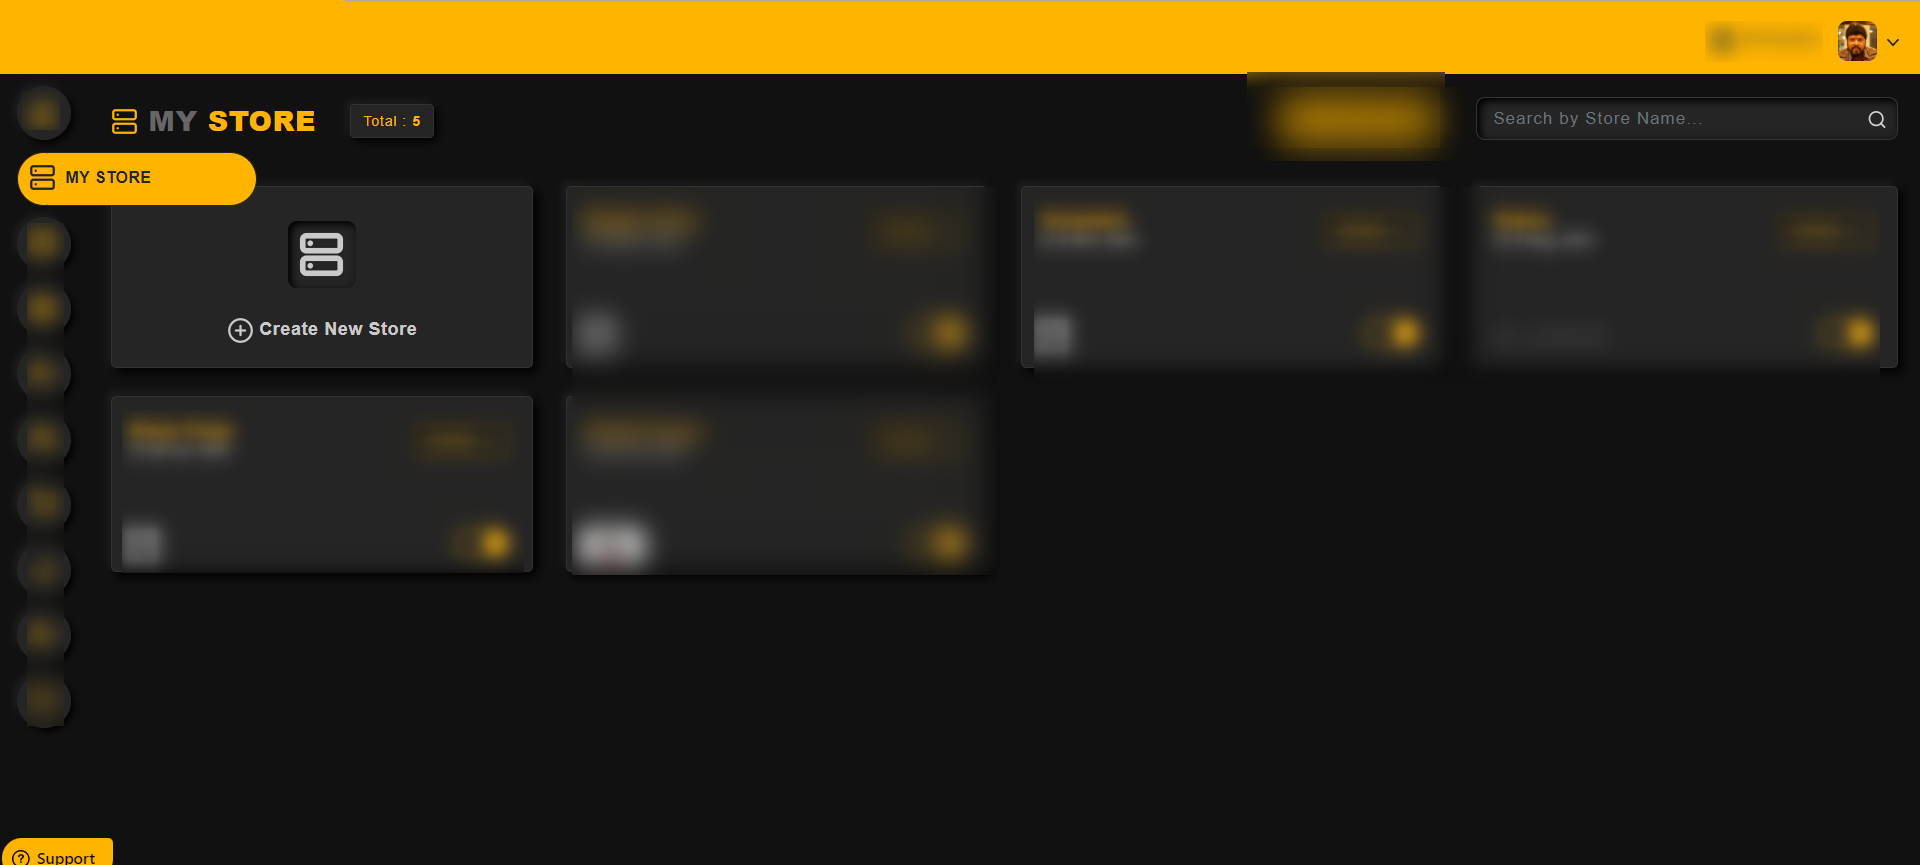
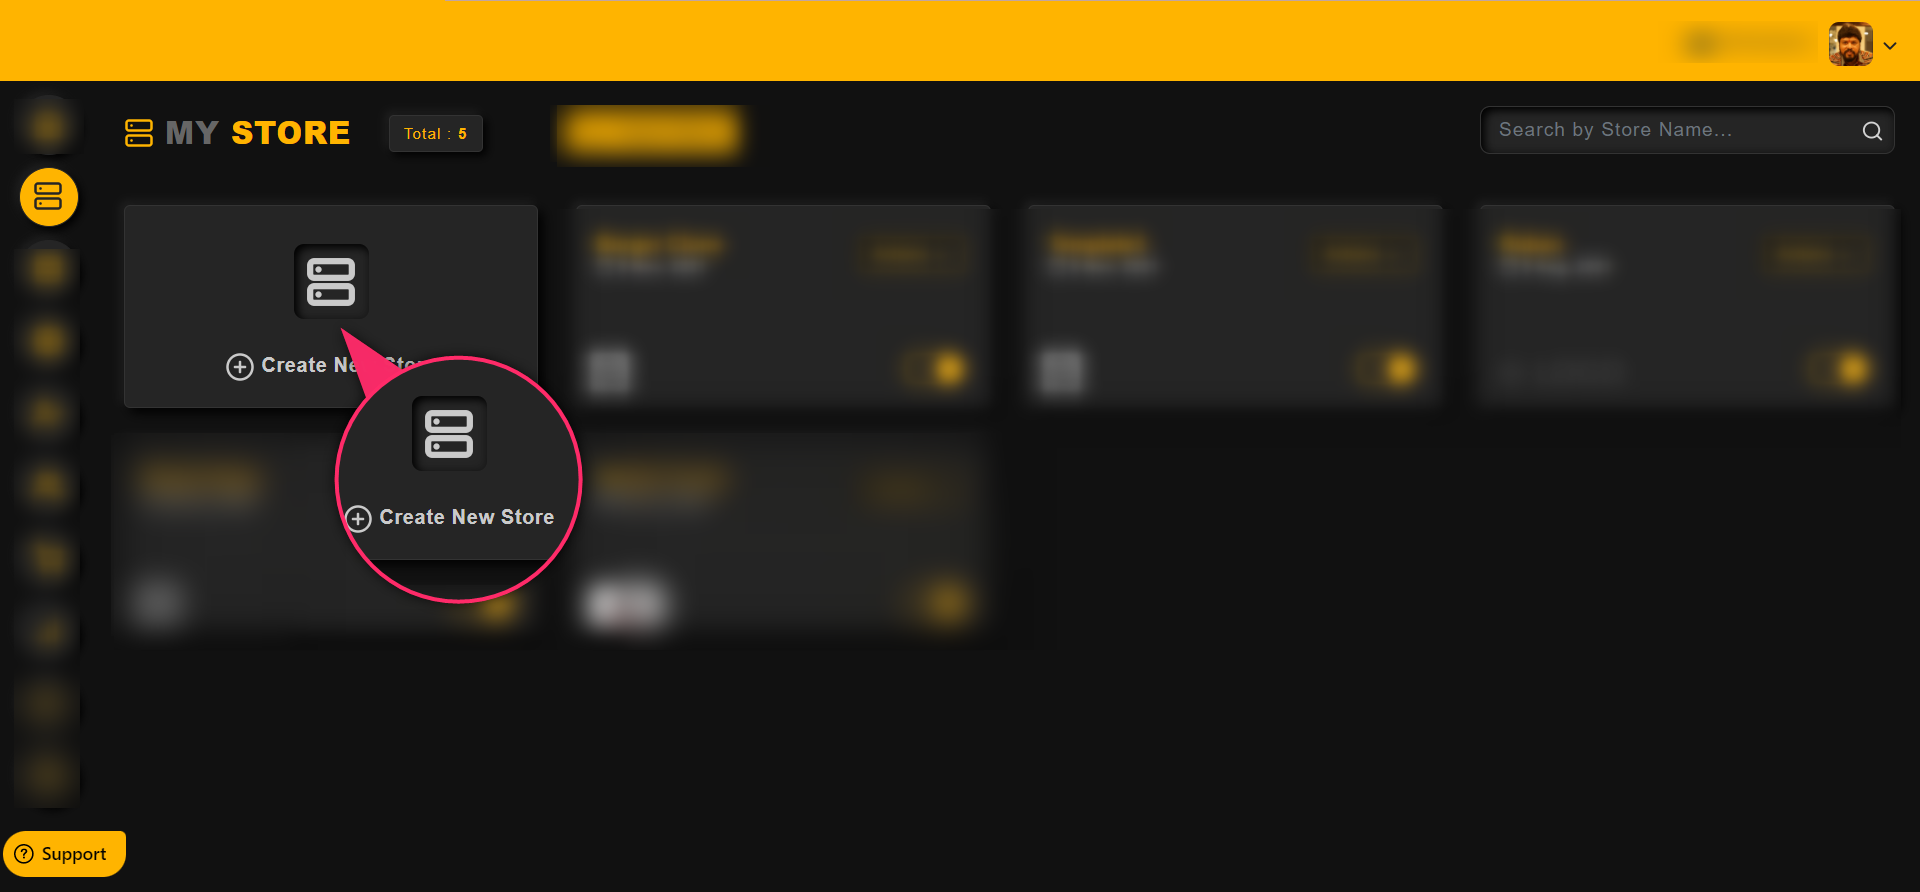
In the My Store section one can create and manage the stores
To create a store, Follow the steps below:
STEP 1 : Click My Store on the left-hand side of the Dashboard.
STEP 2 : Select “Create new store”.
Enter the details of your store’s,
– Name
– URL
– Time zone
– Default Currency
Click “Save” after you have filled the required details.

Once saved, one can see the other options like add favicon, banner image, logo for a store
To choose a template for te store from the given wide range of templates,
Click on the Choose Menu Template as shown in the image below,
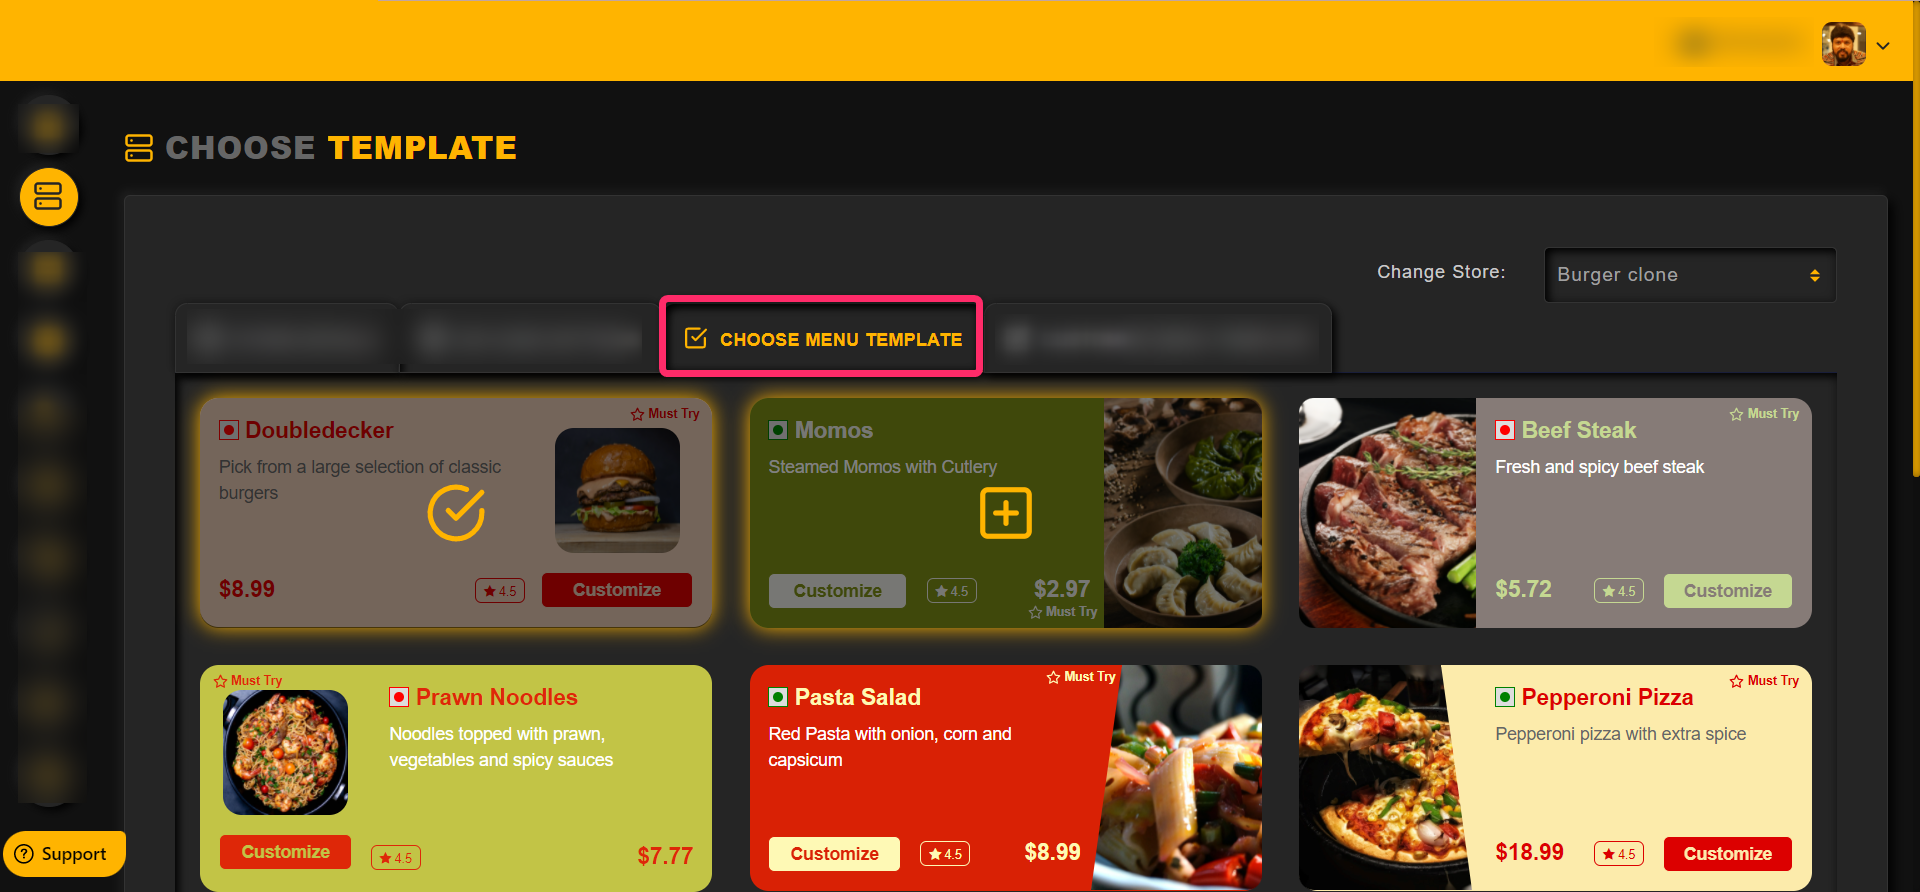
Click on the + icon to choose the template for a store

In this section, an admin can customize the Store Template based on their requirements
– Change Colors for all the text and section of the template in this section

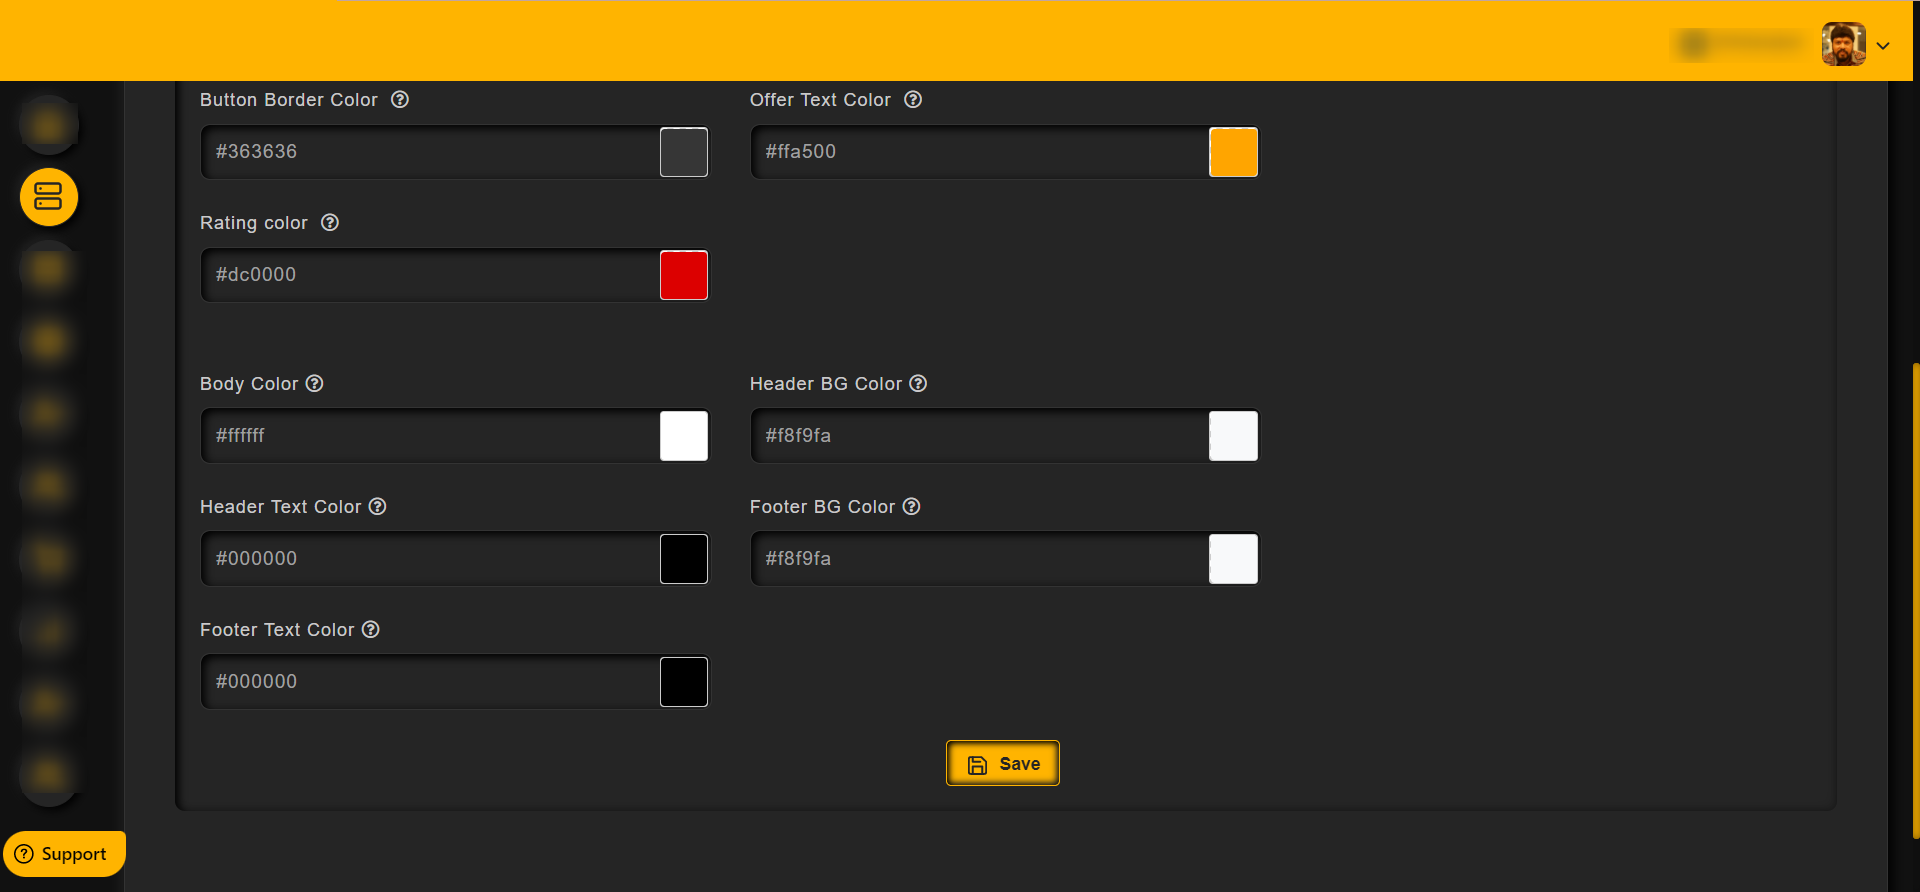
Click on the Save button after configuring the colors
To configure the QR code and QR code page, follow the steps below
Click on the QR Code settings option as shown in the image below

One can configure the Header section of the QR page in the Header color as shown in the image below,
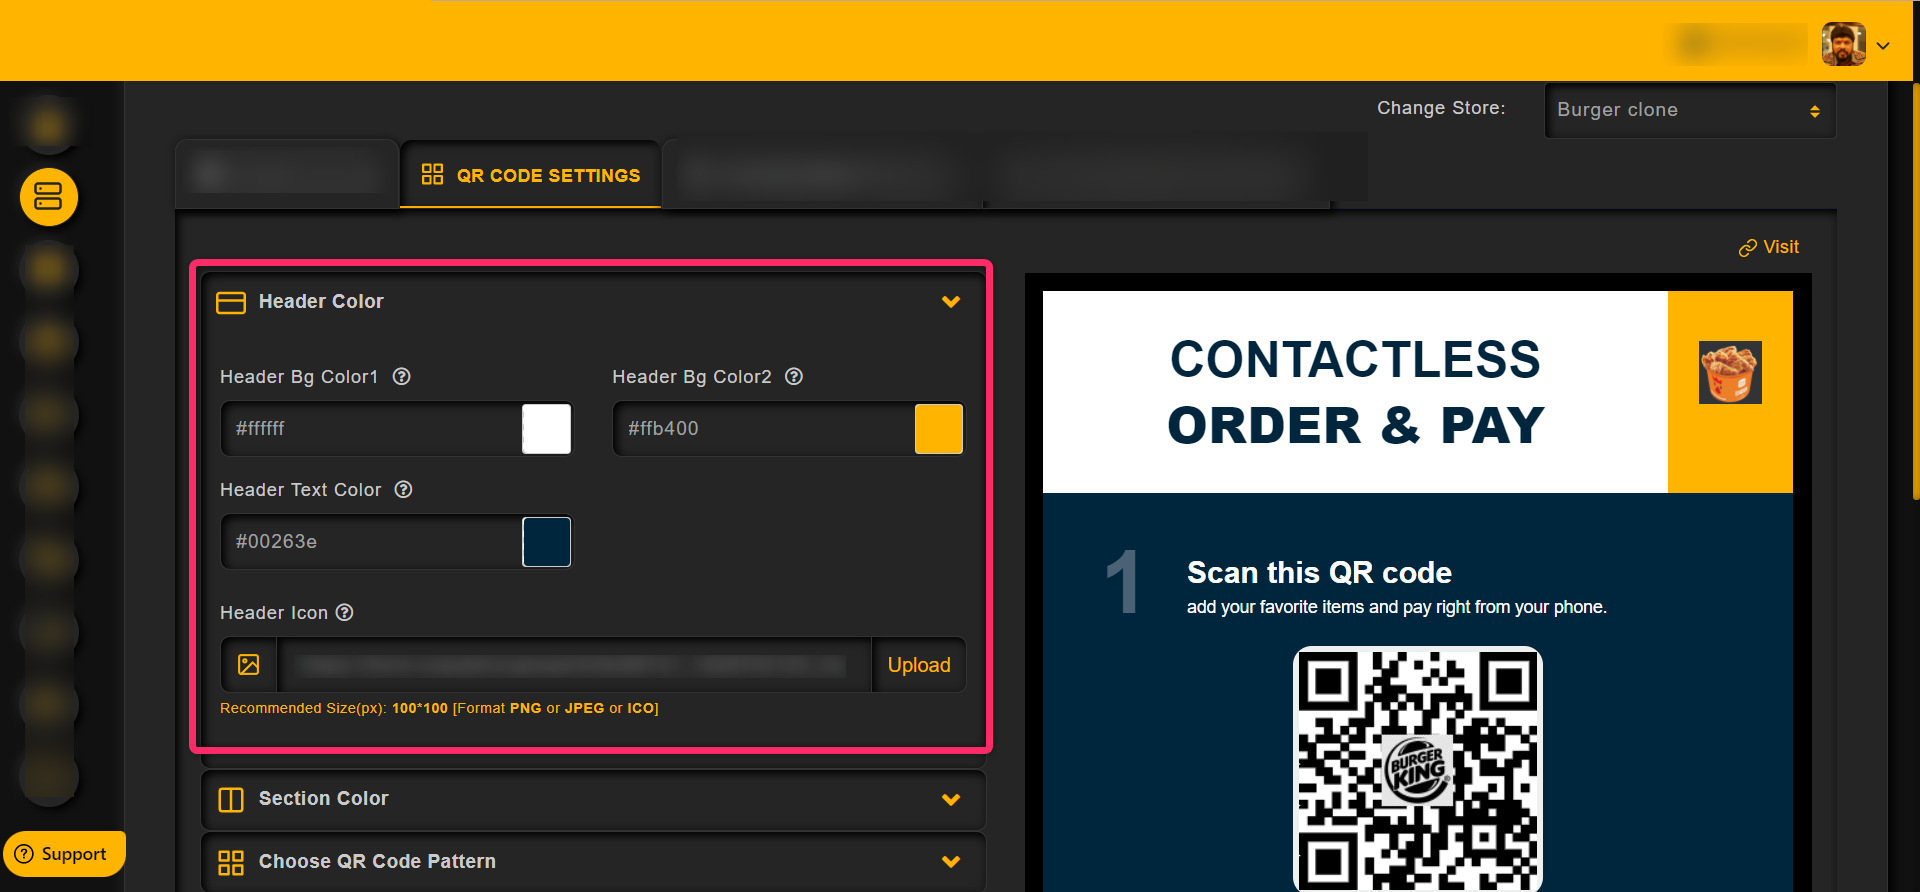
One can configure the other sections of the QR page in the Section color as shown in the image below,

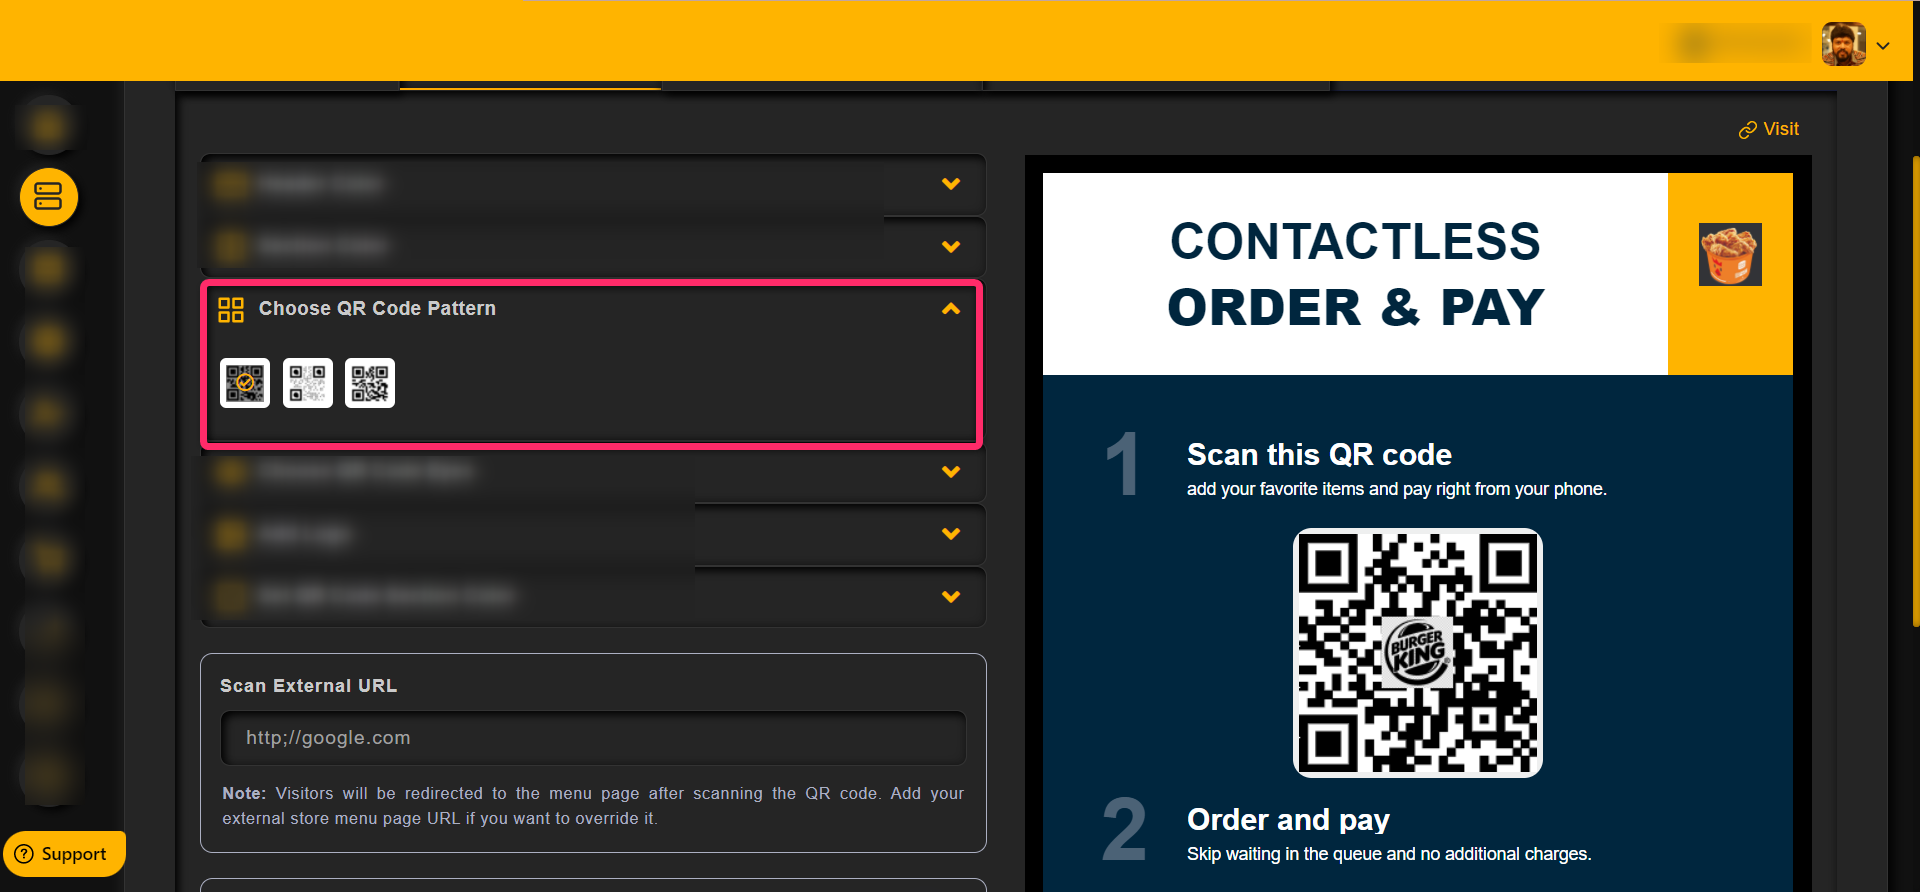
One can change the QR code pattern from the given patterns as shown in the image below,
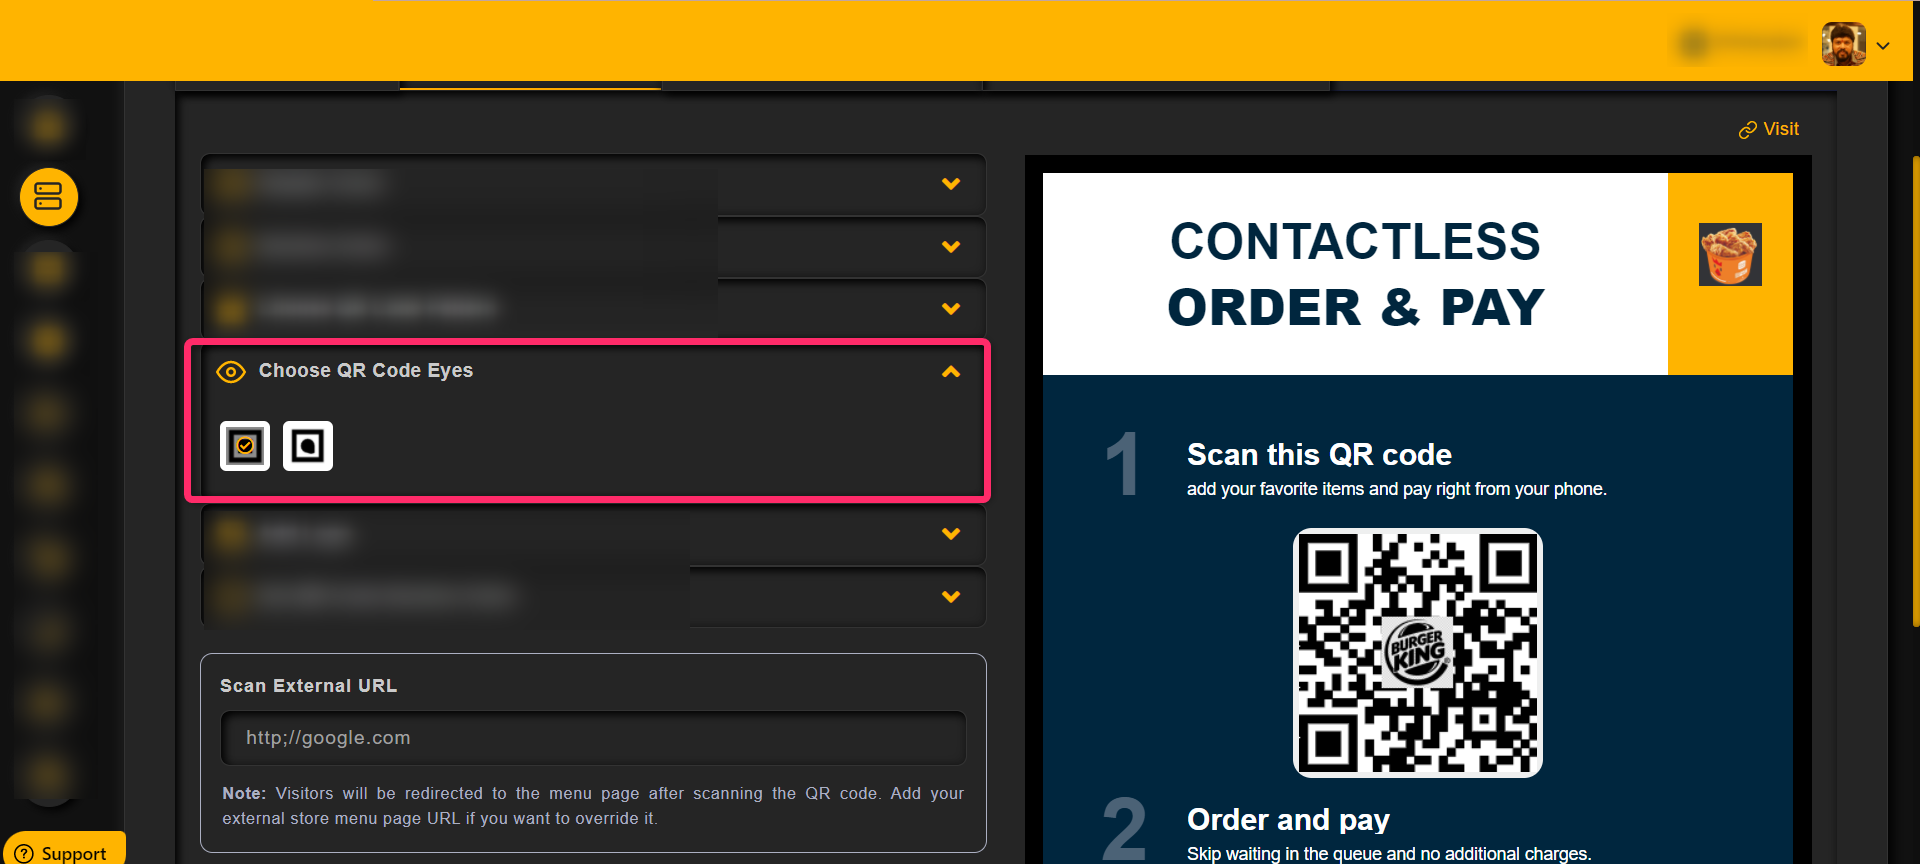
One can change the QR code eyes from the given eye patterns as shown in the image below
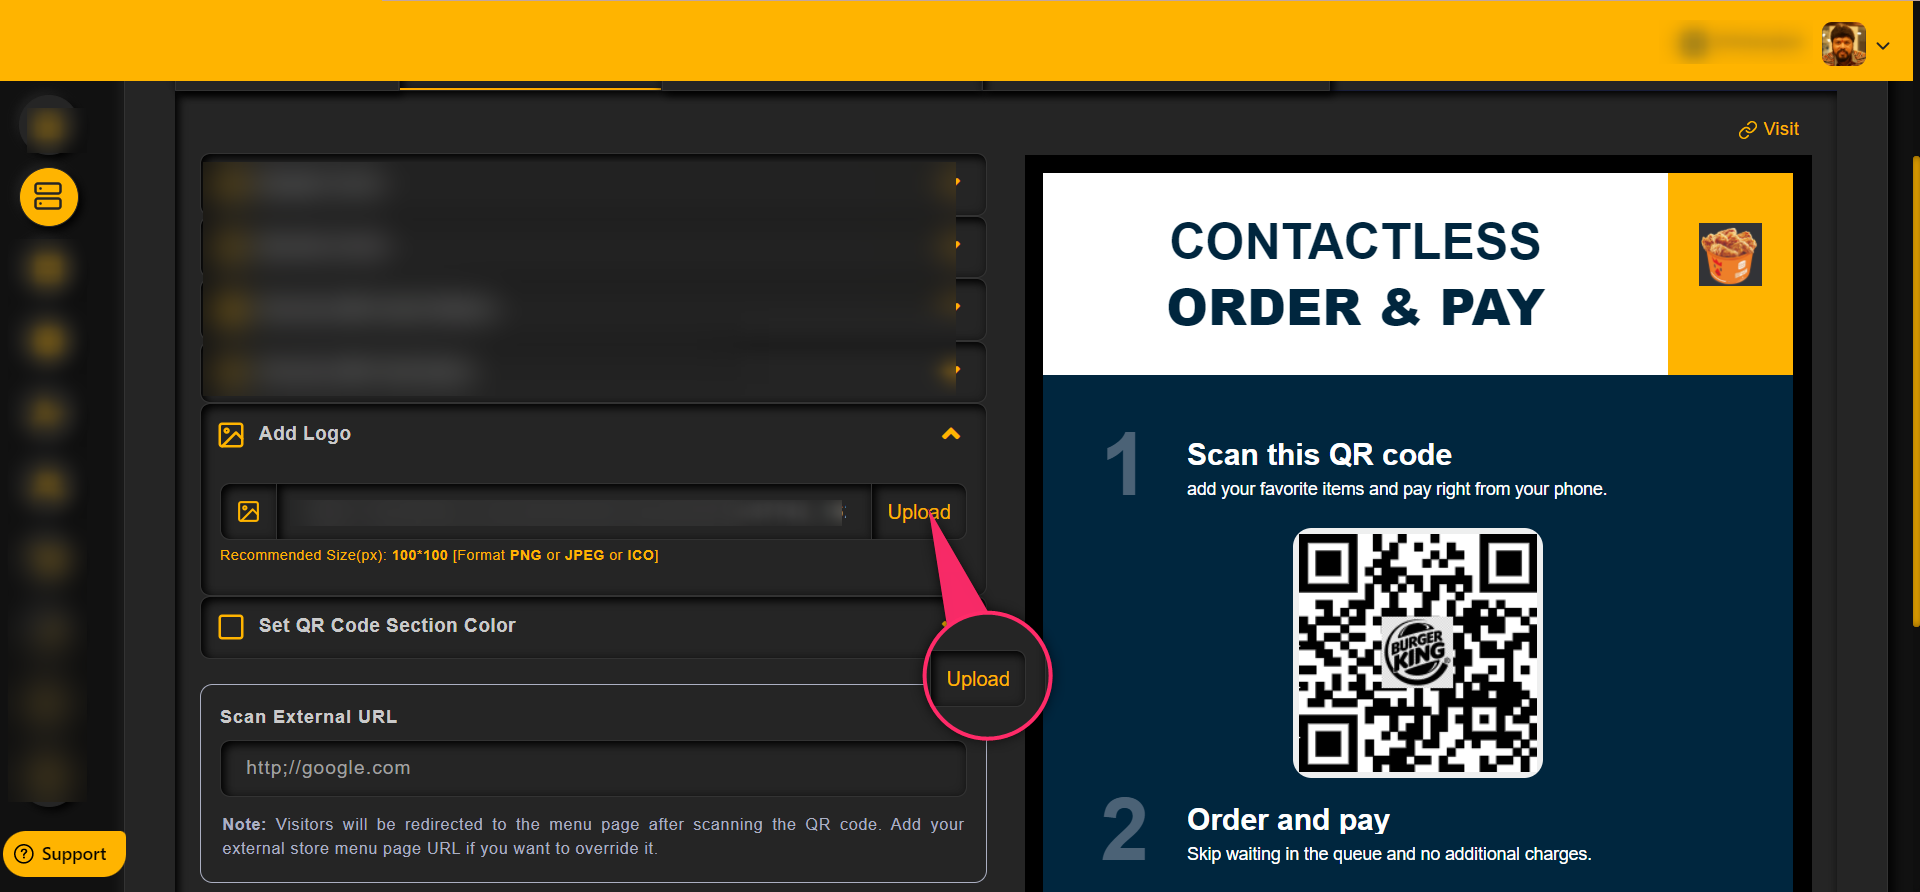
One can add a logo to the QR code page as shown in the image below

Click on Upload option to upload an logo image from the device
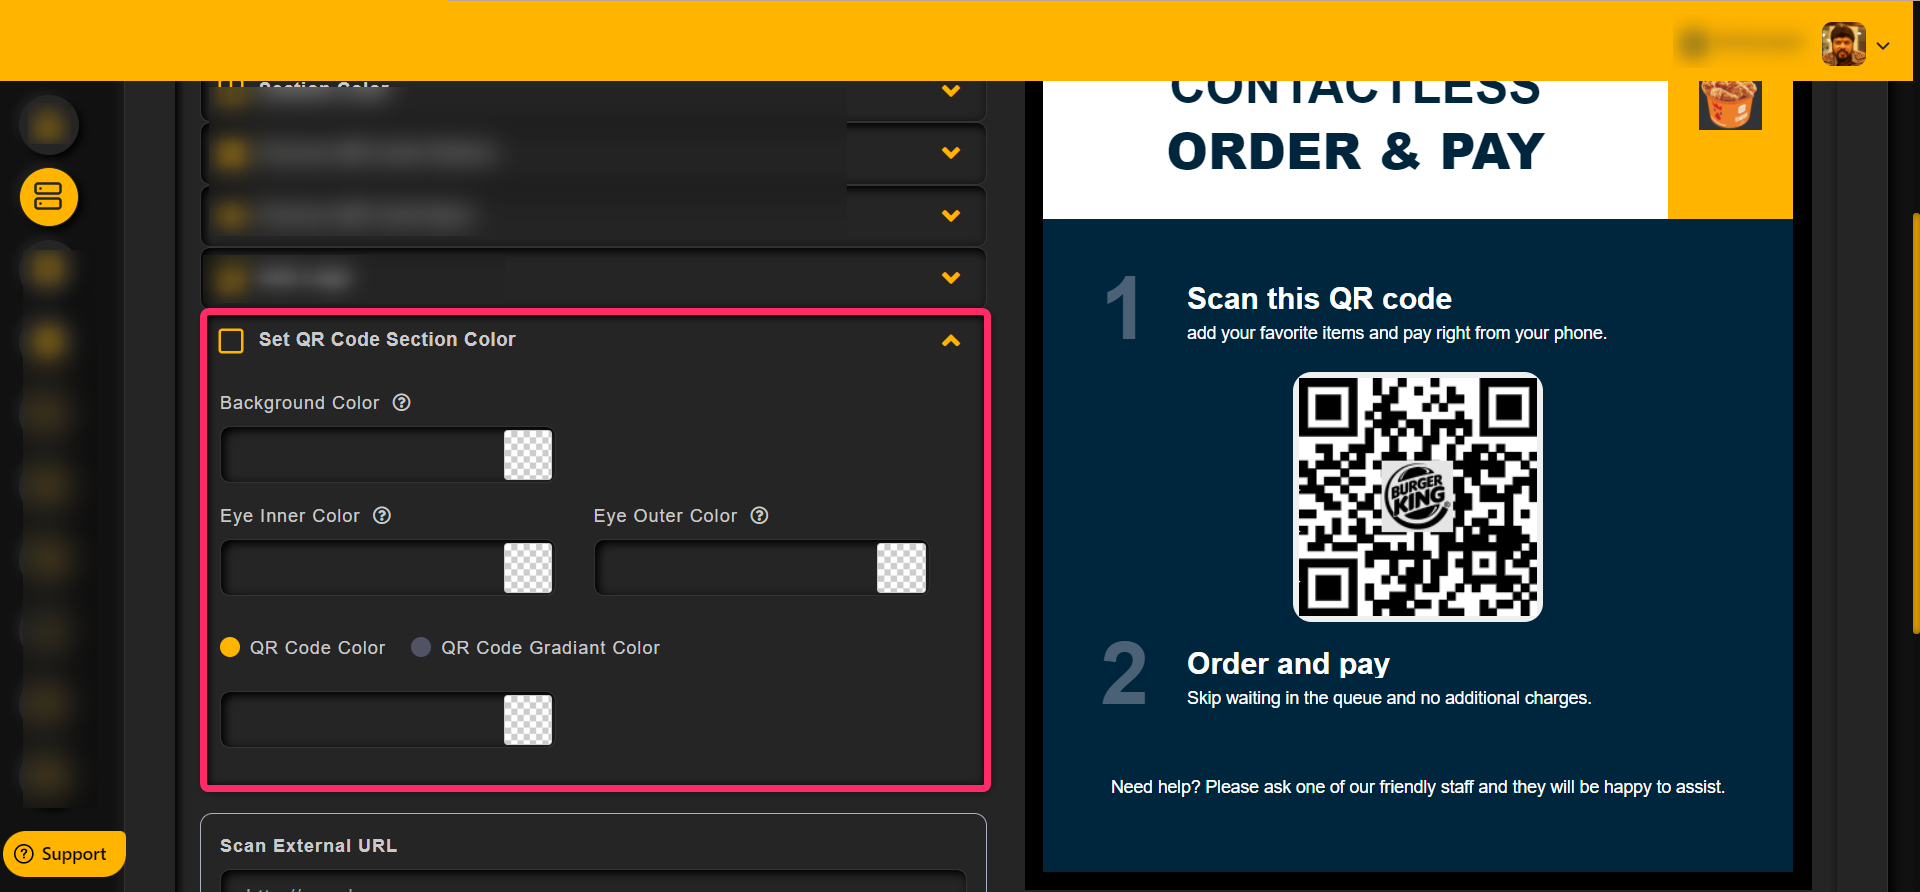
One can configure the QR code section of the QR page in the QR code Section color as shown in the image below,
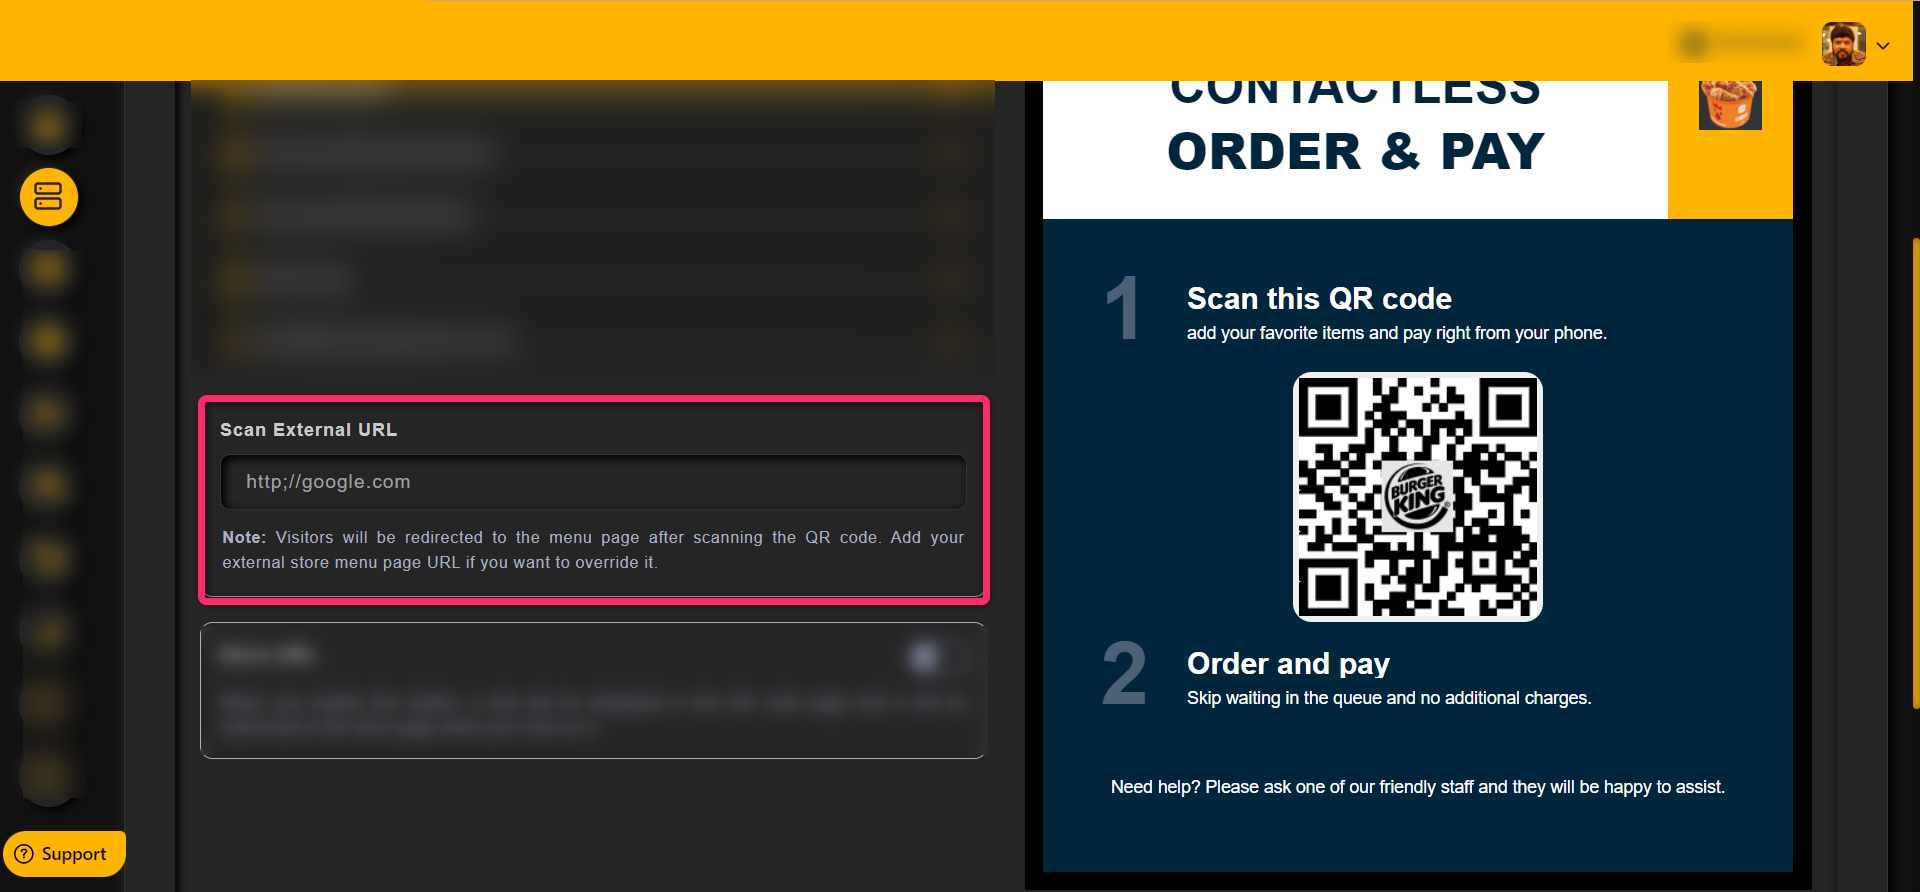
Add a URL in the External URL section, so that the user will be redirected to this URL after scanning the QR code
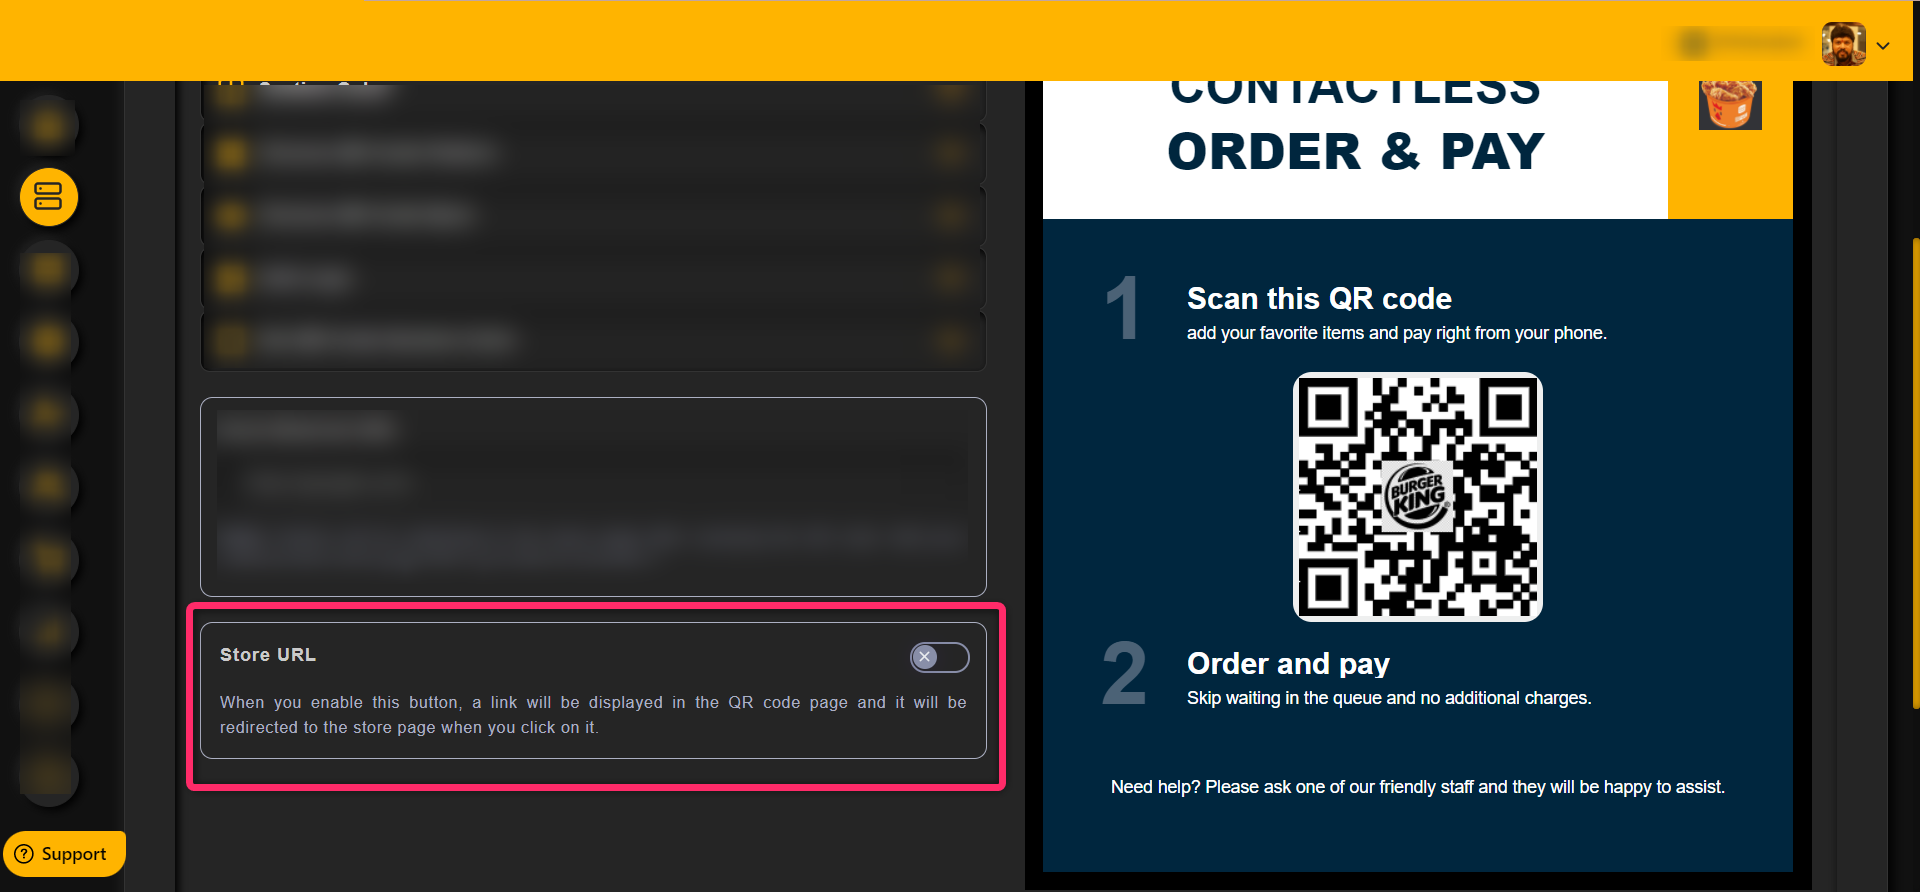
When you enable this store URL toggle switch, a link will be displayed in the QR code page
User will be redirected to the store page when you click on it.
So the user don’t need to scan the QR code
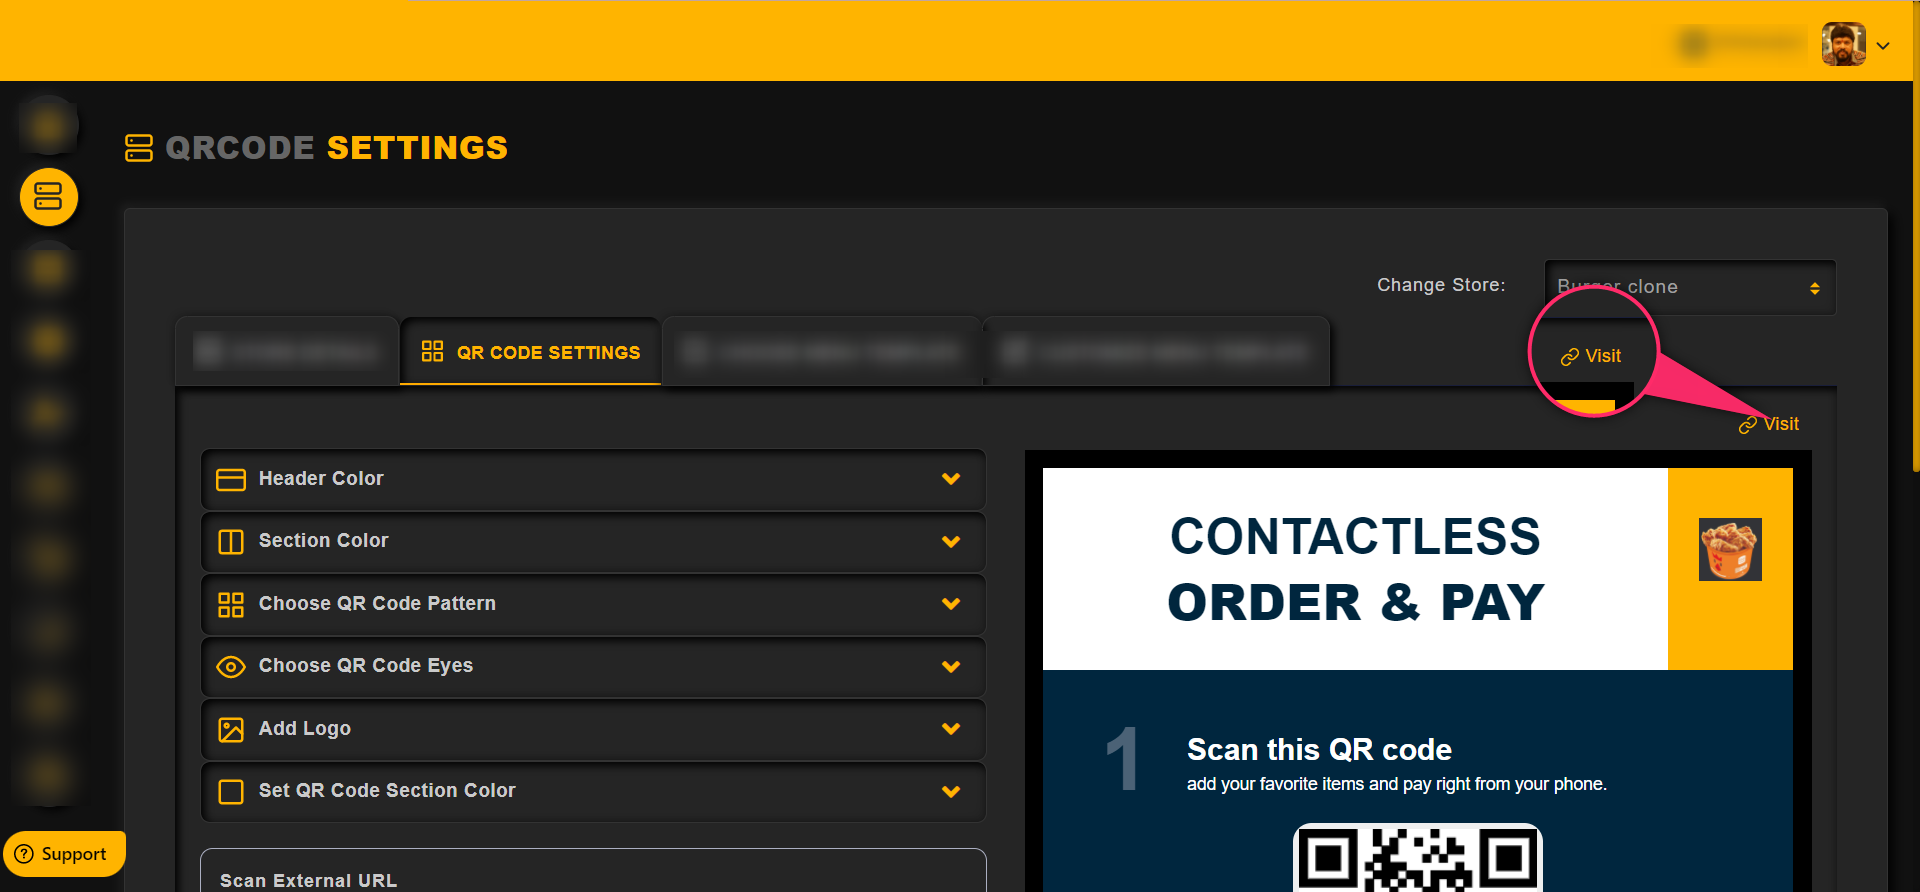
To visit the QR page, click on the visit option as shown in the image below,
To download or print the QR code. click on the Print QR code button as shown in the image below,
The QR code will be downloaded to the device, then the admin or store owner can print the QR code

Admin can use the action menus to edit, clone and delete a store, add custom scripts, Cnam mapping and for more functionalities
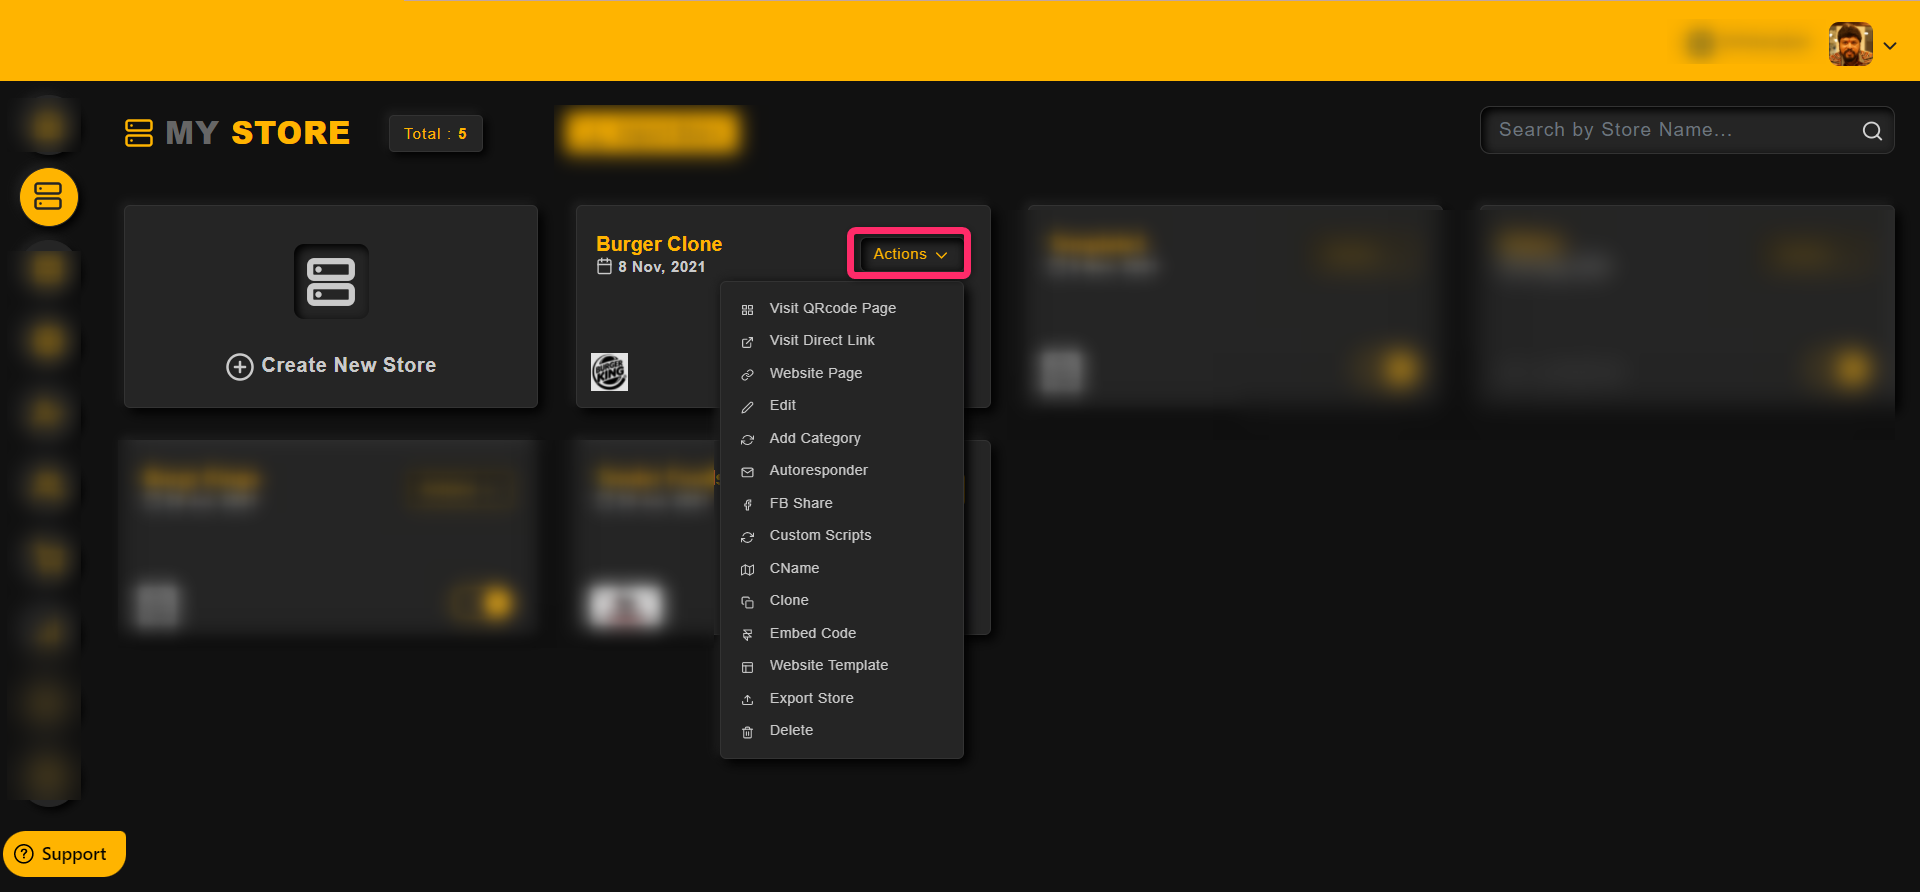
To visit the QR code page,
Click on the Actions drop down menu and then Visit QRcode Page as shown in the image below,

CName : With this feature, one can have their own domain name/URL for their Store
To add Custom Domain,
– Go to My Store
– Click on the Actions menu
– Then click on the CName option as shown in the image below
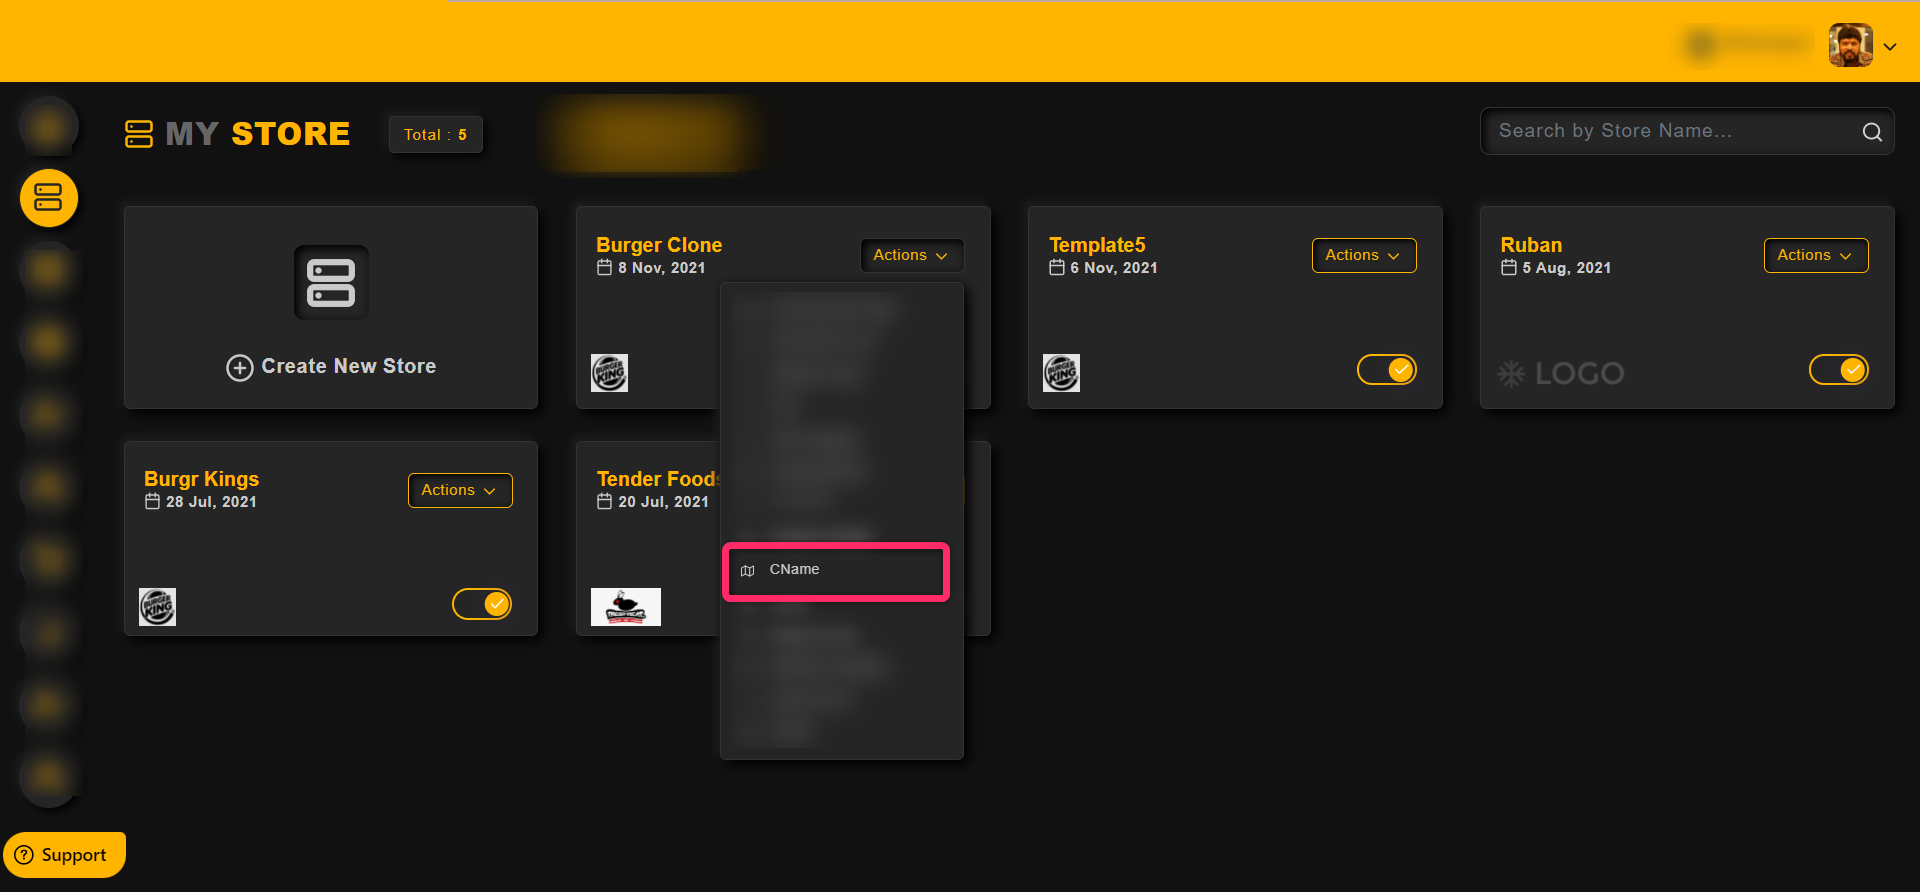
Enter the URL in the text box and click on “Save” button

To add a FB share settings, click on the Action menu
Then click on “FB Share” to add FB settings, the settings added here will be displayed when the link is shared in Facebook
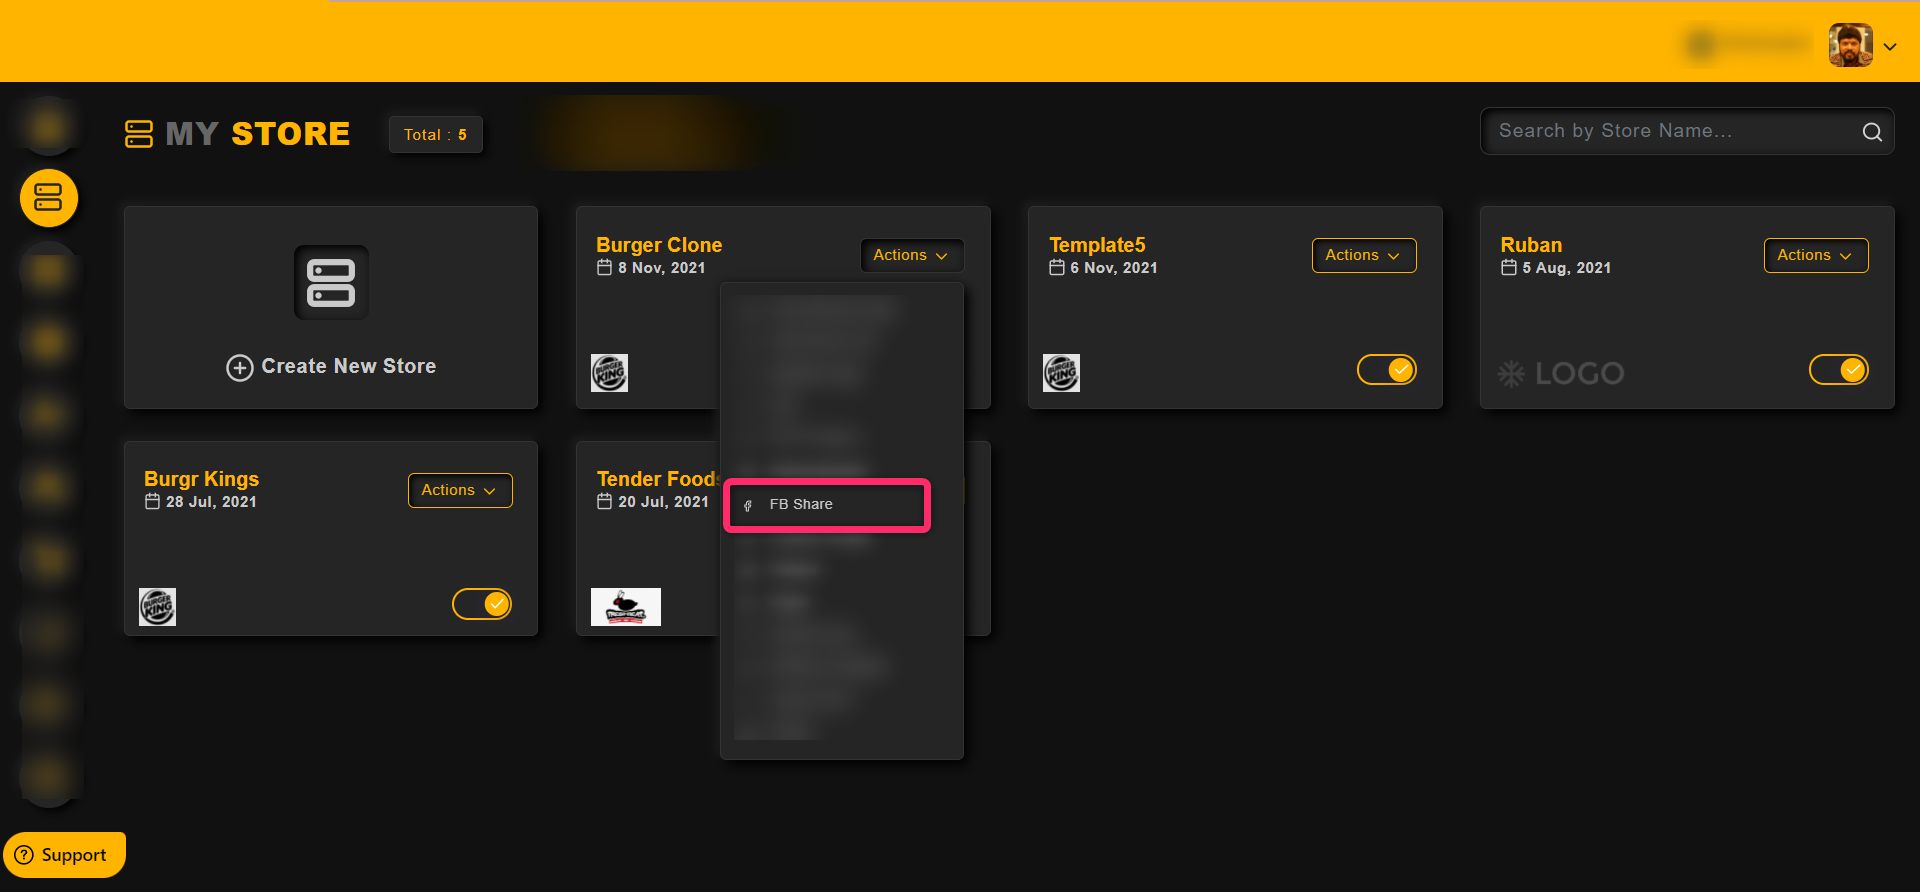
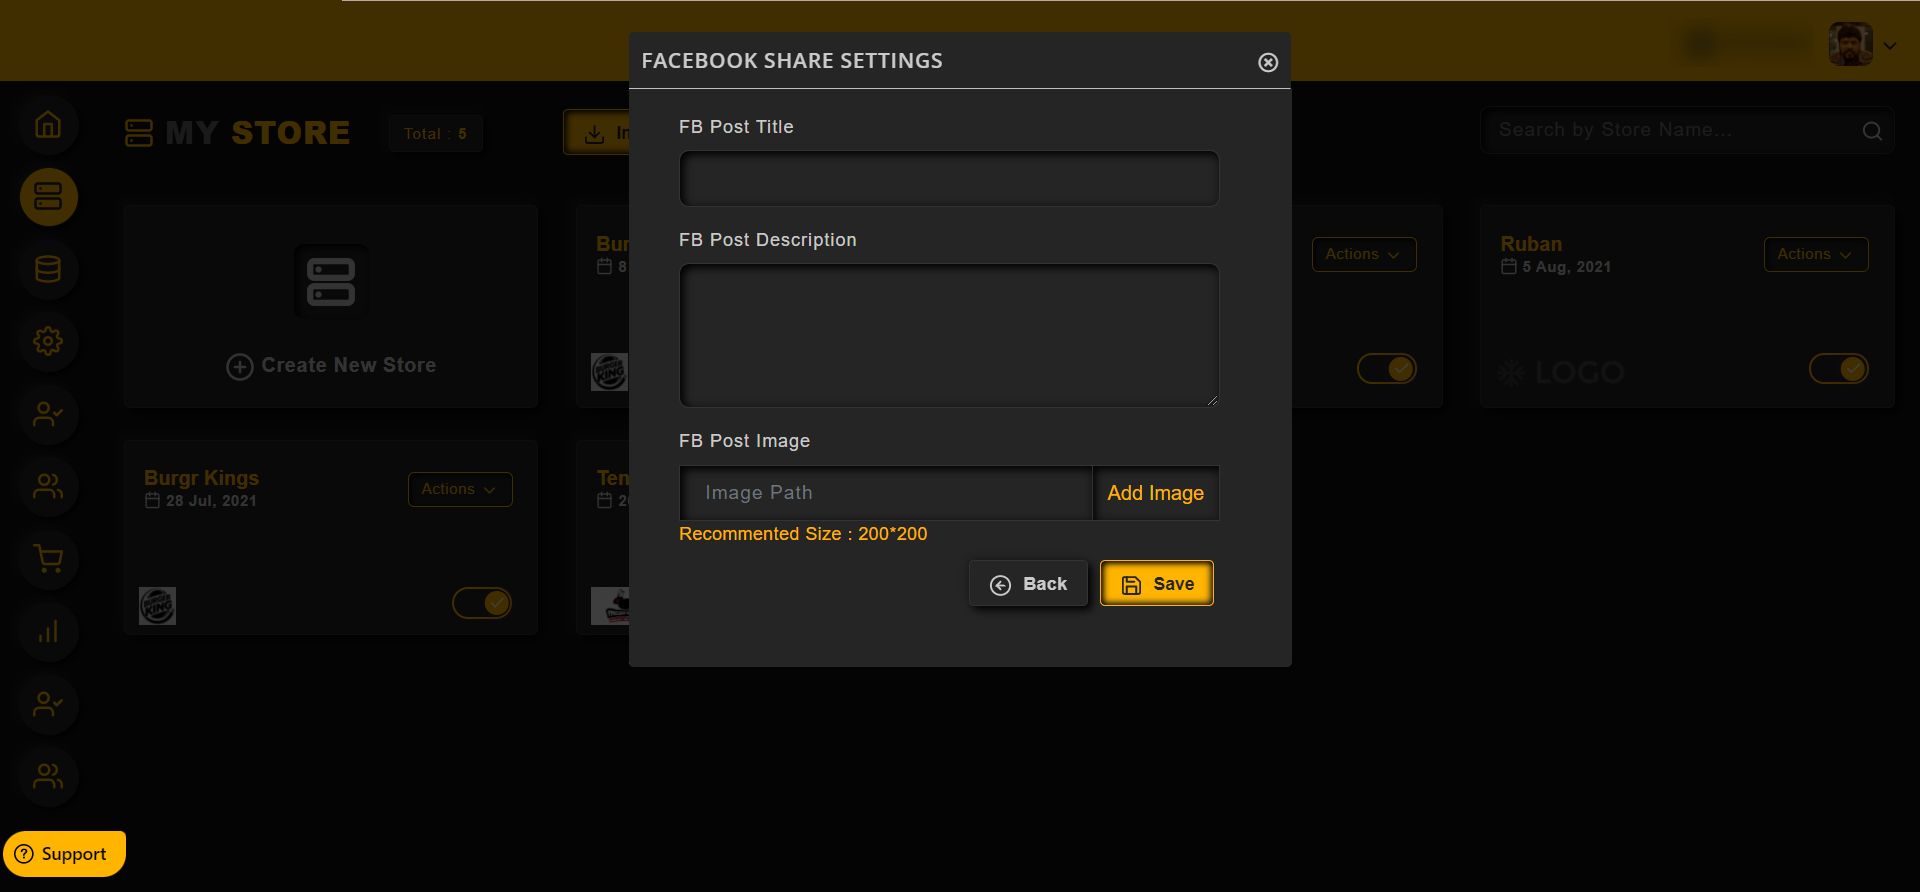
Click on the Save button once the details are added
To link a store with the Autoresponder list and a Webinar list,
Click on the Actions dropdown menu and then click on the Autoresponder

Now, one can choose Webinar platform and list, autoresponder platform and the list as shown in the image below
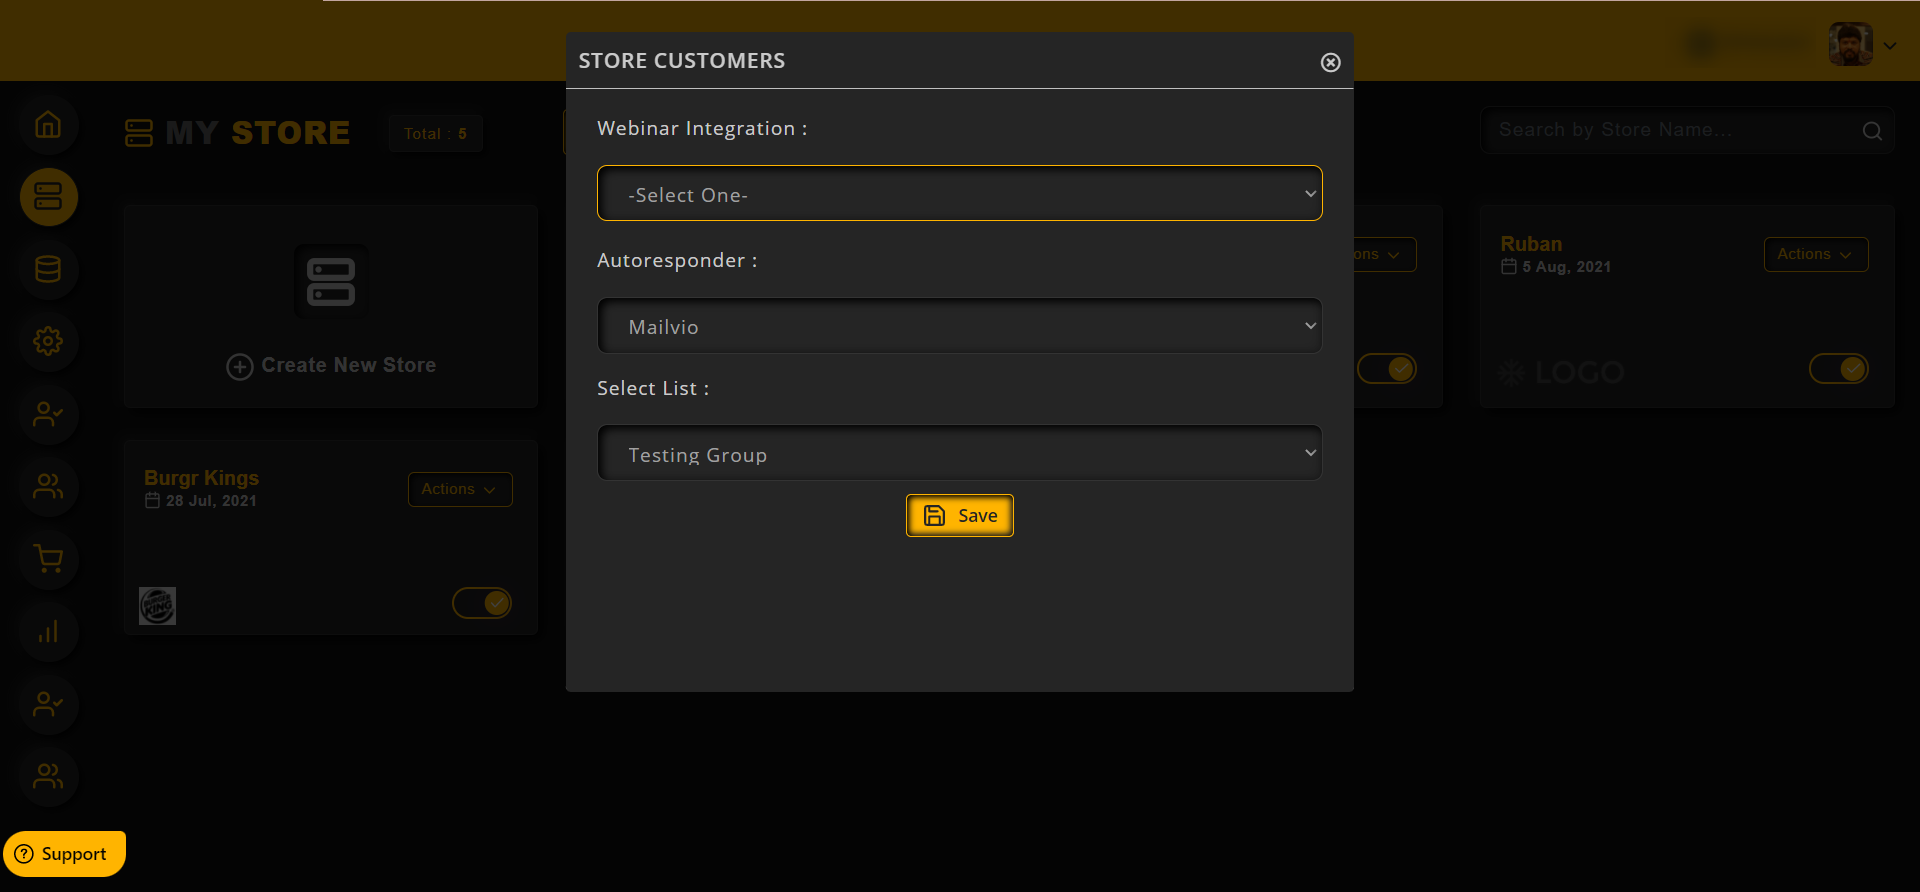
Click on the Save button once the list has been selected
To clone a store,
– Click on the My Store option from the left side menus
– Then click on the Action menu, then click on the “Clone” option to make a copy of the store

Enter the Store name and store URL in the text fields provided
Then click on the Save button

To add third party pixel codes,
Click on the Action menu and then Custom Scripts option as shown in the image below,

Now, add the scripts in the corresponding scripts in the text fields provided
Note: Admin can refer to the document given by the script provider, in which they have mentioned where to add the script, in the head section, or in the body section
Note: One can add multiple scripts code in the same text field
Just add one script and then enter, again add the second script ( you can use this case only when you have a multiple scripts to be added in the same section either head or body tags)
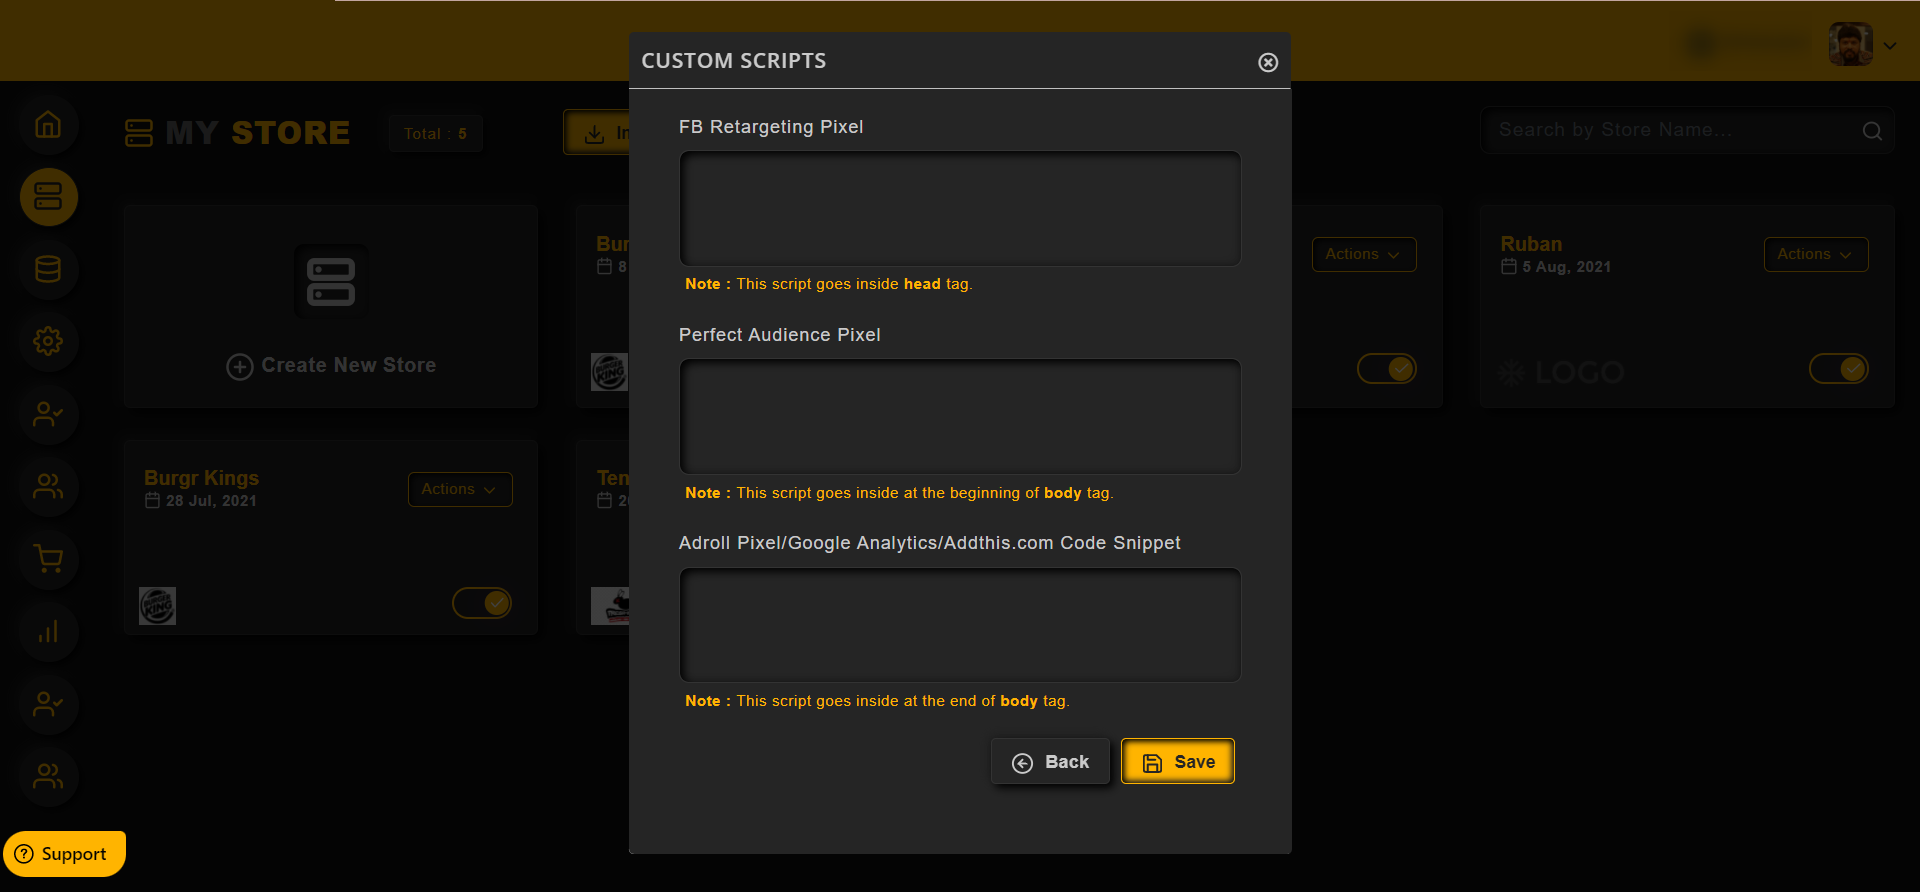
Click on the Save button once the script has been added
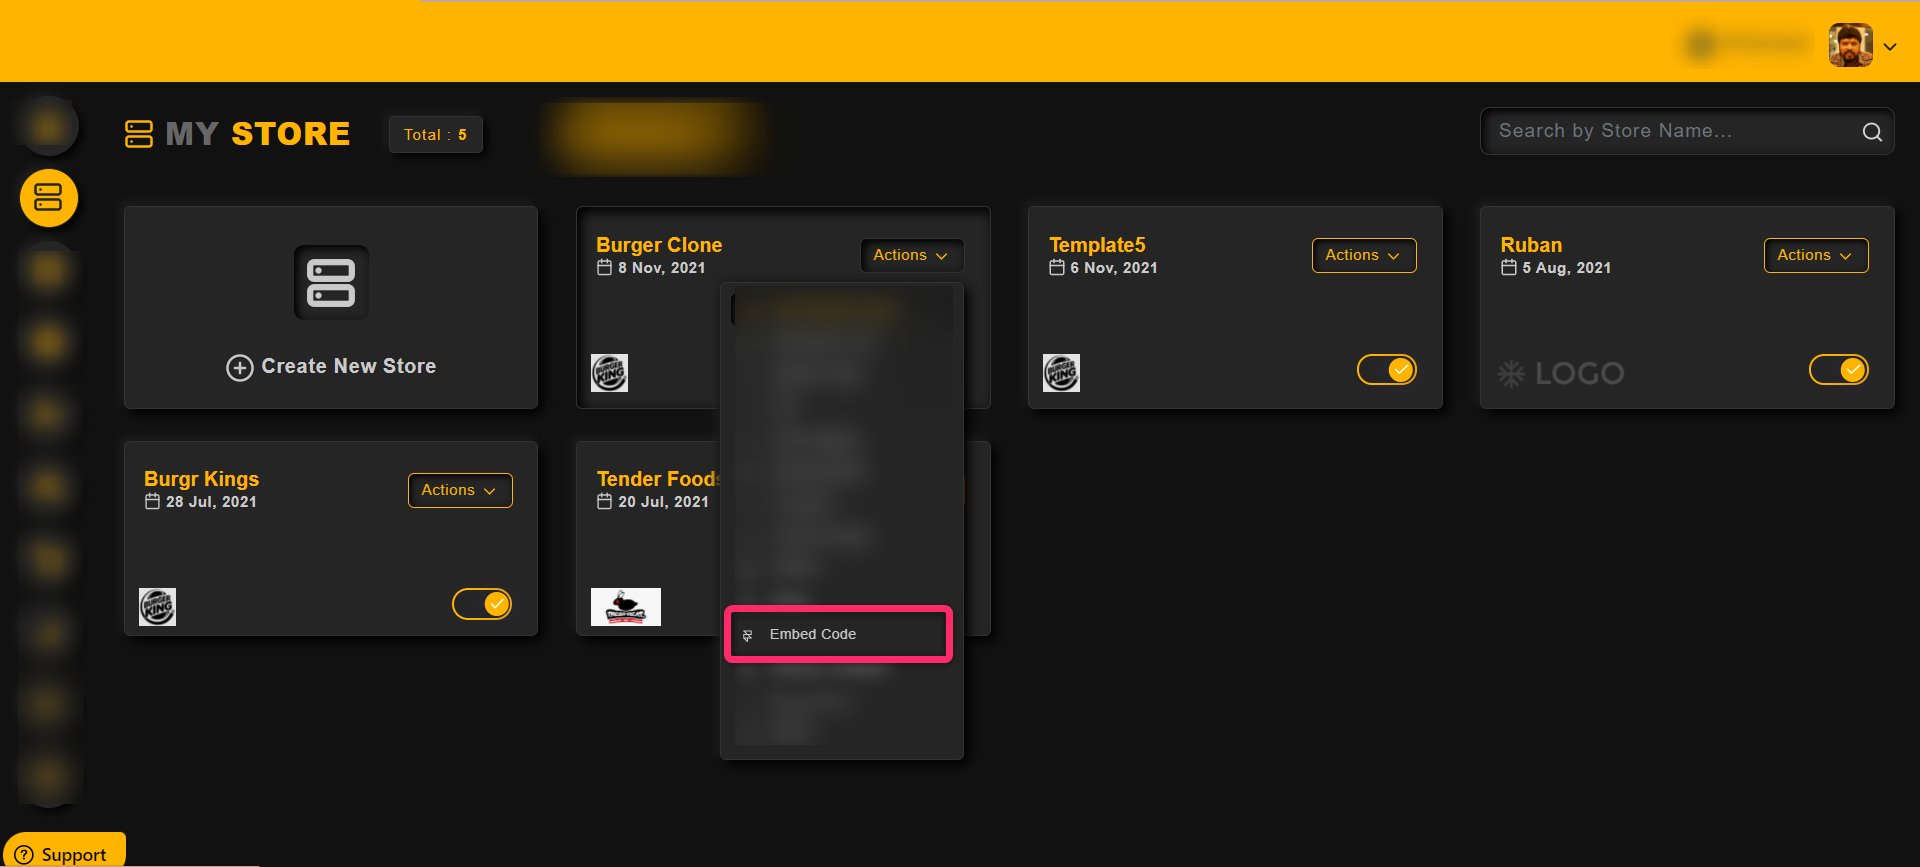
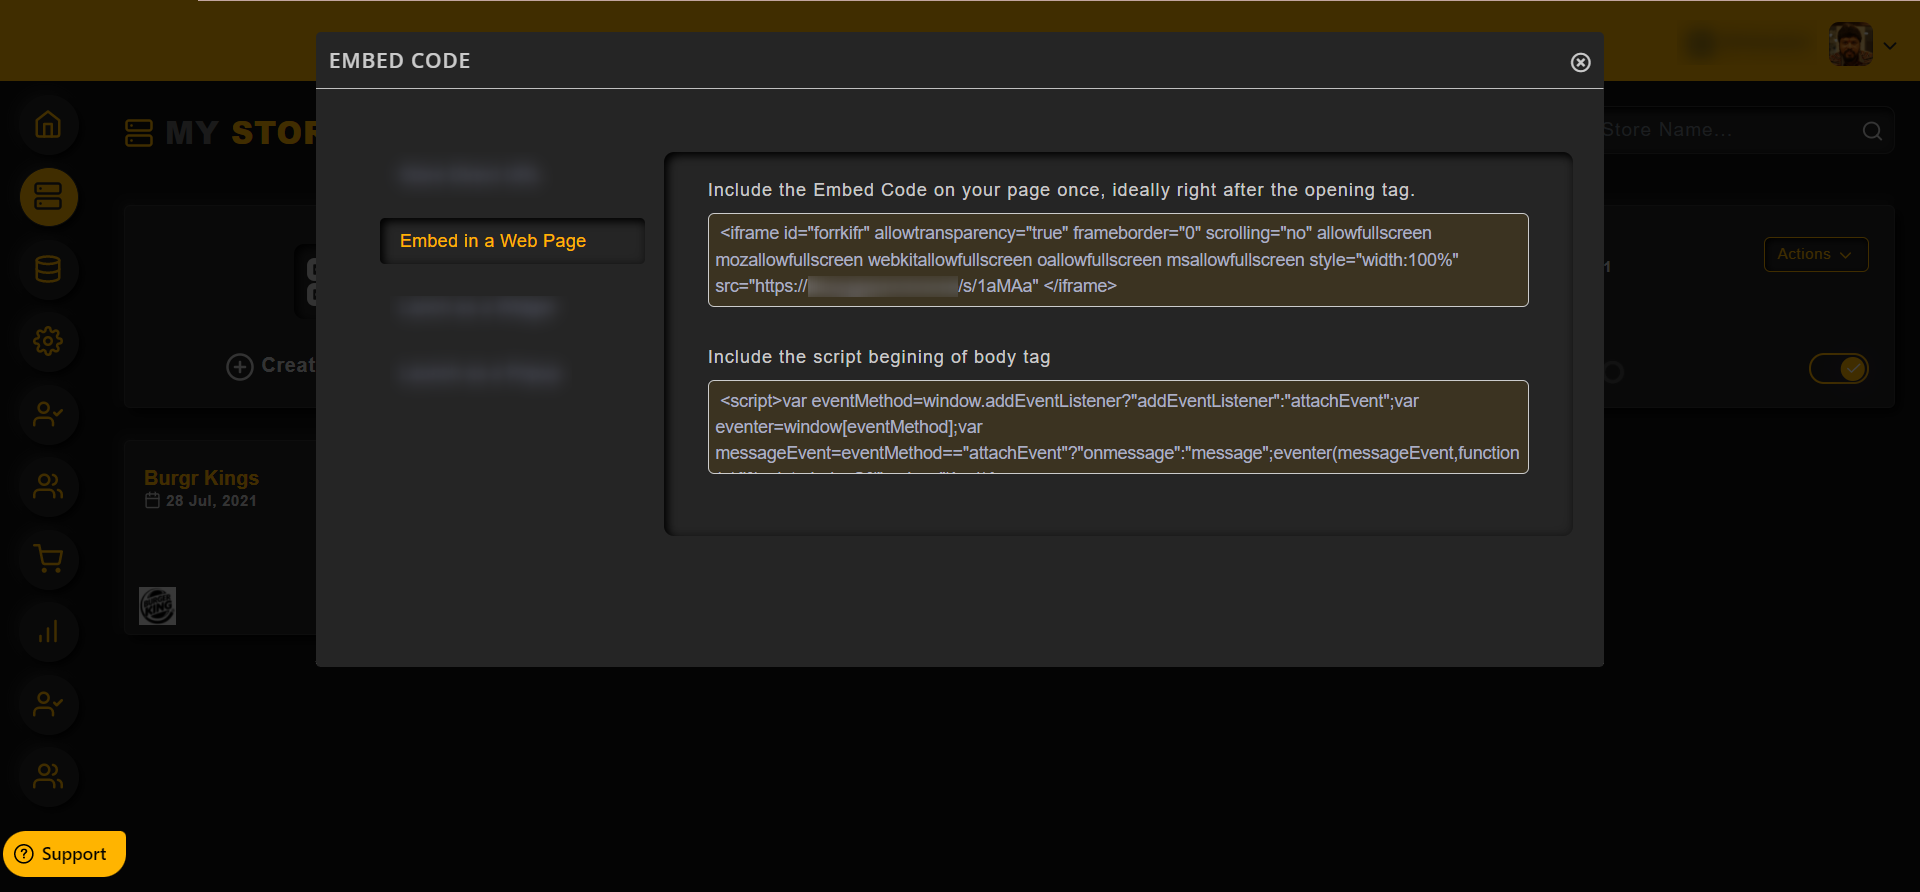
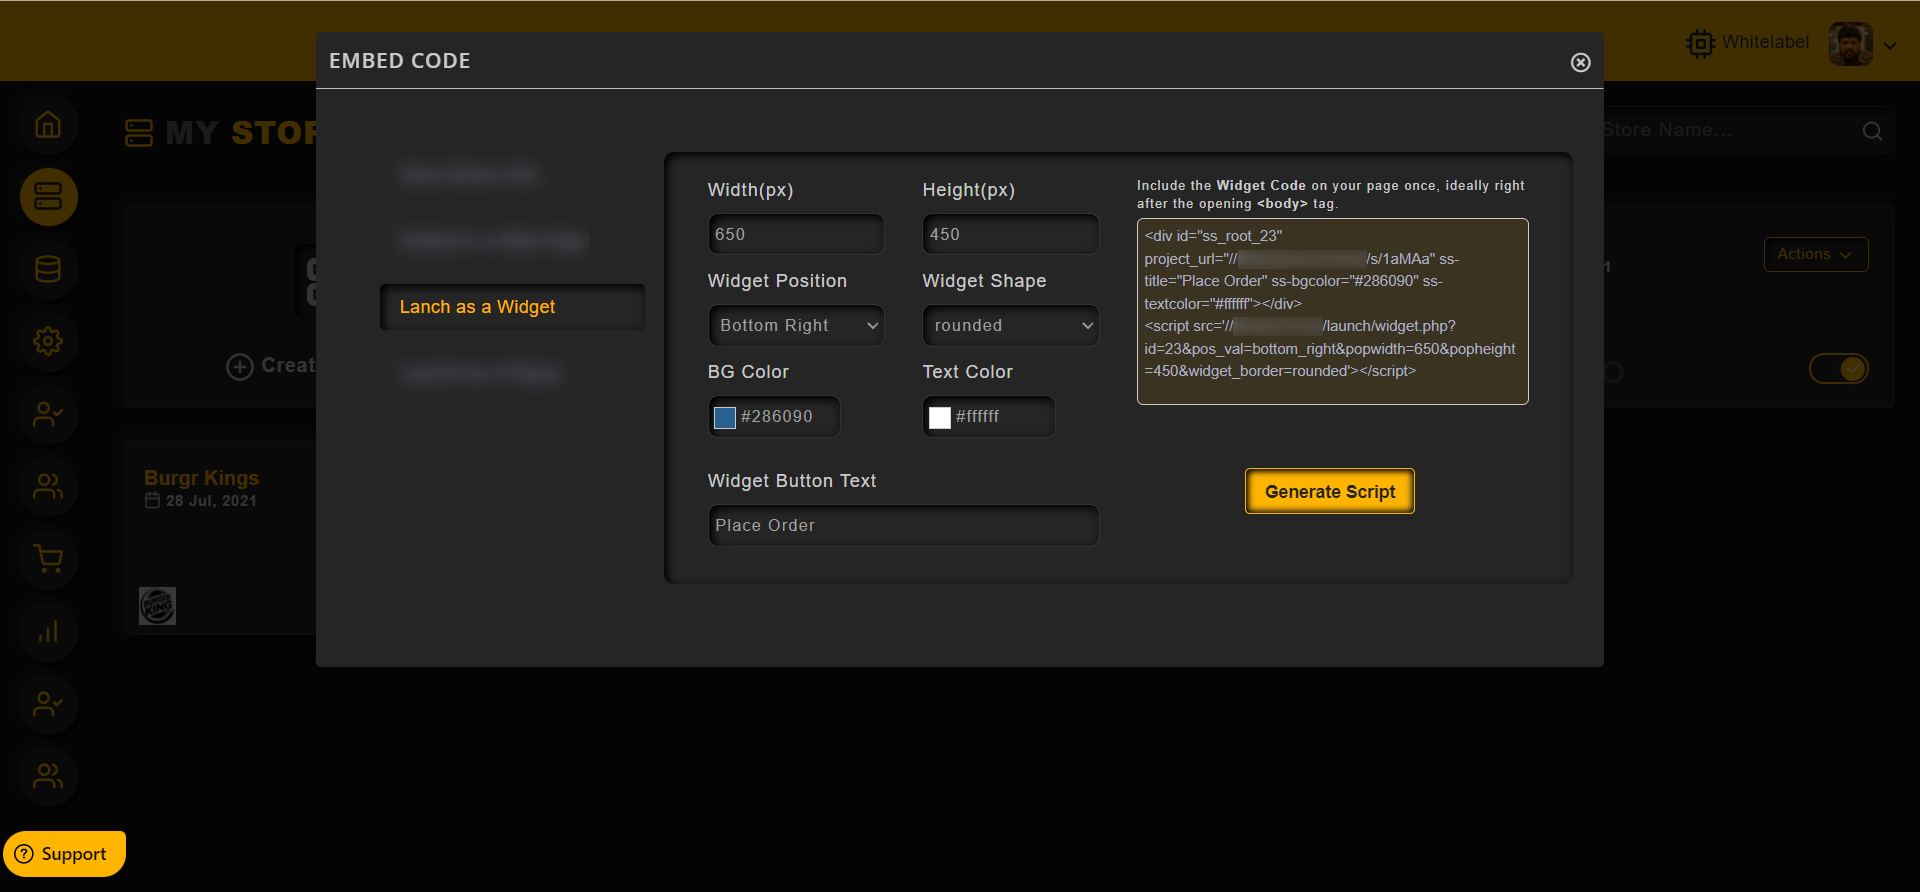
To get the Embed code of a store,
– Go to My Store
– Click on the Action menu
– Then click on the Embed code option as shown in the image below
To get the Store URL, click on the Visit button to visit the store or copy the URL and share
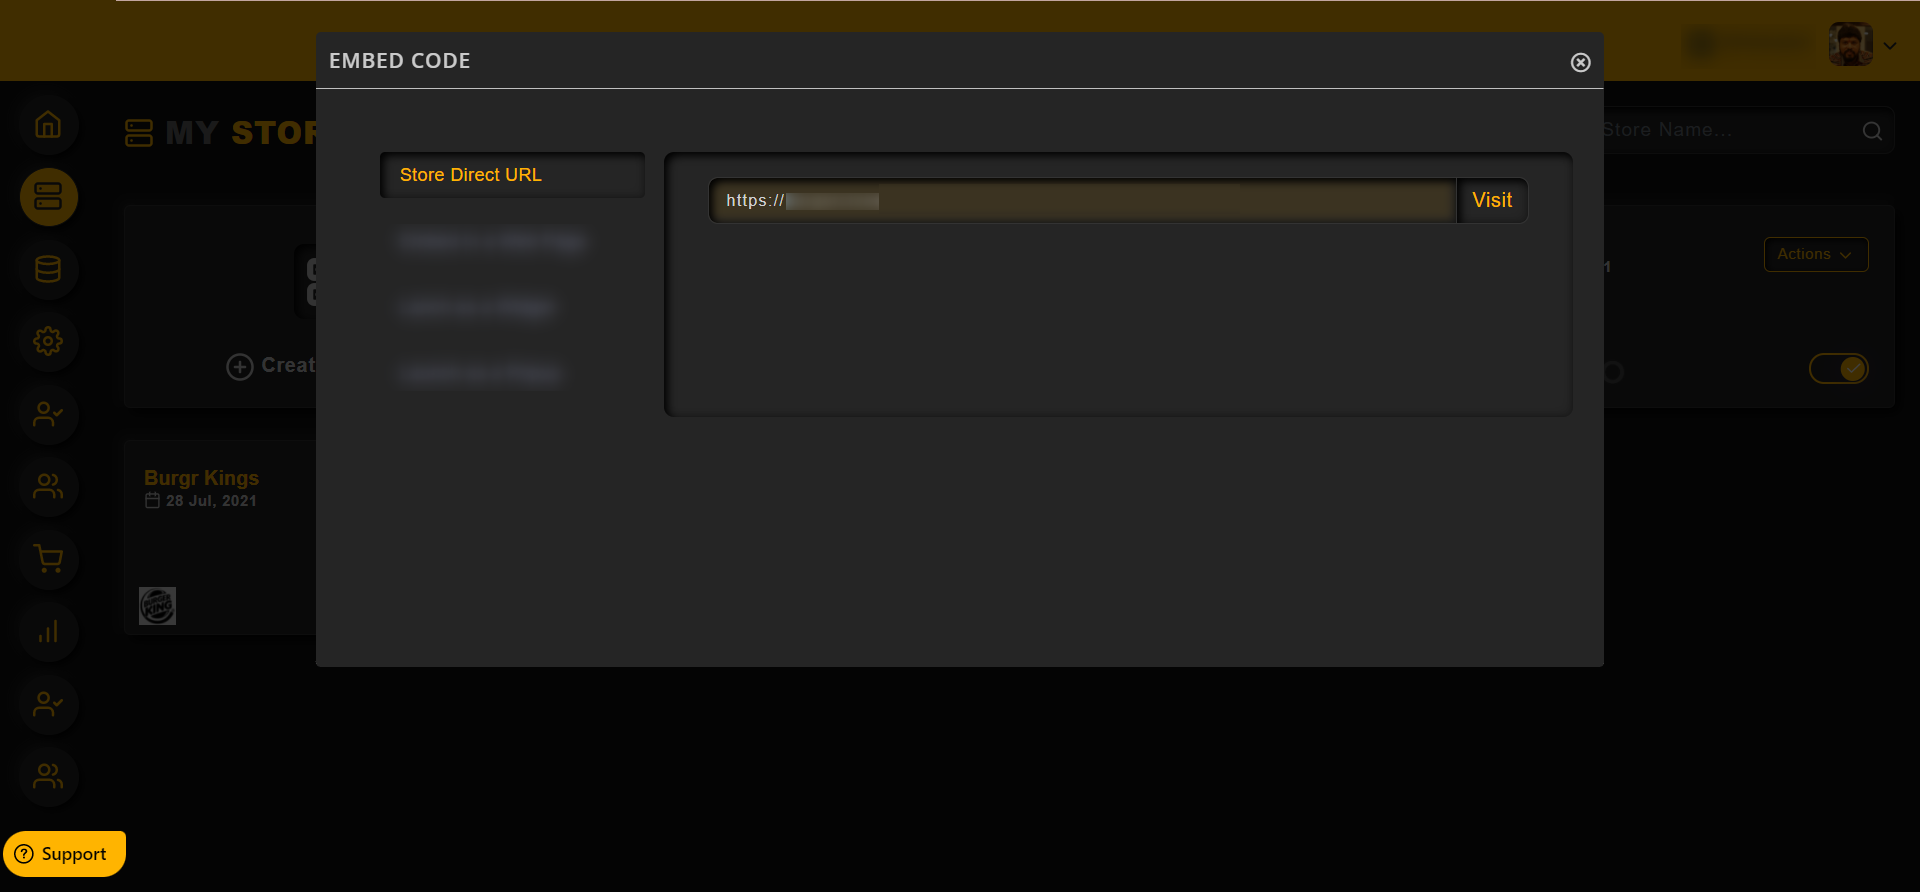
To embed the store in a web page, one can get the embed code in this section as shown in the image below,
To add the store as a widget in a web page, one can get the widget code in this section as shown in the image below,
To add the store in a web page as a popup, one can get the popup code in this section as shown in the image below,
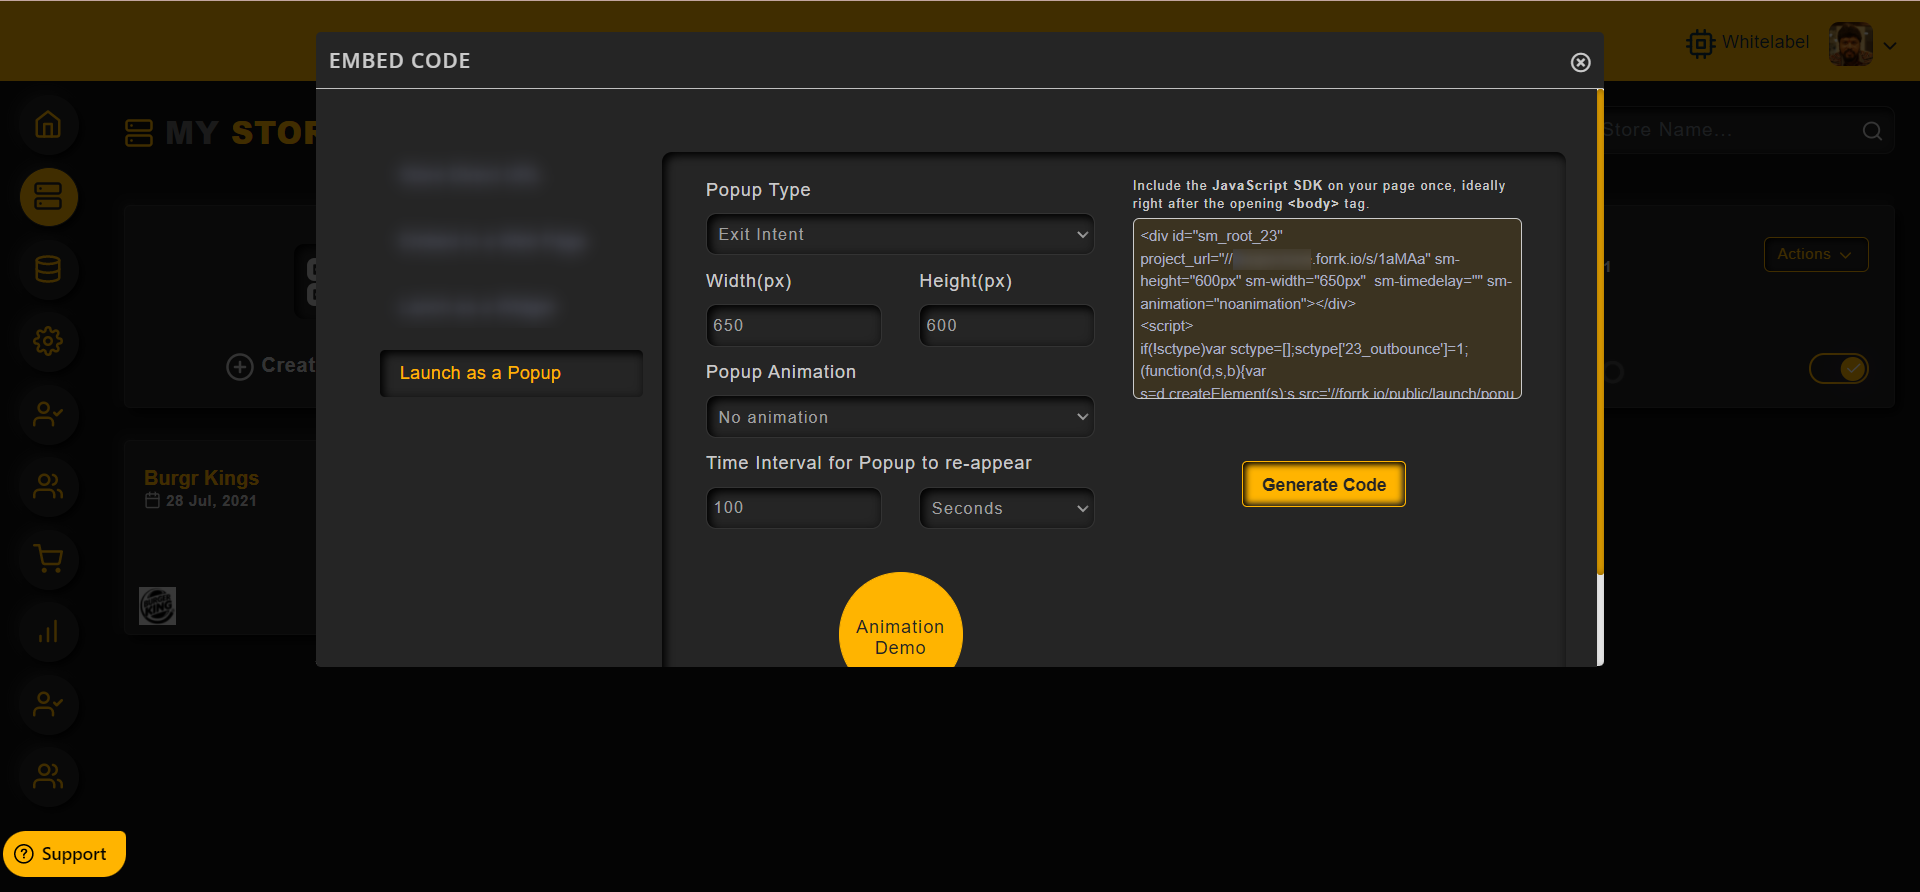
Note: Configure the color, height and other settings and then click on the Generate button, and then get the codes
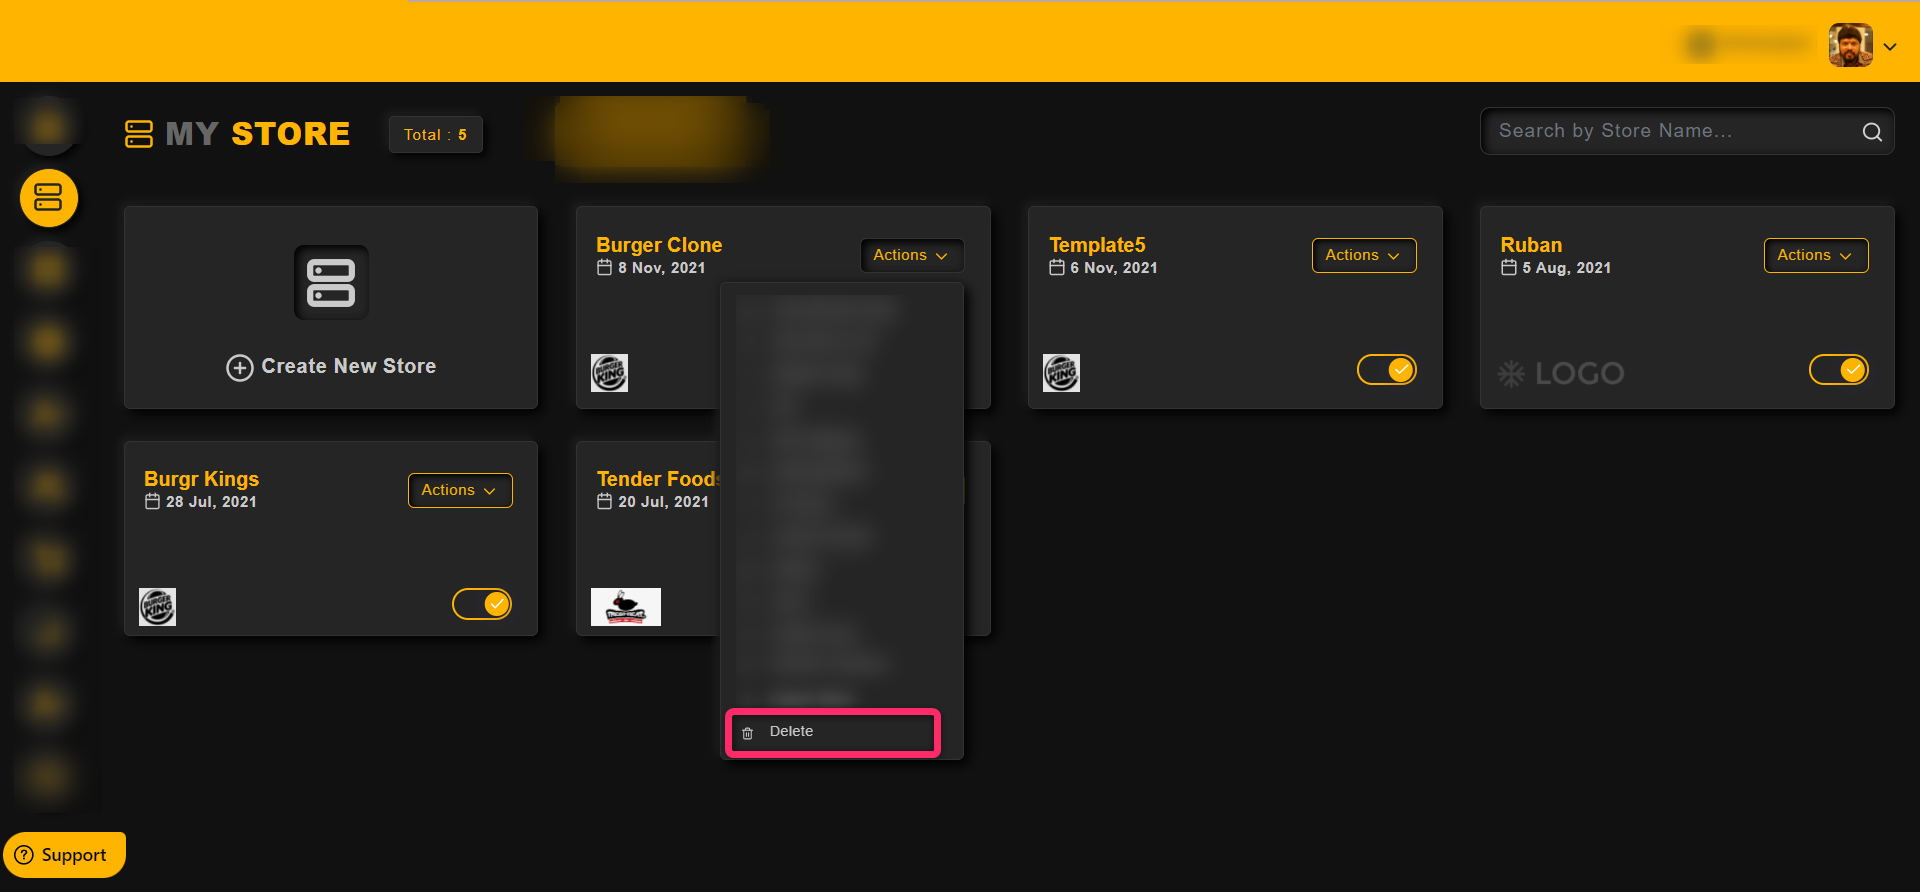
To Remove/Delete your existing store,
Click on the delete option as shown in the image.
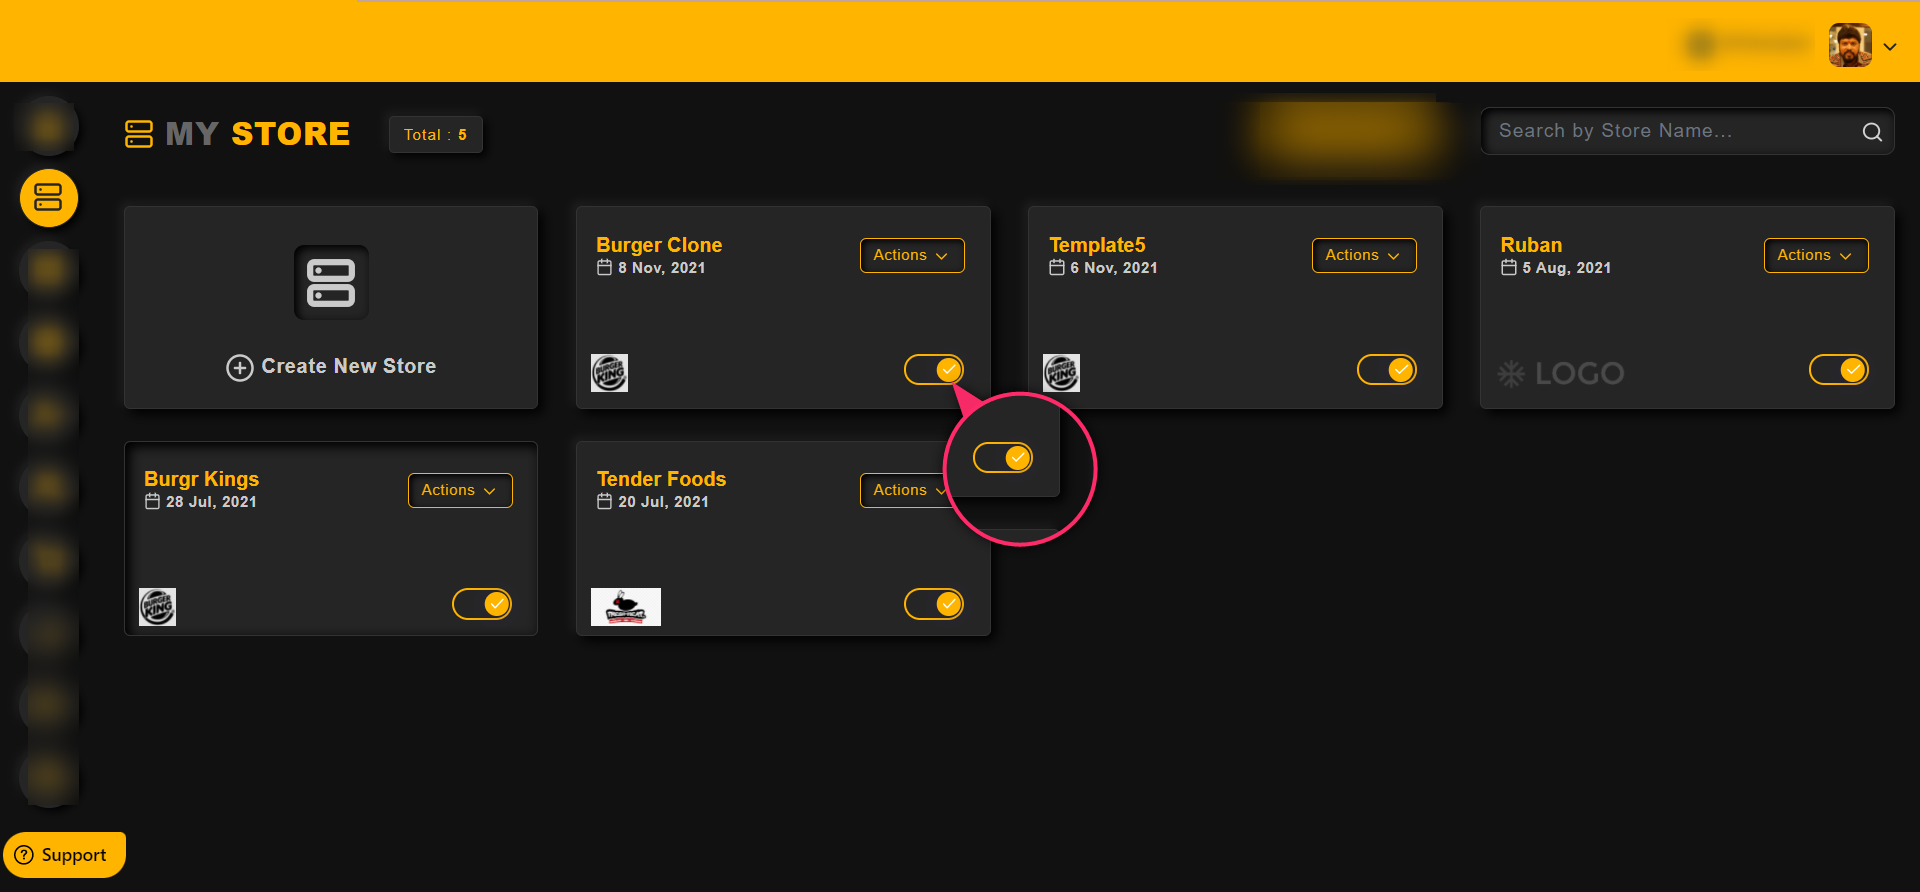
To Enable/Disable an existing store,
Click on the Toggle as shown in the image below,
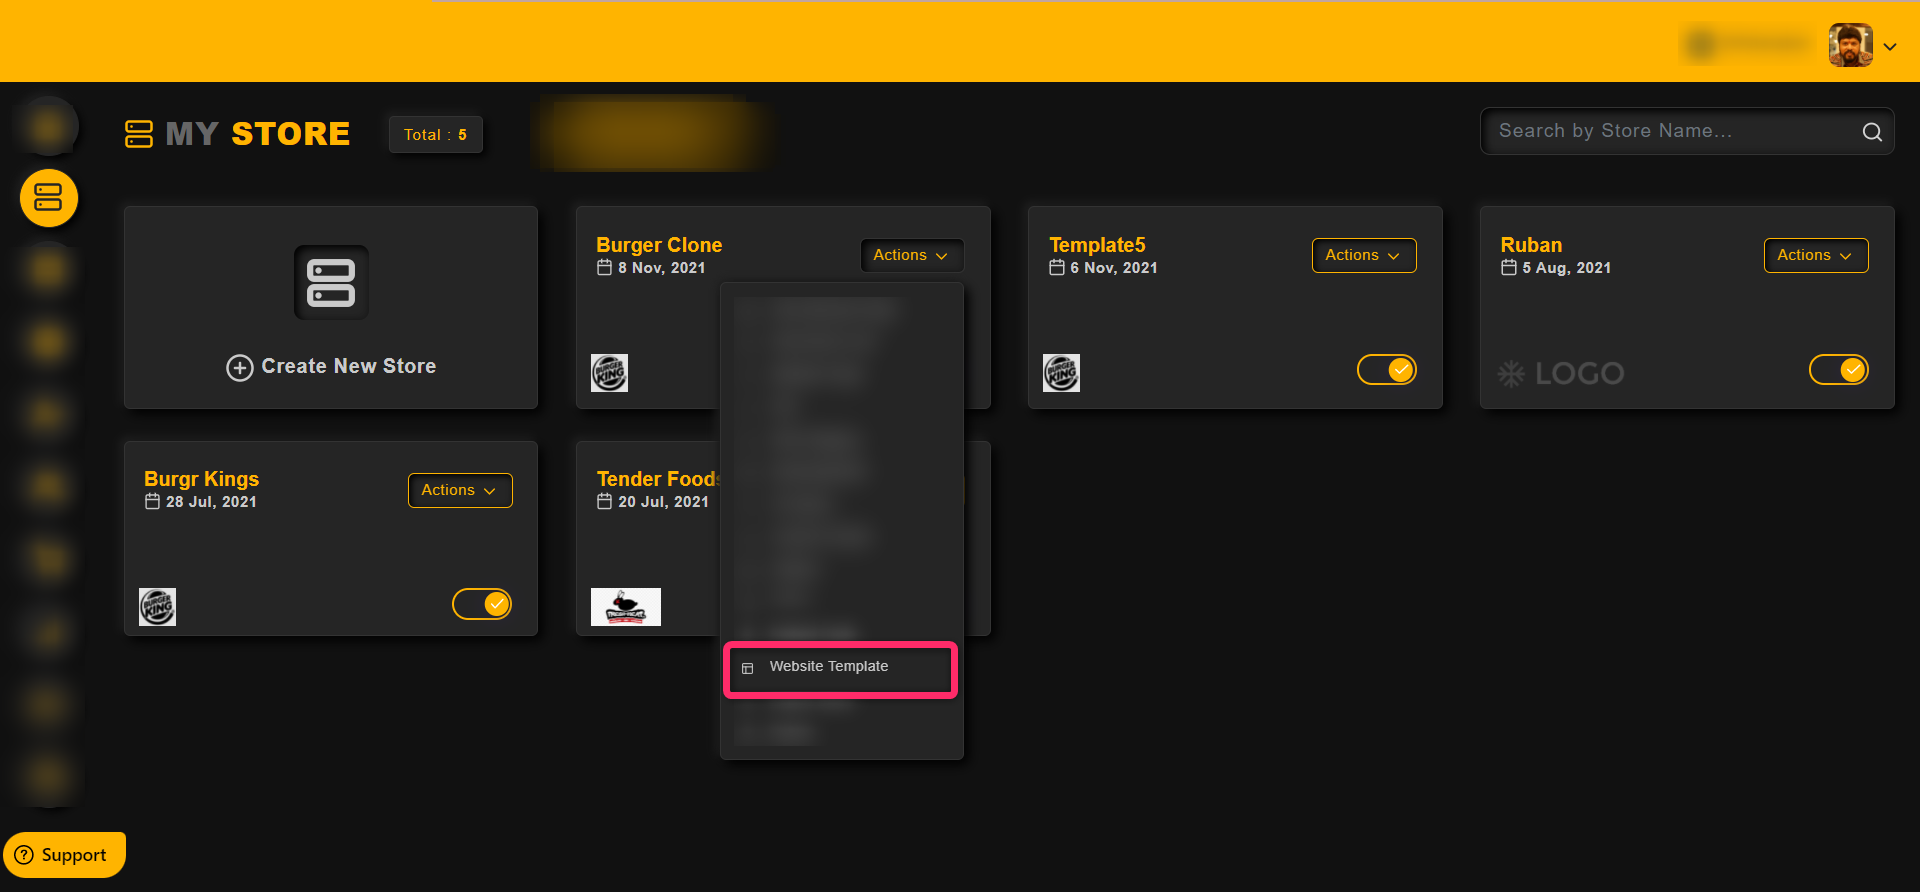
To customize the website template,
– Click on the My store from the left side menus
– Then click on the Action option
– Now, click on the Website Template to customize the Website template
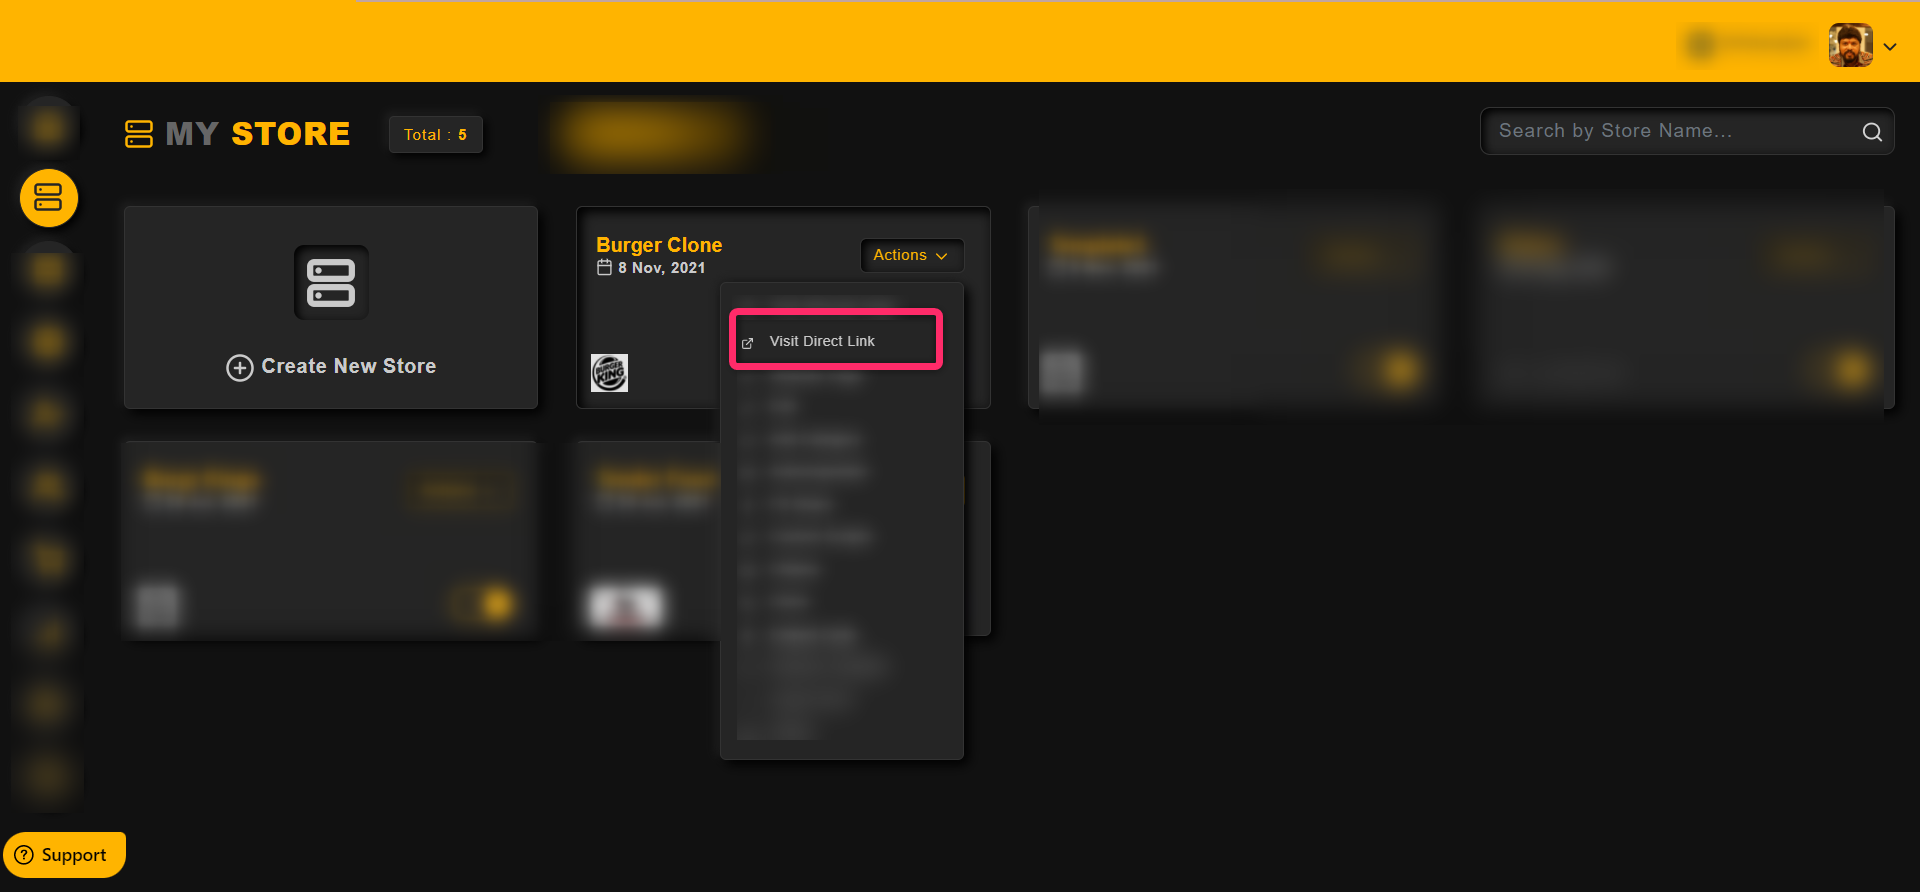
To visit the store page directly,
Click on the Actions drop down and then click Visit Direct Link as shown in the image below,
To visit the website page directly,
Click on the Actions drop down and then click Website Page as shown in the image below,

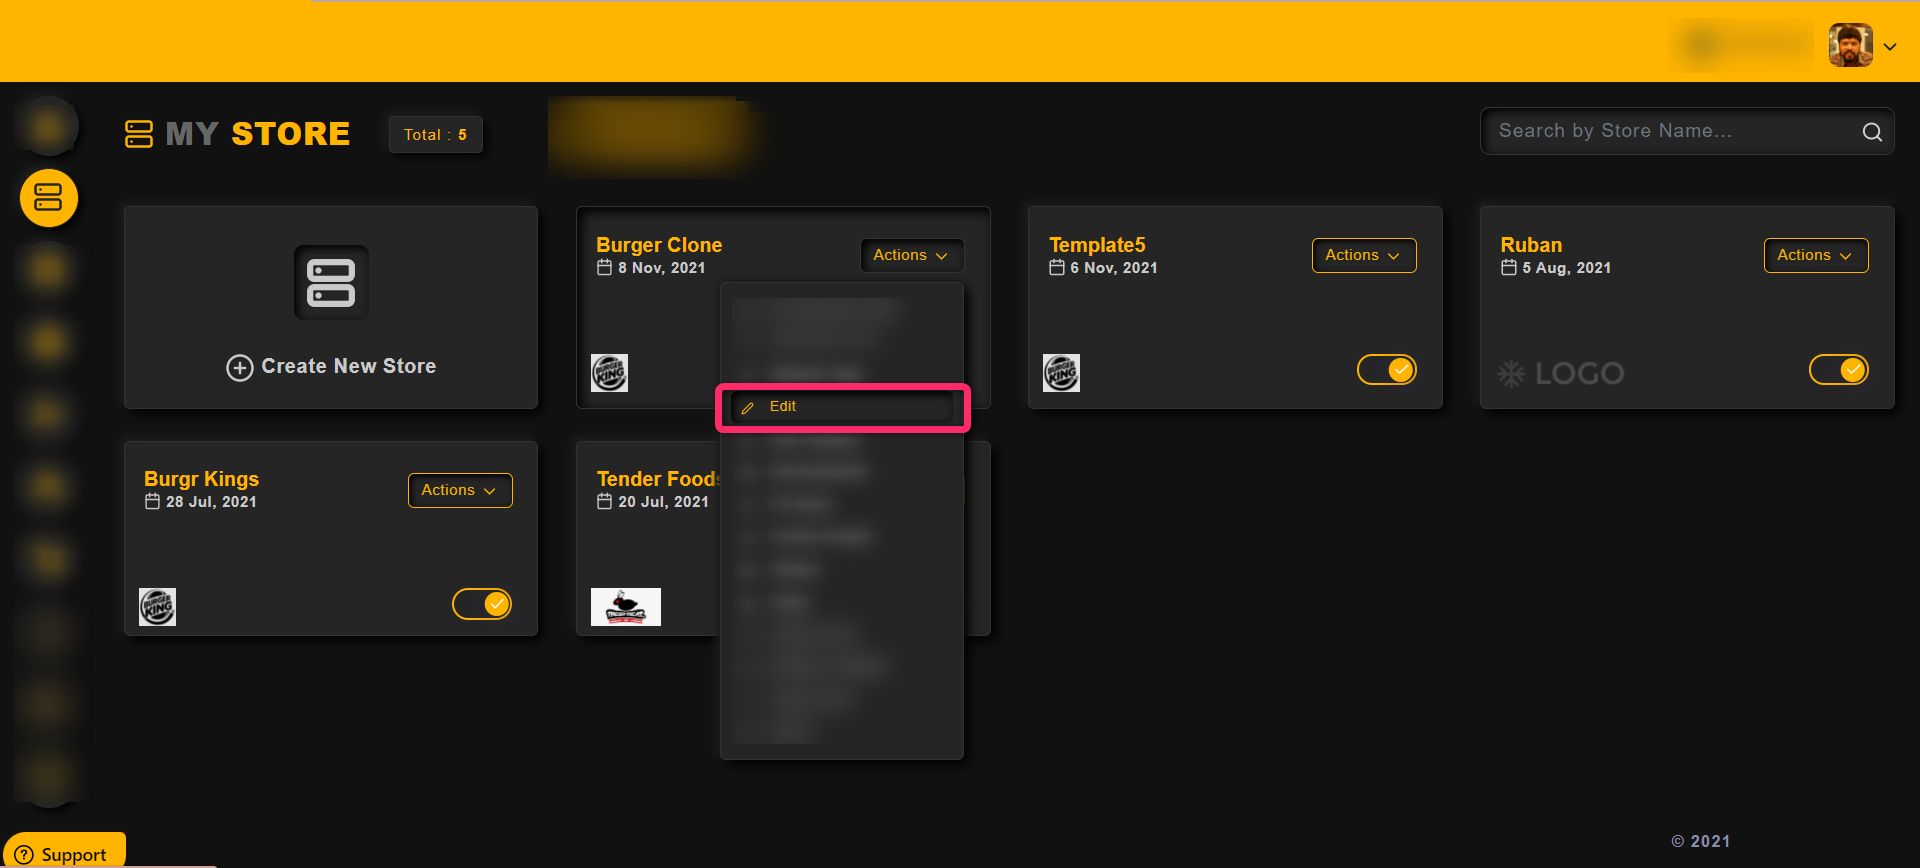
To Edit a store,
STEP 1 : Click on My store from the left-hand side dashboard.
STEP 2 : Choose the store.
STEP 3 : Click on the actions button.
STEP 4 : Choose edit.

To add a category to a store,
STEP 1 : Click on My store from the left-hand side dashboard.
STEP 2 : Choose the store.
STEP 3 : Click on the actions button.
STEP 4 : Then click on the Add Category option
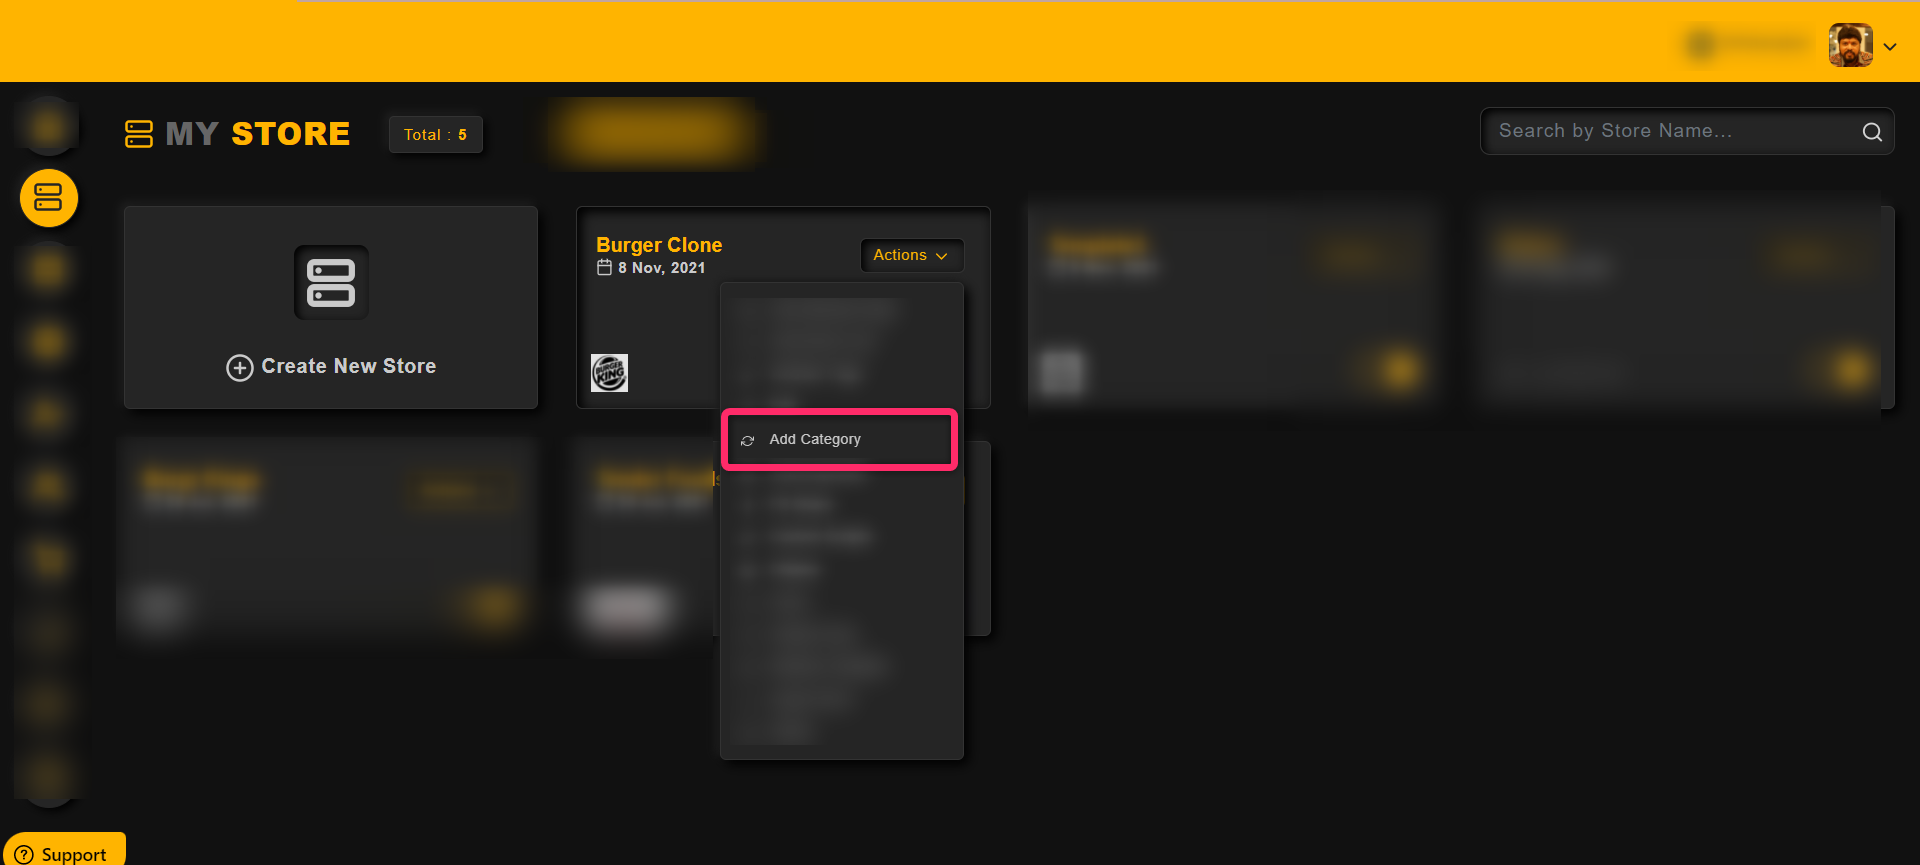
Then click on the Add Category button as shown in the image below,
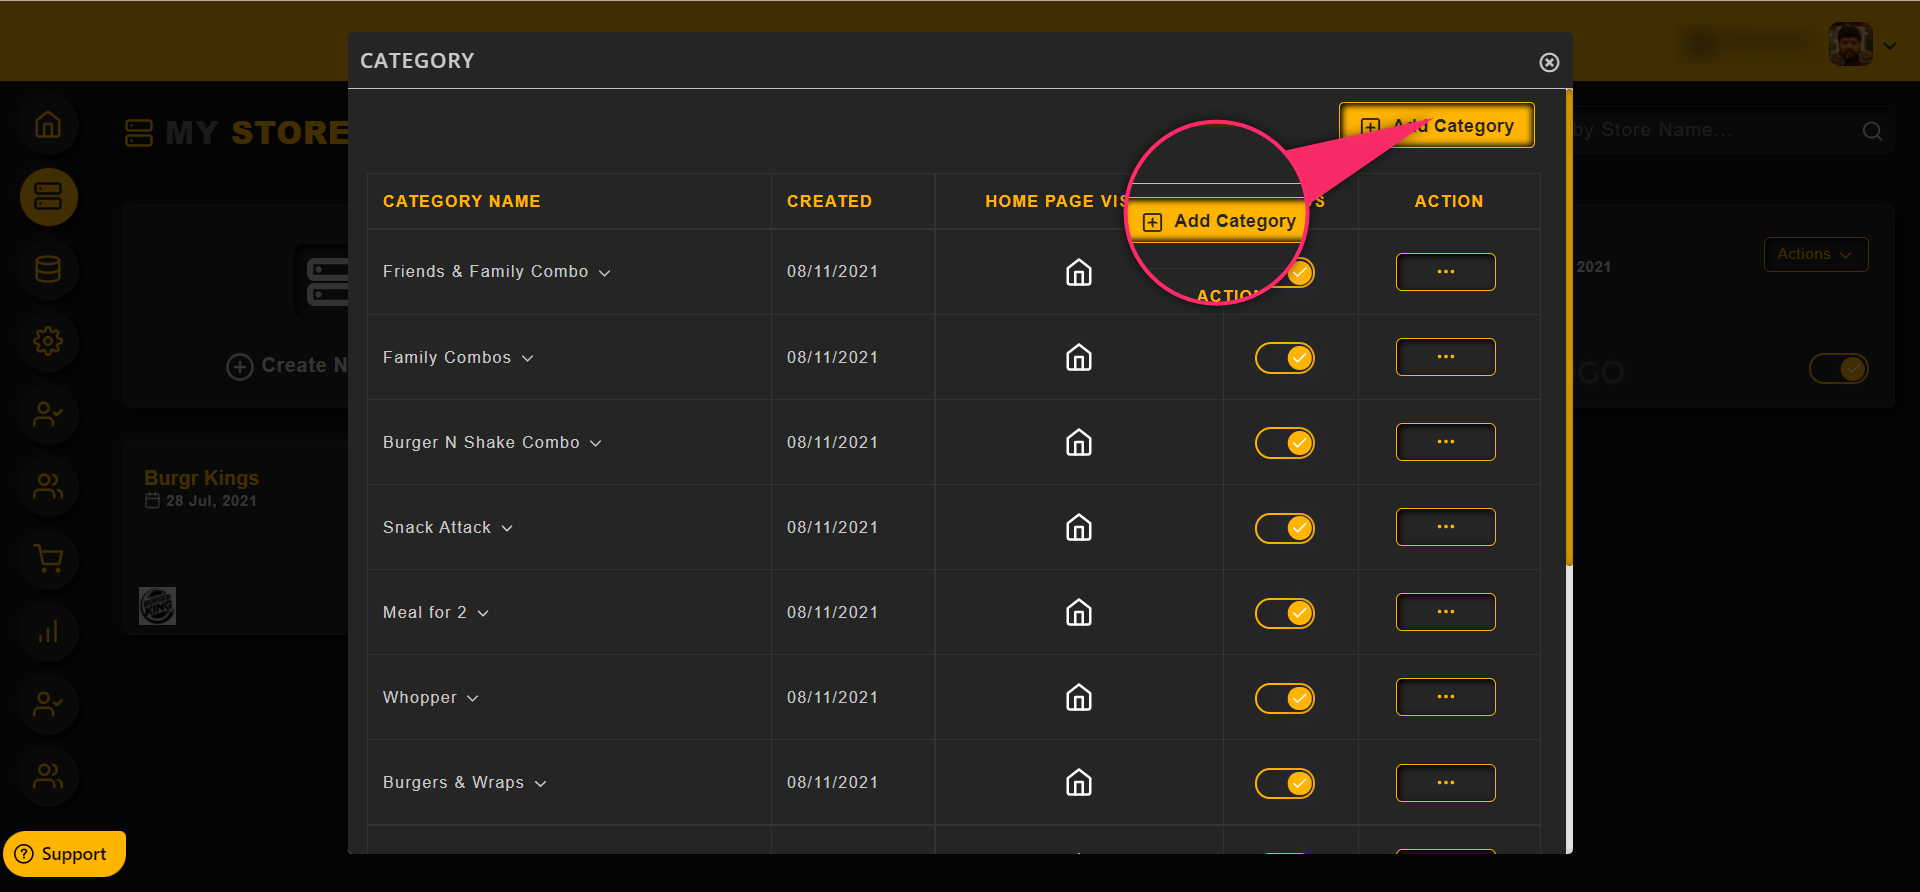
Enter the details of the category in the provided fields
1. Enter the Category Name
2. Enter the External URL, so that the user will be redirected to this URL when they click on the category
Note: Once redirected then the user have to come again to the store manually, there is no automation in returning the customer back to the store and the operations done in the external site will not be tracked by Qrost
3. If the admin wish to add a new category as a subcategory under an existing category then choose the parent category in this section
4. Add the description text
5. Upload the Category image using the upload button and then save the category
To see the sub-categories of a main category, then click on the arrow in the corresponding category as shown in the image below
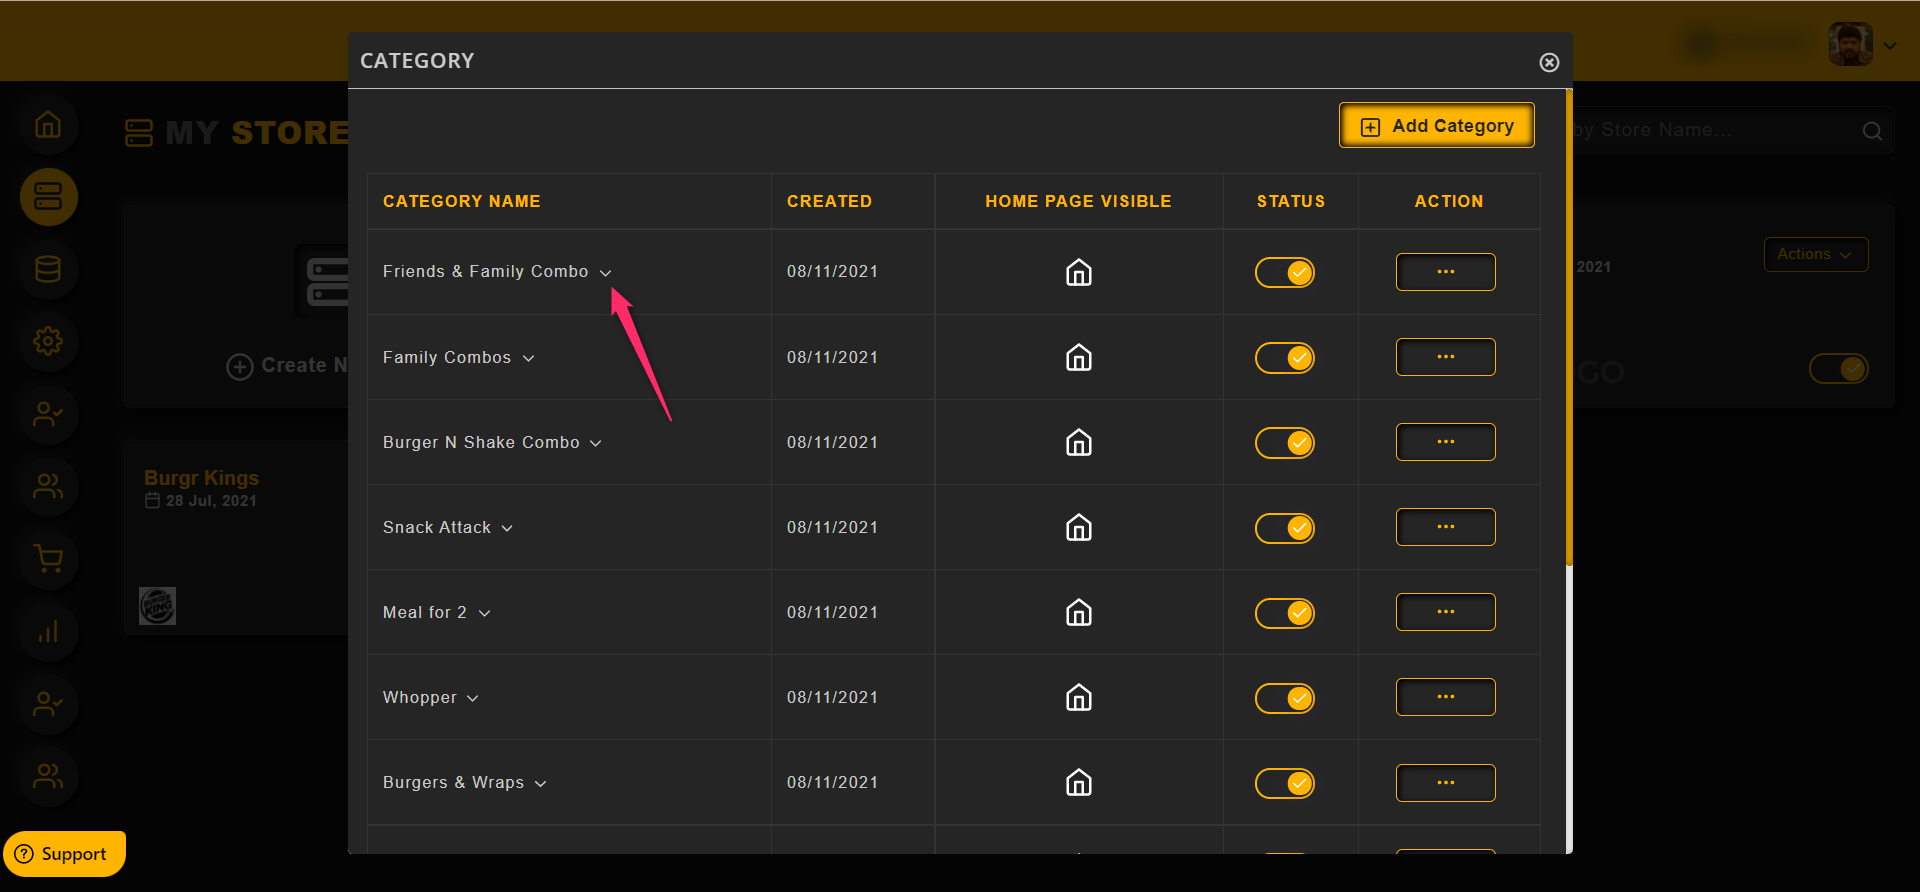
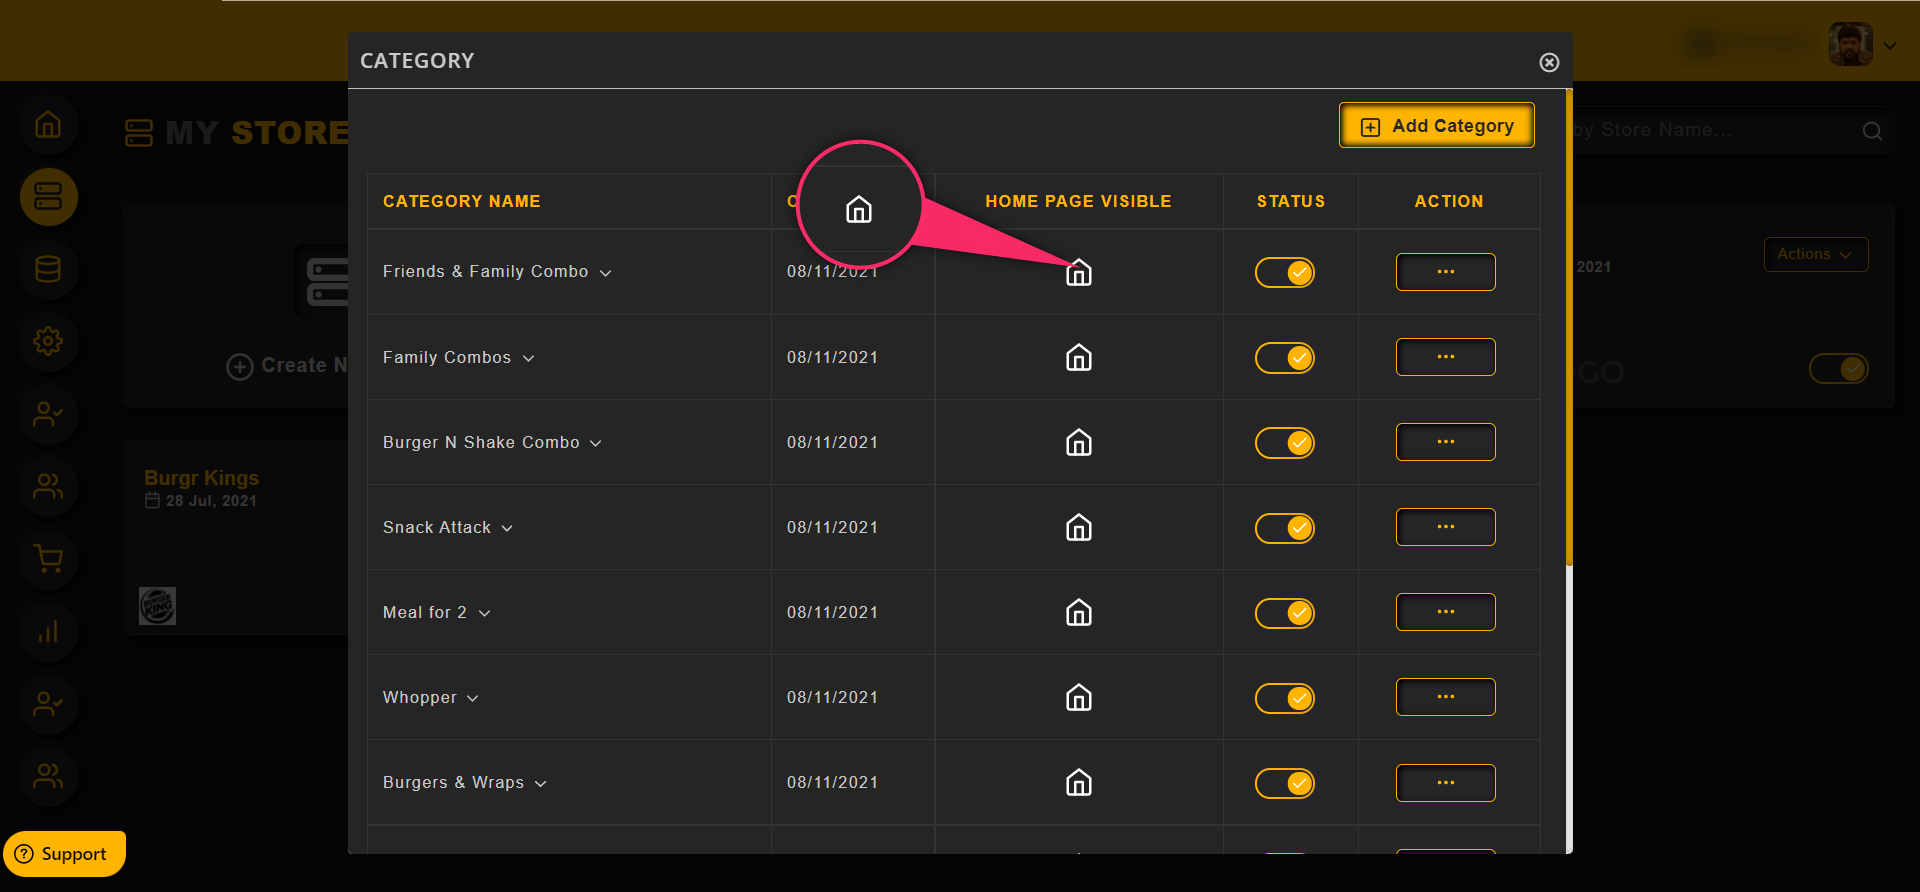
To show a category in the home page, enable this home icon
If this option is disabled, then the category will not be displayed in the home page but admin can see that inside the category section
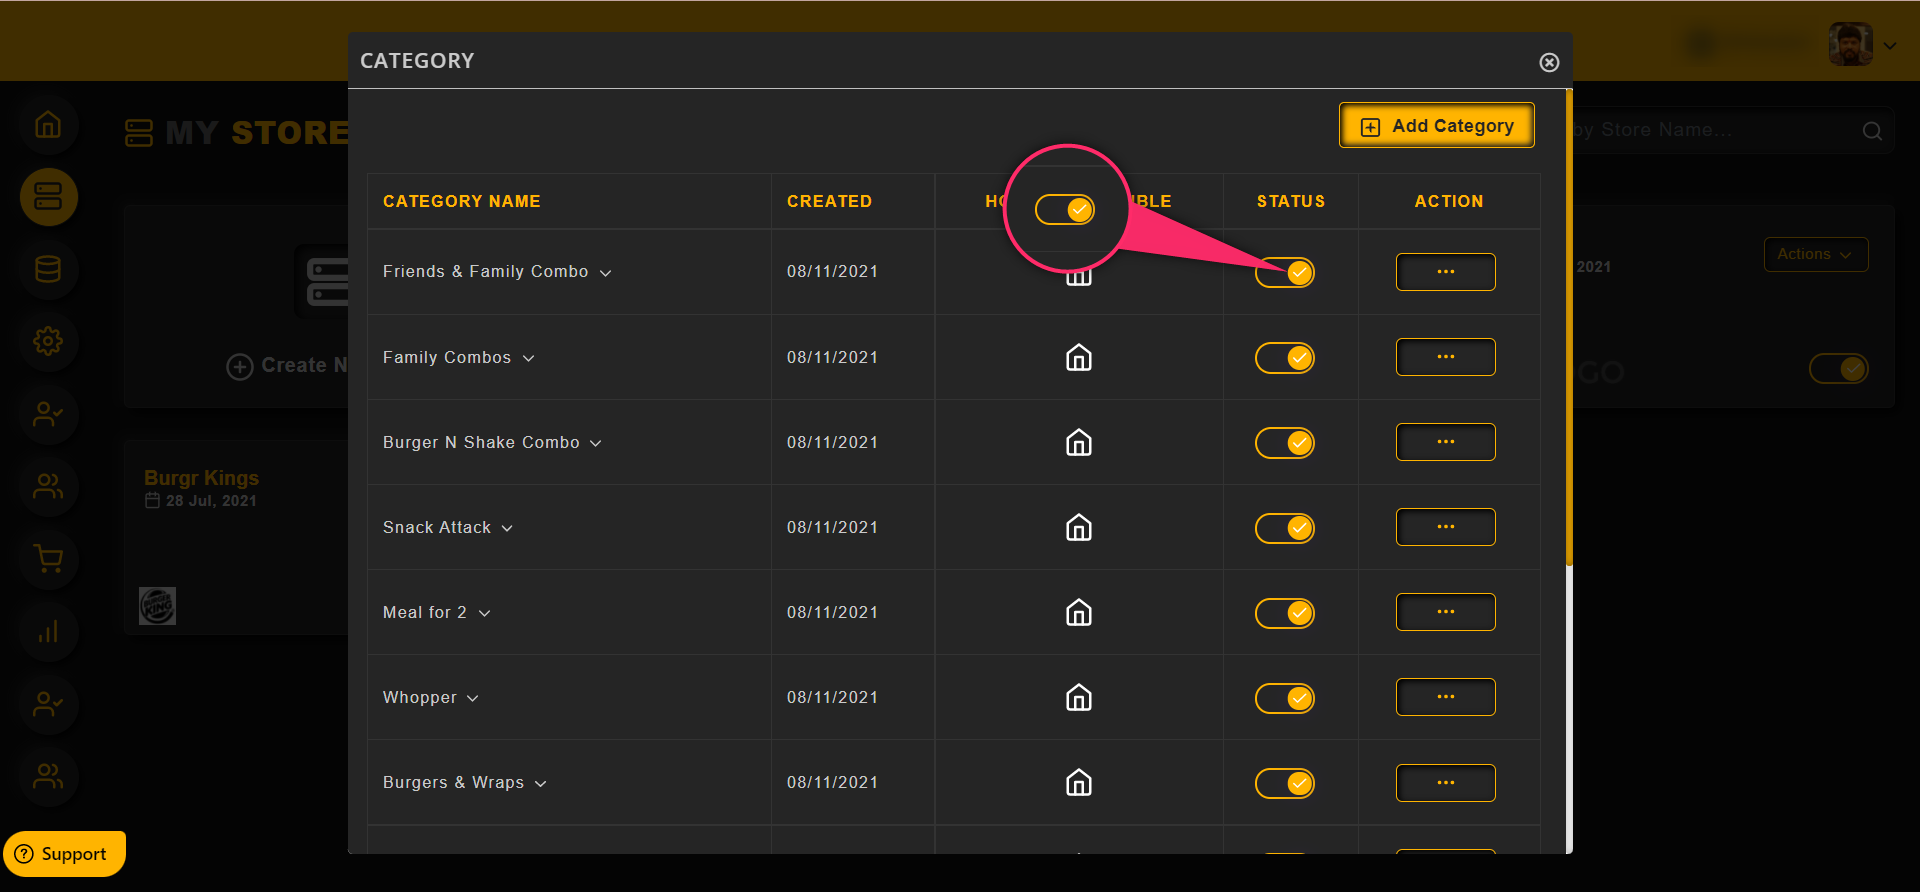
To enable or disable a category, click on the toggle as shown in the image below,
To perform functions like Edit and Delete a category use the Action menu
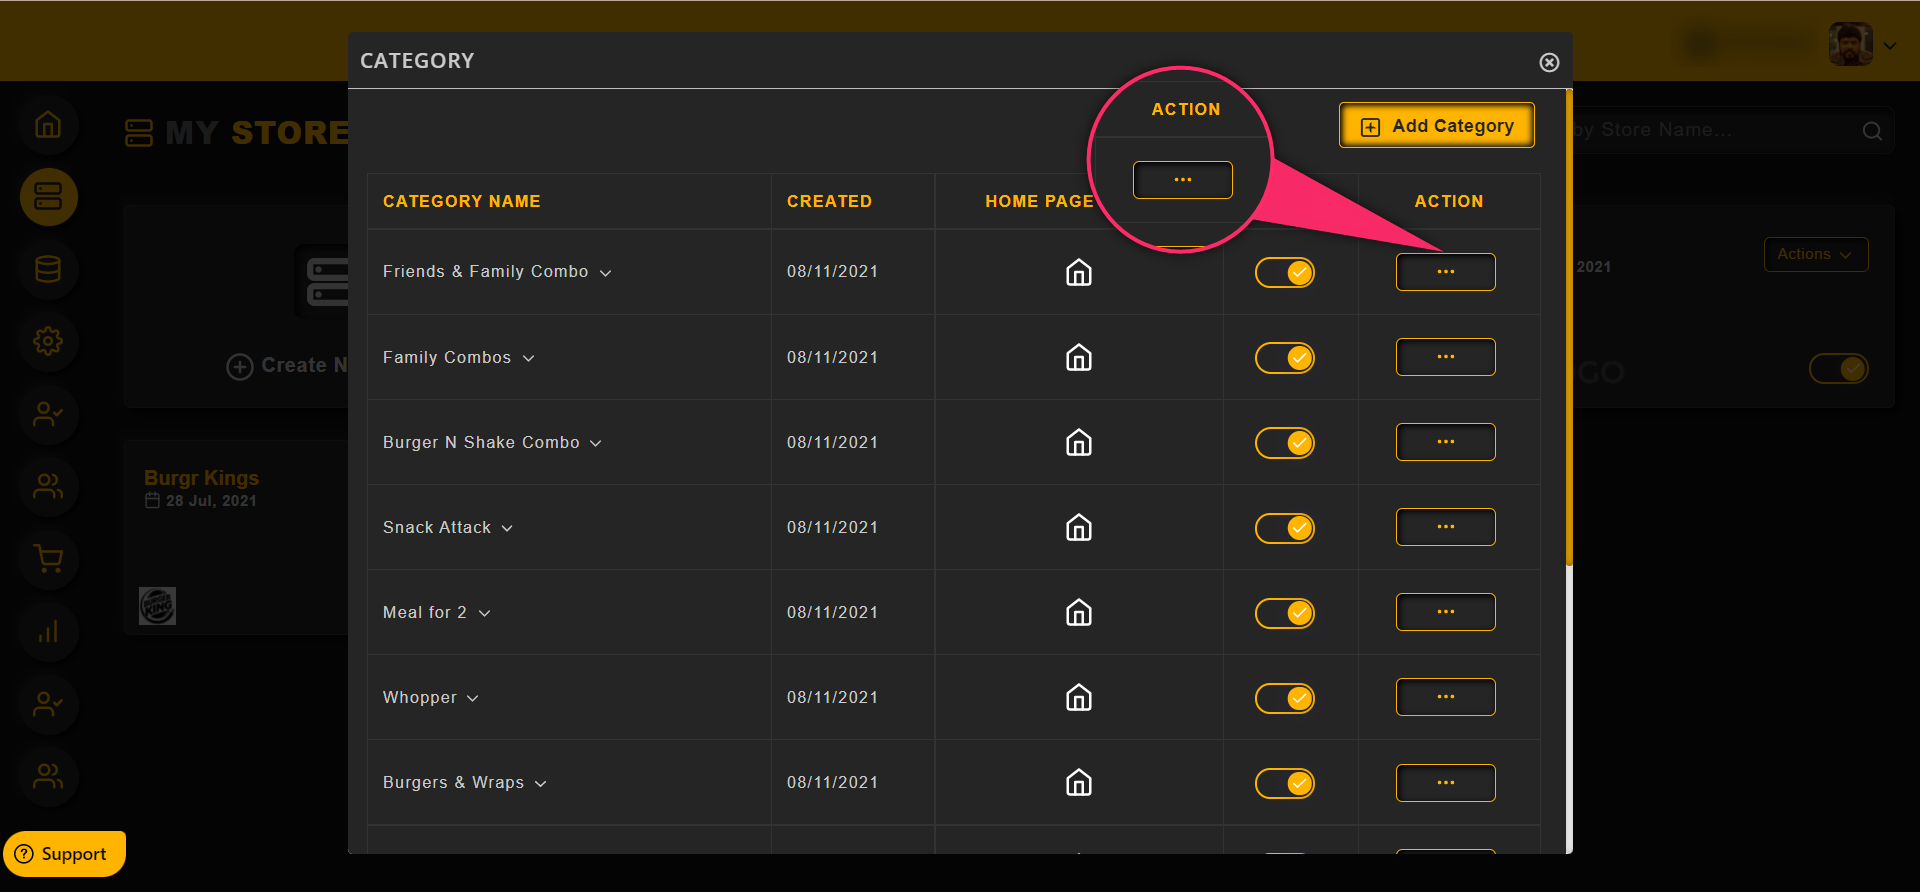
To edit a category, click on the Actions menu and then the Delete option as shown in the image below,
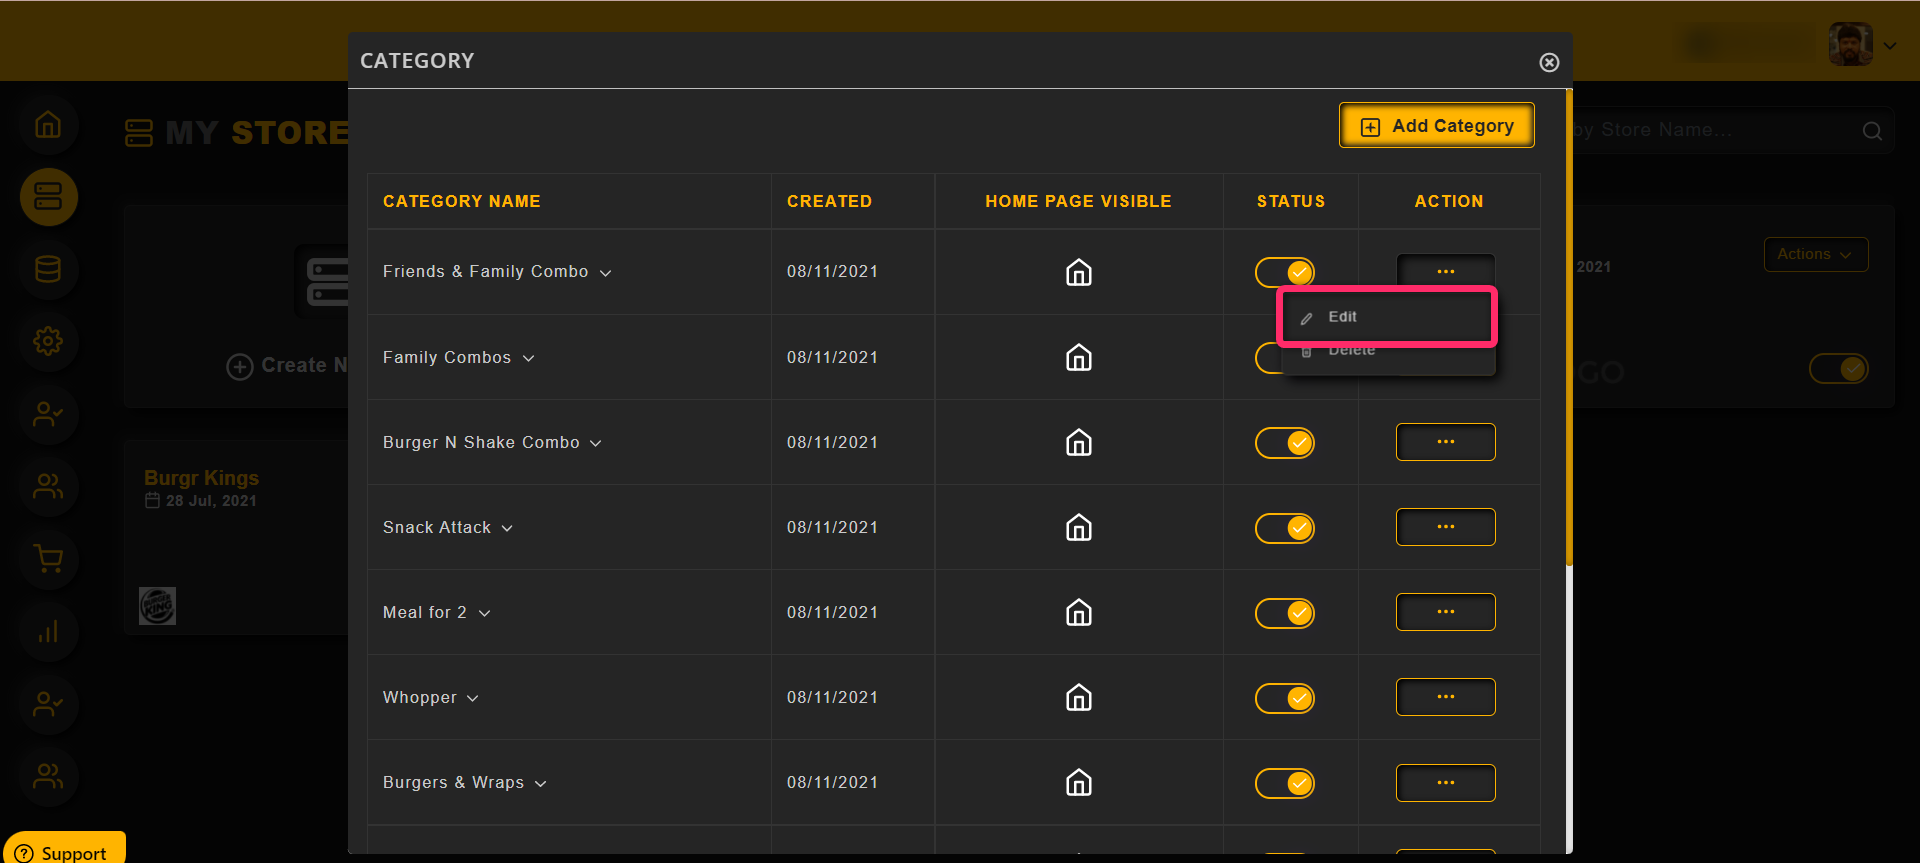
To delete a category, click on the Actions menu and then the Delete option as shown in the image below,

FREQUENTLY ASKED QUESTIONS
Yes of course you can test QROST for Free for 30 days.
Just send us a message and we will contact you as soon as possible.
Within QROST you can add as many Categories, Products, Variantions, Addons, Customers, Subscribers as you need.
Yes of course, its possible to connect multiple stores, for example restaurants in your QROST. Just contact us for more details.
Currently QROST supports these Payment Intergrations for your store:
- Paypal (Paypal and Creditcard)
- Razorpay
- Stripe
- Flutterwave Payment
- Manual Payment
- Ideal, Bancontact, Sofortbanking are in planning.
Currently QROST supports these Autoresponder Intergrations for your store:
- Aweber, Mailchimp, Active Campaign, Sendlane, SendReach, GetResponse, iContact, ConstantContact, Mailvio, SendinBlue, Sendiio, LetsMail, Mailerlite.
Currently QROST supports these Webdinar Intergrations for your store:
- GoToWebinar
- Meetvio
Currently QROST supports these additional Intergrations for your store:
- SMTP
- Youzign
- Rewardsly
Feel free to use the contactform on this page or send a message to:
MORE QUESTIONS AND ANSWERS
Within 24 hours after we have processed your requested trial or payment you will receive access to the Digital QROST terminal and have all features.
With your login details you will be able to set up and customize your:
- QR Code menu
- Mobile Website
- Qrost Terminal
Of course you do not have to use all Qrost features. Just use the features that are suitable for your business.
We provide an additional knowlegde base and support if you have any questions or issues.
A restaurant can customize its QR code menu, mobile website and so much more, suitable for the restaurants business.
The QR code menu can be used in and outside of a restaurant, for example on tables, wall, windows/doors, flyers or advertisements, website, social media or anywhere where a Qr code can be placed.
The customers of the restaurant then scan the QR code and can order directly. Customers add their products, selecting for the restaurant’s menu, for xample from main- and subcategories, variations, add-ons, toppings or extra’s and so much more.
Customers then choose the payment processor or option that the restaurant has selected to receice the customers payment.
The restaurant then receive the order and can process and prepare the order for the customer.
Then the order can be delivered or picked up, as requested by the customer.
QROST offers many more features.
Please explore this website for more details how QROST could boost your restaurant or sales.
Lets give you some examples where you can use your QR menu or code.
- Print it and use on a table or anywhere in and outside of your restaurant or building
- Use it on your flyer or advertisement folder
- Embed it on your website, in a page, a widget, pop up or direct link
- Use on on your social media
- and more places where you can print or use with your imagination
When customers scan the QR code or menu with their mobile phone or by clicking the direct link, it will guide the customer directly to the mobile menu.
The customers who is excited to order from the restaurants can continue to complete the order, by selecting:
- Main and Subcategories
- Products
- Variations
- Addons or Toppings and more
Before choosing a payment option, the customer can register or sign in with their name, email and optional fill in their address and mobile phonenumber. Restaurants can add their optional delivery costs, delivery notes, faq,s and taxes to their menu so the customer(s) have all details and information regarding the order.
Then the customer(s) send the order(s) to the restaurant and the restaurant receives all orders in their QROST Digital Terminal.
The restaurant can see all details of the orders and mark the order(s) as:
- Live order
- Delivered Order
- Cancelled Order
The restaurants prepares the order and both restaurant and customers can see and download/print their order.
This option is a great addition, because the restaurant(s) does not have to rent an additional printer or terminal to print invoices for customers.
All invoices are downloadable and accessable from the restaurants and customers accounts.
After the meal or order is processed, it can be delivered by restaurant or picked up by customers.
Currently the main interface is only available in English language.
However our knowledgebase is multilingual and the QR code menu, mobile website and many more features can be set and translated into any language, serving the customers of the restaurant in the native language for better customer service.
Also restaurants have an additional option to create multiple stores( QR code menu’s and mibile websites if the restaurant preferes to set up their menu’s in multiple languages!
Yes!
You can use or request a specific template or pre-build layour for your QR menu or mobile site and customize it with your colors, images, products, prices and much more.
Yes!
If you desire a specific customized website or other services for your restaurant or business, feel free to contant us.
We offer many solutions to boost your business or sales.
You may also contact this digital agency directly: https://digitalproductions.studio/
Existing QROST clients receive a 25% discount on additional digital services!